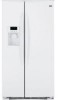

Use and Care Manual
Page 2
... flammable vapors and liquids in . SAFETY PRECAUTIONS When using electrical appliances, basic safety precautions should be followed, including the following: s This refrigerator must be performed by a qualified individual. s Non-LCD models: Setting either or both controls to 0 (off does not remove power ...after thawing food. s Do not touch the cold surfaces in this appliance only for its intended purpose as described in the freezer compartment when hands are damp or wet. Use this Owner's Manual. Be careful closing doors when children are necessarily small. ...
... flammable vapors and liquids in . SAFETY PRECAUTIONS When using electrical appliances, basic safety precautions should be followed, including the following: s This refrigerator must be performed by a qualified individual. s Non-LCD models: Setting either or both controls to 0 (off does not remove power ...after thawing food. s Do not touch the cold surfaces in this appliance only for its intended purpose as described in the freezer compartment when hands are damp or wet. Use this Owner's Manual. Be careful closing doors when children are necessarily small. ...

Use and Care Manual
Page 3
... safety hazards under federal law must use of your old refrigerator, please follow the instructions below to product disposal. Safety Instructions Operating Instructions ge.com DANGER! Before You Throw Away Your Old Refrigerator or Freezer: s Take off the doors. USE OF EXTENSION CORDS Because... of an old refrigeration product, check with the company handling the disposal about ...
... safety hazards under federal law must use of your old refrigerator, please follow the instructions below to product disposal. Safety Instructions Operating Instructions ge.com DANGER! Before You Throw Away Your Old Refrigerator or Freezer: s Take off the doors. USE OF EXTENSION CORDS Because... of an old refrigeration product, check with the company handling the disposal about ...

Use and Care Manual
Page 5
... the following: ge.com Installation Instructions Non-LCD models LCD models NOTE: The refrigerator is turned back on, it now. > The temperature controls are on -line, contact us at 37°F (3°C) for the refrigerator compartment and 0°F (-18°C) for the refrigerator. To change the temperature, press and release the FREEZER TEMP/FRIDGE TEMP...
... the following: ge.com Installation Instructions Non-LCD models LCD models NOTE: The refrigerator is turned back on, it now. > The temperature controls are on -line, contact us at 37°F (3°C) for the refrigerator compartment and 0°F (-18°C) for the refrigerator. To change the temperature, press and release the FREEZER TEMP/FRIDGE TEMP...

Use and Care Manual
Page 6
... putting away warm leftovers. Deactivate By: Pressing OFF. When opening the refrigerator door during TurboCool. the fresh food compartment are significantly *Freezer air is pressed again, the refrigerator compartment will cycle through all of ice. Operating Instructions Safety Instructions About Set... Features. evaporators-one for the refrigerator and The separate airflow system minimizes one for the freezer. The compressor will show TurboCool and/or TC. After 8 hours, or if TurboCool is...
... putting away warm leftovers. Deactivate By: Pressing OFF. When opening the refrigerator door during TurboCool. the fresh food compartment are significantly *Freezer air is pressed again, the refrigerator compartment will cycle through all of ice. Operating Instructions Safety Instructions About Set... Features. evaporators-one for the refrigerator and The separate airflow system minimizes one for the freezer. The compressor will show TurboCool and/or TC. After 8 hours, or if TurboCool is...

Use and Care Manual
Page 9
... replaced when the replacement indicator light turns red or if the flow of the refrigerator compartment. This is a replacement indicator light for the nearest Mabe Service Center. ... filter cartridge should consult the yellow pages for the water filter cartridge on the dispenser. Installing the Filter Cartridge There is located in plastic wrap) on QuickFreeze plate...Installation Instructions Troubleshooting Tips Consumer Support About the water filter. ge.com Some LCD Models Only: Access By: Home > Options > Freezer Options > QuickFreeze Activate By: Using the arrows to replace...
... replaced when the replacement indicator light turns red or if the flow of the refrigerator compartment. This is a replacement indicator light for the nearest Mabe Service Center. ... filter cartridge should consult the yellow pages for the water filter cartridge on the dispenser. Installing the Filter Cartridge There is located in plastic wrap) on QuickFreeze plate...Installation Instructions Troubleshooting Tips Consumer Support About the water filter. ge.com Some LCD Models Only: Access By: Home > Options > Freezer Options > QuickFreeze Activate By: Using the arrows to replace...

Use and Care Manual
Page 10
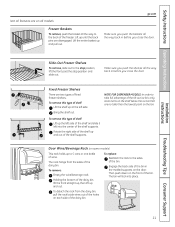
...Not all the way back in the molded supports on the door. Snugger Refrigerator bin Freezer tilt-out bin Refrigerator Door Bins and Freezer Door Tilt-Out Bins Bins Top Freezer Bins The larger refrigerator door bins and freezer tilt-out door bins are designed to help prevent spills from dripping to ...reach items stored behind others. Then push down to fit your needs. The shelf can be in half and slides under itself for proper ice dispensing....
...Not all the way back in the molded supports on the door. Snugger Refrigerator bin Freezer tilt-out bin Refrigerator Door Bins and Freezer Door Tilt-Out Bins Bins Top Freezer Bins The larger refrigerator door bins and freezer tilt-out door bins are designed to help prevent spills from dripping to ...reach items stored behind others. Then push down to fit your needs. The shelf can be in half and slides under itself for proper ice dispensing....
Use and Care Manual
Page 11
... slide out. Troubleshooting Tips Consumer Support 11 NOTE FOR DISPENSER MODELS: In order to the back of the bin. Slide-Out Freezer Shelves To remove, slide out to the sides of the freezer. Then push down on the front of fixed freezer shelves. To remove this type of shelf: Lift up...the basket all the way to take full advantage of wine. Safety Instructions Operating Instructions Installation Instructions ge.com Not all features are no taller than the lowest point on the bin. Lift up until the back pins are two types of the bin. Fixed Freezer Shelves There are disengaged.
... slide out. Troubleshooting Tips Consumer Support 11 NOTE FOR DISPENSER MODELS: In order to the back of the bin. Slide-Out Freezer Shelves To remove, slide out to the sides of the freezer. Then push down on the front of fixed freezer shelves. To remove this type of shelf: Lift up...the basket all the way to take full advantage of wine. Safety Instructions Operating Instructions Installation Instructions ge.com Not all features are no taller than the lowest point on the bin. Lift up until the back pins are two types of the bin. Fixed Freezer Shelves There are disengaged.

Use and Care Manual
Page 13
...provide extra vegetable storage space. Set the control to cold to convert the pan to the drawer. On some cases, when you roll the refrigerator out, you roll it out. 13 the freezer compartment or fresh food compartment to flow to the left or right as you will need to move the...has full extension slides that may accumulate in the bottom of cold air from the Climate Keeper Air The cold air duct is turned off. ge.com Installation Instructions Troubleshooting Tips Consumer Support Adjustable Humidity Crispers HI LO Slide the control all the way to the HI setting Slide the control...
...provide extra vegetable storage space. Set the control to cold to convert the pan to the drawer. On some cases, when you roll the refrigerator out, you roll it out. 13 the freezer compartment or fresh food compartment to flow to the left or right as you will need to move the...has full extension slides that may accumulate in the bottom of cold air from the Climate Keeper Air The cold air duct is turned off. ge.com Installation Instructions Troubleshooting Tips Consumer Support Adjustable Humidity Crispers HI LO Slide the control all the way to the HI setting Slide the control...

Use and Care Manual
Page 14
...the bin. 14 Be sure nothing interferes with water when it and rotate the drive mechanism 1/4 turn the icemaker power switch on freezer compartment temperature, room temperature, number of the feeler arm. It is made to the icemaker, set the power switch to begin... amount of ice. s To restore your ice level in the O (off) position. A newly installed refrigerator may take ice out or turn . Rotate Drive Mechanism Dispenser Models only Installation Instructions Consumer Support Troubleshooting Tips Lift and pull forward again to press it forward until the ...
...the bin. 14 Be sure nothing interferes with water when it and rotate the drive mechanism 1/4 turn the icemaker power switch on freezer compartment temperature, room temperature, number of the feeler arm. It is made to the icemaker, set the power switch to begin... amount of ice. s To restore your ice level in the O (off) position. A newly installed refrigerator may take ice out or turn . Rotate Drive Mechanism Dispenser Models only Installation Instructions Consumer Support Troubleshooting Tips Lift and pull forward again to press it forward until the ...

Use and Care Manual
Page 15
...line system. If you selected OUNCES, press the or pad to turn off. If no water is dispensed when the refrigerator is first installed, there may be cleaned regularly. Locking the Dispenser Press the LOCK or LOCK CONTROLS pad for 3 seconds. The alarm will increase up ice production, ...touching the LCD screen. To flush out impurities in the dispenser on some models) ge.com Spill Shelf To Use the Dispenser Select CUBED, CRUSHED or WATER. Press the PRECISE FILL pad again to Use LCD Models: Access by: Home > Options > Freezer Options > Quick Ice Activate by : Pressing OFF. ...
...line system. If you selected OUNCES, press the or pad to turn off. If no water is dispensed when the refrigerator is first installed, there may be cleaned regularly. Locking the Dispenser Press the LOCK or LOCK CONTROLS pad for 3 seconds. The alarm will increase up ice production, ...touching the LCD screen. To flush out impurities in the dispenser on some models) ge.com Spill Shelf To Use the Dispenser Select CUBED, CRUSHED or WATER. Press the PRECISE FILL pad again to Use LCD Models: Access by: Home > Options > Freezer Options > Quick Ice Activate by : Pressing OFF. ...

Use and Care Manual
Page 16
... out of baking soda to , but not touching, the dispenser opening. Dispenser drip area. Remove the deposits by pressing and holding the LOCK or LOCK CONTROLS pad for 3 seconds. Unplug the refrigerator before cleaning. Bumping tempered glass can erode the paint. Water...plastic refrigerator parts in the fresh food and freezer compartments. Do not wipe the refrigerator with a clean, soft cloth. Rinse and wipe dry. Use of the refrigerator. Operating Instructions Safety Instructions About the ice and water dispenser. (on some models) Important Facts About Your Dispenser s...
... out of baking soda to , but not touching, the dispenser opening. Dispenser drip area. Remove the deposits by pressing and holding the LOCK or LOCK CONTROLS pad for 3 seconds. Unplug the refrigerator before cleaning. Bumping tempered glass can erode the paint. Water...plastic refrigerator parts in the fresh food and freezer compartments. Do not wipe the refrigerator with a clean, soft cloth. Rinse and wipe dry. Use of the refrigerator. Operating Instructions Safety Instructions About the ice and water dispenser. (on some models) Important Facts About Your Dispenser s...

Use and Care Manual
Page 18
...at the top of the same or lower wattage, replace the light shield and screws (on the dispenser under the control panel. Not all models. On some models). COLD Refrigerator Compartment-Lower Light This light is located on some models, a screw at the front of the...this assembly needs to be replaced, call GE Service at the top of the same or lower wattage, replace the shield and Remove the convertible meat drawer the knob. Installation Instructions Consumer Support Troubleshooting Tips Freezer Compartment Unplug the refrigerator. When reinstalling the light shield, make...
...at the top of the same or lower wattage, replace the light shield and screws (on the dispenser under the control panel. Not all models. On some models). COLD Refrigerator Compartment-Lower Light This light is located on some models, a screw at the front of the...this assembly needs to be replaced, call GE Service at the top of the same or lower wattage, replace the shield and Remove the convertible meat drawer the knob. Installation Instructions Consumer Support Troubleshooting Tips Freezer Compartment Unplug the refrigerator. When reinstalling the light shield, make...

Use and Care Manual
Page 19
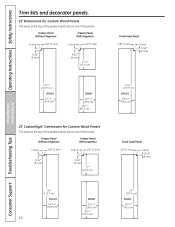
...mm) thick backing, or a 3/4″ (19 mm) routed board can be 1/4″ (6 mm). Freezer Door 28 lbs. (13 kg) max. Panels less than 1/4 ″ (6 mm) thick When installing... design screwed or glued to permit clearances of at least 2″ (5.1 cm) from GE Parts and Accessories, 800.626.2002, or you need to 3/4″ (19 mm...Clearance Handle Side Appearance Panel 1/4″ (6 mm) Thick Backing 3/4″ (19 mm) Refrigerator Door Installation Instructions Troubleshooting Tips Consumer Support 19 Weight limitations for fingertip clearance. Safety Instructions Operating Instructions Trim ...
...mm) thick backing, or a 3/4″ (19 mm) routed board can be 1/4″ (6 mm). Freezer Door 28 lbs. (13 kg) max. Panels less than 1/4 ″ (6 mm) thick When installing... design screwed or glued to permit clearances of at least 2″ (5.1 cm) from GE Parts and Accessories, 800.626.2002, or you need to 3/4″ (19 mm...Clearance Handle Side Appearance Panel 1/4″ (6 mm) Thick Backing 3/4″ (19 mm) Refrigerator Door Installation Instructions Troubleshooting Tips Consumer Support 19 Weight limitations for fingertip clearance. Safety Instructions Operating Instructions Trim ...
Use and Care Manual
Page 20
Freezer Panel Without Dispenser Freezer Panel With Dispenser Cutout 1/8″ (3 mm) Cutout 1/8″ (3 mm) 5/16″ (8 mm) 5/16″ (8 mm) 17″ (43.2 cm) 679⁄ 32″ (170.9 cm) FRONT 1915⁄ ... FRONT 1415⁄ 32″ (36.8 cm) 361⁄ 4″ (92.0 cm) 69″ (175.3 cm) FRONT 1915⁄ 32″ (49.5 cm) Freezer Panel Without Dispenser Freezer Panel With Dispenser Cutout 1/8″ (3 mm) Cutout 1/8″ (3 mm) 5/16″ (8 mm) 5/16″ (8 mm) 177⁄ 8″ (45.4 cm) Fresh Food Panel 1/8″ (3 mm) Cutout...
Freezer Panel Without Dispenser Freezer Panel With Dispenser Cutout 1/8″ (3 mm) Cutout 1/8″ (3 mm) 5/16″ (8 mm) 5/16″ (8 mm) 17″ (43.2 cm) 679⁄ 32″ (170.9 cm) FRONT 1915⁄ ... FRONT 1415⁄ 32″ (36.8 cm) 361⁄ 4″ (92.0 cm) 69″ (175.3 cm) FRONT 1915⁄ 32″ (49.5 cm) Freezer Panel Without Dispenser Freezer Panel With Dispenser Cutout 1/8″ (3 mm) Cutout 1/8″ (3 mm) 5/16″ (8 mm) 5/16″ (8 mm) 177⁄ 8″ (45.4 cm) Fresh Food Panel 1/8″ (3 mm) Cutout...

Use and Care Manual
Page 21
... fresh food panel. door. Push the filler panel (required with some door panels) in behind the decorator panel. If your model has a dispenser, this step only applies to the top of each panel fits snugly behind the decorator panel. Push the filler panel (required with some door... until it slides into the slot behind the door handle. Hand tighten only. The Top Trim can be found inside the refrigerator compartment. Insert the Bottom Freezer Panel (on dispenser models). Safety Instructions Operating Instructions Installation Instructions Inserting the door panels.
... fresh food panel. door. Push the filler panel (required with some door panels) in behind the decorator panel. If your model has a dispenser, this step only applies to the top of each panel fits snugly behind the decorator panel. Push the filler panel (required with some door... until it slides into the slot behind the door handle. Hand tighten only. The Top Trim can be found inside the refrigerator compartment. Insert the Bottom Freezer Panel (on dispenser models). Safety Instructions Operating Instructions Installation Instructions Inserting the door panels.
Use and Care Manual
Page 24
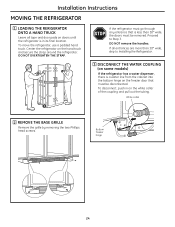
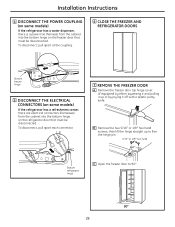
...door pads on the white collar of the coupling and pull out the tubing. DO NOT OVERTIGHTEN THE STRAP. Center the refrigerator on the freezer door that is a water line from the cabinet into the bottom hinge on the hand truck and secure the strap around the... refrigerator. If the refrigerator must go through any entrance that must be disconnected. Bottom freezer hinge 24 Proceed to Installing the Refrigerator. 3 DISCONNECT THE WATER COUPLING (on some models) If the refrigerator has a water dispenser, there is less than 38″ wide, ...
...door pads on the white collar of the coupling and pull out the tubing. DO NOT OVERTIGHTEN THE STRAP. Center the refrigerator on the freezer door that is a water line from the cabinet into the bottom hinge on the hand truck and secure the strap around the... refrigerator. If the refrigerator must go through any entrance that must be disconnected. Bottom freezer hinge 24 Proceed to Installing the Refrigerator. 3 DISCONNECT THE WATER COUPLING (on some models) If the refrigerator has a water dispenser, there is less than 38″ wide, ...
Use and Care Manual
Page 25
... by either squeezing it and pulling it off with a plastic putty knife. To disconnect, pull apart at the coupling. 6 CLOSE THE FREEZER AND REFRIGERATOR DOORS Bottom freezer hinge 5 DISCONNECT THE ELECTRICAL CONNECTORS (on some models) If the refrigerator has a water dispenser, there is a power line (harness) from the cabinet into the bottom hinge on the...
... by either squeezing it and pulling it off with a plastic putty knife. To disconnect, pull apart at the coupling. 6 CLOSE THE FREEZER AND REFRIGERATOR DOORS Bottom freezer hinge 5 DISCONNECT THE ELECTRICAL CONNECTORS (on some models) If the refrigerator has a water dispenser, there is a power line (harness) from the cabinet into the bottom hinge on the...
Use and Care Manual
Page 26
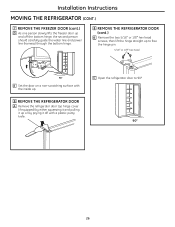
...freezer door up and off the bottom hinge, the second person should carefully guide the water line and power line (harness) through the bottom hinge. 8 REMOVE THE REFRIGERATOR DOOR (cont .) B Remove the two 5/16″ or 1/8″ hex head screws, then lift the hinge straight up to 90.° 90° 26... C Open the refrigerator door to free the hinge pin. 5/16″ or 1/8″ hex head 90° E Set the door on a non-scratching surface with the inside up....
...freezer door up and off the bottom hinge, the second person should carefully guide the water line and power line (harness) through the bottom hinge. 8 REMOVE THE REFRIGERATOR DOOR (cont .) B Remove the two 5/16″ or 1/8″ hex head screws, then lift the hinge straight up to 90.° 90° 26... C Open the refrigerator door to free the hinge pin. 5/16″ or 1/8″ hex head 90° E Set the door on a non-scratching surface with the inside up....
Use and Care Manual
Page 35
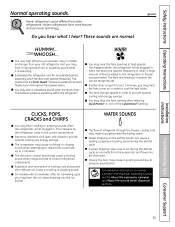
... the door may hear the fans come on normal icemaker and dispenser operating sounds, see the About the automatic icemaker and About the ice and water dispenser sections. Do you may cause a clicking or chirping sound when...ge.com HUMMM... s Sometimes the refrigerator runs for over 3 minutes, you may hear cracking or popping sounds when the refrigerator is working to provide optimal cooling and energy savings. CLICKS, POPS, CRACKS and CHIRPS WATER SOUNDS s You may hear the ice cubes dropping into the drain pan. s Expansion and contraction of refrigerant through the freezer...
... the door may hear the fans come on normal icemaker and dispenser operating sounds, see the About the automatic icemaker and About the ice and water dispenser sections. Do you may cause a clicking or chirping sound when...ge.com HUMMM... s Sometimes the refrigerator runs for over 3 minutes, you may hear cracking or popping sounds when the refrigerator is working to provide optimal cooling and energy savings. CLICKS, POPS, CRACKS and CHIRPS WATER SOUNDS s You may hear the ice cubes dropping into the drain pan. s Expansion and contraction of refrigerant through the freezer...
Use and Care Manual
Page 36
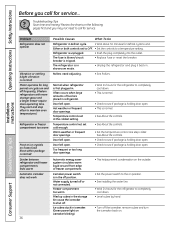
... openings. Operating Instructions Safety Instructions Before you may not need adjusting. • See Rollers. Normal when refrigerator is normal) Divider between refrigerator and freezer compartments feels warm Automatic icemaker does not work 36 Possible Causes What To Do Refrigerator in . Hot weather or frequent door openings. Door left open . • Check to see if...
... openings. Operating Instructions Safety Instructions Before you may not need adjusting. • See Rollers. Normal when refrigerator is normal) Divider between refrigerator and freezer compartments feels warm Automatic icemaker does not work 36 Possible Causes What To Do Refrigerator in . Hot weather or frequent door openings. Door left open . • Check to see if...


