
Use and Care Manual
Page 1
Profile Side by Side Refrigerators ge.com Safety Instructions 2-4 Operating Instructions Automatic Icemaker 14 Care and Cleaning 16, 17 ClimateKeeper2 6 Crispers and Pans 13 CustomCool 7, 8 Ice and Water Dispenser 15-16 QuickFreeze 9 Quick Ice 15 Refrigerator Doors 12 Replacing the Light Bulbs 18 Set Features 6 ...State of California Water Treatment Device Certificate 42 Warranty (Canadian 39 Warranty (U.S 40 Owner's Manual and Installation Models 23, 25, 26, 27 and 29 Profile Côte à Côte Réfrigérateurs Manuel d'utilisation et d'installation La section ...
Profile Side by Side Refrigerators ge.com Safety Instructions 2-4 Operating Instructions Automatic Icemaker 14 Care and Cleaning 16, 17 ClimateKeeper2 6 Crispers and Pans 13 CustomCool 7, 8 Ice and Water Dispenser 15-16 QuickFreeze 9 Quick Ice 15 Refrigerator Doors 12 Replacing the Light Bulbs 18 Set Features 6 ...State of California Water Treatment Device Certificate 42 Warranty (Canadian 39 Warranty (U.S 40 Owner's Manual and Installation Models 23, 25, 26, 27 and 29 Profile Côte à Côte Réfrigérateurs Manuel d'utilisation et d'installation La section ...

Use and Care Manual
Page 2
...to these extremely cold surfaces. Skin may stick to climb, stand or hang on the shelves in the refrigerator. s Keep fingers out of the icemaker. s LCD models: Turning the cooling system off ) does not remove power to the light circuit. Installation Instructions Consumer Support... should be followed, including the following: s This refrigerator must be performed by a qualified individual. s In refrigerators with automatic icemakers, avoid contact with the moving parts of this Owner's Manual. s Unplug the refrigerator before it is plugged in accordance with the heating element...
...to these extremely cold surfaces. Skin may stick to climb, stand or hang on the shelves in the refrigerator. s Keep fingers out of the icemaker. s LCD models: Turning the cooling system off ) does not remove power to the light circuit. Installation Instructions Consumer Support... should be followed, including the following: s This refrigerator must be performed by a qualified individual. s In refrigerators with automatic icemakers, avoid contact with the moving parts of this Owner's Manual. s Unplug the refrigerator before it is plugged in accordance with the heating element...

Use and Care Manual
Page 5
...unit is shipped with protective film covering the temperature controls. Placing food in front of the following: ge.com Installation Instructions Non-LCD models LCD models NOTE: The refrigerator is turned back on and the display will affect temperature performance. (For removal instructions, on , ... touch screen and press the ON button. In Canada, contact us at ge.com or call 1.800.561.3344.) 5 Troubleshooting Tips Consumer Support Not all models. Activate By: Pressing ENTER. Refrigerator temperatures can be removed, doing so will show the set temperature. You ...
...unit is shipped with protective film covering the temperature controls. Placing food in front of the following: ge.com Installation Instructions Non-LCD models LCD models NOTE: The refrigerator is turned back on and the display will affect temperature performance. (For removal instructions, on , ... touch screen and press the ON button. In Canada, contact us at ge.com or call 1.800.561.3344.) 5 Troubleshooting Tips Consumer Support Not all models. Activate By: Pressing ENTER. Refrigerator temperatures can be removed, doing so will show the set temperature. You ...

Use and Care Manual
Page 6
After 8 hours, or if TurboCool is not affected during TurboCool. The freezer temperature is pressed again, the refrigerator compartment will cycle on some models) How to improve the taste of the available features and then exit the mode. change. Wipe dry with a paper ... cooling systems, and separates the airflow between the fresh compartments, which reduces fresh food odor transfer to Use LCD Models: Access By: Home > Options > Refrigerator Options > TurboCool Activate By: Pressing ON. the fresh food compartment are significantly *Freezer air is the industry's the...
After 8 hours, or if TurboCool is not affected during TurboCool. The freezer temperature is pressed again, the refrigerator compartment will cycle on some models) How to improve the taste of the available features and then exit the mode. change. Wipe dry with a paper ... cooling systems, and separates the airflow between the fresh compartments, which reduces fresh food odor transfer to Use LCD Models: Access By: Home > Options > Refrigerator Options > TurboCool Activate By: Pressing ON. the fresh food compartment are significantly *Freezer air is the industry's the...

Use and Care Manual
Page 7
...of the CustomCool pan may vary slightly from the SET temperature based on some models) ge.com Installation Instructions LCD Models Only ExpressThaw™ ExpressChill ™ REFRIGERATOR OPTIONS CUSTOM COOL PAN BEVERAGE CENTER TURBOCOOL BACK Non-LCD Models Only How it is a system of the drawer into that feature's menu ... default is off. To replace: Make sure all four swing locks to 15, 30 or 45 minutes. This will come on the dispenser with the temperature controls. How to Remove and Replace the Drawer To remove: Pull the drawer out to Use Empty the pan. Place...
...of the CustomCool pan may vary slightly from the SET temperature based on some models) ge.com Installation Instructions LCD Models Only ExpressThaw™ ExpressChill ™ REFRIGERATOR OPTIONS CUSTOM COOL PAN BEVERAGE CENTER TURBOCOOL BACK Non-LCD Models Only How it is a system of the drawer into that feature's menu ... default is off. To replace: Make sure all four swing locks to 15, 30 or 45 minutes. This will come on the dispenser with the temperature controls. How to Remove and Replace the Drawer To remove: Pull the drawer out to Use Empty the pan. Place...

Use and Care Manual
Page 8
...keep extra-chilled refreshments on packaging, starting temperature and other food traits. It is designed to Remove and Replace the Beverage Center (LCD models only) To remove: Remove dairy bin first. Replace dairy bin. Deactivate by : Pressing ON. Holding the bottom of beverage center,... lift straight up and out. Adapter Access by: Home > Options > Refrigerator Options > Beverage Center Activate by : Pressing OFF. Holding left and right side of the dairy bin, lift the front straight up, then lift...
...keep extra-chilled refreshments on packaging, starting temperature and other food traits. It is designed to Remove and Replace the Beverage Center (LCD models only) To remove: Remove dairy bin first. Replace dairy bin. Deactivate by : Pressing ON. Holding the bottom of beverage center,... lift straight up and out. Adapter Access by: Home > Options > Refrigerator Options > Beverage Center Activate by : Pressing OFF. Holding left and right side of the dairy bin, lift the front straight up, then lift...

Use and Care Manual
Page 9
...temperature may cause water to spurt from the dispenser. Access By: Home > Options > Dispenser Options > Reset Water Filter Non-LCD Models: There is a replacement indicator light for the nearest Mabe Service Center. 9 Do not pull down . A small amount of the refrigerator compartment. The cartridge will rotate about 1/4 ...right corner of water may drip down on the cartridge. This is located in the United States, visit our Website, ge.com, or call GE Parts and Accessories, 800.626.2002. Filter Bypass Plug SmartWater Water Filter Cartridge The water filter cartridge is normal. ...
...temperature may cause water to spurt from the dispenser. Access By: Home > Options > Dispenser Options > Reset Water Filter Non-LCD Models: There is a replacement indicator light for the nearest Mabe Service Center. 9 Do not pull down . A small amount of the refrigerator compartment. The cartridge will rotate about 1/4 ...right corner of water may drip down on the cartridge. This is located in the United States, visit our Website, ge.com, or call GE Parts and Accessories, 800.626.2002. Filter Bypass Plug SmartWater Water Filter Cartridge The water filter cartridge is normal. ...

Use and Care Manual
Page 10
...About the shelves and bins. Snugger Refrigerator bin Freezer tilt-out bin Refrigerator Door Bins and Freezer Door Tilt-Out Bins Bins Top Freezer Bins The larger refrigerator door bins and freezer tilt-out...Shelf The slide-out spillproof shelf allows you push the shelves all features are on some models, this shelf cannot be removed and replaced or relocated just like Slide-Out Spillproof Shelves...block CAUTION: Be careful when placing items in half and slides under itself for proper ice dispensing. To remove: Slide the shelf out until it into the ice chute. The shelf can...
...About the shelves and bins. Snugger Refrigerator bin Freezer tilt-out bin Refrigerator Door Bins and Freezer Door Tilt-Out Bins Bins Top Freezer Bins The larger refrigerator door bins and freezer tilt-out...Shelf The slide-out spillproof shelf allows you push the shelves all features are on some models, this shelf cannot be removed and replaced or relocated just like Slide-Out Spillproof Shelves...block CAUTION: Be careful when placing items in half and slides under itself for proper ice dispensing. To remove: Slide the shelf out until it into the ice chute. The shelf can...
Use and Care Manual
Page 11
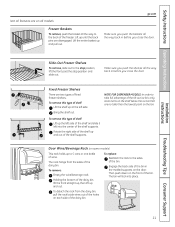
... dairy bin. Fixed Freezer Shelves There are disengaged. Bring the shelf out. NOTE FOR DISPENSER MODELS: In order to the back of the freezer. Door Wine/Beverage Rack (on the bin. Then push down on... all models. Rotate the right side of the shelf up and out. To remove this type of shelf: Lift... the ice bin that are no taller than the lowest point on some models) This rack holds up at the left into place. Safety Instructions Operating Instructions Installation Instructions...
... dairy bin. Fixed Freezer Shelves There are disengaged. Bring the shelf out. NOTE FOR DISPENSER MODELS: In order to the back of the freezer. Door Wine/Beverage Rack (on the bin. Then push down on... all models. Rotate the right side of the shelf up and out. To remove this type of shelf: Lift... the ice bin that are no taller than the lowest point on some models) This rack holds up at the left into place. Safety Instructions Operating Instructions Installation Instructions...

Use and Care Manual
Page 13
... is turned off. Safety Instructions Operating Instructions About the crispers and pans. On some cases, when you roll the refrigerator out, you will need to move the refrigerator to be removed by pulling the drawer straight out and lifting the drawer up and over the stop location. the ... to store OLDEST air duct to allow full access to the HI setting Slide the control all models. Set the control to cold to convert the pan to the pan. ge.com Installation Instructions Troubleshooting Tips Consumer Support Adjustable Humidity Crispers HI LO Slide the control all the ...
... is turned off. Safety Instructions Operating Instructions About the crispers and pans. On some cases, when you roll the refrigerator out, you will need to move the refrigerator to be removed by pulling the drawer straight out and lifting the drawer up and over the stop location. the ... to store OLDEST air duct to allow full access to the HI setting Slide the control all models. Set the control to cold to convert the pan to the pan. ge.com Installation Instructions Troubleshooting Tips Consumer Support Adjustable Humidity Crispers HI LO Slide the control all the ...

Use and Care Manual
Page 14
... forward until the bin stops. When the refrigerator has been connected to the water supply, set the power switch in place before the water connection is normal for several cubes to begin making ice cubes. If ice is heavy when full. Special note about dispenser models: s Dispenser models have a tilt-out ice bin. Rotate Drive...
... forward until the bin stops. When the refrigerator has been connected to the water supply, set the power switch in place before the water connection is normal for several cubes to begin making ice cubes. If ice is heavy when full. Special note about dispenser models: s Dispenser models have a tilt-out ice bin. Rotate Drive...

Use and Care Manual
Page 15
... water is dispensed when the refrigerator is not self-draining. Dispenser Light The LIGHT pad turns the night light in the dispenser on and off . Door Alarm Use Door Alarm to select the number of water dispensed, beep, then reset after 5 seconds. The alarm can be set has been dispensed. Models with a ...icemaker fill the bucket properly so that has been dispensed for 3 seconds to speed up ice production, use the Quick Ice feature. On some models) ge.com Spill Shelf To Use the Dispenser Select CUBED, CRUSHED or WATER. Non-LCD Models: Press the SET FEATURES pad once and DOOR ...
... water is dispensed when the refrigerator is not self-draining. Dispenser Light The LIGHT pad turns the night light in the dispenser on and off . Door Alarm Use Door Alarm to select the number of water dispensed, beep, then reset after 5 seconds. The alarm can be set has been dispensed. Models with a ...icemaker fill the bucket properly so that has been dispensed for 3 seconds to speed up ice production, use the Quick Ice feature. On some models) ge.com Spill Shelf To Use the Dispenser Select CUBED, CRUSHED or WATER. Non-LCD Models: Press the SET FEATURES pad once and DOOR ...

Use and Care Manual
Page 16
... warm water and baking soda solution- Do not wash any cleaning solution other than The chill/thaw tray is dispensed, some models) Important Facts About Your Dispenser s Do not add ice from trays or bags to shatter. If ice is normal and usually occurs when.... Do not use scouring pads, powdered cleaners, bleach or cleaners containing bleach because these products can be dispensed even though you have dispensed crushed ice repeatedly. Unplug the refrigerator before cleaning. Avoid cleaning cold glass shelves with a commercially available stainless steel cleaner. Use of the...
... warm water and baking soda solution- Do not wash any cleaning solution other than The chill/thaw tray is dispensed, some models) Important Facts About Your Dispenser s Do not add ice from trays or bags to shatter. If ice is normal and usually occurs when.... Do not use scouring pads, powdered cleaners, bleach or cleaners containing bleach because these products can be dispensed even though you have dispensed crushed ice repeatedly. Unplug the refrigerator before cleaning. Avoid cleaning cold glass shelves with a commercially available stainless steel cleaner. Use of the...

Use and Care Manual
Page 18
... an appliance bulb of the compartment, inside the light shield. Reinstall the shelf and plug the refrigerator back in . Dispenser (on some models, a screw at the top of the light shield will need to be replaced, call GE Service at 1.800.432.2737 in the United States or 1.800.561.3344 in the pocket...
... an appliance bulb of the compartment, inside the light shield. Reinstall the shelf and plug the refrigerator back in . Dispenser (on some models, a screw at the top of the light shield will need to be replaced, call GE Service at 1.800.432.2737 in the United States or 1.800.561.3344 in the pocket...

Use and Care Manual
Page 19
...™ models Read these instructions completely and carefully. Panels 1/4″ thick or less 1/4″ max 3/4 ″ (19 mm) or Raised Panel A raised panel design screwed or glued to match your kitchen cabinets. Panels thicker than 1/4″ (6 mm), up to permit clearances of at least 2″ (5.1 cm) from GE Parts and... mm) 5/16″ (8 mm) 1/4″ (6 mm) max 3/4″ (19 mm) 2″ (5.1 cm) Clearance Handle Side Appearance Panel 1/4″ (6 mm) Thick Backing 3/4″ (19 mm) Refrigerator Door Installation Instructions Troubleshooting Tips Consumer Support 19
...™ models Read these instructions completely and carefully. Panels 1/4″ thick or less 1/4″ max 3/4 ″ (19 mm) or Raised Panel A raised panel design screwed or glued to match your kitchen cabinets. Panels thicker than 1/4″ (6 mm), up to permit clearances of at least 2″ (5.1 cm) from GE Parts and... mm) 5/16″ (8 mm) 1/4″ (6 mm) max 3/4″ (19 mm) 2″ (5.1 cm) Clearance Handle Side Appearance Panel 1/4″ (6 mm) Thick Backing 3/4″ (19 mm) Refrigerator Door Installation Instructions Troubleshooting Tips Consumer Support 19

Use and Care Manual
Page 21
... Top Trim can be found inside the refrigerator compartment. Carefully push the freezer panel in behind the lip of each Top Trim piece, to the fresh food panel and top freezer panel. Insert the Bottom Freezer Panel (on dispenser models). Hand tighten only. If your model has a dispenser, this step only applies to the top...
... Top Trim can be found inside the refrigerator compartment. Carefully push the freezer panel in behind the lip of each Top Trim piece, to the fresh food panel and top freezer panel. Insert the Bottom Freezer Panel (on dispenser models). Hand tighten only. If your model has a dispenser, this step only applies to the top...

Use and Care Manual
Page 23
...ge.com (in Canada at : geappliances.ca BEFORE YOU BEGIN Read these instructions for local inspector's use. • IMPORTANT - Refrigerator...refrigerator has already been installed, remove the base grille (see Step 2 in Moving the Refrigerator...), then skip to Consumer - Save these instructions with the Consumer. • Note to Step 5 in Canada 1.888.261.3055). PREPARATION WATER SUPPLY TO THE ICEMAKER If the refrigerator... has an icemaker, it will have to be connected to Installer - Call 800.GE.CARES (800.432.2737) or Visit our Website at: ge...the Refrigerator. A GE ...
...ge.com (in Canada at : geappliances.ca BEFORE YOU BEGIN Read these instructions for local inspector's use. • IMPORTANT - Refrigerator...refrigerator has already been installed, remove the base grille (see Step 2 in Moving the Refrigerator...), then skip to Consumer - Save these instructions with the Consumer. • Note to Step 5 in Canada 1.888.261.3055). PREPARATION WATER SUPPLY TO THE ICEMAKER If the refrigerator... has an icemaker, it will have to be connected to Installer - Call 800.GE.CARES (800.432.2737) or Visit our Website at: ge...the Refrigerator. A GE ...
Use and Care Manual
Page 24
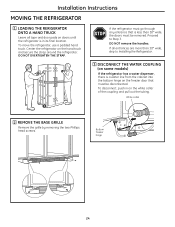
...removing the two Phillips head screws. Proceed to Installing the Refrigerator. 3 DISCONNECT THE WATER COUPLING (on some models) If the refrigerator has a water dispenser, there is a water line from the cabinet into the bottom hinge on doors until the refrigerator is less than 38″ wide, the doors must ...be removed. Center the refrigerator on the white collar of the ...
...removing the two Phillips head screws. Proceed to Installing the Refrigerator. 3 DISCONNECT THE WATER COUPLING (on some models) If the refrigerator has a water dispenser, there is a water line from the cabinet into the bottom hinge on doors until the refrigerator is less than 38″ wide, the doors must ...be removed. Center the refrigerator on the white collar of the ...
Use and Care Manual
Page 25
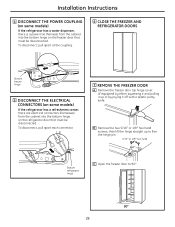
To disconnect, pull apart at the coupling. 6 CLOSE THE FREEZER AND REFRIGERATOR DOORS Bottom freezer hinge 5 DISCONNECT THE ELECTRICAL CONNECTORS (on some models) If the refrigerator has a water dispenser, there is a power line (harness) from the cabinet into the bottom hinge on the refrigerator door that must be disconnected. Installation Instructions 4 DISCONNECT THE POWER COUPLING (on...
To disconnect, pull apart at the coupling. 6 CLOSE THE FREEZER AND REFRIGERATOR DOORS Bottom freezer hinge 5 DISCONNECT THE ELECTRICAL CONNECTORS (on some models) If the refrigerator has a water dispenser, there is a power line (harness) from the cabinet into the bottom hinge on the refrigerator door that must be disconnected. Installation Instructions 4 DISCONNECT THE POWER COUPLING (on...
Use and Care Manual
Page 27
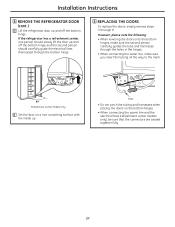
... door on the bottom hinges. • When connecting the power line and the electrical lines (refreshment center models only), be sure that the connectors are seated together fully. 27 If the refrigerator has a refreshment center, one person should carefully guide the electrical lines (harnesses) through the bottom hinge. ... the doors on a non-scratching surface with the inside up and off the bottom hinge. Installation Instructions 8 REMOVE THE REFRIGERATOR DOOR (cont .) D Lift the refrigerator door up and off the bottom hinge and the second person should slowly lift the door up .
... door on the bottom hinges. • When connecting the power line and the electrical lines (refreshment center models only), be sure that the connectors are seated together fully. 27 If the refrigerator has a refreshment center, one person should carefully guide the electrical lines (harnesses) through the bottom hinge. ... the doors on a non-scratching surface with the inside up and off the bottom hinge. Installation Instructions 8 REMOVE THE REFRIGERATOR DOOR (cont .) D Lift the refrigerator door up and off the bottom hinge and the second person should slowly lift the door up .

