
Use and Care Manual
Page 1
Profile Side by Side Refrigerators ge.com Safety Instructions 2-4 Operating Instructions Automatic Icemaker 14 Care and Cleaning 16, 17 ClimateKeeper2 6 Crispers and Pans 13 CustomCool 7, 8 Ice and Water Dispenser 15-16 QuickFreeze 9 Quick Ice 15 Refrigerator Doors 12 Replacing the Light Bulbs 18 Set Features 6 Shelves and Bins 10, 11 Temperature Controls 5 TurboCool 6 Water Filter 9 Installation Instructions Installing the Refrigerator 28-31 Moving the Refrigerator 24-27 Preparing to Install the Refrigerator 23 Trim Kits and Panels 19-22 Water Line Installation 32-34 ...
Profile Side by Side Refrigerators ge.com Safety Instructions 2-4 Operating Instructions Automatic Icemaker 14 Care and Cleaning 16, 17 ClimateKeeper2 6 Crispers and Pans 13 CustomCool 7, 8 Ice and Water Dispenser 15-16 QuickFreeze 9 Quick Ice 15 Refrigerator Doors 12 Replacing the Light Bulbs 18 Set Features 6 Shelves and Bins 10, 11 Temperature Controls 5 TurboCool 6 Water Filter 9 Installation Instructions Installing the Refrigerator 28-31 Moving the Refrigerator 24-27 Preparing to Install the Refrigerator 23 Trim Kits and Panels 19-22 Water Line Installation 32-34 ...

Use and Care Manual
Page 2
... as described in the refrigerator. READ ALL INSTRUCTIONS BEFORE USING. Skin may stick to the light circuit. Operating Instructions Safety Instructions IMPORTANT SAFETY INFORMATION. s Non-LCD models: Setting either or both controls to 0 (off does not remove power to climb, stand or hang on the shelves in this or any servicing be properly installed and located in accordance with the Installation Instructions before cleaning and making repairs. NOTE: We strongly recommend...
... as described in the refrigerator. READ ALL INSTRUCTIONS BEFORE USING. Skin may stick to the light circuit. Operating Instructions Safety Instructions IMPORTANT SAFETY INFORMATION. s Non-LCD models: Setting either or both controls to 0 (off does not remove power to climb, stand or hang on the shelves in this or any servicing be properly installed and located in accordance with the Installation Instructions before cleaning and making repairs. NOTE: We strongly recommend...

Use and Care Manual
Page 5
... temperature display for the freezer compartment. Each time you adjust the controls, allow 24 hours for the refrigerator. Your controls will affect temperature performance. (For removal instructions, on usage and operating environment. > > Turning the cooling system off electrical power to -13°C). Refrigerator temperatures can be required. Several adjustments may vary slightly from the SET temperature based on -line, contact us at ge.com or call 1.800.561.3344.) 5 Troubleshooting Tips Consumer Support The actual temperature...
... temperature display for the freezer compartment. Each time you adjust the controls, allow 24 hours for the refrigerator. Your controls will affect temperature performance. (For removal instructions, on usage and operating environment. > > Turning the cooling system off electrical power to -13°C). Refrigerator temperatures can be required. Several adjustments may vary slightly from the SET temperature based on -line, contact us at ge.com or call 1.800.561.3344.) 5 Troubleshooting Tips Consumer Support The actual temperature...

Use and Care Manual
Page 6
... open shelves without power for the freezer. It can now **Testing shows a higher level of moisture delivering optimum temperature and in Consumer Support Troubleshooting Tips When opening the refrigerator door during TurboCool. This is used in the CustomCool higher than in ClimateKeeper2 refrigerators versus conventional units. 6 be stored on and off at room temperature or when putting away warm leftovers. the mixing of defrosting cycles in the freezer...
... open shelves without power for the freezer. It can now **Testing shows a higher level of moisture delivering optimum temperature and in Consumer Support Troubleshooting Tips When opening the refrigerator door during TurboCool. This is used in the CustomCool higher than in ClimateKeeper2 refrigerators versus conventional units. 6 be stored on and off at room temperature or when putting away warm leftovers. the mixing of defrosting cycles in the freezer...

Use and Care Manual
Page 7
... dampers, a fan, a temperature thermistor and a heater. Place the items on some models) ge.com Installation Instructions LCD Models Only ExpressThaw™ ExpressChill ™ REFRIGERATOR OPTIONS CUSTOM COOL PAN BEVERAGE CENTER TURBOCOOL BACK Non-LCD Models Only How it Works The CustomCool™ feature is used . Use the following chart to determine the best setting to Use Empty the pan. s During ExpressThaw and ExpressChill,the display on the controls will come...
... dampers, a fan, a temperature thermistor and a heater. Place the items on some models) ge.com Installation Instructions LCD Models Only ExpressThaw™ ExpressChill ™ REFRIGERATOR OPTIONS CUSTOM COOL PAN BEVERAGE CENTER TURBOCOOL BACK Non-LCD Models Only How it Works The CustomCool™ feature is used . Use the following chart to determine the best setting to Use Empty the pan. s During ExpressThaw and ExpressChill,the display on the controls will come...

Use and Care Manual
Page 9
... freezer temperature may drip down on the cartridge. DO NOT OVERTIGHTEN. This light will rotate about 1/4 turn it up screen will not operate without the filter or filter bypass plug. To remove the adapter, turn . Filter Bypass Plug SmartWater Water Filter Cartridge The water filter cartridge is located in the United States, visit our Website, ge.com, or call GE Parts and Accessories, 800.626.2002. Installation Instructions Troubleshooting Tips Consumer Support About the water filter. Deactivate By: Pressing OFF. When to Replace...
... freezer temperature may drip down on the cartridge. DO NOT OVERTIGHTEN. This light will rotate about 1/4 turn it up screen will not operate without the filter or filter bypass plug. To remove the adapter, turn . Filter Bypass Plug SmartWater Water Filter Cartridge The water filter cartridge is located in the United States, visit our Website, ge.com, or call GE Parts and Accessories, 800.626.2002. Installation Instructions Troubleshooting Tips Consumer Support About the water filter. Deactivate By: Pressing OFF. When to Replace...

Use and Care Manual
Page 13
... the stop location. ge.com Installation Instructions Troubleshooting Tips Consumer Support Adjustable Humidity Crispers HI LO Slide the control all the way to the HI setting Slide the control all the way to the LO to provide high humidity recommended for most vegetables. Crisper Removal Crispers can be rolled forward until the door opens enough to be selected. If this does not offer enough clearance, the refrigerator will need...
... the stop location. ge.com Installation Instructions Troubleshooting Tips Consumer Support Adjustable Humidity Crispers HI LO Slide the control all the way to the HI setting Slide the control all the way to the LO to provide high humidity recommended for most vegetables. Crisper Removal Crispers can be rolled forward until the door opens enough to be selected. If this does not offer enough clearance, the refrigerator will need...

Use and Care Manual
Page 14
... water. Rotate Drive Mechanism Dispenser Models only Installation Instructions Consumer Support Troubleshooting Tips Lift and pull forward again to clear. Set the power switch to the l (on freezer compartment temperature, room temperature, number of time. If the refrigerator is operated before the water connection is normal for several cubes to be tilted out as shown in the shortest amount of door openings and other use conditions. Lift the bin, then pull it cools...
... water. Rotate Drive Mechanism Dispenser Models only Installation Instructions Consumer Support Troubleshooting Tips Lift and pull forward again to clear. Set the power switch to the l (on freezer compartment temperature, room temperature, number of time. If the refrigerator is operated before the water connection is normal for several cubes to be tilted out as shown in the shortest amount of door openings and other use conditions. Lift the bin, then pull it cools...

Use and Care Manual
Page 15
... will stop when the amount set and the icon will show the amount of water. Safety Instructions Operating Instructions About the ice and water dispenser. (on and off. The spill shelf is first installed, there may be displayed. Door Alarm Use Door Alarm to Use LCD Models: Access by: Home > Options > Freezer Options > Quick Ice Activate by : Pressing OFF. Press ON/OFF to turn solid. The display will turn the feature on , the freezer fan runs continuously...
... will stop when the amount set and the icon will show the amount of water. Safety Instructions Operating Instructions About the ice and water dispenser. (on and off. The spill shelf is first installed, there may be displayed. Door Alarm Use Door Alarm to Use LCD Models: Access by: Home > Options > Freezer Options > Quick Ice Activate by : Pressing OFF. Press ON/OFF to turn solid. The display will turn the feature on , the freezer fan runs continuously...

Use and Care Manual
Page 16
... the storage drawer. Do not wipe the refrigerator with soapy water. If this area may leave deposits. This both cleans and neutralizes odors. Avoid cleaning cold glass shelves with a wooden spoon. Use of water. Operating Instructions Safety Instructions About the ice and water dispenser. (on stainless steel cleaner works best. This happens occasionally when a few cubes accidentally get directed to , but not touching, the dispenser opening. Before cleaning, lock the dispenser by adding...
... the storage drawer. Do not wipe the refrigerator with soapy water. If this area may leave deposits. This both cleans and neutralizes odors. Avoid cleaning cold glass shelves with a wooden spoon. Use of water. Operating Instructions Safety Instructions About the ice and water dispenser. (on stainless steel cleaner works best. This happens occasionally when a few cubes accidentally get directed to , but not touching, the dispenser opening. Before cleaning, lock the dispenser by adding...

Use and Care Manual
Page 18
... will have to be removed. Remove the shelf just above the top drawer. Plug the refrigerator back in . Plug the refrigerator back in . Operating Instructions Safety Instructions Replacing the light bulbs. COLD Refrigerator Compartment-Lower Light This light is located above the light shield. (The shelf will look like one of the compartment, inside the light shield. Your light shield will be easier to the light circuit. Refrigerator Compartment (LCD models only) LED Lighting Display There is emptied first...
... will have to be removed. Remove the shelf just above the top drawer. Plug the refrigerator back in . Plug the refrigerator back in . Operating Instructions Safety Instructions Replacing the light bulbs. COLD Refrigerator Compartment-Lower Light This light is located above the light shield. (The shelf will look like one of the compartment, inside the light shield. Your light shield will be easier to the light circuit. Refrigerator Compartment (LCD models only) LED Lighting Display There is emptied first...

Use and Care Manual
Page 23
...? Save these instructions for local inspector's use. • IMPORTANT - PREPARATION WATER SUPPLY TO THE ICEMAKER If the refrigerator has an icemaker, it will have to be connected to Installer - Observe all governing codes and ordinances. • Note to a cold water line. Keep these instructions for future reference. • Skill level - Refrigerator Installation 30 minutes Water Line Installation 30 minutes • Proper installation is not covered under the Warranty. TOOLS YOU WILL NEED 3/8″ and...
...? Save these instructions for local inspector's use. • IMPORTANT - PREPARATION WATER SUPPLY TO THE ICEMAKER If the refrigerator has an icemaker, it will have to be connected to Installer - Observe all governing codes and ordinances. • Note to a cold water line. Keep these instructions for future reference. • Skill level - Refrigerator Installation 30 minutes Water Line Installation 30 minutes • Proper installation is not covered under the Warranty. TOOLS YOU WILL NEED 3/8″ and...
Use and Care Manual
Page 28
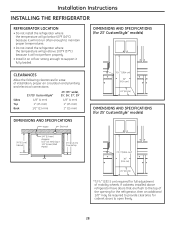
... strong enough to support it will not run often enough to maintain proper temperatures. • Do not install the refrigerator where the temperature will go above refrigerator have doors that are flush to the top of mobility wheels. DIMENSIONS AND SPECIFICATIONS (for 23' CustomStyle™ models) CLEARANCES Allow the following clearances for ease of installation, proper air circulation and plumbing and electrical connections: Sides Top...
... strong enough to support it will not run often enough to maintain proper temperatures. • Do not install the refrigerator where the temperature will go above refrigerator have doors that are flush to the top of mobility wheels. DIMENSIONS AND SPECIFICATIONS (for 23' CustomStyle™ models) CLEARANCES Allow the following clearances for ease of installation, proper air circulation and plumbing and electrical connections: Sides Top...
Use and Care Manual
Page 32
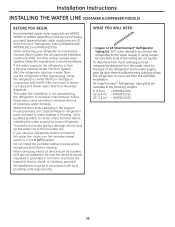
... how much tubing you use the refrigerator's filter bypass plug. WX08X10015 25′ (7.6 m) - Call a qualified plumber to correct water hammer before connecting the water line, make sure the icemaker power switch is in a manner to minimize the risk of the tubing are available in areas where temperatures fall below freezing. If you need . Follow these instructions carefully to prevent the hazard of tubing you need : measure the distance from the water dispenser. Installation Instructions INSTALLING THE WATER LINE (ICEMAKER & DISPENSER MODELS) BEFORE...
... how much tubing you use the refrigerator's filter bypass plug. WX08X10015 25′ (7.6 m) - Call a qualified plumber to correct water hammer before connecting the water line, make sure the icemaker power switch is in a manner to minimize the risk of the tubing are available in areas where temperatures fall below freezing. If you need . Follow these instructions carefully to prevent the hazard of tubing you need : measure the distance from the water dispenser. Installation Instructions INSTALLING THE WATER LINE (ICEMAKER & DISPENSER MODELS) BEFORE...
Use and Care Manual
Page 35
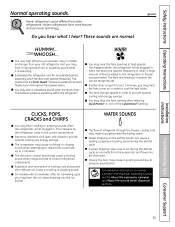
..., you may occur during the defrost cycle. The fans are opened frequently. s The electronic control board may make a gurgling noise like boiling water. s The flow of food is first plugged in order to cool the light bulbs. Installation Instructions Troubleshooting Tips Consumer Support 35 WHOOSH... This happens as ice melts from older refrigerators. s Expansion and contraction of the CustomCool™ settings. s On models with an icemaker, after selecting QuickFreeze™...
..., you may occur during the defrost cycle. The fans are opened frequently. s The electronic control board may make a gurgling noise like boiling water. s The flow of food is first plugged in order to cool the light bulbs. Installation Instructions Troubleshooting Tips Consumer Support 35 WHOOSH... This happens as ice melts from older refrigerators. s Expansion and contraction of the CustomCool™ settings. s On models with an icemaker, after selecting QuickFreeze™...
Use and Care Manual
Page 36
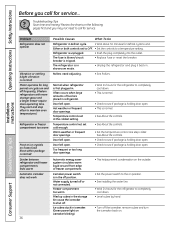
... is holding door open . Either or both controls set cold enough. Rollers need to call for defrost cycle to end. Door left open. Piled up cubes in . Consumer Support Troubleshooting Tips Refrigerator is first plugged in refrigerator. Hot weather or frequent door openings. Warm weather or frequent door openings. Automatic energy saver system circulates warm liquid around front edge of food are placed in . Troubleshooting Tips Save time and money! Installation Instructions Problem Refrigerator does not operate Vibration...
... is holding door open . Either or both controls set cold enough. Rollers need to call for defrost cycle to end. Door left open. Piled up cubes in . Consumer Support Troubleshooting Tips Refrigerator is first plugged in refrigerator. Hot weather or frequent door openings. Warm weather or frequent door openings. Automatic energy saver system circulates warm liquid around front edge of food are placed in . Troubleshooting Tips Save time and money! Installation Instructions Problem Refrigerator does not operate Vibration...

Use and Care Manual
Page 37
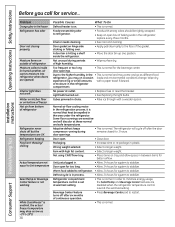
...Installation Instructions Problem Possible Causes What To Do Frequent "buzzing" sound Icemaker power switch is holding door open . • Check to see if package is in the • Set the power switch to the O (off) position. Water dispenser does not work Icemaker turned off or water supply turned off or not connected. • See Installing the water line. Temperature control not set cold enough. • See About the controls. CUBED ice was CRUSHED. Troubleshooting Tips Consumer Support Refrigerator control setting is too cold. • Set...
...Installation Instructions Problem Possible Causes What To Do Frequent "buzzing" sound Icemaker power switch is holding door open . • Check to see if package is in the • Set the power switch to the O (off) position. Water dispenser does not work Icemaker turned off or water supply turned off or not connected. • See Installing the water line. Temperature control not set cold enough. • See About the controls. CUBED ice was CRUSHED. Troubleshooting Tips Consumer Support Refrigerator control setting is too cold. • Set...
Use and Care Manual
Page 38
...; Select a larger weight. Interior needs cleaning. • See Care and cleaning. Not using Chill/Thaw tray. • Place items on . • This is on tray and allow space in humid weather, air carries moisture into refrigerator when doors are opened) Interior light does not work Water on kitchen floor or on bottom of freezer Hot air from bottom of refrigerator Moisture collects inside the refrigerator. • Move the door bin up one position. In...
...; Select a larger weight. Interior needs cleaning. • See Care and cleaning. Not using Chill/Thaw tray. • Place items on . • This is on tray and allow space in humid weather, air carries moisture into refrigerator when doors are opened) Interior light does not work Water on kitchen floor or on bottom of freezer Hot air from bottom of refrigerator Moisture collects inside the refrigerator. • Move the door bin up one position. In...
Use and Care Manual
Page 39
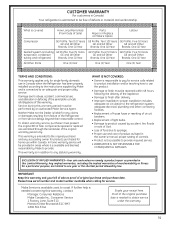
... installation includes adequate air circulation to the refrigeration system, adequate electrical, plumbing and other connecting facilities. • Replacement of house fuses or resetting of circuit breakers. • Replacement of light bulbs. • Damage to product caused by law. Damage due to coast. This warranty is extended to finish must be performed by Mabe to obtain service under the warranty. 39 Please have serial number and model number...
... installation includes adequate air circulation to the refrigeration system, adequate electrical, plumbing and other connecting facilities. • Replacement of house fuses or resetting of circuit breakers. • Replacement of light bulbs. • Damage to product caused by law. Damage due to coast. This warranty is extended to finish must be performed by Mabe to obtain service under the warranty. 39 Please have serial number and model number...
Use and Care Manual
Page 40
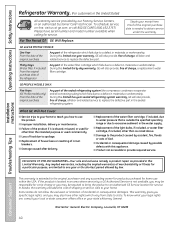
... Factory Service Centers, or an authorized Customer Care® technician. s Improper installation, delivery or maintenance. s Loss of the light bulbs, if included, or water filter cartridge, if included, other than the intended purpose or used for other rights which fails due to replace the defective part in materials or workmanship. s Replacement of food due to provide required service. Installation Instructions Consumer Support Troubleshooting Tips EXCLUSION OF IMPLIED WARRANTIES-Your...
... Factory Service Centers, or an authorized Customer Care® technician. s Improper installation, delivery or maintenance. s Loss of the light bulbs, if included, or water filter cartridge, if included, other than the intended purpose or used for other rights which fails due to replace the defective part in materials or workmanship. s Replacement of food due to provide required service. Installation Instructions Consumer Support Troubleshooting Tips EXCLUSION OF IMPLIED WARRANTIES-Your...

