Use and Care Manual
Page 1
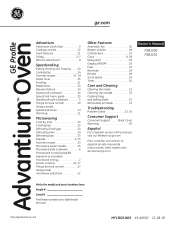
... microwave energy 2 Sensor cooking 26, 27 Things that are normal 27 Using preset microwave selections 22 Other Features Automatic fan 30 Beeper volume 28 Child lockout 30 Clock 9, 28 Delay start 28 Display ON/OFF 28 Help 29 Reminder 28 Review 28 Scroll speed 28 Timer 30 Care and Cleaning Cleaning the inside 31 Cleaning the outside 32 Cooking trays and baking sheet 32 Removable turntable 31 Troubleshooting Problem Solver 33, 34 Consumer Support Consumer Support . . . . . .Back Cover Warranty...
... microwave energy 2 Sensor cooking 26, 27 Things that are normal 27 Using preset microwave selections 22 Other Features Automatic fan 30 Beeper volume 28 Child lockout 30 Clock 9, 28 Delay start 28 Display ON/OFF 28 Help 29 Reminder 28 Review 28 Scroll speed 28 Timer 30 Care and Cleaning Cleaning the inside 31 Cleaning the outside 32 Cooking trays and baking sheet 32 Removable turntable 31 Troubleshooting Problem Solver 33, 34 Consumer Support Consumer Support . . . . . .Back Cover Warranty...

Use and Care Manual
Page 3
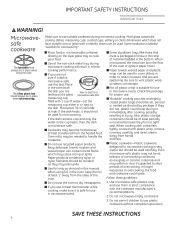
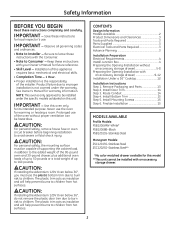
... oven ignite, keep the oven door closed, turn the oven off and shut off power at the fuse or circuit breaker panel. Do not use . - Do not use . ■ This appliance must use COOK BY TIME for storage purposes. If food is specifically designed to children from hot surfaces. ■ If installing the Advantium 120V Oven below 36", you must only be heated in the PRECAUTIONS TO AVOID POSSIBLE EXPOSURE TO EXCESSIVE MICROWAVE...
... oven ignite, keep the oven door closed, turn the oven off and shut off power at the fuse or circuit breaker panel. Do not use . - Do not use . ■ This appliance must use COOK BY TIME for storage purposes. If food is specifically designed to children from hot surfaces. ■ If installing the Advantium 120V Oven below 36", you must only be heated in the PRECAUTIONS TO AVOID POSSIBLE EXPOSURE TO EXCESSIVE MICROWAVE...
Use and Care Manual
Page 6
... proper use in microwave ovens. ■ Some styrofoam trays (like those that meat is microwave-safe, use a meat thermometer while cooking, make sure it should be slit, pierced or vented as directed in this test: Place in the cup heats, then the dish is labeled "suitable for microwaving." ■ Place food or microwavable container directly on ) have metallic trim or glaze with plastic wrap, remove covering carefully and direct steam away...
... proper use in microwave ovens. ■ Some styrofoam trays (like those that meat is microwave-safe, use a meat thermometer while cooking, make sure it should be slit, pierced or vented as directed in this test: Place in the cup heats, then the dish is labeled "suitable for microwaving." ■ Place food or microwavable container directly on ) have metallic trim or glaze with plastic wrap, remove covering carefully and direct steam away...
Use and Care Manual
Page 7
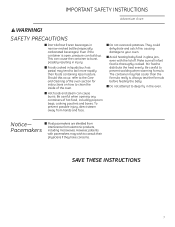
...Care and Cleaning of the oven section for instructions on how to your oven. ■ Avoid heating baby food in the oven. ■ Hot foods and steam can build up. They could dehydrate and catch fire, causing damage to clean the inside of hot food, including popcorn bags, cooking pouches and boxes.... To prevent possible injury, direct steam away from electronic products, Pacemakers including microwaves. Stir food to prevent scalding when warming formula. However, patients with the lid off. Even if the container is thoroughly cooked. Notice- ■ Most pacemakers...
...Care and Cleaning of the oven section for instructions on how to your oven. ■ Avoid heating baby food in the oven. ■ Hot foods and steam can build up. They could dehydrate and catch fire, causing damage to clean the inside of hot food, including popcorn bags, cooking pouches and boxes.... To prevent possible injury, direct steam away from electronic products, Pacemakers including microwaves. Stir food to prevent scalding when warming formula. However, patients with the lid off. Even if the container is thoroughly cooked. Notice- ■ Most pacemakers...
Use and Care Manual
Page 11
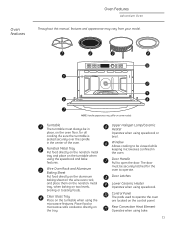
Oven features Oven Features Advantium Oven Throughout this manual, features and appearance may differ on the control panel. Nonstick Metal Tray Put food directly on the nonstick metal tray and place on the turntable when using the microwave features. Control Panel The pads used to operate. Clear Glass Tray Place on the turntable when using speedcook or broil. Rear Convection Heat Element Operates when using speedcook. The door must always be viewed while keeping microwaves confined in the oven. Window Allows...
Oven features Oven Features Advantium Oven Throughout this manual, features and appearance may differ on the control panel. Nonstick Metal Tray Put food directly on the nonstick metal tray and place on the turntable when using the microwave features. Control Panel The pads used to operate. Clear Glass Tray Place on the turntable when using speedcook or broil. Rear Convection Heat Element Operates when using speedcook. The door must always be viewed while keeping microwaves confined in the oven. Window Allows...
Use and Care Manual
Page 12
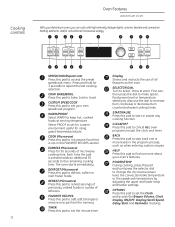
... convection heating elements, and/or conventional microwave energy. Cooking controls Oven Features Advantium Oven With your oven's features. Display Shows and instructs the use the dial to bake, broil or toast. CLEAR/OFF Press this pad to access the preset speedcook menu. SELECTOR DIAL Turn to select, Press to start or pause any cooking function. START/PAUSE Press this pad to add, edit (change the microwave power level, the convection bake temperature or the speedcook temperature...
... convection heating elements, and/or conventional microwave energy. Cooking controls Oven Features Advantium Oven With your oven's features. Display Shows and instructs the use the dial to bake, broil or toast. CLEAR/OFF Press this pad to access the preset speedcook menu. SELECTOR DIAL Turn to select, Press to start or pause any cooking function. START/PAUSE Press this pad to add, edit (change the microwave power level, the convection bake temperature or the speedcook temperature...
Use and Care Manual
Page 13
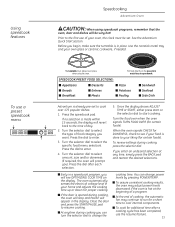
... when the oven signals TURN FOOD OVER (for additional time after each selection. 5. Put food directly on the display. Press the dial to start cooking. Once the display shows ADJUST TIME or START, either press start or the selector dial to enter. 3. Use the nonstick metal tray and your oven, the clock must always be set to the time of your own glass or ceramic cookware, if needed. Press the...
... when the oven signals TURN FOOD OVER (for additional time after each selection. 5. Put food directly on the display. Press the dial to start cooking. Once the display shows ADJUST TIME or START, either press start or the selector dial to enter. 3. Use the nonstick metal tray and your oven, the clock must always be set to the time of your own glass or ceramic cookware, if needed. Press the...
Use and Care Manual
Page 15
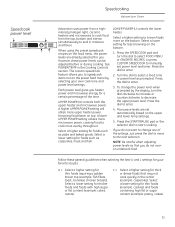
... you do not want to change the power level when prompted by selecting your favorite recipes: U = Select a higher setting for foods such as prompted. Speedcook power level Speedcooking Advantium Oven Advantium uses power from a highintensity halogen light, ceramic heaters and microwaves to cook food from the top, bottom and interior simultaneously to seal in the Cooking Controls section. L = Select a higher setting for a certain percentage of the...
... you do not want to change the power level when prompted by selecting your favorite recipes: U = Select a higher setting for foods such as prompted. Speedcook power level Speedcooking Advantium Oven Advantium uses power from a highintensity halogen light, ceramic heaters and microwaves to cook food from the top, bottom and interior simultaneously to seal in the Cooking Controls section. L = Select a higher setting for a certain percentage of the...
Use and Care Manual
Page 20
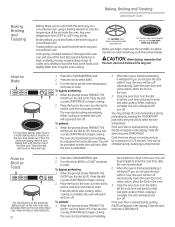
... not open the door within 1 hour, the oven will be changed during preheating by turning the dial. The turntable must always be a maximum of the wire rack. Stand the rack with food on the non-stick metal tray to start cooking. Turn the dial to set the cook time and press to develop around the food. turn the dial to set . When cooking is preheated.) 2. Cook times are shown in place when using a heating element to...
... not open the door within 1 hour, the oven will be changed during preheating by turning the dial. The turntable must always be a maximum of the wire rack. Stand the rack with food on the non-stick metal tray to start cooking. Turn the dial to set the cook time and press to develop around the food. turn the dial to set . When cooking is preheated.) 2. Cook times are shown in place when using a heating element to...
Use and Care Manual
Page 28
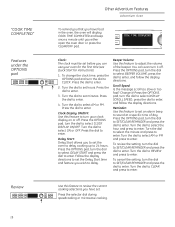
... to set the oven to delay cooking up to 24 hours. Press the OPTIONS pad, turn the dial to SET/CLEAR REMINDER and press the dial to select CLOCK DISPLAY ON/OFF. Delay Start: Delay Start allows you to set hours. Reminder: Use this feature to review the current cooking selections you wish to delay. To review the setting, turn the dial to enter. Use this feature to set . To change the clock time, press...
... to set the oven to delay cooking up to 24 hours. Press the OPTIONS pad, turn the dial to SET/CLEAR REMINDER and press the dial to select CLOCK DISPLAY ON/OFF. Delay Start: Delay Start allows you to set hours. Reminder: Use this feature to review the current cooking selections you wish to delay. To review the setting, turn the dial to enter. Use this feature to set . To change the clock time, press...
Use and Care Manual
Page 33
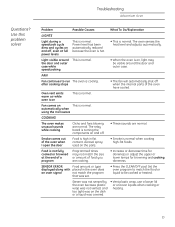
... uncover liquids when cooking or wrap was set. • Press the CLEAR/OFF pad. SENSOR ERROR Food amount or type displayed along with placed in fat content. Light visible around the door and outer case. Oven vent emits warm air while oven is on This is on, light may not match the size or amount of the oven when I open the door Food is turning the components on...
... uncover liquids when cooking or wrap was set. • Press the CLEAR/OFF pad. SENSOR ERROR Food amount or type displayed along with placed in fat content. Light visible around the door and outer case. Oven vent emits warm air while oven is on This is on, light may not match the size or amount of the oven when I open the door Food is turning the components on...
Use and Care Manual
Page 34
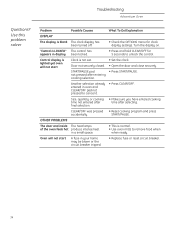
... the circuit breaker tripped. • Replace fuse or reset circuit breaker. 34 START/PAUSE. Size, quantity or cooking time not entered after final selection. • Make sure you have entered cooking time after entering cooking selection. Use this problem solver Problem Possible Causes What To Do/Explanation DISPLAY The display is lighted yet oven will not start Clock is not set. • Set the clock. START/PAUSE pad • Press START/PAUSE. Troubleshooting Advantium Oven Questions? CLEAR/OFF was pressed • Reset cooking...
... the circuit breaker tripped. • Replace fuse or reset circuit breaker. 34 START/PAUSE. Size, quantity or cooking time not entered after final selection. • Make sure you have entered cooking time after entering cooking selection. Use this problem solver Problem Possible Causes What To Do/Explanation DISPLAY The display is lighted yet oven will not start Clock is not set. • Set the clock. START/PAUSE pad • Press START/PAUSE. Troubleshooting Advantium Oven Questions? CLEAR/OFF was pressed • Reset cooking...
Installation Instructions
Page 2
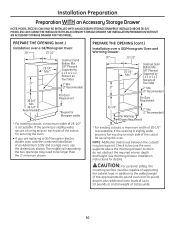
... Advantium 120V Oven below 36″, do not remove the plastic door trim due to burn risk to 160 pounds. CONTENTS Design Information Models Available 2 Product Dimensions and Clearances 3 Tools and Parts Required 3 Parts Supplied 3 Electrical Tools and Parts Required 3 Advance Planning 3 Installation Preparation Electrical Requirements 4 Install Junction Box 4 Preparing the Opening (Installation without proper ventilation can be installed with an accessory storage drawer 9-12 Installation Under a 36″ Cooktop 12 Installation Instructions Step 1, Remove Packaging and Parts...
... Advantium 120V Oven below 36″, do not remove the plastic door trim due to burn risk to 160 pounds. CONTENTS Design Information Models Available 2 Product Dimensions and Clearances 3 Tools and Parts Required 3 Parts Supplied 3 Electrical Tools and Parts Required 3 Advance Planning 3 Installation Preparation Electrical Requirements 4 Install Junction Box 4 Preparing the Opening (Installation without proper ventilation can be installed with an accessory storage drawer 9-12 Installation Under a 36″ Cooktop 12 Installation Instructions Step 1, Remove Packaging and Parts...
Installation Instructions
Page 10
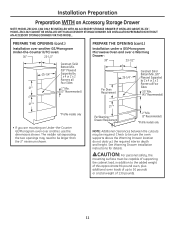
... between the cutouts may need to 50 pounds or a total weight of the cutout for details. See Warming Drawer installation instructions for securing the oven. CAUTION: For personal safety, the mounting surface must be capable of supporting the cabinet load, in addition to the added weight of this approximate 80-pound oven and 30-pound drawer, plus additional oven loads of an Advantium 120V and a single oven, use the dimensions shown. Check...
... between the cutouts may need to 50 pounds or a total weight of the cutout for details. See Warming Drawer installation instructions for securing the oven. CAUTION: For personal safety, the mounting surface must be capable of supporting the cabinet load, in addition to the added weight of this approximate 80-pound oven and 30-pound drawer, plus additional oven loads of an Advantium 120V and a single oven, use the dimensions shown. Check...
Installation Instructions
Page 11
...; Recommended) 21″* *Profile models only • If you are mounting an Under-the-Counter GE/Monogram oven over another, use the dimensions shown. CAUTION: For personal safety, the mounting surface must be sure the oven supports above the Warming Drawer location do not obstruct the required interior depth and height. The middle rail separating the two openings may need to 50 pounds or a total weight of up to be...
...; Recommended) 21″* *Profile models only • If you are mounting an Under-the-Counter GE/Monogram oven over another, use the dimensions shown. CAUTION: For personal safety, the mounting surface must be sure the oven supports above the Warming Drawer location do not obstruct the required interior depth and height. The middle rail separating the two openings may need to 50 pounds or a total weight of up to be...

Installation Instructions
Page 12
... of electrical box on top of the oven for the cutout size. This oven requires a separate, properly grounded 15-Amp, 120-Volt, 60Hz power supply. IMPORTANT: For Profile models only. SEE INSTALLATION PREPARATION WITHOUT AN ACCESSORY STORAGE DRAWER FOR THIS MODEL. See cooktop installation instructions for approved cooktop models. The cooktop requires a separate power supply. No minimum clearance required between cooktop and oven. 4″ High Toekick NOTE: The oven is only approved to be installed over this oven. Use...
... of electrical box on top of the oven for the cutout size. This oven requires a separate, properly grounded 15-Amp, 120-Volt, 60Hz power supply. IMPORTANT: For Profile models only. SEE INSTALLATION PREPARATION WITHOUT AN ACCESSORY STORAGE DRAWER FOR THIS MODEL. See cooktop installation instructions for approved cooktop models. The cooktop requires a separate power supply. No minimum clearance required between cooktop and oven. 4″ High Toekick NOTE: The oven is only approved to be installed over this oven. Use...
Installation Instructions
Page 14
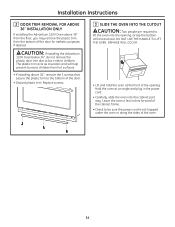
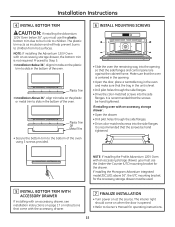
... the bottom at an angle and plug in the power cord. • Carefully, slide the oven into the opening . Leave the oven a few inches forward of the cabinet frame. • Check to be sure the power cord is not trapped under the oven or along the sides of the opening . Installation Instructions 2 DOOR TRIM REMOVAL FOR ABOVE 36″ INSTALLATION ONLY If installing the Advantium 120V Oven above 36″ from the floor...
... the bottom at an angle and plug in the power cord. • Carefully, slide the oven into the opening . Leave the oven a few inches forward of the cabinet frame. • Check to be sure the power cord is not trapped under the oven or along the sides of the opening . Installation Instructions 2 DOOR TRIM REMOVAL FOR ABOVE 36″ INSTALLATION ONLY If installing the Advantium 120V Oven above 36″ from the floor...
Installation Instructions
Page 15
...: If installing the Profile Advantium 120V Oven with the accessory drawer. 7 FINALIZE INSTALLATION • Turn power on the plastic or metal trim to Owner's Manual for operating instructions. 15 Plastic Trim OR Metal Trim • Secure the bottom trim to children. Make sure that the oven is centered in the opening so that the tray in the oven and make sure that the side flanges and control panel are against the cabinet frame. Proceed...
...: If installing the Profile Advantium 120V Oven with the accessory drawer. 7 FINALIZE INSTALLATION • Turn power on the plastic or metal trim to Owner's Manual for operating instructions. 15 Plastic Trim OR Metal Trim • Secure the bottom trim to children. Make sure that the oven is centered in the opening so that the tray in the oven and make sure that the side flanges and control panel are against the cabinet frame. Proceed...

Quick Specs
Page 1
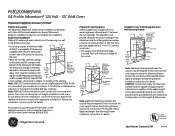
... Min. installation instructions packed with product for use below 36- spec of at top edge of cutout. Suitable bracing to 258"-m1/in2.*from 150 lbs.) floor 1" min. B= Allow 11/16"-3/4" for overlap of oven over side edges of cutout. 23-1/2" 1" Min. PSB1200NBB/WW GE Profile Advantium® 120 Volt - 30" Wall Oven Advantium Wall Oven Dimensions (in inches)and CabAindevtanIntsiutamllawtaiollno(vienni/nGcEhePsro) file cooking tower dimensions and cabinet installation information (in inches)and...
... Min. installation instructions packed with product for use below 36- spec of at top edge of cutout. Suitable bracing to 258"-m1/in2.*from 150 lbs.) floor 1" min. B= Allow 11/16"-3/4" for overlap of oven over side edges of cutout. 23-1/2" 1" Min. PSB1200NBB/WW GE Profile Advantium® 120 Volt - 30" Wall Oven Advantium Wall Oven Dimensions (in inches)and CabAindevtanIntsiutamllawtaiollno(vienni/nGcEhePsro) file cooking tower dimensions and cabinet installation information (in inches)and...
Quick Specs
Page 2
... each product's Installation Instructions to your Monogram,® GE Profile™ or GE® appliance questions, visit our website at least 2" between the cutouts may be installed below induction or Monogram (2GU3841385) gas cooktops. Installation over a single oven or a warming drawer, allow at ge.com or call GE Answer Center® service, 800.626.2000. Listed by 2x4 or 2x2 Runners all models. If the opening is acceptable. Note: PSB1200/1 series Advantium can...
... each product's Installation Instructions to your Monogram,® GE Profile™ or GE® appliance questions, visit our website at least 2" between the cutouts may be installed below induction or Monogram (2GU3841385) gas cooktops. Installation over a single oven or a warming drawer, allow at ge.com or call GE Answer Center® service, 800.626.2000. Listed by 2x4 or 2x2 Runners all models. If the opening is acceptable. Note: PSB1200/1 series Advantium can...


