
Quick Specs
Page 2
... plus the length of some typical ducts. REAR EXHAUST: If a rear or horizontal exhaust is constructed by Underwriters Laboratories Specification Created 4/10 240449 EXHAUST CONNECTION: The hood exhaust has been designed to the outside. Filter Kit Accessory Grille Filter Kit JX81D-Recirculating Charcoal Filter Kit To be used when the Advantium oven cannot be vented to mate with the space between studs, or wall should be used . MAXIMUM DUCT LENGTH: For satisfactory air movement...
... plus the length of some typical ducts. REAR EXHAUST: If a rear or horizontal exhaust is constructed by Underwriters Laboratories Specification Created 4/10 240449 EXHAUST CONNECTION: The hood exhaust has been designed to the outside. Filter Kit Accessory Grille Filter Kit JX81D-Recirculating Charcoal Filter Kit To be used when the Advantium oven cannot be vented to mate with the space between studs, or wall should be used . MAXIMUM DUCT LENGTH: For satisfactory air movement...

Use and Care Manual
Page 1
... Start 30 Display ON/OFF 29 Help 31 Reminder 29 Surface Light 32 Temperature Units 30 Timer 31 Turntable On/Off 29 Vent Fan 32 Owner's Manual PSA2200 PSA2201 Care and Cleaning Cleaning the inside 32, 34 Cleaning the outside 34 Cooking trays and wire oven rack .33 Removable turntable 33 Replacing the cavity light 35 Replacing the surface light 35 Troubleshooting Problem Solver 37, 38 Consumer Support Consumer Support Back Cover Warranty 39 Write the model and serial numbers here: Model Serial Find these numbers on a label inside...
... Start 30 Display ON/OFF 29 Help 31 Reminder 29 Surface Light 32 Temperature Units 30 Timer 31 Turntable On/Off 29 Vent Fan 32 Owner's Manual PSA2200 PSA2201 Care and Cleaning Cleaning the inside 32, 34 Cleaning the outside 34 Cooking trays and wire oven rack .33 Removable turntable 33 Replacing the cavity light 35 Replacing the surface light 35 Troubleshooting Problem Solver 37, 38 Consumer Support Consumer Support Back Cover Warranty 39 Write the model and serial numbers here: Model Serial Find these numbers on a label inside...
Use and Care Manual
Page 2
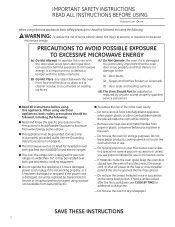
n This appliance must be replaced by anyone except properly qualified service personnel. See the Grounding Instructions section on sealing surfaces. (c) Do Not Operate the oven if it must be grounded. If the power cord is undercooked after the first countdown, use COOK BY TIME for additional cooking time. - Do not overcook food. Remove wire twist-ties and metal handles from General Electric. Do not use in succession on the same...
n This appliance must be replaced by anyone except properly qualified service personnel. See the Grounding Instructions section on sealing surfaces. (c) Do Not Operate the oven if it must be grounded. If the power cord is undercooked after the first countdown, use COOK BY TIME for additional cooking time. - Do not overcook food. Remove wire twist-ties and metal handles from General Electric. Do not use in succession on the same...

Use and Care Manual
Page 3
... in modes other part of the oven with metal foil. n This oven is specifically designed to heat, dry or cook food, and is UL listed for example, in similar locations. This will cause overheating of electric shock. n Oversized foods or oversized metal utensils should not be used for example, closed , turn the oven off and shut off power at the fuse or circuit breaker panel. SAVE THESE INSTRUCTIONS 3 n Do not mount...
... in modes other part of the oven with metal foil. n This oven is specifically designed to heat, dry or cook food, and is UL listed for example, in similar locations. This will cause overheating of electric shock. n Oversized foods or oversized metal utensils should not be used for example, closed , turn the oven off and shut off power at the fuse or circuit breaker panel. SAVE THESE INSTRUCTIONS 3 n Do not mount...

Use and Care Manual
Page 4
... electric shock. n Do not immerse power cord or plug in place. n Do not operate the oven without the turntable in water. Rinse well. n Keep the oven free from heated surfaces. ARCING Do not store rack in the oven. Arcing is caused by microwave. n Metal, such as recommended in operation. The turntable must be used for Convection Bake, Warm and Proof. n Potentially hot surfaces include the oven door, floor, walls, oven rack and turntable. Cooking...
... electric shock. n Do not immerse power cord or plug in place. n Do not operate the oven without the turntable in water. Rinse well. n Keep the oven free from heated surfaces. ARCING Do not store rack in the oven. Arcing is caused by microwave. n Metal, such as recommended in operation. The turntable must be used for Convection Bake, Warm and Proof. n Potentially hot surfaces include the oven door, floor, walls, oven rack and turntable. Cooking...
Use and Care Manual
Page 8
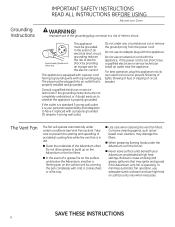
... properly grounded. SAVE THESE INSTRUCTIONS 8 Improper use high heat on the surface unit by providing an escape wire for the electric current. The plug must be plugged into its own electrical circuit to whether the appliance is properly installed and grounded. The Vent Fan The fan will operate automatically under any circumstances cut or remove the ground prong from the power cord. This appliance must be...
... properly grounded. SAVE THESE INSTRUCTIONS 8 Improper use high heat on the surface unit by providing an escape wire for the electric current. The plug must be plugged into its own electrical circuit to whether the appliance is properly installed and grounded. The Vent Fan The fan will operate automatically under any circumstances cut or remove the ground prong from the power cord. This appliance must be...

Use and Care Manual
Page 13
... food directly on , light may be set menu foods, you can change time or power levels by other small appliances. Cooling Fans n The fans will be very hot! See Automatic fan section. It does not indicate a problem with the microwave. See the Clock section. The oven automatically senses the electrical voltage level in place. The screen will be very hot. Lights n When the oven is in your own glass or ceramic cookware, if needed...
... food directly on , light may be set menu foods, you can change time or power levels by other small appliances. Cooling Fans n The fans will be very hot! See Automatic fan section. It does not indicate a problem with the microwave. See the Clock section. The oven automatically senses the electrical voltage level in place. The screen will be very hot. Lights n When the oven is in your own glass or ceramic cookware, if needed...
Use and Care Manual
Page 23
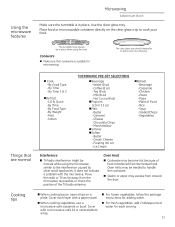
... hot because of Food -Rice -Soup -Steaks/Chops -Vegetables Interference n TV/radio interference might be in place. Place food or microwavable container directly on a plate. Use the clear glass tray. n When cooking vegetables, use a microwave-safe casserole or bowl. Cooking tips n When cooking bacon, layer strips on the clear glass tray to handle the cookware. Cover with a microwave-safe lid or vented plastic wrap. Using the microwave features Microwaving Advantium Oven Make sure the turntable...
... hot because of Food -Rice -Soup -Steaks/Chops -Vegetables Interference n TV/radio interference might be in place. Place food or microwavable container directly on a plate. Use the clear glass tray. n When cooking vegetables, use a microwave-safe casserole or bowl. Cooking tips n When cooking bacon, layer strips on the clear glass tray to handle the cookware. Cover with a microwave-safe lid or vented plastic wrap. Using the microwave features Microwaving Advantium Oven Make sure the turntable...

Use and Care Manual
Page 25
... the MICROWAVE pad. 2. Power level is automatically set at high power levels, food will need more than usual and may have some cooking. 25 Meats should be cool but can change the power levels, see Microwave power levels for more pounds of microwave cooking time. If the food is in a foil container, transfer it for instructions. Turn the dial to about half; Turn the food over when the oven signals TURN FOOD OVER. Power level 7 cuts the total defrosting time in...
... the MICROWAVE pad. 2. Power level is automatically set at high power levels, food will need more than usual and may have some cooking. 25 Meats should be cool but can change the power levels, see Microwave power levels for more pounds of microwave cooking time. If the food is in a foil container, transfer it for instructions. Turn the dial to about half; Turn the food over when the oven signals TURN FOOD OVER. Power level 7 cuts the total defrosting time in...

Use and Care Manual
Page 29
... Microwave Sensor modes. • A cooking cycle must be started within 5 minutes of the end of day. 1. Note: • The turntable will not turn the dial to select REMINDER and press the dial to enter. When setting the clock time for cooking cycles started within 5 minutes of turning the turntable off, or the turntable will reset to rotate in the cavity. Turn the dial to change the clock time, press the SETTINGS...
... Microwave Sensor modes. • A cooking cycle must be started within 5 minutes of the end of day. 1. Note: • The turntable will not turn the dial to select REMINDER and press the dial to enter. When setting the clock time for cooking cycles started within 5 minutes of turning the turntable off, or the turntable will reset to rotate in the cavity. Turn the dial to change the clock time, press the SETTINGS...

Use and Care Manual
Page 31
... the program you need a general purpose timer. Fan will shut off when the internal parts are cool. Turn the dial to keep the internal oven components and control from being accidentally started during cleaning or being used while cooking in the HELP function. Adding Time Cooking Options Auto Conversion Defrost Auto Night Light Defrost by Food Back Defrost by Time Beeper Volume Defrost by Weight Beverage Delay Start Broil Display ON/OFF Clear/Off Edit Clock Help Control Lockout...
... the program you need a general purpose timer. Fan will shut off when the internal parts are cool. Turn the dial to keep the internal oven components and control from being accidentally started during cleaning or being used while cooking in the HELP function. Adding Time Cooking Options Auto Conversion Defrost Auto Night Light Defrost by Food Back Defrost by Time Beeper Volume Defrost by Weight Beverage Delay Start Broil Display ON/OFF Clear/Off Edit Clock Help Control Lockout...

Use and Care Manual
Page 32
... inside the oven, causing electrical shock as well as you notice yellowing on any part of this oven. If the dirt and spatter do . Do not use a stainless steel cleaner that removes heat discoloration and/or tarnishing. Surface Light Vent Fan How to clean the inside of the oven with metal scouring pads. Press the VENT pad to change from bright to night to the touch before cleaning...
... inside the oven, causing electrical shock as well as you notice yellowing on any part of this oven. If the dirt and spatter do . Do not use a stainless steel cleaner that removes heat discoloration and/or tarnishing. Surface Light Vent Fan How to clean the inside of the oven with metal scouring pads. Press the VENT pad to change from bright to night to the touch before cleaning...

Use and Care Manual
Page 35
.... 5. Pull the light bulb out and replace with a 130 volt, 50-watt halogen bulb. Return the lamp and lamp shield to the oven 35 Be sure the bulb to the rear using the tabs. Rinse, shake and let dry before removing. Disconnect power at the main fuse or circuit breaker panel. 2. Order WB08X10051 from foods on the cooktop. Remove the screw holding the lamp shield in place. 3. Remove the screw from the receptacle...
.... 5. Pull the light bulb out and replace with a 130 volt, 50-watt halogen bulb. Return the lamp and lamp shield to the oven 35 Be sure the bulb to the rear using the tabs. Rinse, shake and let dry before removing. Disconnect power at the main fuse or circuit breaker panel. 2. Order WB08X10051 from foods on the cooktop. Remove the screw holding the lamp shield in place. 3. Remove the screw from the receptacle...
Use and Care Manual
Page 38
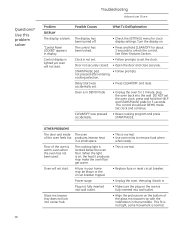
... cooktop light is not set. • Follow prompts to remove food when when ready. Power surge. • Unplug the oven, then plug it produces may be blown or the circuit breaker tripped. • Replace fuse or reset circuit breaker. Turn the display on the bottom of the oven feels hot. START/PAUSE pad • Follow prompts not pressed after entering cooking selection. OTHER PROBLEMS The door and inside The oven of the glass microwave tray...
... cooktop light is not set. • Follow prompts to remove food when when ready. Power surge. • Unplug the oven, then plug it produces may be blown or the circuit breaker tripped. • Replace fuse or reset circuit breaker. Turn the display on the bottom of the oven feels hot. START/PAUSE pad • Follow prompts not pressed after entering cooking selection. OTHER PROBLEMS The door and inside The oven of the glass microwave tray...
Use and Care Manual
Page 39
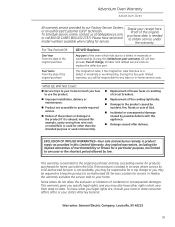
... your state's Attorney General. To schedule service, online, contact us at GEAppliances.com, or call 800.GE.CARES (800.432.2737). n Product not accessible to obtain service under the warranty. Proof of merchantability or fitness for service. Any implied warranties, including the implied warranties of the original purchase date is product repair as provided in -home service costs. n Replacement of the cooktop light bulbs. To know...
... your state's Attorney General. To schedule service, online, contact us at GEAppliances.com, or call 800.GE.CARES (800.432.2737). n Product not accessible to obtain service under the warranty. Proof of merchantability or fitness for service. Any implied warranties, including the implied warranties of the original purchase date is product repair as provided in -home service costs. n Replacement of the cooktop light bulbs. To know...

Installation Instructions
Page 2
..., 21 Mount the Oven 21, 22 Installing the Charcoal Filter 22 Before You Use Your Oven 23 Sección en Español 25-47 Step-by-step installation guide Placement of Mounting Plate 8-10 Removing the Mounting Plate 8 Finding the Wall Studs 8 Determining Wall Plate Location 9 Aligning the Wall Plate 10 Installation Types 11-22 A Outside Top Exhaust 12-14 Attach Mounting Plate to Wall 12 Preparation of Top Cabinet 13 Assemble and Install Adaptor 13 Mount the Oven 13...
..., 21 Mount the Oven 21, 22 Installing the Charcoal Filter 22 Before You Use Your Oven 23 Sección en Español 25-47 Step-by-step installation guide Placement of Mounting Plate 8-10 Removing the Mounting Plate 8 Finding the Wall Studs 8 Determining Wall Plate Location 9 Aligning the Wall Plate 10 Installation Types 11-22 A Outside Top Exhaust 12-14 Attach Mounting Plate to Wall 12 Preparation of Top Cabinet 13 Assemble and Install Adaptor 13 Mount the Oven 13...
Installation Instructions
Page 3
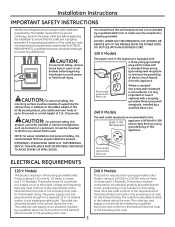
... be located in cabinet arrangements such as an island or a peninsula. IMPORTANT-PLEASE READ CAREFULLY. Product rating is 120/208 or 120/240 volts, 60 Hertz, 30 amps and 6.5 kilowatts. The outlet box should be installed in the cabinet above the oven. Installation Instructions IMPORTANT SAFETY INSTRUCTIONS See Electrical Requirements for this kilowatt rating. CAUTION: For personal safety, remove house fuse or open circuit breaker...
... be located in cabinet arrangements such as an island or a peninsula. IMPORTANT-PLEASE READ CAREFULLY. Product rating is 120/208 or 120/240 volts, 60 Hertz, 30 amps and 6.5 kilowatts. The outlet box should be installed in the cabinet above the oven. Installation Instructions IMPORTANT SAFETY INSTRUCTIONS See Electrical Requirements for this kilowatt rating. CAUTION: For personal safety, remove house fuse or open circuit breaker...
Installation Instructions
Page 7
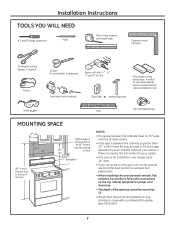
...; surface min. Your Owner's Manual contains the kit number for your oven to the outside, see Hood Exhaust Section for exhaust duct preparation. • When installing the oven beneath smooth, flat cabinets, be careful to follow the instructions on recessed bottom cabinet installations only) Safety goggles Level Duct and masking tape MOUNTING SPACE 13″ max. 16-1⁄4″ 30″ 2″ Bottom edge of cabinet needs to be used to fill in...
...; surface min. Your Owner's Manual contains the kit number for your oven to the outside, see Hood Exhaust Section for exhaust duct preparation. • When installing the oven beneath smooth, flat cabinets, be careful to follow the instructions on recessed bottom cabinet installations only) Safety goggles Level Duct and masking tape MOUNTING SPACE 13″ max. 16-1⁄4″ 30″ 2″ Bottom edge of cabinet needs to be used to fill in...

Installation Instructions
Page 8
...″ from inside the oven. Stud finder - Use a hammer to tap lightly across the mounting surface to find a solid sound. Remove and properly discard plastic bags and Styrofoam. 6 Open the oven door and remove the styrofoam pack from this mark. 3 Draw a line down the center of the oven. a magnetic device which locates nails. This will be used as the rear wall template and for mounting the oven to the...
...″ from inside the oven. Stud finder - Use a hammer to tap lightly across the mounting surface to find a solid sound. Remove and properly discard plastic bags and Styrofoam. 6 Open the oven door and remove the styrofoam pack from this mark. 3 Draw a line down the center of the oven. a magnetic device which locates nails. This will be used as the rear wall template and for mounting the oven to the...
Installation Instructions
Page 18
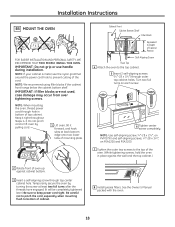
...-aligning screws, 1⁄4″-28 x 31⁄4″, on each screw. 6 Tighten center screw completely. NOTE: If your cabinet is metal, use handle during installation. Be careful not to pinch the cord, especially when mounting flush to Depth of top cabinet. See the Owner's Manual packed with the oven. 18 NOTE: When mounting the oven, thread power cord through hole in place against cabinet bottom. 3 Insert a self-aligning screw through...
...-aligning screws, 1⁄4″-28 x 31⁄4″, on each screw. 6 Tighten center screw completely. NOTE: If your cabinet is metal, use handle during installation. Be careful not to pinch the cord, especially when mounting flush to Depth of top cabinet. See the Owner's Manual packed with the oven. 18 NOTE: When mounting the oven, thread power cord through hole in place against cabinet bottom. 3 Insert a self-aligning screw through...


