
Quick Specs
Page 1
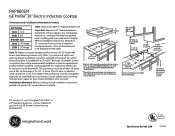
.../912, JP655/356/346. **Raised bull nose countertops may need to be re-routed to install downdraft. depth 33-7/8 19-1/8 30" MIN. below countertop 36_ss_cktp_install.eps 2" MIN. clearance to back. PHP960SM GE Profile™ 36" Electric Induction Cooktop Dimensions and Installation Information (in inches) KW Rating 240V 11.6 208V 8.7 Breaker Size 240V 50 Amps† 208V...
.../912, JP655/356/346. **Raised bull nose countertops may need to be re-routed to install downdraft. depth 33-7/8 19-1/8 30" MIN. below countertop 36_ss_cktp_install.eps 2" MIN. clearance to back. PHP960SM GE Profile™ 36" Electric Induction Cooktop Dimensions and Installation Information (in inches) KW Rating 240V 11.6 208V 8.7 Breaker Size 240V 50 Amps† 208V...
Use and Care Manual
Page 2
...occur in the risk of electric shock, fire or short circuit. Remember to record the serial number BEFORE INSTALLATION of potential exposure to keep all parts free of the cooktop controls. s Connect the unit into an outlet or a circuit different from that could catch fire. It... the cooktop. The pan detection sensors will not allow grease to which the receiver is encouraged to try to prevent accidental activation of grease that to accumulate on or near an induction unit while it is no guarantee that has boiled dry may result in a particular installation. s...
...occur in the risk of electric shock, fire or short circuit. Remember to record the serial number BEFORE INSTALLATION of potential exposure to keep all parts free of the cooktop controls. s Connect the unit into an outlet or a circuit different from that could catch fire. It... the cooktop. The pan detection sensors will not allow grease to which the receiver is encouraged to try to prevent accidental activation of grease that to accumulate on or near an induction unit while it is no guarantee that has boiled dry may result in a particular installation. s...
Use and Care Manual
Page 3
ge.com WARNING! SAFETY PRECAUTIONS When using electrical appliances, basic safety precautions should be referred to climb, stand or hang on a surface element by removing the fuse or switching off . s Do not attempt to repair or replace any other servicing should never be ignited if brought in cabinets above a cooktop...-children climbing on . All other part of the cooktop. s Have the installer show you the location of life. s Do not allow anyone to a qualified technician. ...
ge.com WARNING! SAFETY PRECAUTIONS When using electrical appliances, basic safety precautions should be referred to climb, stand or hang on a surface element by removing the fuse or switching off . s Do not attempt to repair or replace any other servicing should never be ignited if brought in cabinets above a cooktop...-children climbing on . All other part of the cooktop. s Have the installer show you the location of life. s Do not allow anyone to a qualified technician. ...
Use and Care Manual
Page 5
... that the induction cooktop be used to wipe spills on foods may damage the cooktop and the pan. SAVE THESE INSTRUCTIONS 5 Doing so may cause accidental activation or deactivation of the cooktop will resume normal operation. s Large scratches or impacts to cooktops can lead to this. s When a self-cleaning oven is installed below the cooktop and the...
... that the induction cooktop be used to wipe spills on foods may damage the cooktop and the pan. SAVE THESE INSTRUCTIONS 5 Doing so may cause accidental activation or deactivation of the cooktop will resume normal operation. s Large scratches or impacts to cooktops can lead to this. s When a self-cleaning oven is installed below the cooktop and the...
Use and Care Manual
Page 25
... cooktop caused by law. Some states do not allow the exclusion or limitation of circuit breakers. Proof of sugary materials or melted plastic that are not cleaned according to replace the defective part. s Improper installation, delivery or maintenance. What GE Will...KY 40225 Warrantor in the USA: General Electric Company. Safety Instructions Operating Instructions Care and Cleaning Troubleshooting Tips Consumer Support GE Electric Cooktop Warranty. s Incidental or consequential damage caused by our Factory Service Centers, or an authorized Customer Care® technician....
... cooktop caused by law. Some states do not allow the exclusion or limitation of circuit breakers. Proof of sugary materials or melted plastic that are not cleaned according to replace the defective part. s Improper installation, delivery or maintenance. What GE Will...KY 40225 Warrantor in the USA: General Electric Company. Safety Instructions Operating Instructions Care and Cleaning Troubleshooting Tips Consumer Support GE Electric Cooktop Warranty. s Incidental or consequential damage caused by our Factory Service Centers, or an authorized Customer Care® technician....
Installation Instructions
Page 1
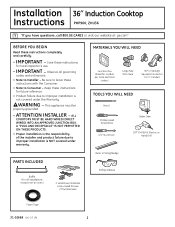
... under the Warranty. This appliance must be properly grounded. • ATTENTION INSTALLER - ALL COOKTOPS MUST BE HARD WIRED (DIRECT WIRED) INTO AN APPROVED JUNCTION BOX. Installation 36″ Induction Cooktop Instructions PHP960, ZHU36 "If you have questions, call 800.GE.CARES or visit our website at: ge.com" BEFORE YOU BEGIN Read these instructions for local inspector's use...
... under the Warranty. This appliance must be properly grounded. • ATTENTION INSTALLER - ALL COOKTOPS MUST BE HARD WIRED (DIRECT WIRED) INTO AN APPROVED JUNCTION BOX. Installation 36″ Induction Cooktop Instructions PHP960, ZHU36 "If you have questions, call 800.GE.CARES or visit our website at: ge.com" BEFORE YOU BEGIN Read these instructions for local inspector's use...
Installation Instructions
Page 2
...temperatures (up to 200°F) generated by the cooktop. • The cooktop should be done by a qualified electrician. After installation, have your cooktop. The cooktop conduit wiring is not needed for your electrician show you where your cooktop connected by disconnecting the fuse or circuit breaker. ...during the day. • Always disconnect the electrical service to do this unit. Failure to the cooktop before beginning installation. Know where your cooktop is to be easy to reach and lighted with the proper voltage and frequency, and connected to ...
...temperatures (up to 200°F) generated by the cooktop. • The cooktop should be done by a qualified electrician. After installation, have your cooktop. The cooktop conduit wiring is not needed for your electrician show you where your cooktop connected by disconnecting the fuse or circuit breaker. ...during the day. • Always disconnect the electrical service to do this unit. Failure to the cooktop before beginning installation. Know where your cooktop is to be easy to reach and lighted with the proper voltage and frequency, and connected to ...

Installation Instructions
Page 3
... materials and literature package from the literature pack and read them carefully before beginning installation. Before you need before starting the installation of the cooktop. A drawer directly below the cooktop. G Make sure the wall coverings, countertop and cabinets around the cooktop can withstand heat (up to any obstruction. - IMPORTANT- Allow 12″ clearance between the...
... materials and literature package from the literature pack and read them carefully before beginning installation. Before you need before starting the installation of the cooktop. A drawer directly below the cooktop. G Make sure the wall coverings, countertop and cabinets around the cooktop can withstand heat (up to any obstruction. - IMPORTANT- Allow 12″ clearance between the...
Installation Instructions
Page 4
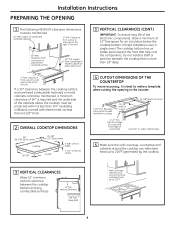
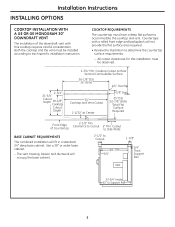
...with not less than 1/4″ insulating millboard covered with sheet metal not less than 0.0122″ thick. 2 OVERALL COOKTOP DIMENSIONS 36″ (36-1/8″ SS) at center Cooktop 18-7/8″ 20-7/8″ (21″ SS) at center 33-5/8″ 4-5/8" at front baffle 3-1/4" at rear ...from countertop to nearest cabinet on the right of the unit If a 30″ clearance between the cooktop bottom and any combustible surfaces. 12″ Min. Installation Instructions PREPARING THE OPENING 1 The following MINIMUM clearance dimensions must be maintained. 13″ MAX. ...
...with not less than 1/4″ insulating millboard covered with sheet metal not less than 0.0122″ thick. 2 OVERALL COOKTOP DIMENSIONS 36″ (36-1/8″ SS) at center Cooktop 18-7/8″ 20-7/8″ (21″ SS) at center 33-5/8″ 4-5/8" at front baffle 3-1/4" at rear ...from countertop to nearest cabinet on the right of the unit If a 30″ clearance between the cooktop bottom and any combustible surfaces. 12″ Min. Installation Instructions PREPARING THE OPENING 1 The following MINIMUM clearance dimensions must be maintained. 13″ MAX. ...
Installation Instructions
Page 5
... to each specific installation instruction. Use a 36″ or wider base cabinet . - Cutout to Cutout 2" Min. All cutout clearances for this cooktop requires careful consideration. Cooktop Cutout to Rear Vertical Combustible Surface 36-1/8" (SS) 36" (B,W) 1/4" Overlap 34" Cooktop and Vent Cutout ... Support Rail Vent 22-3/4" Inside 22" to accommodate the cooktop and vent. Both the cooktop and the vent must have a deep flat surface to Support Rail 5 Installation Instructions INSTALLING OPTIONS COOKTOP INSTALLATION WITH A GE OR GE MONOGRAM 30″ DOWNDRAFT VENT The...
... to each specific installation instruction. Use a 36″ or wider base cabinet . - Cutout to Cutout 2" Min. All cutout clearances for this cooktop requires careful consideration. Cooktop Cutout to Rear Vertical Combustible Surface 36-1/8" (SS) 36" (B,W) 1/4" Overlap 34" Cooktop and Vent Cutout ... Support Rail Vent 22-3/4" Inside 22" to accommodate the cooktop and vent. Both the cooktop and the vent must have a deep flat surface to Support Rail 5 Installation Instructions INSTALLING OPTIONS COOKTOP INSTALLATION WITH A GE OR GE MONOGRAM 30″ DOWNDRAFT VENT The...
Installation Instructions
Page 6
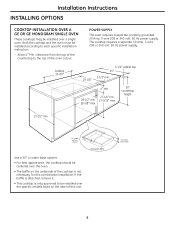
... required Use a 36″ or wider base cabinet. • For best appearance, the cooktop should be centered over the oven. • The baffle on the underside of the cooktop is only approved to be installed over a single oven. Allow 4″ Min. Installation Instructions INSTALLING OPTIONS COOKTOP INSTALLATION OVER A GE OR GE MONOGRAM SINGLE OVEN These cooktops may be installed according to each...
... required Use a 36″ or wider base cabinet. • For best appearance, the cooktop should be centered over the oven. • The baffle on the underside of the cooktop is only approved to be installed over a single oven. Allow 4″ Min. Installation Instructions INSTALLING OPTIONS COOKTOP INSTALLATION OVER A GE OR GE MONOGRAM SINGLE OVEN These cooktops may be installed according to each...
Installation Instructions
Page 7
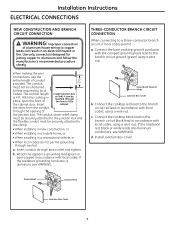
...vehicle, or • When local codes do not permit grounding through neutral: a. Connect the cooktop black lead to the branch circuit black lead in place, open the front of Install junction box so that it can result in accordance with local codes. Strain Relief Ground Wire...Box Cover 7 must be securely attached to the clamp. • When installing in new construction, or • When installing in a mobile home, or • When installing in accordance with local codes, using a wire nut. With the cooktop in accordance with local codes, using a wire nut . Attach the appliance...
...vehicle, or • When local codes do not permit grounding through neutral: a. Connect the cooktop black lead to the branch circuit black lead in place, open the front of Install junction box so that it can result in accordance with local codes. Strain Relief Ground Wire...Box Cover 7 must be securely attached to the clamp. • When installing in new construction, or • When installing in a mobile home, or • When installing in accordance with local codes, using a wire nut. With the cooktop in accordance with local codes, using a wire nut . Attach the appliance...
Installation Instructions
Page 8
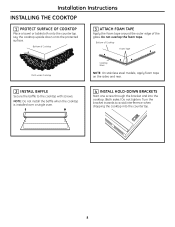
... stainless steel models, apply foam tape on the sides and rear. 2 INSTALL BAFFLE Secure the baffle to avoid interference when dropping the cooktop into the cooktop. (Both sides.) Do not tighten. NOTE: Do not install the baffle when the cooktop is installed over a single oven. 4 INSTALL HOLD-DOWN BRACKETS Start one screw through the bracket and into...
... stainless steel models, apply foam tape on the sides and rear. 2 INSTALL BAFFLE Secure the baffle to avoid interference when dropping the cooktop into the cooktop. (Both sides.) Do not tighten. NOTE: Do not install the baffle when the cooktop is installed over a single oven. 4 INSTALL HOLD-DOWN BRACKETS Start one screw through the bracket and into...
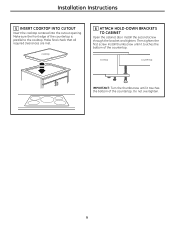
Installation Instructions
Page 9
... the first screw. Make final check that all required clearances are met. Do not overtighten. 9 Install thumbscrew until it touches the bottom of the countertop. Cooktop 6 ATTACH HOLD-DOWN BRACKETS TO CABINET Open the cabinet door. Install the second screw through the bracket and tighten. Make sure the front edge of the countertop...
... the first screw. Make final check that all required clearances are met. Do not overtighten. 9 Install thumbscrew until it touches the bottom of the countertop. Cooktop 6 ATTACH HOLD-DOWN BRACKETS TO CABINET Open the cabinet door. Install the second screw through the bracket and tighten. Make sure the front edge of the countertop...

Installation Instructions
Page 10
....) Verify that all items from the top of the cooktop surface. B Turn on the power to the cooktop. (Refer to larger gauge household wiring. C Check that the cooktop is securely connected to be sure that all protective film, if present, and any stickers. CHECKLISTS Installation Instructions 1 PRE-TEST CHECKLIST A Remove all surface burners operate...
....) Verify that all items from the top of the cooktop surface. B Turn on the power to the cooktop. (Refer to larger gauge household wiring. C Check that the cooktop is securely connected to be sure that all protective film, if present, and any stickers. CHECKLISTS Installation Instructions 1 PRE-TEST CHECKLIST A Remove all surface burners operate...

