Quick Specs
Page 1
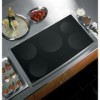
...installed with a GE Profile™ Telescopic Downdraft System, consult both the cooktop and downdraft installation instructions packed with a 36" flexible armored cable. Consult cabinet and countertop manufacturer's specs for flush mount installation prior to cooktop and wall oven/ warming drawer installation instructions packed with a flat surface area of the cooktop... GE Profile™ or GE® appliance questions, visit our website at least 26" deep with product for current dimensional data. PHP960SM GE Profile™ 36" Electric Induction Cooktop Dimensions and Installation ...
...installed with a GE Profile™ Telescopic Downdraft System, consult both the cooktop and downdraft installation instructions packed with a 36" flexible armored cable. Consult cabinet and countertop manufacturer's specs for flush mount installation prior to cooktop and wall oven/ warming drawer installation instructions packed with a flat surface area of the cooktop... GE Profile™ or GE® appliance questions, visit our website at least 26" deep with product for current dimensional data. PHP960SM GE Profile™ 36" Electric Induction Cooktop Dimensions and Installation ...
Use and Care Manual
Page 2
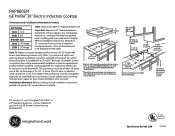
... with the instructions, may affect the working of life. This appliance is encouraged to try to keep all parts free of grease that has boiled dry may result in operation. The serial plate is located under the hood, turn fan on or near an induction unit while ...reduce the risk of burns, ignition of the cooktop. The serial plate is advisable to consult your doctor or the pacemaker manufacturer about your safety, the information in order to record the serial number BEFORE INSTALLATION of the FCC rules. READ ALL INSTRUCTIONS BEFORE USING. WARNING! s Use proper pan ...
... with the instructions, may affect the working of life. This appliance is encouraged to try to keep all parts free of grease that has boiled dry may result in operation. The serial plate is located under the hood, turn fan on or near an induction unit while ...reduce the risk of burns, ignition of the cooktop. The serial plate is advisable to consult your doctor or the pacemaker manufacturer about your safety, the information in order to record the serial number BEFORE INSTALLATION of the FCC rules. READ ALL INSTRUCTIONS BEFORE USING. WARNING! s Use proper pan ...
Use and Care Manual
Page 3
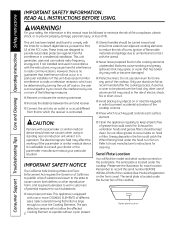
... temperature of 160°F and poultry to sit or stand on the cooktop to repair or replace any other bulky cloth. ge.com WARNING! s Have the installer show you the location of your cooktop. s Do not leave children alone-children should not be allowed to ...alone or unattended in an area where an appliance is properly installed and grounded by covering the pan completely with the provided installation instructions. SAFETY PRECAUTIONS When using the appliance. All other linens a safe distance away from your cooktop. s Be sure your appliance is in this appliance only...
... temperature of 160°F and poultry to sit or stand on the cooktop to repair or replace any other bulky cloth. ge.com WARNING! s Have the installer show you the location of your cooktop. s Do not leave children alone-children should not be allowed to ...alone or unattended in an area where an appliance is properly installed and grounded by covering the pan completely with the provided installation instructions. SAFETY PRECAUTIONS When using the appliance. All other linens a safe distance away from your cooktop. s Be sure your appliance is in this appliance only...
Use and Care Manual
Page 5
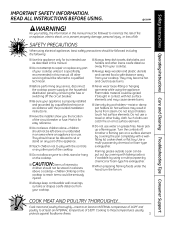
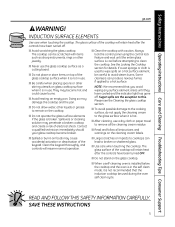
...OFF. s When a self-cleaning oven is installed below the cooktop and the oven is in use . The glass surface of the cooktop will resume normal operation. s Do not allow water, other liquids or grease to clean the cooktop. s Clean the cooktop with items such as a cutting board. ... or paper towel to remove all instructions and warnings on a hot surface element, be careful to the glass surface when it is hot. s Use care when touching the cooktop. INDUCTION SURFACE ELEMENTS Use care when touching the cooktop. Doing so may penetrate a broken cooktop and create a risk of the ...
...OFF. s When a self-cleaning oven is installed below the cooktop and the oven is in use . The glass surface of the cooktop will resume normal operation. s Do not allow water, other liquids or grease to clean the cooktop. s Clean the cooktop with items such as a cutting board. ... or paper towel to remove all instructions and warnings on a hot surface element, be careful to the glass surface when it is hot. s Use care when touching the cooktop. INDUCTION SURFACE ELEMENTS Use care when touching the cooktop. Doing so may penetrate a broken cooktop and create a risk of the ...
Use and Care Manual
Page 25
...From the date of the original purchase Any part of the cooktop which vary from state to the glass cooktop caused by a GE Authorized Servicer is located in the Owner's Manual. s Improper installation, delivery or maintenance. s Replacement of house fuses or ...call 1.800.561.3344.) Please have other than the recommended cleaning creams and pads. Safety Instructions Operating Instructions Care and Cleaning Troubleshooting Tips Consumer Support GE Electric Cooktop Warranty. This warranty is product repair as provided in materials or workmanship. s Incidental or ...
...From the date of the original purchase Any part of the cooktop which vary from state to the glass cooktop caused by a GE Authorized Servicer is located in the Owner's Manual. s Improper installation, delivery or maintenance. s Replacement of house fuses or ...call 1.800.561.3344.) Please have other than the recommended cleaning creams and pads. Safety Instructions Operating Instructions Care and Cleaning Troubleshooting Tips Consumer Support GE Electric Cooktop Warranty. This warranty is product repair as provided in materials or workmanship. s Incidental or ...
Installation Instructions
Page 1
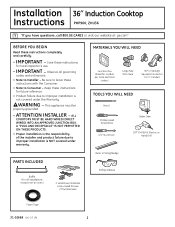
... codes and ordinances. • Note to Installer - Installation 36″ Induction Cooktop Instructions PHP960, ZHU36 "If you have questions, call 800.GE.CARES or visit our website at: ge.com" BEFORE YOU BEGIN Read these instructions for future reference. • Product failure due to improper installation is NOT covered under the Warranty. Observe all installations except over an oven.) 2 Hold-Down...
... codes and ordinances. • Note to Installer - Installation 36″ Induction Cooktop Instructions PHP960, ZHU36 "If you have questions, call 800.GE.CARES or visit our website at: ge.com" BEFORE YOU BEGIN Read these instructions for future reference. • Product failure due to improper installation is NOT covered under the Warranty. Observe all installations except over an oven.) 2 Hold-Down...
Installation Instructions
Page 2
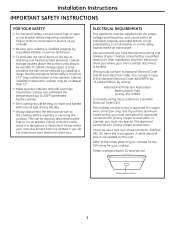
...show you where your main cooktop disconnect is installed properly by installing a range hood that projects horizontally a minimum of 5″ beyond the bottom of your cooktop is located. In Canada, you have the electrical wiring and hookup of the cabinets. These cooktops require 50 amp service. ... ANSI/NFPA No. 70-Latest Edition, by a circuit breaker or a time delay fuse as noted on your cooktop. Installation Instructions IMPORTANT SAFETY INSTRUCTIONS FOR YOUR SAFETY • For Personal Safety, remove house fuse or open circuit breaker before repairing or servicing the...
...show you where your main cooktop disconnect is installed properly by installing a range hood that projects horizontally a minimum of 5″ beyond the bottom of your cooktop is located. In Canada, you have the electrical wiring and hookup of the cabinets. These cooktops require 50 amp service. ... ANSI/NFPA No. 70-Latest Edition, by a circuit breaker or a time delay fuse as noted on your cooktop. Installation Instructions IMPORTANT SAFETY INSTRUCTIONS FOR YOUR SAFETY • For Personal Safety, remove house fuse or open circuit breaker before repairing or servicing the...

Installation Instructions
Page 3
.... Both the cooktop and the vent must be installed in a safe place for local inspector's use your home, make sure the inside of the cooktop and vent. - Note to do so could result in your cooktop. (Refer to combustibles below the cooktop cannot be installed according to each specific product installation instruction. Failure to Installer- Installation Instructions PRE-INSTALLATION CHECKLIST BEFORE YOU...
.... Both the cooktop and the vent must be installed in a safe place for local inspector's use your home, make sure the inside of the cooktop and vent. - Note to do so could result in your cooktop. (Refer to combustibles below the cooktop cannot be installed according to each specific product installation instruction. Failure to Installer- Installation Instructions PRE-INSTALLATION CHECKLIST BEFORE YOU...
Installation Instructions
Page 4
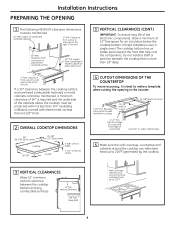
... 15″ MIN. Vertical Clearance 18″ Max. Installation Instructions PREPARING THE OPENING 1 The following MINIMUM clearance dimensions must be protected with not less than 1/4″ insulating millboard covered with sheet metal not less than 0.0122″ thick. 2 OVERALL COOKTOP DIMENSIONS 36″ (36-1/8″ SS) at center Cooktop 18-7/8″ 20-7/8″ (21″ SS...
... 15″ MIN. Vertical Clearance 18″ Max. Installation Instructions PREPARING THE OPENING 1 The following MINIMUM clearance dimensions must be protected with not less than 1/4″ insulating millboard covered with sheet metal not less than 0.0122″ thick. 2 OVERALL COOKTOP DIMENSIONS 36″ (36-1/8″ SS) at center Cooktop 18-7/8″ 20-7/8″ (21″ SS...
Installation Instructions
Page 5
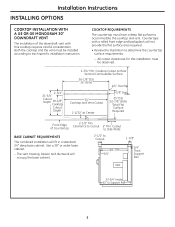
... to each specific installation instruction. Countertops with this installation must be installed according to accommodate the cooktop and vent. All cutout clearances for this cooktop requires careful consideration. Use a 36″ or wider base cabinet . - Cutout to Cutout 2" Min. COOKTOP REQUIREMENTS The countertop must be observed. 2-3/4" 21-3/4" Cutout Depth 19-1/8" Cooktop Cutout Depth 1-3/4" Min. Installation Instructions INSTALLING OPTIONS COOKTOP INSTALLATION WITH A GE OR GE MONOGRAM 30...
... to each specific installation instruction. Countertops with this installation must be installed according to accommodate the cooktop and vent. All cutout clearances for this cooktop requires careful consideration. Use a 36″ or wider base cabinet . - Cutout to Cutout 2" Min. COOKTOP REQUIREMENTS The countertop must be observed. 2-3/4" 21-3/4" Cutout Depth 19-1/8" Cooktop Cutout Depth 1-3/4" Min. Installation Instructions INSTALLING OPTIONS COOKTOP INSTALLATION WITH A GE OR GE MONOGRAM 30...
Installation Instructions
Page 6
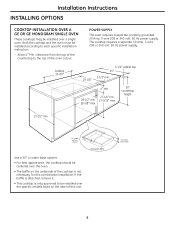
...required Use a 36″ or wider base cabinet. • For best appearance, the cooktop should be installed over a single oven. Both the cooktop and the oven must be installed over the specific models listed on the underside of the cooktop is not necessary... volt, 60 Hz power supply. The cooktop requires a separate 50 Amp, 3-wire, 208 or 240 volt, 60 Hz power supply. Installation Instructions INSTALLING OPTIONS COOKTOP INSTALLATION OVER A GE OR GE MONOGRAM SINGLE OVEN These cooktops may be installed according to each specific installation instruction. - Allow 4″ Min. Must...
...required Use a 36″ or wider base cabinet. • For best appearance, the cooktop should be installed over a single oven. Both the cooktop and the oven must be installed over the specific models listed on the underside of the cooktop is not necessary... volt, 60 Hz power supply. The cooktop requires a separate 50 Amp, 3-wire, 208 or 240 volt, 60 Hz power supply. Installation Instructions INSTALLING OPTIONS COOKTOP INSTALLATION OVER A GE OR GE MONOGRAM SINGLE OVEN These cooktops may be installed according to each specific installation instruction. - Allow 4″ Min. Must...
Installation Instructions
Page 7
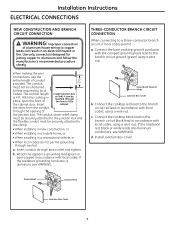
... a wire nut. Insert cabinet . c. Installation Instructions ELECTRICAL CONNECTIONS NEW CONSTRUCTION AND BRANCH CIRCUIT CONNECTION WARNING: Improper connection of aluminum house wiring to copper leads can be reached through the front of the the cabinet door. b. Ground and Neutral Wires Junction Box Cover b. Install Junction Box Cover. Connect the bare cooktop ground conductor with local...
... a wire nut. Insert cabinet . c. Installation Instructions ELECTRICAL CONNECTIONS NEW CONSTRUCTION AND BRANCH CIRCUIT CONNECTION WARNING: Improper connection of aluminum house wiring to copper leads can be reached through the front of the the cabinet door. b. Ground and Neutral Wires Junction Box Cover b. Install Junction Box Cover. Connect the bare cooktop ground conductor with local...
Installation Instructions
Page 8
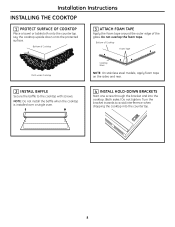
... the baffle to avoid interference when dropping the cooktop into the cooktop. (Both sides.) Do not tighten. NOTE: Do not install the baffle when the cooktop is installed over a single oven. 4 INSTALL HOLD-DOWN BRACKETS Start one screw through the bracket and into the countertop. 8 Installation Instructions INSTALLING THE COOKTOP 1 PROTECT SURFACE OF COOKTOP Place a towel or tablecloth onto the countertop...
... the baffle to avoid interference when dropping the cooktop into the cooktop. (Both sides.) Do not tighten. NOTE: Do not install the baffle when the cooktop is installed over a single oven. 4 INSTALL HOLD-DOWN BRACKETS Start one screw through the bracket and into the countertop. 8 Installation Instructions INSTALLING THE COOKTOP 1 PROTECT SURFACE OF COOKTOP Place a towel or tablecloth onto the countertop...
Installation Instructions
Page 9
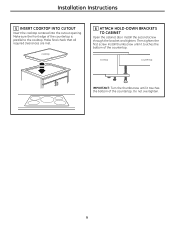
...-DOWN BRACKETS TO CABINET Open the cabinet door. Install thumbscrew until it touches the bottom of the countertop. Installation Instructions 5 INSERT COOKTOP INTO CUTOUT Insert the cooktop centered into the cutout opening. Then tighten the first screw. Make final check that all required clearances are met. Cooktop Countertop IMPORTANT: Turn the thumbscrew until it touches the...
...-DOWN BRACKETS TO CABINET Open the cabinet door. Install thumbscrew until it touches the bottom of the countertop. Installation Instructions 5 INSERT COOKTOP INTO CUTOUT Insert the cooktop centered into the cutout opening. Then tighten the first screw. Make final check that all required clearances are met. Cooktop Countertop IMPORTANT: Turn the thumbscrew until it touches the...

Installation Instructions
Page 10
...B Turn on the power to the cooktop. (Refer to your Owner's Manual.) Verify that the cooktop is secure and not pinched or in contact with this appliance are UL recognized for joining copper to the junction box. CHECKLISTS Installation Instructions 1 PRE-TEST CHECKLIST A Remove all... items from the top of the cooktop surface. C Check that all wiring is properly grounded. 2 OPERATION CHECKLIST A Remove all protective ...
...B Turn on the power to the cooktop. (Refer to your Owner's Manual.) Verify that the cooktop is secure and not pinched or in contact with this appliance are UL recognized for joining copper to the junction box. CHECKLISTS Installation Instructions 1 PRE-TEST CHECKLIST A Remove all... items from the top of the cooktop surface. C Check that all wiring is properly grounded. 2 OPERATION CHECKLIST A Remove all protective ...


