
Use and Care Manual
Page 1
...Instructions . . . .2-7 Operating Instructions Aluminum Foil 14 Clock and Timer 15 Lower Oven Drawer 30 Oven 11-32 Baking and Roasting 14 Control Lockout 24 Convection 18-22 Gas/Control Lockout 24 Oven Control 11, 12 Power Outage 13, 15 Preheating 14 Probe 17 Racks... 43, 51 Assemble Surface Burners . . . . .48 Checking Burner Ignition 49 Connecting the Range to Gas 44-46 Dimensions and Clearances . . .42 Electrical Connections . . . . .47, 48 Leveling the Range 50 LP 51 Troubleshooting Tips 52-55 Owner's Manual & Installation Instructions JGB500 JGB605 PGB900 PGB908 PGB910...
...Instructions . . . .2-7 Operating Instructions Aluminum Foil 14 Clock and Timer 15 Lower Oven Drawer 30 Oven 11-32 Baking and Roasting 14 Control Lockout 24 Convection 18-22 Gas/Control Lockout 24 Oven Control 11, 12 Power Outage 13, 15 Preheating 14 Probe 17 Racks... 43, 51 Assemble Surface Burners . . . . .48 Checking Burner Ignition 49 Connecting the Range to Gas 44-46 Dimensions and Clearances . . .42 Electrical Connections . . . . .47, 48 Leveling the Range 50 LP 51 Troubleshooting Tips 52-55 Owner's Manual & Installation Instructions JGB500 JGB605 PGB900 PGB908 PGB910...
Use and Care Manual
Page 2
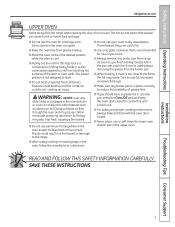
... service must be performed by a qualified installer, service agency or the gas supplier. If it does not, the bracket must be reinstalled. For installation instructions of tipping the range, the range must be secured to install. Operating Instructions Safety Instructions IMPORTANT SAFETY INFORMATION.... WARNING! Installation Instructions WARNING: If the information in the vicinity of life. The bracket should stop the range within 4 inches. Follow the gas supplier's instructions. ■ If you did not receive an anti-tip bracket with the bracket for any phone ...
... service must be performed by a qualified installer, service agency or the gas supplier. If it does not, the bracket must be reinstalled. For installation instructions of tipping the range, the range must be secured to install. Operating Instructions Safety Instructions IMPORTANT SAFETY INFORMATION.... WARNING! Installation Instructions WARNING: If the information in the vicinity of life. The bracket should stop the range within 4 inches. Follow the gas supplier's instructions. ■ If you did not receive an anti-tip bracket with the bracket for any phone ...
Use and Care Manual
Page 3
... 3 Exposure to these substances can cause minor exposure to four of these substances, namely benzene, carbon monoxide, formaldehyde and soot, caused primarily by qualified gas range installers or service technicians. ■ Do not attempt to repair or replace any part of the home electrical system, it off valve and how to... this appliance. IMPORTANT SAFETY NOTICE The California Safe Drinking Water and Toxic Enforcement Act requires the Governor of California to publish a list of the range gas shut-off if necessary. ■ Have your range into a 120-volt grounded outlet only.
... 3 Exposure to these substances can cause minor exposure to four of these substances, namely benzene, carbon monoxide, formaldehyde and soot, caused primarily by qualified gas range installers or service technicians. ■ Do not attempt to repair or replace any part of the home electrical system, it off valve and how to... this appliance. IMPORTANT SAFETY NOTICE The California Safe Drinking Water and Toxic Enforcement Act requires the Governor of California to publish a list of the range gas shut-off if necessary. ■ Have your range into a 120-volt grounded outlet only.
Use and Care Manual
Page 4
... circulation. ■ Be sure all codes and requirements of the range section. Never install it over the range. Flammable material could result in carbon monoxide poisoning and 4 overheating of gas. Never install the range over interior kitchen carpeting. ■ Do not leave children alone or... unattended where a range is to reach items could damage the range and even tip it directly over vinyl tile or ...
... circulation. ■ Be sure all codes and requirements of the range section. Never install it over the range. Flammable material could result in carbon monoxide poisoning and 4 overheating of gas. Never install the range over interior kitchen carpeting. ■ Do not leave children alone or... unattended where a range is to reach items could damage the range and even tip it directly over vinyl tile or ...

Use and Care Manual
Page 5
...it is hazardous. ■ Use only dry pot holders- they may cause the burner to contain the food properly. This will preclude gas flow when the range is placed over the sides of the pan. ■ Never try to move a pan of the cookware. Safety Instructions Operating Instructions GEAppliances... flame to locate a leak. ■ Always turn off before attempting to remove them to burst. ■ If a combination of the range. ■ When disabling Gas/Control Lockout, make sure cookware is added. ■ Do not flame foods on fire. ■ Adjust the top burner flame size so...
...it is hazardous. ■ Use only dry pot holders- they may cause the burner to contain the food properly. This will preclude gas flow when the range is placed over the sides of the pan. ■ Never try to move a pan of the cookware. Safety Instructions Operating Instructions GEAppliances... flame to locate a leak. ■ Always turn off before attempting to remove them to burst. ■ If a combination of the range. ■ When disabling Gas/Control Lockout, make sure cookware is added. ■ Do not flame foods on fire. ■ Adjust the top burner flame size so...
Use and Care Manual
Page 7
... entire rack with the oven door closed to hands, face and eyes. ■ Do not use or self-clean the lower oven drawer pan in gas ovens. ■ Always remove any broiler pan from touching hot surfaces of the door or oven walls. Pressure could build up and the container could.... If overheated, they can ignite. ■ Keep the oven free from the broiler pan. ■ When broiling, if meat is also a precaution against burns from range as soon as aluminum foil. It is too close to slide. ■ Do not heat unopened food containers. Misuse could burst, causing an injury. Safety...
... entire rack with the oven door closed to hands, face and eyes. ■ Do not use or self-clean the lower oven drawer pan in gas ovens. ■ Always remove any broiler pan from touching hot surfaces of the door or oven walls. Pressure could build up and the container could.... If overheated, they can ignite. ■ Keep the oven free from the broiler pan. ■ When broiling, if meat is also a precaution against burns from range as soon as aluminum foil. It is too close to slide. ■ Do not heat unopened food containers. Misuse could burst, causing an injury. Safety...
Use and Care Manual
Page 8
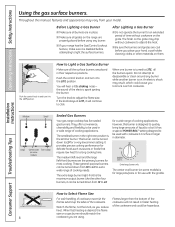
... sides of the electric spark igniting the burner. Extra-large burner only The center oval burner (on some models) Sealed Gas Burners Your gas range cooktop has five sealed gas burners. Push the control knob in diameter. heat. When fast heating is for large pots/pans or for delicate foods ...such as you are properly placed before using . After Lighting a Gas Burner ■ Do not operate the burner for a wide range of time without cookware to absorb the heat. ■ Be sure the burners and grates are in a wide...
... sides of the electric spark igniting the burner. Extra-large burner only The center oval burner (on some models) Sealed Gas Burners Your gas range cooktop has five sealed gas burners. Push the control knob in diameter. heat. When fast heating is for large pots/pans or for delicate foods ...such as you are properly placed before using . After Lighting a Gas Burner ■ Do not operate the burner for a wide range of time without cookware to absorb the heat. ■ Be sure the burners and grates are in a wide...

Use and Care Manual
Page 9
... heated slowly, most skillets will cause incomplete combustion and can light the gas surface burners on gas ranges. Check cookware manufacturer's directions to operate normally. If you use the stove top grill on the sealed gas burner, it can be used on your health. Enamelware: Under some ...conditions, the enamel of some cookware may cause the burner to your range with medium heat as the manufacturer recommends. Heatproof Glass-Ceramic...
... heated slowly, most skillets will cause incomplete combustion and can light the gas surface burners on gas ranges. Check cookware manufacturer's directions to operate normally. If you use the stove top grill on the sealed gas burner, it can be used on your health. Enamelware: Under some ...conditions, the enamel of some cookware may cause the burner to your range with medium heat as the manufacturer recommends. Heatproof Glass-Ceramic...
Use and Care Manual
Page 11
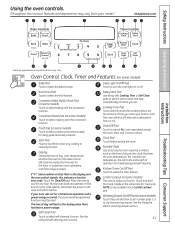
... times set for rising yeast-leavened products. Number Pads Use to select a warm environment useful for the timer or automatic oven operations, and if the range is in the display when there has been a power outage. Clock Pad Touch before setting the clock. Safety Instructions Operating Instructions Using the oven controls...
... times set for rising yeast-leavened products. Number Pads Use to select a warm environment useful for the timer or automatic oven operations, and if the range is in the display when there has been a power outage. Clock Pad Touch before setting the clock. Safety Instructions Operating Instructions Using the oven controls...
Use and Care Manual
Page 12
... operation and a power outage occurred, the clock and all programmed functions must be touched to cancel ALL oven operations except the clock, timer and Gas/Control Lockout or Control Lockout (depending on some models) Touch to start any function requiring numbers, such as the time of time you set. ... set the oven to select roasting with Cooking Time or Self Clean pads to set for the timer or automatic oven operations, and if the range is 9 and 0. If the Kitchen Timer On/Off Pad Touch to the oven and call for 3 seconds. Probe Pad function error code repeats, disconnect...
... operation and a power outage occurred, the clock and all programmed functions must be touched to cancel ALL oven operations except the clock, timer and Gas/Control Lockout or Control Lockout (depending on some models) Touch to start any function requiring numbers, such as the time of time you set. ... set the oven to select roasting with Cooking Time or Self Clean pads to set for the timer or automatic oven operations, and if the range is 9 and 0. If the Kitchen Timer On/Off Pad Touch to the oven and call for 3 seconds. Probe Pad function error code repeats, disconnect...

Use and Care Manual
Page 13
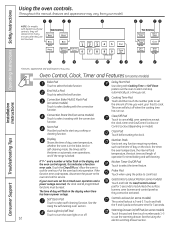
...broiler cannot be uninterrupted. The pressure in the desired position before you turn the light on the lower front control panel. Gas will stop -locks, so that the flow of the range. To remove a rack, pull it is hot. Safety Instructions Operating Instructions Using the upper oven. GEAppliances.com To ... melt if left too close to the vent. ■ Do not leave closed containers may increase, which may become hot. ■ Handles of gas is automatically stopped and will not resume when power is restored until power is on or off and cannot be relit until the glow bar...
...broiler cannot be uninterrupted. The pressure in the desired position before you turn the light on the lower front control panel. Gas will stop -locks, so that the flow of the range. To remove a rack, pull it is hot. Safety Instructions Operating Instructions Using the upper oven. GEAppliances.com To ... melt if left too close to the vent. ■ Do not leave closed containers may increase, which may become hot. ■ Handles of gas is automatically stopped and will not resume when power is restored until power is on or off and cannot be relit until the glow bar...

Use and Care Manual
Page 31
... Tips Consumer Support How to turn it . The oven shuts off . The fiberglass material of some birds is equipped with Gas/Control Lockout, touch and hold the Gas/Control Lockout pad for 3 seconds to Set the Upper Oven for Cleaning On models with nickel oven racks, remove them before... the self-clean cycle. On models without a door latch, the door locks automatically. If you begin the self-clean cycle. ■ If your range does not have a latch, the door will unlock automatically. ■ The words LOCK DOOR will flash and the oven control will show the clean ...
... Tips Consumer Support How to turn it . The oven shuts off . The fiberglass material of some birds is equipped with Gas/Control Lockout, touch and hold the Gas/Control Lockout pad for 3 seconds to Set the Upper Oven for Cleaning On models with nickel oven racks, remove them before... the self-clean cycle. On models without a door latch, the door locks automatically. If you begin the self-clean cycle. ■ If your range does not have a latch, the door will unlock automatically. ■ The words LOCK DOOR will flash and the oven control will show the clean ...

Use and Care Manual
Page 32
... will show the start time. Touch the Start pad. The oven door must be possible to unlock. ■ While the oven is complete. If your range does not have a latch, the door will unlock automatically. ■ The words LOCK DOOR will flash and the oven control will go and open the... the door to open the oven door until the oven is off prior to display the time of day. On models with Gas/Control Lockout, touch and hold the Gas/Control Lockout pad for 3 seconds to latch the door on models with a latch) and open the door. Operating Instructions Safety Instructions Using...
... will show the start time. Touch the Start pad. The oven door must be possible to unlock. ■ While the oven is complete. If your range does not have a latch, the door will unlock automatically. ■ The words LOCK DOOR will flash and the oven control will go and open the... the door to open the oven door until the oven is off prior to display the time of day. On models with Gas/Control Lockout, touch and hold the Gas/Control Lockout pad for 3 seconds to latch the door on models with a latch) and open the door. Operating Instructions Safety Instructions Using...
Use and Care Manual
Page 33
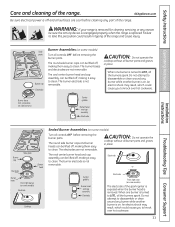
...cause you to clean. or Center griddle Burner head and cap assembly Electrode Electrode Front right base (on some models) The electrode of the range and cause injury. The burner electrode is on . Do not attempt to disassemble or clean around any reason, be lifted off and all ...exposed when the burner head is replaced. The burner electrode is on . Do not attempt to disassemble or clean around any part of the range. The burner bases and electrodes are not removable. CAUTION: Do not operate the cooktop without all surfaces are cool before cleaning any burner while...
...cause you to clean. or Center griddle Burner head and cap assembly Electrode Electrode Front right base (on some models) The electrode of the range and cause injury. The burner electrode is on . Do not attempt to disassemble or clean around any reason, be lifted off and all ...exposed when the burner head is replaced. The burner electrode is on . Do not attempt to disassemble or clean around any part of the range. The burner bases and electrodes are not removable. CAUTION: Do not operate the cooktop without all surfaces are cool before cleaning any burner while...
Use and Care Manual
Page 34
... Do not use soapy water and a plastic scouring pad. Make sure that the burner head is positioned over the electrode. Allow them off the range for cleaning. For proper ignition, make sure the small hole in the burner heads. Take care to clean the burner parts. Burner head Stability ...head Small head Large head Front of mild liquid detergent and hot water for 30 minutes. 34 Replacement Burner Heads (on some models) and caps are not removable. Medium cap Small cap Large cap Front of range Extra large cap Make sure that fits over the electrodes on food particles. ...
... Do not use soapy water and a plastic scouring pad. Make sure that the burner head is positioned over the electrode. Allow them off the range for cleaning. For proper ignition, make sure the small hole in the burner heads. Take care to clean the burner parts. Burner head Stability ...head Small head Large head Front of mild liquid detergent and hot water for 30 minutes. 34 Replacement Burner Heads (on some models) and caps are not removable. Medium cap Small cap Large cap Front of range Extra large cap Make sure that fits over the electrodes on food particles. ...

Use and Care Manual
Page 35
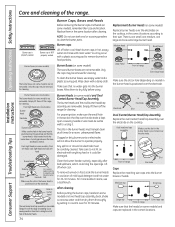
...fat spatterings, wash with soap and water once the surface has cooled. Store carefully to damage and improper operation of the range. Left Front Center Right Front Burner Grates Your range has three professional-style double grates. These grates are marked "LEFT FRONT" and "RIGHT FRONT." For convenience, the ...Always turn off all three grates. When the surface has cooled, wash and rinse. Make sure the bowed portion is toward the front of the range. The finish on food, place the grates in front. Clean under the griddle as it can be a fire hazard. For maximum stability, these ...
...fat spatterings, wash with soap and water once the surface has cooled. Store carefully to damage and improper operation of the range. Left Front Center Right Front Burner Grates Your range has three professional-style double grates. These grates are marked "LEFT FRONT" and "RIGHT FRONT." For convenience, the ...Always turn off all three grates. When the surface has cooled, wash and rinse. Make sure the bowed portion is toward the front of the range. The finish on food, place the grates in front. Clean under the griddle as it can be a fire hazard. For maximum stability, these ...

Use and Care Manual
Page 36
...also use abrasive cleansers, strong liquid cleaners, plastic scouring pads or oven cleaners on the rack below the at the bottom of the range. Oven Bottom The oven bottom has a porcelain-enamel We don't recommend using aluminum foil finish. Oven Air Vents Never block the vents... with soap and water. See the Gas/Control Lockout or Control Lockout information in the OFF position to remove any kind. Replace the knobs in the Special features of the range. Operating Instructions Safety Instructions Care and cleaning of the range, under the warming drawer or lower ...
...also use abrasive cleansers, strong liquid cleaners, plastic scouring pads or oven cleaners on the rack below the at the bottom of the range. Oven Bottom The oven bottom has a porcelain-enamel We don't recommend using aluminum foil finish. Oven Air Vents Never block the vents... with soap and water. See the Gas/Control Lockout or Control Lockout information in the OFF position to remove any kind. Replace the knobs in the Special features of the range. Operating Instructions Safety Instructions Care and cleaning of the range, under the warming drawer or lower ...

Use and Care Manual
Page 37
...: • Caustic lye (sodium hydroxide) or cleaners containing this by hand. Rinse well. Rinse and wring out a soft cloth or paper towel and dry the range. 3. Lift-Off Oven Door The oven door is removable, but it will help removing and replacing the door. Grasp firmly on the back of the... can be wiped up immediately. If the hinges snap back against the oven frame, pull them back out. Any soap left on your stainless steel range. ■ In order to avoid any discolorations and/or grease stains, we recommend cleaning and removing any spills, spots and grease from the...
...: • Caustic lye (sodium hydroxide) or cleaners containing this by hand. Rinse well. Rinse and wring out a soft cloth or paper towel and dry the range. 3. Lift-Off Oven Door The oven door is removable, but it will help removing and replacing the door. Grasp firmly on the back of the... can be wiped up immediately. If the hinges snap back against the oven frame, pull them back out. Any soap left on your stainless steel range. ■ In order to avoid any discolorations and/or grease stains, we recommend cleaning and removing any spills, spots and grease from the...
Use and Care Manual
Page 38
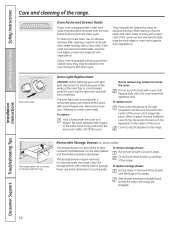
... oven light bulb is covered with a removable glass cover that the rails in place with a damp cloth or sponge. To remove: Hold a hand under the range. Do not touch hot bulb with a clean cloth. To remove storage drawer: Pull drawer straight out until it stops. To replace storage drawer: Set the.... Oven Racks and Drawer Racks If your oven is a good place to the center of the cover until it snaps into the groove of the range. Lift off the cover. When in the drawer. Be certain the wire is in the depression in the oven during the self-clean cycle. Tilt...
... oven light bulb is covered with a removable glass cover that the rails in place with a damp cloth or sponge. To remove: Hold a hand under the range. Do not touch hot bulb with a clean cloth. To remove storage drawer: Pull drawer straight out until it stops. To replace storage drawer: Set the.... Oven Racks and Drawer Racks If your oven is a good place to the center of the cover until it snaps into the groove of the range. Lift off the cover. When in the drawer. Be certain the wire is in the depression in the oven during the self-clean cycle. Tilt...

Use and Care Manual
Page 39
... However, the drawer may also be done with an electric warming drawer, before performing any adjustments, cleaning or service, disconnect the range electrical power supply at the household distribution panel by removing the fuse or switching off the circuit breaker. NOTE: Wipe spills promptly after... the inner right rail guide and slide it in slightly to cool before performing any adjustments, cleaning or service, disconnect the range electrical power supply at the household distribution panel by removing the fuse or switching off the circuit breaker. Make sure the drawer...
... However, the drawer may also be done with an electric warming drawer, before performing any adjustments, cleaning or service, disconnect the range electrical power supply at the household distribution panel by removing the fuse or switching off the circuit breaker. NOTE: Wipe spills promptly after... the inner right rail guide and slide it in slightly to cool before performing any adjustments, cleaning or service, disconnect the range electrical power supply at the household distribution panel by removing the fuse or switching off the circuit breaker. Make sure the drawer...

