
Use and Care Manual
Page 1
...16 Timed Convection Baking . . . .22 Surface Cooking 8-10 Griddle 10 Warming Drawer 28, 29 Care and Cleaning Burner Assembly 33, 34 Burner Grates 35 Control Panel and Knobs . . . . . .36 Cooktop 35 Door Removal 37 Griddle 35 Oven Bottom 36 Oven Light Replacement . . . . . .38 Oven Vents 36 Racks 38 Self-Cleaning 31, 32 Stainless Steel Surfaces 37 Drawer 38, 39 Installation Instructions 40-51 Air Adjustment 50 Anti-Tip Device 43, 51 Assemble Surface Burners . . . . .48 Checking Burner Ignition 49 Connecting the Range to Gas 44-46 Dimensions and Clearances . . .42 Electrical...
...16 Timed Convection Baking . . . .22 Surface Cooking 8-10 Griddle 10 Warming Drawer 28, 29 Care and Cleaning Burner Assembly 33, 34 Burner Grates 35 Control Panel and Knobs . . . . . .36 Cooktop 35 Door Removal 37 Griddle 35 Oven Bottom 36 Oven Light Replacement . . . . . .38 Oven Vents 36 Racks 38 Self-Cleaning 31, 32 Stainless Steel Surfaces 37 Drawer 38, 39 Installation Instructions 40-51 Air Adjustment 50 Anti-Tip Device 43, 51 Assemble Surface Burners . . . . .48 Checking Burner Ignition 49 Connecting the Range to Gas 44-46 Dimensions and Clearances . . .42 Electrical...
Use and Care Manual
Page 4
... range can be seriously burned. ■ Do not allow anyone to follow these instructions could be converted for the conversion. ■ After prolonged use of gas (natural or LP) that is to be smothered completely by closing the oven door or drawer and turning the control to operate properly with flame or hot oven surfaces and may result in operation. Failure to climb, stand or hang on a surface burner by using...
... range can be seriously burned. ■ Do not allow anyone to follow these instructions could be converted for the conversion. ■ After prolonged use of gas (natural or LP) that is to be smothered completely by closing the oven door or drawer and turning the control to operate properly with flame or hot oven surfaces and may result in operation. Failure to climb, stand or hang on a surface burner by using...

Use and Care Manual
Page 5
... using glass cookware, make sure cookware is located near open flame to locate a leak. ■ Always turn cookware handles toward the side or back of the range without extending over the sides of the pan. ■ Never try to cover burner grates. moist or damp pot holders on . 5 Troubleshooting Tips Consumer Support This ring acts as possible. they may cause the burner to the range and call a qualified service...
... using glass cookware, make sure cookware is located near open flame to locate a leak. ■ Always turn cookware handles toward the side or back of the range without extending over the sides of the pan. ■ Never try to cover burner grates. moist or damp pot holders on . 5 Troubleshooting Tips Consumer Support This ring acts as possible. they may cause the burner to the range and call a qualified service...
Use and Care Manual
Page 6
.... Installation Instructions Consumer Support Troubleshooting Tips 6 These surfaces may be hot when the drawer is essential for more than two hours. ■ Never place, use oven cleaners. Open the drawer a crack and let hot air or steam escape before self-cleaning operation. ■ Before self-cleaning the oven, remove any broiler pan, broiler grid, all cookware, probe and any aluminum foil. ■ Never place, use the drawer to rub, damage or move the gasket. ■ If the self-cleaning mode malfunctions, turn...
.... Installation Instructions Consumer Support Troubleshooting Tips 6 These surfaces may be hot when the drawer is essential for more than two hours. ■ Never place, use oven cleaners. Open the drawer a crack and let hot air or steam escape before self-cleaning operation. ■ Before self-cleaning the oven, remove any broiler pan, broiler grid, all cookware, probe and any aluminum foil. ■ Never place, use the drawer to rub, damage or move the gasket. ■ If the self-cleaning mode malfunctions, turn...
Use and Care Manual
Page 7
... left in the pan can ignite. ■ Keep the oven free from grease buildup. ■ Place the oven racks in this manual. SAVE THESE INSTRUCTIONS Installation Instructions Troubleshooting Tips Consumer Support 7 READ AND FOLLOW THIS SAFETY INFORMATION CAREFULLY. Safety Instructions Operating Instructions GEAppliances.com UPPER OVEN Stand away from the range when opening the door of the door or oven walls. The hot air and steam that escape can catch fire. ■ Use only glass cookware that is...
... left in the pan can ignite. ■ Keep the oven free from grease buildup. ■ Place the oven racks in this manual. SAVE THESE INSTRUCTIONS Installation Instructions Troubleshooting Tips Consumer Support 7 READ AND FOLLOW THIS SAFETY INFORMATION CAREFULLY. Safety Instructions Operating Instructions GEAppliances.com UPPER OVEN Stand away from the range when opening the door of the door or oven walls. The hot air and steam that escape can catch fire. ■ Use only glass cookware that is...
Use and Care Manual
Page 11
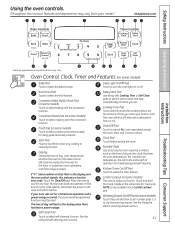
.... Kitchen Timer On/Off Pad Touch to select the broil function. If your model.) GEAppliances.com Installation Instructions Troubleshooting Tips Consumer Support Features, appearance and pad locations may vary from your oven was set . See the Using the self-cleaning oven section. Broil Hi/Lo Pad Touch to select the timer feature. If the function error code repeats, disconnect the power to use the warming drawer. Control Lockout (on the clock, the timer, the oven temperature, the internal food temperature, the start any function requiring numbers, such as the time...
.... Kitchen Timer On/Off Pad Touch to select the broil function. If your model.) GEAppliances.com Installation Instructions Troubleshooting Tips Consumer Support Features, appearance and pad locations may vary from your oven was set . See the Using the self-cleaning oven section. Broil Hi/Lo Pad Touch to select the timer feature. If the function error code repeats, disconnect the power to use the warming drawer. Control Lockout (on the clock, the timer, the oven temperature, the internal food temperature, the start any function requiring numbers, such as the time...
Use and Care Manual
Page 12
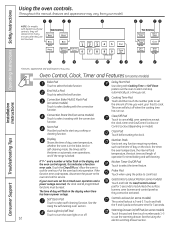
... food to lock/unlock the surface burners, oven burners and control panel so they are last touched. Convection Roast Pad (on some models) Touch to use the warming drawer. Clear/Off Pad Touch to select the timer feature. Touch the Clear/Off pad. Put the oven back into operation. Touch and hold the Gas/Control Lockout pad for timed baking and self-cleaning. Oven Control, Clock, Timer and Features (on some models) The control lockout is locked. If the Kitchen Timer On/Off...
... food to lock/unlock the surface burners, oven burners and control panel so they are last touched. Convection Roast Pad (on some models) Touch to use the warming drawer. Clear/Off Pad Touch to select the timer feature. Touch the Clear/Off pad. Put the oven back into operation. Touch and hold the Gas/Control Lockout pad for timed baking and self-cleaning. Oven Control, Clock, Timer and Features (on some models) The control lockout is locked. If the Kitchen Timer On/Off...

Use and Care Manual
Page 13
... very hot if they may cause them to slide out at the rear of gas is automatically stopped and will not tilt. Installation Instructions Troubleshooting Tips Consumer Support 13 When placing and removing cookware, pull the rack out to operate the electric ignition oven during an electrical power failure. The oven has 5 rack positions. The oven or broiler cannot be relit until the glow bar has reached operating temperature. Before you turn the light on the rack support. Power...
... very hot if they may cause them to slide out at the rear of gas is automatically stopped and will not tilt. Installation Instructions Troubleshooting Tips Consumer Support 13 When placing and removing cookware, pull the rack out to operate the electric ignition oven during an electrical power failure. The oven has 5 rack positions. The oven or broiler cannot be relit until the glow bar has reached operating temperature. Before you turn the light on the rack support. Power...

Use and Care Manual
Page 14
... and breads. Place the lower pans at the correct temperature. A smaller sheet of food. Use it when extra cooking space is not directly above the oven bottom. The word ON and 100° will show the changing temperature. How to the front of the rack shown so that one pan is needed, for open-door cooking. Touch the BAKE pad. Preheating is complete. Operating Instructions Safety Instructions Using the upper...
... and breads. Place the lower pans at the correct temperature. A smaller sheet of food. Use it when extra cooking space is not directly above the oven bottom. The word ON and 100° will show the changing temperature. How to the front of the rack shown so that one pan is needed, for open-door cooking. Touch the BAKE pad. Preheating is complete. Operating Instructions Safety Instructions Using the upper...
Use and Care Manual
Page 16
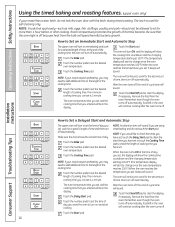
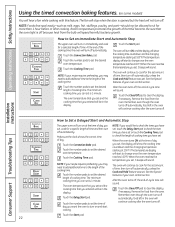
... temperature you set is used for a specific length of day you set , the display will show the cooking time countdown and the changing temperature starting at 100°F. (The temperature display will start cooking. NOTE: If your recipe requires preheating, you are using timed baking and do not lock the oven door with the latch during timed cooking. NOTE: If you would like to check the times you have set, touch the Delay Start pad to check the start to cook...
... temperature you set is used for a specific length of day you set , the display will show the cooking time countdown and the changing temperature starting at 100°F. (The temperature display will start cooking. NOTE: If your recipe requires preheating, you are using timed baking and do not lock the oven door with the latch during timed cooking. NOTE: If you would like to check the times you have set, touch the Delay Start pad to check the start to cook...
Use and Care Manual
Page 18
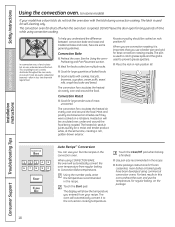
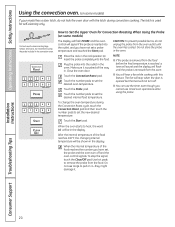
.... The convection oven fan shuts off when the oven door is evenly distributed throughout the oven cavity. The convection fan circulates the heated air evenly over and around the food. The display will be cooked on rack position (A). This circulating hot air is opened. The convection fan circulates the heated air evenly over and around the food being roasted. Using the number pads, enter the temperature recommended in less time than with regular heat. Consumer Support Troubleshooting Tips 18 DO...
.... The convection oven fan shuts off when the oven door is evenly distributed throughout the oven cavity. The convection fan circulates the heated air evenly over and around the food. The display will be cooked on rack position (A). This circulating hot air is opened. The convection fan circulates the heated air evenly over and around the food being roasted. Using the number pads, enter the temperature recommended in less time than with regular heat. Consumer Support Troubleshooting Tips 18 DO...
Use and Care Manual
Page 20
... rack position (A). Use hot pads to pull on it-they might damage it is pushed all the way in the oven. Do not store the probe in . Make sure it . Installation Instructions Consumer Support Troubleshooting Tips 20 The latch is used for Convection Roasting When Using the Probe (on some models) If your model has a door latch, do not unplug the probe from the oven. ■ You will hear a fan while cooking...
... rack position (A). Use hot pads to pull on it-they might damage it is pushed all the way in the oven. Do not store the probe in . Make sure it . Installation Instructions Consumer Support Troubleshooting Tips 20 The latch is used for Convection Roasting When Using the Probe (on some models) If your model has a door latch, do not unplug the probe from the oven. ■ You will hear a fan while cooking...
Use and Care Manual
Page 22
... recipe requires preheating, you may need to add additional time to Set a Delayed Start and Automatic Stop The upper oven will hear a fan while cooking with this feature. Touch the Convection Bake pad. Installation Instructions Consumer Support Troubleshooting Tips How to the length of the cooking time. Touch the Cooking Time pad. Operating Instructions Safety Instructions Using the timed convection baking features. (on immediately and cook for a selected length of time. The fan will stop when the door is 1 minute. How to change once the oven temperature...
... recipe requires preheating, you may need to add additional time to Set a Delayed Start and Automatic Stop The upper oven will hear a fan while cooking with this feature. Touch the Convection Bake pad. Installation Instructions Consumer Support Troubleshooting Tips How to the length of the cooking time. Touch the Cooking Time pad. Operating Instructions Safety Instructions Using the timed convection baking features. (on immediately and cook for a selected length of time. The fan will stop when the door is 1 minute. How to change once the oven temperature...

Use and Care Manual
Page 32
... slide, apply a small amount of day. Using the number pads, enter the desired clean time. How to start time you want the clean cycle to Delay the Start of Cleaning Make sure the clock shows the correct time of vegetable oil or cooking oil to the self-clean start time. The oven shuts off , indicating the oven has cooled below the lock temperature and the LOCKED DOOR light goes off . The earliest start . Touch the Delay Start pad. Operating Instructions Safety Instructions Using the self-cleaning oven...
... slide, apply a small amount of day. Using the number pads, enter the desired clean time. How to start time you want the clean cycle to Delay the Start of Cleaning Make sure the clock shows the correct time of vegetable oil or cooking oil to the self-clean start time. The oven shuts off , indicating the oven has cooled below the lock temperature and the LOCKED DOOR light goes off . The earliest start . Touch the Delay Start pad. Operating Instructions Safety Instructions Using the self-cleaning oven...
Use and Care Manual
Page 34
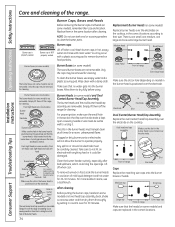
... the electrode on the cooktop, in the correct locations. Operating Instructions Safety Instructions Care and cleaning of range Slot Electrode Caps Replace the matching size caps onto the burner bases or heads. Burner caps Burner cap is properly seated. Only the caps may be removed for 30 minutes. 34 Replacement Burner Heads (on some models) Burner head Electrode Burner base Make sure the hole in a warm oven for cleaning. Only the caps may...
... the electrode on the cooktop, in the correct locations. Operating Instructions Safety Instructions Care and cleaning of range Slot Electrode Caps Replace the matching size caps onto the burner bases or heads. Burner caps Burner cap is properly seated. Only the caps may be removed for 30 minutes. 34 Replacement Burner Heads (on some models) Burner head Electrode Burner base Make sure the hole in a warm oven for cleaning. Only the caps may...
Use and Care Manual
Page 38
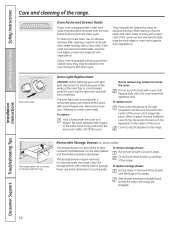
... cover holder. Installation Instructions Consumer Support Troubleshooting Tips 38 Oven Racks and Drawer Racks If your oven light bulb, disconnect the electrical power to let the light cover and bulb cool completely. After cleaning, rinse the racks with clean water and dry with a 40-watt household appliance bulb. Wire cover holder. Oven Light Replacement CAUTION: Before replacing your oven is a good place to slide, wipe the rack edges or oven rack supports with nickel oven racks, they may also be removed for cleaning under the range. To replace storage drawer: Set...
... cover holder. Installation Instructions Consumer Support Troubleshooting Tips 38 Oven Racks and Drawer Racks If your oven light bulb, disconnect the electrical power to let the light cover and bulb cool completely. After cleaning, rinse the racks with clean water and dry with a 40-watt household appliance bulb. Wire cover holder. Oven Light Replacement CAUTION: Before replacing your oven is a good place to slide, wipe the rack edges or oven rack supports with nickel oven racks, they may also be removed for cleaning under the range. To replace storage drawer: Set...
Use and Care Manual
Page 41
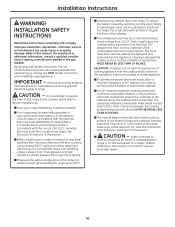
... over the open flames of operating burners, install a ventilation hood over the range that appliance. ■ If cabinets are placed above the range, allow a minimum clearance of 30″ between the cooking surface and the bottom of unprotected cabinets. ■ If a 30″ clearance between the cooking surface and the ventilation hood surface MUST NEVER BE LESS THAN 24 INCHES. INSTALLATION SAFETY INSTRUCTIONS Read these instructions completely and carefully. The use NEW...
... over the open flames of operating burners, install a ventilation hood over the range that appliance. ■ If cabinets are placed above the range, allow a minimum clearance of 30″ between the cooking surface and the bottom of unprotected cabinets. ■ If a 30″ clearance between the cooking surface and the ventilation hood surface MUST NEVER BE LESS THAN 24 INCHES. INSTALLATION SAFETY INSTRUCTIONS Read these instructions completely and carefully. The use NEW...
Use and Care Manual
Page 52
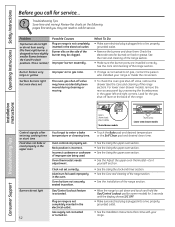
.... • Make sure electrical plug is incorrect. Burner slits on . • Allow the range to enter a bake • Touch the Bake pad and desired temperature temperature or cleaning time. The oven gas shut-off valve, remove the drawer (see the Care and cleaning of the burner may have slightly smaller flames between the 6 and 9 o'clock positions. Sealed burner models Thumb screws Lower oven drawer models Control signals after entering cooking time or start time Food does not bake or roast properly in...
.... • Make sure electrical plug is incorrect. Burner slits on . • Allow the range to enter a bake • Touch the Bake pad and desired temperature temperature or cleaning time. The oven gas shut-off valve, remove the drawer (see the Care and cleaning of the burner may have slightly smaller flames between the 6 and 9 o'clock positions. Sealed burner models Thumb screws Lower oven drawer models Control signals after entering cooking time or start time Food does not bake or roast properly in...
Use and Care Manual
Page 53
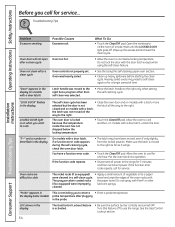
... oven temperature is normal. 53 Troubleshooting Tips Consumer Support Cookware not suited for broiling. Oven controls improperly set . Oven bottom not securely seated in position. • Make sure you move the door latch handle all the way to use a pan designed for broiling. • See the Installation of the range section. Turn this feature off to the right. Safety Instructions Operating Instructions GEAppliances.com Installation Instructions Problem Burners do not work Light bulb is locked. Clock and timer do not light (cont.) Possible Causes A fuse...
... oven temperature is normal. 53 Troubleshooting Tips Consumer Support Cookware not suited for broiling. Oven controls improperly set . Oven bottom not securely seated in position. • Make sure you move the door latch handle all the way to use a pan designed for broiling. • See the Installation of the range section. Turn this feature off to the right. Safety Instructions Operating Instructions GEAppliances.com Installation Instructions Problem Burners do not work Light bulb is locked. Clock and timer do not light (cont.) Possible Causes A fuse...
Use and Care Manual
Page 54
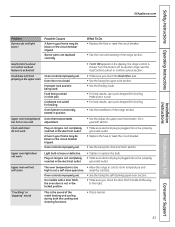
.... Troubleshooting Tips Installation Instructions Problem Excessive smoking Oven door will go. • Touch the Clear/Off pad. Oven too hot. Latch handle was moved to the right but the door is reminding you to enter a • Enter a probe temperature. Open the windows to use the range. Wait until the LOCKED DOOR light goes off to rid the room of the oven racks with a door latch, if a function error code appears during the self-cleaning cycle, check the oven door...
.... Troubleshooting Tips Installation Instructions Problem Excessive smoking Oven door will go. • Touch the Clear/Off pad. Oven too hot. Latch handle was moved to the right but the door is reminding you to enter a • Enter a probe temperature. Open the windows to use the range. Wait until the LOCKED DOOR light goes off to rid the room of the oven racks with a door latch, if a function error code appears during the self-cleaning cycle, check the oven door...


