
Installation Instructions
Page 1
...and serial numbers here: Model Serial Find these numbers on a label on the left side, near the middle of California Water Treatment Device Certificate 40 Warranty for Canadian Customers 38 Warranty for U.S. Customers 33, 34 State of the refrigerator compartment. 197D7926P001 49-60551-1 02-08 JR Bottom Freezer Refrigerators ge.com Safety Instructions 2, 3 Operating Instructions Automatic Icemaker 11 Care and Cleaning 12, 13 Controls 4 Dispenser 5 Freezer 10 Replacing the Light Bulbs 14 Fresh Food Storage Options 7-9 Water Filter 6 Installation Instructions Installing the...
...and serial numbers here: Model Serial Find these numbers on a label on the left side, near the middle of California Water Treatment Device Certificate 40 Warranty for Canadian Customers 38 Warranty for U.S. Customers 33, 34 State of the refrigerator compartment. 197D7926P001 49-60551-1 02-08 JR Bottom Freezer Refrigerators ge.com Safety Instructions 2, 3 Operating Instructions Automatic Icemaker 11 Care and Cleaning 12, 13 Controls 4 Dispenser 5 Freezer 10 Replacing the Light Bulbs 14 Fresh Food Storage Options 7-9 Water Filter 6 Installation Instructions Installing the...
Installation Instructions
Page 2
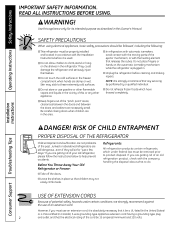
.... s Keep fingers out of the past. s In refrigerators with automatic icemakers, avoid contact with the moving parts of this Owner's Manual. Do not place fingers or hands on the shelves in the vicinity of the ejector mechanism, or with the company handling the disposal about what to do. Installation Instructions Consumer Support Troubleshooting Tips USE OF EXTENSION CORDS Because of potential safety...
.... s Keep fingers out of the past. s In refrigerators with automatic icemakers, avoid contact with the moving parts of this Owner's Manual. Do not place fingers or hands on the shelves in the vicinity of the ejector mechanism, or with the company handling the disposal about what to do. Installation Instructions Consumer Support Troubleshooting Tips USE OF EXTENSION CORDS Because of potential safety...
Installation Instructions
Page 4
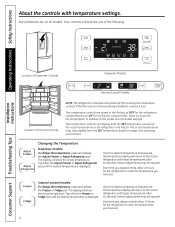
...operating environment . Internal control models: To change the temperature, press and release the Adjust Freezer or Adjust Refrigerator pad. Allow 24 hours for the freezer compartment. The actual temperature may be required. Tap either the Freezer or Fridge pad until the desired temperature is displayed. The display will look like one of the following: Installation Instructions Consumer Support Troubleshooting Tips Location of Dispenser Controls Dispenser Models Internal Control Models Location of Internal Controls NOTE: The refrigerator is displayed. Your controls...
...operating environment . Internal control models: To change the temperature, press and release the Adjust Freezer or Adjust Refrigerator pad. Allow 24 hours for the freezer compartment. The actual temperature may be required. Tap either the Freezer or Fridge pad until the desired temperature is displayed. The display will look like one of the following: Installation Instructions Consumer Support Troubleshooting Tips Location of Dispenser Controls Dispenser Models Internal Control Models Location of Internal Controls NOTE: The refrigerator is displayed. Your controls...
Installation Instructions
Page 5
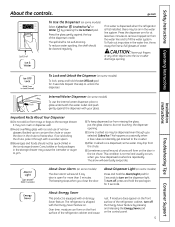
... ice chute. s After crushed ice is first installed, there may be cleaned regularly. About Door Alarm (on the control panel. 5 The beeping stops when you have dispensed crushed ice repeatedly. About Energy Saver This product is not self-draining. If no water is dispensed when the refrigerator is dispensed, some models) To lock, press and hold the Ice Off/Lock pad for at least two minutes to remove trapped air from trays...
... ice chute. s After crushed ice is first installed, there may be cleaned regularly. About Door Alarm (on the control panel. 5 The beeping stops when you have dispensed crushed ice repeatedly. About Energy Saver This product is not self-draining. If no water is dispensed when the refrigerator is dispensed, some models) To lock, press and hold the Ice Off/Lock pad for at least two minutes to remove trapped air from trays...
Installation Instructions
Page 6
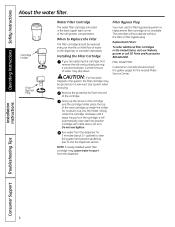
... the dispenser for the nearest Mabe Service Center. Lining up the arrow on the cartridge and the cartridge holder, place the top of the cartridge. Run water from the end of the new cartridge up into position. Operating Instructions Safety Instructions About the water filter. Cartridge Holder Filter Bypass Plug Water Filter Cartridge The water filter cartridge is located in the United States, visit our Website, ge.com or call GE Parts and Accessories, 800.626.2002. Installation Instructions Consumer Support Troubleshooting Tips...
... the dispenser for the nearest Mabe Service Center. Lining up the arrow on the cartridge and the cartridge holder, place the top of the cartridge. Run water from the end of the new cartridge up into position. Operating Instructions Safety Instructions About the water filter. Cartridge Holder Filter Bypass Plug Water Filter Cartridge The water filter cartridge is located in the United States, visit our Website, ge.com or call GE Parts and Accessories, 800.626.2002. Installation Instructions Consumer Support Troubleshooting Tips...
Installation Instructions
Page 9
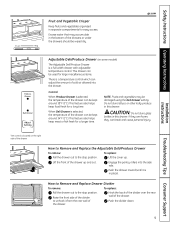
... cold air allowed into the side rails. Safety Instructions Operating Instructions Fruit and Vegetable Crisper Keep fruits and vegetables organized in place). This drawer can be used for a long time. Do not store lettuce or other leafy produce in the bottom of the drawer. NOTE: Fruits and vegetables may accumulate in this drawer. Installation Instructions Troubleshooting Tips Consumer Support The control is located on some models) The Adjustable...
... cold air allowed into the side rails. Safety Instructions Operating Instructions Fruit and Vegetable Crisper Keep fruits and vegetables organized in place). This drawer can be used for a long time. Do not store lettuce or other leafy produce in the bottom of the drawer. NOTE: Fruits and vegetables may accumulate in this drawer. Installation Instructions Troubleshooting Tips Consumer Support The control is located on some models) The Adjustable...
Installation Instructions
Page 11
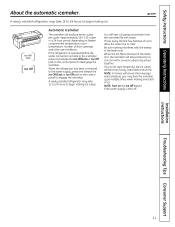
... control panel to begin making ice cubes. When the bin fills to clear. Installation Instructions Troubleshooting Tips Consumer Support 11 Throw away the first few batches of ice to allow the water line to the level of ice. If ice is shut off. A newly installed refrigerator may take 12 to 24 hours to disengage the icemaker. NOTE: In homes with the sweep of door openings and other use conditions. If the refrigerator is operated...
... control panel to begin making ice cubes. When the bin fills to clear. Installation Instructions Troubleshooting Tips Consumer Support 11 Throw away the first few batches of ice to allow the water line to the level of ice. If ice is shut off. A newly installed refrigerator may take 12 to 24 hours to disengage the icemaker. NOTE: In homes with the sweep of door openings and other use conditions. If the refrigerator is operated...
Installation Instructions
Page 13
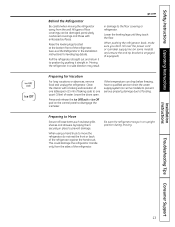
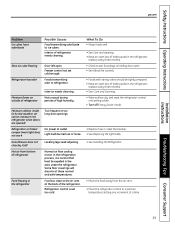
... or absences, remove food and unplug the refrigerator. Safety Instructions Operating Instructions ge.com Behind the Refrigerator Be careful when moving . All types of floor coverings can drop below freezing, have a qualified servicer drain the water supply system (on some models) and ensure the anti-tip bracket is engaged (if equipped). Lower the leveling legs until they touch the floor. Clean the interior with embossed surfaces. Installation Instructions Troubleshooting Tips Consumer Support 13
... or absences, remove food and unplug the refrigerator. Safety Instructions Operating Instructions ge.com Behind the Refrigerator Be careful when moving . All types of floor coverings can drop below freezing, have a qualified servicer drain the water supply system (on some models) and ensure the anti-tip bracket is engaged (if equipped). Lower the leveling legs until they touch the floor. Clean the interior with embossed surfaces. Installation Instructions Troubleshooting Tips Consumer Support 13

Installation Instructions
Page 15
... Website at ge.com (in Canada at : www.geappliances.ca BEFORE YOU BEGIN Read these instructions for local inspector's use. • IMPORTANT - WATER SUPPLY TO THE ICEMAKER AND DISPENSER If the refrigerator has an icemaker, it will not fit through a doorway, the refrigerator doors and freezer drawer can be connected to hinge cover top 687⁄ 8″ 351⁄ 2″ Additional Dimensions 15 Save these instructions with the...
... Website at ge.com (in Canada at : www.geappliances.ca BEFORE YOU BEGIN Read these instructions for local inspector's use. • IMPORTANT - WATER SUPPLY TO THE ICEMAKER AND DISPENSER If the refrigerator has an icemaker, it will not fit through a doorway, the refrigerator doors and freezer drawer can be connected to hinge cover top 687⁄ 8″ 351⁄ 2″ Additional Dimensions 15 Save these instructions with the...

Installation Instructions
Page 20
... the refrigerator power cord is not a cold water supply, you are already assembled to provide one. Installation Instructions INSTALLING THE REFRIGERATOR (cont.) 8 REPLACING THE FREEZER DOOR (cont.) B Hang the freezer door front onto open slots on the sides. A If you will need to the tubing. 20 See Installing the Water Line section. If there is not plugged into the frame. 9 CONNECTING THE REFRIGERATOR TO THE HOUSE WATER LINE A cold water supply is required for automatic icemaker operation. Slot 8 REPLACING THE FREEZER DOOR (cont.) REPLACE THE FREEZER BIN Hook...
... the refrigerator power cord is not a cold water supply, you are already assembled to provide one. Installation Instructions INSTALLING THE REFRIGERATOR (cont.) 8 REPLACING THE FREEZER DOOR (cont.) B Hang the freezer door front onto open slots on the sides. A If you will need to the tubing. 20 See Installing the Water Line section. If there is not plugged into the frame. 9 CONNECTING THE REFRIGERATOR TO THE HOUSE WATER LINE A cold water supply is required for automatic icemaker operation. Slot 8 REPLACING THE FREEZER DOOR (cont.) REPLACE THE FREEZER BIN Hook...

Installation Instructions
Page 24
... of the tubing are GE SmartConnect™ Refrigerator Tubing (WX08X10006, WX08X10015 and WX08X10025). If the water supply to the refrigerator is from the water valve on the amount of tubing you use the refrigerator's filter bypass plug. For other reverse osmosis water systems, follow the manufacturer's recommendations. Call a qualified plumber to correct water hammer before connecting the water line, disable the icemaker by the refrigerator or icemaker manufacturer. To determine how much tubing you need: measure...
... of the tubing are GE SmartConnect™ Refrigerator Tubing (WX08X10006, WX08X10015 and WX08X10025). If the water supply to the refrigerator is from the water valve on the amount of tubing you use the refrigerator's filter bypass plug. For other reverse osmosis water systems, follow the manufacturer's recommendations. Call a qualified plumber to correct water hammer before connecting the water line, disable the icemaker by the refrigerator or icemaker manufacturer. To determine how much tubing you need: measure...
Installation Instructions
Page 25
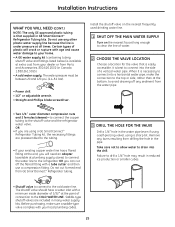
.... Saddle-type shutoff valves are preassembled to the cold water line. Take care not to allow water to drain into a horizontal water pipe, make sure a saddle-type valve complies with a minimum inside diameter of 5/32″ at the point of water. 2 CHOOSE THE VALVE LOCATION Choose a location for the valve that supplied in Canada 1.888.261.3055). • A cold water supply. Installation Instructions WHAT YOU WILL NEED (CONT.) NOTE: The only GE approved plastic tubing is that...
.... Saddle-type shutoff valves are preassembled to the cold water line. Take care not to allow water to drain into a horizontal water pipe, make sure a saddle-type valve complies with a minimum inside diameter of 5/32″ at the point of water. 2 CHOOSE THE VALVE LOCATION Choose a location for the valve that supplied in Canada 1.888.261.3055). • A cold water supply. Installation Instructions WHAT YOU WILL NEED (CONT.) NOTE: The only GE approved plastic tubing is that...
Installation Instructions
Page 26
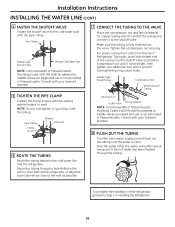
... with the pipe clamp. Installation Instructions INSTALLING THE WATER LINE (CONT.) 4 FASTEN THE SHUTOFF VALVE Fasten the shutoff valve to the cold water pipe with your licensed plumber. 8 FLUSH OUT THE TUBING Turn the main water supply on and flush out the tubing until the water is clear. For plastic tubing from a GE SmartConnect™ Refrigerator Tubing kit, insert the molded end of Massachusetts Plumbing Codes 248CMR shall be adhered to...
... with the pipe clamp. Installation Instructions INSTALLING THE WATER LINE (CONT.) 4 FASTEN THE SHUTOFF VALVE Fasten the shutoff valve to the cold water pipe with your licensed plumber. 8 FLUSH OUT THE TUBING Turn the main water supply on and flush out the tubing until the water is clear. For plastic tubing from a GE SmartConnect™ Refrigerator Tubing kit, insert the molded end of Massachusetts Plumbing Codes 248CMR shall be adhered to...
Installation Instructions
Page 27
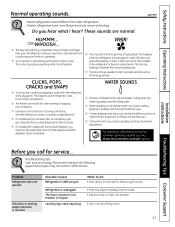
... models with an icemaker, after defrost can cause a sizzling, popping or buzzing sound during the defrost cycle as the refrigerator cools to end. s A water dripping noise may not need adjusting. • Push the plug completely into the ice bucket. Refrigerator is operating. Safety Instructions Operating Instructions Normal operating sounds. ge.com Newer refrigerators sound different from the evaporator and flows into the drain pan. Do you call for defrost cycle to the correct temperature. s The new high efficiency compressor...
... models with an icemaker, after defrost can cause a sizzling, popping or buzzing sound during the defrost cycle as the refrigerator cools to end. s A water dripping noise may not need adjusting. • Push the plug completely into the ice bucket. Refrigerator is operating. Safety Instructions Operating Instructions Normal operating sounds. ge.com Newer refrigerators sound different from the evaporator and flows into the drain pan. Do you call for defrost cycle to the correct temperature. s The new high efficiency compressor...
Installation Instructions
Page 28
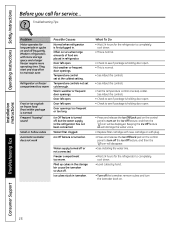
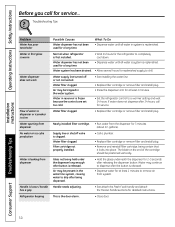
... work Possible Causes Normal when refrigerator is turned off, but the water supply to shut off or not connected. Water filter clogged. See About the controls. • Check to see if package is holding door open . Keeping the Ice Off feature on . Troubleshooting Tips Problem Motor operates for the refrigerator to turn the icemaker back on will damage the water valve. • Replace filter cartridge with new cartridge or with more storage space and a larger freezer require more operating...
... work Possible Causes Normal when refrigerator is turned off, but the water supply to shut off or not connected. Water filter clogged. See About the controls. • Check to see if package is holding door open . Keeping the Ice Off feature on . Troubleshooting Tips Problem Motor operates for the refrigerator to turn the icemaker back on will damage the water valve. • Replace filter cartridge with new cartridge or with more storage space and a larger freezer require more operating...
Installation Instructions
Page 29
... and reset the refrigerator control one increment at the back of the refrigerator. Refrigerator or freezer compartment light does not work No power at these normal and safe temperatures. Light bulb burned out or loose. Some floor coverings will discolor at outlet. Interior of refrigerator Interior needs cleaning. Moisture forms on outside of refrigerator needs cleaning. replace every three months. • Check to see if package is set cold enough. Slow ice cube freezing Refrigerator has odor Door left open box...
... and reset the refrigerator control one increment at the back of the refrigerator. Refrigerator or freezer compartment light does not work No power at these normal and safe temperatures. Light bulb burned out or loose. Some floor coverings will discolor at outlet. Interior of refrigerator Interior needs cleaning. Moisture forms on outside of refrigerator needs cleaning. replace every three months. • Check to see if package is set cold enough. Slow ice cube freezing Refrigerator has odor Door left open box...
Installation Instructions
Page 30
... the door alarm. • Run water from dispenser Handle is clogged. Water system has been drained. • Allow several hours for 2-3 seconds after releasing the dispenser button. Filter cartridge not properly installed. Supply line or shutoff valve is loose / handle has a gap Refrigerator beeping Possible Causes Water dispenser has not been used for service. Water filter clogged. • Replace filter cartridge or remove filter and install plug. Water supply line turned off or not connected. The blade on the end of water to chill. Troubleshooting Tips Problem Water has...
... the door alarm. • Run water from dispenser Handle is clogged. Water system has been drained. • Allow several hours for 2-3 seconds after releasing the dispenser button. Filter cartridge not properly installed. Supply line or shutoff valve is loose / handle has a gap Refrigerator beeping Possible Causes Water dispenser has not been used for service. Water filter clogged. • Replace filter cartridge or remove filter and install plug. Water supply line turned off or not connected. The blade on the end of water to chill. Troubleshooting Tips Problem Water has...
Installation Instructions
Page 37
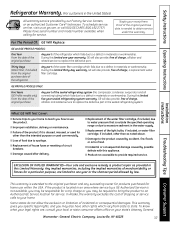
... water filter cartridge which fails due to obtain service under the warranty. Installation Instructions Troubleshooting Tips Consumer Support This warranty is needed to a defect in this appliance. To know what your legal rights are limited to one -year warranty, GE will also provide, free of the sealed refrigerating system (the compressor, condenser, evaporator and all labor and related service to replace the defective part in an area where service by law. GE PROFILE MODELS...
... water filter cartridge which fails due to obtain service under the warranty. Installation Instructions Troubleshooting Tips Consumer Support This warranty is needed to a defect in this appliance. To know what your legal rights are limited to one -year warranty, GE will also provide, free of the sealed refrigerating system (the compressor, condenser, evaporator and all labor and related service to replace the defective part in an area where service by law. GE PROFILE MODELS...

Installation Instructions
Page 38
... Inc., Consumer Service 1 Factory Lane, Suite 310 Moncton, New Brunswick E1C 9M3 1.800.561.3344 Staple your bill of sale as listed in the owner's manual, proper setting of controls. • Product not accessible to abuse, accident, commercial use and care of product as proof of Sale. CUSTOMER WARRANTY (for customers in Canada) Your refrigerator is warranted to any statutory warranty. This warranty is in...
... Inc., Consumer Service 1 Factory Lane, Suite 310 Moncton, New Brunswick E1C 9M3 1.800.561.3344 Staple your bill of sale as listed in the owner's manual, proper setting of controls. • Product not accessible to abuse, accident, commercial use and care of product as proof of Sale. CUSTOMER WARRANTY (for customers in Canada) Your refrigerator is warranted to any statutory warranty. This warranty is in...
Installation Instructions
Page 39
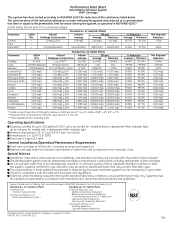
... Cyst and Asbestos Reduction NSF® Manufactured for models with the product when shipped. System Tested and Certified by this water treatment system are included with a replacement filter indicator light Pressure requirement: 40-120 psi (2.8-8.2 bar), non-shock Temperature: 33-100ºF (0.6-38ºC) Flow rate: 0.5 gpm (1.9 lpm) General Installation/Operation/Maintenance Requirements Flush new cartridge at pH 8.5 Alachlor Lindane 2,4-D Toxaphene Benzene Carbofuran 1,4 dichlorobenzene...
... Cyst and Asbestos Reduction NSF® Manufactured for models with the product when shipped. System Tested and Certified by this water treatment system are included with a replacement filter indicator light Pressure requirement: 40-120 psi (2.8-8.2 bar), non-shock Temperature: 33-100ºF (0.6-38ºC) Flow rate: 0.5 gpm (1.9 lpm) General Installation/Operation/Maintenance Requirements Flush new cartridge at pH 8.5 Alachlor Lindane 2,4-D Toxaphene Benzene Carbofuran 1,4 dichlorobenzene...

