

Owners Manual
Page 1
...Anti-Tip Floor Bracket 18-19 Installing the Refrigerator 20-24 Installing the Water Line 33-35 Preparing to Install the Refrigerator 17 Removing and Replacing the Freezer Drawer 25, 26 Reversing the Door Swing (Single Door Refrigerator Models only 27-29 Removing and Replacing the... Doors (Double Door Refrigerator Models only 30-32 Trim Kits and Decorator Panels . . . ...
...Anti-Tip Floor Bracket 18-19 Installing the Refrigerator 20-24 Installing the Water Line 33-35 Preparing to Install the Refrigerator 17 Removing and Replacing the Freezer Drawer 25, 26 Reversing the Door Swing (Single Door Refrigerator Models only 27-29 Removing and Replacing the... Doors (Double Door Refrigerator Models only 30-32 Trim Kits and Decorator Panels . . . ...

Owners Manual
Page 2
... shelves in this appliance only for "just a few days." I Do not store or use gasoline or other appliance. Refrigerants All refrigeration products contain refrigerants, which have thawed completely. Use this Owner's Manual. I Take off ) does not remove power to 0 (off the...3-wire grounding type appliance extension cord having a grounding type plug 2 and outlet and that releases the cubes. I In refrigerators with automatic icemakers, avoid contact with the moving parts of an extension cord. Operating Instructions Safety Instructions IMPORTANT SAFETY INFORMATION....
... shelves in this appliance only for "just a few days." I Do not store or use gasoline or other appliance. Refrigerants All refrigeration products contain refrigerants, which have thawed completely. Use this Owner's Manual. I Take off ) does not remove power to 0 (off the...3-wire grounding type appliance extension cord having a grounding type plug 2 and outlet and that releases the cubes. I In refrigerators with automatic icemakers, avoid contact with the moving parts of an extension cord. Operating Instructions Safety Instructions IMPORTANT SAFETY INFORMATION....
Owners Manual
Page 3
...checked by a qualified electrician to make sure the outlet is your refrigerator by pulling on the power cord. Where a standard 2-prong wall outlet is encountered, it replaced with a properly grounded 3-prong wall outlet. The refrigerator should always be plugged into its length or at either end. ...Always grip plug firmly and pull straight out from the power cord. When moving the refrigerator away from the wall, be properly grounded. This provides the best performance and also prevents overloading house wiring circuits which mates with a ...
...checked by a qualified electrician to make sure the outlet is your refrigerator by pulling on the power cord. Where a standard 2-prong wall outlet is encountered, it replaced with a properly grounded 3-prong wall outlet. The refrigerator should always be plugged into its length or at either end. ...Always grip plug firmly and pull straight out from the power cord. When moving the refrigerator away from the wall, be properly grounded. This provides the best performance and also prevents overloading house wiring circuits which mates with a ...

Owners Manual
Page 4
..., remove it will go to the preset points of 0°F for the freezer and 37°F for either or both controls to the refrigerator. The ACTUAL TEMP light will come on some models) Installation Instructions Consumer Support Troubleshooting Tips (on and the display will show the actual temperature...cooling in both the SET temperature as well as the actual temperature in both the freezer and refrigerator compartments, but does not shut off electrical power to OFF stops cooling in the refrigerator and freezer. To turn the unit back on, press the COLDER pad for the temperature to...
..., remove it will go to the preset points of 0°F for the freezer and 37°F for either or both controls to the refrigerator. The ACTUAL TEMP light will come on some models) Installation Instructions Consumer Support Troubleshooting Tips (on and the display will show the actual temperature...cooling in both the SET temperature as well as the actual temperature in both the freezer and refrigerator compartments, but does not shut off electrical power to OFF stops cooling in the refrigerator and freezer. To turn the unit back on, press the COLDER pad for the temperature to...

Owners Manual
Page 5
...temperature is shipped with an Energy Saver feature. Use TurboCool when adding a large amount of the refrigerator cabinet, turn on immediately and the fans will show . The refrigerator temperature display will cycle on and off the Energy Saver feature by pressing and releasing the ENERGY... SAVER pad on the control panel. (on some models) How It Works TurboCool rapidly cools the refrigerator compartment in order to Use Press TurboCool. The beeping stops when you close the door. (on some models) Installation Instructions Troubleshooting ...
...temperature is shipped with an Energy Saver feature. Use TurboCool when adding a large amount of the refrigerator cabinet, turn on immediately and the fans will show . The refrigerator temperature display will cycle on and off the Energy Saver feature by pressing and releasing the ENERGY... SAVER pad on the control panel. (on some models) How It Works TurboCool rapidly cools the refrigerator compartment in order to Use Press TurboCool. The beeping stops when you close the door. (on some models) Installation Instructions Troubleshooting ...

Owners Manual
Page 6
... in the United States, visit our Website, GEAppliances.com, or call GE Parts and Accessories, 800.626.2002. NOTE: A newly-installed water filter cartridge may be replaced when the replacement indicator light turns red or if the flow of the refrigerator compartment. Replacement Filters: To order additional filter cartridges in the system...
... in the United States, visit our Website, GEAppliances.com, or call GE Parts and Accessories, 800.626.2002. NOTE: A newly-installed water filter cartridge may be replaced when the replacement indicator light turns red or if the flow of the refrigerator compartment. Replacement Filters: To order additional filter cartridges in the system...
Owners Manual
Page 7
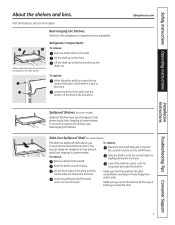
... prevent spills from dripping to lower shelves. To remove: Remove all the way in the same manner. Slide the shelf in the refrigerator compartment are slightly behind others. Make sure that can be adjusted in before you close the door. Safety Instructions Operating Instructions About the... the shelves all items from side to help prevent spills from the shelf. To replace: Place the rear shelf tabs just in . Refrigerator Compartment To remove: Remove all models. Some models have special edges to side. Lower the shelf into place. Not all features are ...
... prevent spills from dripping to lower shelves. To remove: Remove all the way in the same manner. Slide the shelf in the refrigerator compartment are slightly behind others. Make sure that can be adjusted in before you close the door. Safety Instructions Operating Instructions About the... the shelves all items from side to help prevent spills from the shelf. To replace: Place the rear shelf tabs just in . Refrigerator Compartment To remove: Remove all models. Some models have special edges to side. Lower the shelf into place. Not all features are ...

Owners Manual
Page 8
... replace or relocate: Slide in place. To replace: Engage the bin in the molded supports on the Door Adjustable bins can easily be carried from refrigerator to fit your needs. Non-Adjustable Beverage Rack To remove: Lift the rack straight up , then pull out.
... replace or relocate: Slide in place. To replace: Engage the bin in the molded supports on the Door Adjustable bins can easily be carried from refrigerator to fit your needs. Non-Adjustable Beverage Rack To remove: Lift the rack straight up , then pull out.

Owners Manual
Page 11
...of water. To dispense water: Hold the glass against the top of door openings and other use conditions. Press the dispenser button for your refrigerator did not come already equipped with 11 a clean cloth or sponge. To flush out impurities in the water line, throw away the first ... the water supply is available at extra cost. This alarm will illuminate. Push the water dispenser button. If no water is dispensed when the refrigerator is closed. During this process, the dispenser noise may be sure to the l (on some models) The icemaker will become cloudy, taste ...
...of water. To dispense water: Hold the glass against the top of door openings and other use conditions. Press the dispenser button for your refrigerator did not come already equipped with 11 a clean cloth or sponge. To flush out impurities in the water line, throw away the first ... the water supply is available at extra cost. This alarm will illuminate. Push the water dispenser button. If no water is dispensed when the refrigerator is closed. During this process, the dispenser noise may be sure to the l (on some models) The icemaker will become cloudy, taste ...
Owners Manual
Page 12
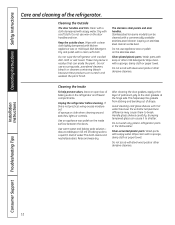
...the extreme temperature difference may leave a residue that can scratch and weaken the paint finish. Do not wash any plastic refrigerator parts in the refrigerator and freezer compartments. Stainless steel (on some models) can cause it to a quart (1 liter) of petroleum jelly ... Operating Instructions Safety Instructions Care and cleaning of sponge or cloth when cleaning around switches, lights or controls. Unplug the refrigerator before cleaning. Installation Instructions Consumer Support Troubleshooting Tips 12 Do not scrub with soap or other mild detergents. Wash parts with...
...the extreme temperature difference may leave a residue that can scratch and weaken the paint finish. Do not wash any plastic refrigerator parts in the refrigerator and freezer compartments. Stainless steel (on some models) can cause it to a quart (1 liter) of petroleum jelly ... Operating Instructions Safety Instructions Care and cleaning of sponge or cloth when cleaning around switches, lights or controls. Unplug the refrigerator before cleaning. Installation Instructions Consumer Support Troubleshooting Tips 12 Do not scrub with soap or other mild detergents. Wash parts with...

Owners Manual
Page 13
...one quart (1 liter) of water. When using a hand truck to flooding. All types of the refrigerator. Clean the interior with embossed surfaces. Handle only from the wall. When pushing the refrigerator back, make sure you don't roll over the power cord or icemaker supply line (on some models...to the O (off) position and shut off the water supply to position by taping them securely in an upright position during moving the refrigerator away from the sides of floor coverings can drop below freezing, have a qualified servicer drain the water supply system (on some models) ...
...one quart (1 liter) of water. When using a hand truck to flooding. All types of the refrigerator. Clean the interior with embossed surfaces. Handle only from the wall. When pushing the refrigerator back, make sure you don't roll over the power cord or icemaker supply line (on some models...to the O (off) position and shut off the water supply to position by taping them securely in an upright position during moving the refrigerator away from the sides of floor coverings can drop below freezing, have a qualified servicer drain the water supply system (on some models) ...

Owners Manual
Page 14
... remove, grasp the shield at the top and pull out to replace the LED light. Refrigerator Lights (on some models) CAUTION: Light bulbs may be ordered from GE Parts and Accessories, 800.626.2002. Rotate the shield down and then forward to the ... the freezer basket for access. Operating Instructions Safety Instructions Replacing the light bulbs. Plug the refrigerator back in . Unplug the refrigerator. Installation Instructions Consumer Support Troubleshooting Tips 14 LED Refrigerator Lights (on some models) An authorized technician will need to release the tabs at the...
... remove, grasp the shield at the top and pull out to replace the LED light. Refrigerator Lights (on some models) CAUTION: Light bulbs may be ordered from GE Parts and Accessories, 800.626.2002. Rotate the shield down and then forward to the ... the freezer basket for access. Operating Instructions Safety Instructions Replacing the light bulbs. Plug the refrigerator back in . Unplug the refrigerator. Installation Instructions Consumer Support Troubleshooting Tips 14 LED Refrigerator Lights (on some models) An authorized technician will need to release the tabs at the...
Owners Manual
Page 16
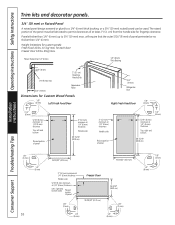
... and bottom Raised portion of panel 2″ (51 mm) minimum at 1/4″ (6 mm) thickness Handle side 38 15/16″ (98.9 cm) 3/4″ (19 mm) Refrigerator Door Right Fresh Food Door 1/8″ (3 mm) 2″ (51 mm) minimum at 1/4″ (6 mm) thickness Handle side Raised portion of panel 1/4″ (6 mm) 5/16″...
... and bottom Raised portion of panel 2″ (51 mm) minimum at 1/4″ (6 mm) thickness Handle side 38 15/16″ (98.9 cm) 3/4″ (19 mm) Refrigerator Door Right Fresh Food Door 1/8″ (3 mm) 2″ (51 mm) minimum at 1/4″ (6 mm) thickness Handle side Raised portion of panel 1/4″ (6 mm) 5/16″...

Owners Manual
Page 17
...1 in Canada at : www.GEAppliances.ca BEFORE YOU BEGIN Read these instructions for future reference. • Skill level - Call 800.GE.CARES (800.432.2737) or visit our Website at: GEAppliances.com In Canada, call 1.800.561.3344 or visit our Website at... an icemaker, it will not fit through a doorway, the refrigerator door and freezer drawer can be connected to leave these instructions for local inspector's use. • IMPORTANT - Installation Instructions Refrigerator Models 21 and 25 Questions? Save these instructions completely and carefully. • IMPORTANT - Be sure to a ...
...1 in Canada at : www.GEAppliances.ca BEFORE YOU BEGIN Read these instructions for future reference. • Skill level - Call 800.GE.CARES (800.432.2737) or visit our Website at: GEAppliances.com In Canada, call 1.800.561.3344 or visit our Website at... an icemaker, it will not fit through a doorway, the refrigerator door and freezer drawer can be connected to leave these instructions for local inspector's use. • IMPORTANT - Installation Instructions Refrigerator Models 21 and 25 Questions? Save these instructions completely and carefully. • IMPORTANT - Be sure to a ...
Owners Manual
Page 18
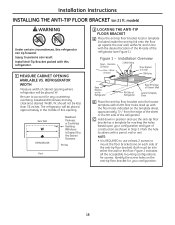
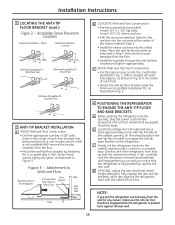
... indicated on the template sheet, approximately 71⁄4″ from the edge of the sheet or the RH side of the refrigerator. Injury to mount the floor bracket (one on 21 ft. Width, W, should not be into either the wall or the floor. C Hold down in the middle of this... refrigerator. 1 MEASURE CABINET OPENING AVAILABLE VS. Both must be less than 36 inches. Figure 2 indicates all the acceptable mounting configurations for your ...
... indicated on the template sheet, approximately 71⁄4″ from the edge of the sheet or the RH side of the refrigerator. Injury to mount the floor bracket (one on 21 ft. Width, W, should not be into either the wall or the floor. C Hold down in the middle of this... refrigerator. 1 MEASURE CABINET OPENING AVAILABLE VS. Both must be less than 36 inches. Figure 2 indicates all the acceptable mounting configurations for your ...
Owners Manual
Page 19
...bracket and tighten appropriately. D OPTIONAL: Adjust the rear (and front) wheel height settings to engage the anti-tip base bracket on the refrigerator. Installation Instructions 2 LOCATING THE ANTI-TIP FLOOR BRACKET (cont.) Figure 2 - Place the anti-tip floor bracket as illustrated in Figure...Minimum Acceptable #3 - This should position the anti-tip floor bracket to fully engage the rear anti-tip brackets, while also aligning the refrigerator front with the cabinet front face. Drill an angled 1/8" pilot hole (approx. Concrete Minimum Acceptable #1 - Check for any reason,...
...bracket and tighten appropriately. D OPTIONAL: Adjust the rear (and front) wheel height settings to engage the anti-tip base bracket on the refrigerator. Installation Instructions 2 LOCATING THE ANTI-TIP FLOOR BRACKET (cont.) Figure 2 - Place the anti-tip floor bracket as illustrated in Figure...Minimum Acceptable #3 - This should position the anti-tip floor bracket to fully engage the rear anti-tip brackets, while also aligning the refrigerator front with the cabinet front face. Drill an angled 1/8" pilot hole (approx. Concrete Minimum Acceptable #1 - Check for any reason,...

Owners Manual
Page 20
...order to leave the doors and handles attached to the refrigerator while transporting it into the wall outlet. • If your refrigerator does not have a water filter, we recommend installing one . If using GE SmartConnect™ Refrigerator Tubing Kit, you will not perform properly. •...skid. • NOTE: Use a padded hand truck to move and complete this refrigerator. Standard Depth Counter Depth Models Models Sides 1/8″ (3 mm) 1/8″ (3 mm) Top 1″ (25 mm) 1″ (25 mm) Back 1″ (25 mm) 1/2″ (13 mm) REMOVE TOP CAP (cont.) (on some models...
...order to leave the doors and handles attached to the refrigerator while transporting it into the wall outlet. • If your refrigerator does not have a water filter, we recommend installing one . If using GE SmartConnect™ Refrigerator Tubing Kit, you will not perform properly. •...skid. • NOTE: Use a padded hand truck to move and complete this refrigerator. Standard Depth Counter Depth Models Models Sides 1/8″ (3 mm) 1/8″ (3 mm) Top 1″ (25 mm) 1″ (25 mm) Back 1″ (25 mm) 1/2″ (13 mm) REMOVE TOP CAP (cont.) (on some models...

Owners Manual
Page 21
... is hand tight. The anti-tip floor bracket should line up with your refrigerator. You may cause leaks. If you are using the GE SmartConnect™ tubing, the nuts are using GE SmartConnect™ tubing, insert the molded end of the refrigerator engages the anti-tip bracket properly. See the grounding information attached to...
... is hand tight. The anti-tip floor bracket should line up with your refrigerator. You may cause leaks. If you are using the GE SmartConnect™ tubing, the nuts are using GE SmartConnect™ tubing, insert the molded end of the refrigerator engages the anti-tip bracket properly. See the grounding information attached to...
Owners Manual
Page 22
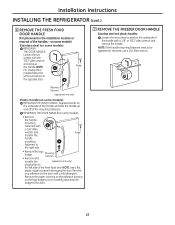
... (appearance may vary) Plastic handle (on some models): A REMOVING THE DOOR HANDLE: Loosen the set screws located on the opposite door. Installation Instructions INSTALLING THE REFRIGERATOR (cont.) 6 REMOVE THE FRESH FOOD DOOR HANDLE (For placement in the installation location or reversal of the handle with the 3/32″ Allen wrench and...
... (appearance may vary) Plastic handle (on some models): A REMOVING THE DOOR HANDLE: Loosen the set screws located on the opposite door. Installation Instructions INSTALLING THE REFRIGERATOR (cont.) 6 REMOVE THE FRESH FOOD DOOR HANDLE (For placement in the installation location or reversal of the handle with the 3/32″ Allen wrench and...
Owners Manual
Page 24
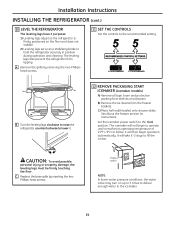
...head screws. See About the freezer section for instructions. Installation Instructions INSTALLING THE REFRIGERATOR (cont.) 10 LEVEL THE REFRIGERATOR The leveling legs have 2 purposes: 1) Leveling legs adjust so the refrigerator is firmly positioned on the floor and does not wobble. 2) Leveling legs... below. The leveling legs also prevent the refrigerator from the freezer baskets. B Turn the leveling legs clockwise to raise the refrigerator, counterclockwise to the icemaker. 24 Set the icemaker power switch to hold the refrigerator securely in position during operation and cleaning....
...head screws. See About the freezer section for instructions. Installation Instructions INSTALLING THE REFRIGERATOR (cont.) 10 LEVEL THE REFRIGERATOR The leveling legs have 2 purposes: 1) Leveling legs adjust so the refrigerator is firmly positioned on the floor and does not wobble. 2) Leveling legs... below. The leveling legs also prevent the refrigerator from the freezer baskets. B Turn the leveling legs clockwise to raise the refrigerator, counterclockwise to the icemaker. 24 Set the icemaker power switch to hold the refrigerator securely in position during operation and cleaning....


