
Owners Manual
Page 1
...the refrigerator compartment. Customers . . . . .45 Write the model and serial numbers here: Model Serial Find these numbers on a label on the right side, near the top of California Water Treatment Device Certificate . . . . .48 Warranty for Canadian Customers 46 Warranty for U.S. ge.... the Refrigerator . . . .20-24 Installing the Water Line . . . . .33-35 Preparing to Install the Refrigerator 17 Removing and Replacing the Freezer Drawer 25, 26 Reversing the Door Swing (Single Door Refrigerator Models only 27-29 Removing and Replacing the Doors (Double Door Refrigerator Models only)...
...the refrigerator compartment. Customers . . . . .45 Write the model and serial numbers here: Model Serial Find these numbers on a label on the right side, near the top of California Water Treatment Device Certificate . . . . .48 Warranty for Canadian Customers 46 Warranty for U.S. ge.... the Refrigerator . . . .20-24 Installing the Water Line . . . . .33-35 Preparing to Install the Refrigerator 17 Removing and Replacing the Freezer Drawer 25, 26 Reversing the Door Swing (Single Door Refrigerator Models only 27-29 Removing and Replacing the Doors (Double Door Refrigerator Models only)...

Owners Manual
Page 4
... in both the freezer and refrigerator compartments, but does not shut off electrical power to the refrigerator. Several adjustments may vary slightly from the SET temperature based on -the-Door Models: To change the temperature, press either the refrigerator or the freezer until the display... the WARMER or COLDER touch pads until the desired temperature is shipped with temperature settings. (on some models) (on and the display will go to the actual refrigerator and freezer temperatures after 5 4 seconds. Each time you have set , the temperature display will return...
... in both the freezer and refrigerator compartments, but does not shut off electrical power to the refrigerator. Several adjustments may vary slightly from the SET temperature based on -the-Door Models: To change the temperature, press either the refrigerator or the freezer until the display... the WARMER or COLDER touch pads until the desired temperature is shipped with temperature settings. (on some models) (on and the display will go to the actual refrigerator and freezer temperatures after 5 4 seconds. Each time you have set , the temperature display will return...
Owners Manual
Page 5
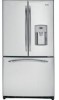
... Consumer Support About TurboCool.™ (on some models) ge.com (on some models) (on some models) How it will cycle on and off the Energy Saver feature by pressing and releasing the ENERGY SAVER pad on the control panel. (on some models) 5 After TurboCool is pressed again, the refrigerator compartment will return to the original setting...
... Consumer Support About TurboCool.™ (on some models) ge.com (on some models) (on some models) How it will cycle on and off the Energy Saver feature by pressing and releasing the ENERGY SAVER pad on the control panel. (on some models) 5 After TurboCool is pressed again, the refrigerator compartment will return to the original setting...
Owners Manual
Page 6
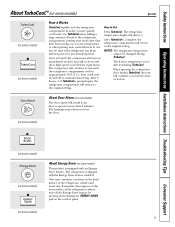
... on the tab at the front and pulling down . Run water from the dispenser. Consumer Support 6 A small amount of the refrigerator compartment. The grip on the cartridge and the cartridge holder, slowly rotate the cartridge clockwise until it counterclockwise. Press and hold the... from the dispenser for the water filter cartridge on some models) (on the temperature display. When the cartridge is not available. Filter Model GSWF Customers in the United States, visit our Website, ge.com, or call GE Parts and Accessories, 800.626.2002. Close the cartridge ...
... on the tab at the front and pulling down . Run water from the dispenser. Consumer Support 6 A small amount of the refrigerator compartment. The grip on the cartridge and the cartridge holder, slowly rotate the cartridge clockwise until it counterclockwise. Press and hold the... from the dispenser for the water filter cartridge on some models) (on the temperature display. When the cartridge is not available. Filter Model GSWF Customers in the United States, visit our Website, ge.com, or call GE Parts and Accessories, 800.626.2002. Close the cartridge ...

Owners Manual
Page 7
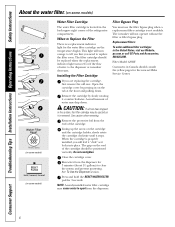
...Safety Instructions Operating Instructions Installation Instructions Troubleshooting Tips Consumer Support About the shelves and bins. Some models have special edges to help prevent spills from the shelf. Refrigerator Compartment To remove: Remove all items from side to lower shelves. Not all features are slightly... shelf up , insert the top hook at the front. ge.com Spillproof Shelves (on all the way in the refrigerator compartment are above the front bar. Make sure you push the shelves all models. Continue pulling the shelf forward until the central tabs are ...
...Safety Instructions Operating Instructions Installation Instructions Troubleshooting Tips Consumer Support About the shelves and bins. Some models have special edges to help prevent spills from the shelf. Refrigerator Compartment To remove: Remove all items from side to lower shelves. Not all features are slightly... shelf up , insert the top hook at the front. ge.com Spillproof Shelves (on all the way in the refrigerator compartment are above the front bar. Make sure you push the shelves all models. Continue pulling the shelf forward until the central tabs are ...
Owners Manual
Page 8
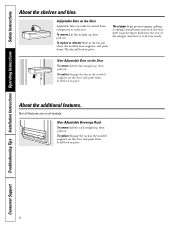
... it to work area. Non-Adjustable Bins on the door shelf. Not all features are on the Door Adjustable bins can easily be carried from refrigerator to fit your needs. To replace: Engage the rack in place. Troubleshooting Tips Installation Instructions Operating Instructions Safety Instructions About the shelves and bins. It... additional features. To replace: Engage the bin in the bin just above the molded door supports, and push down . Consumer Support 8 Adjustable Bins on all models. To replace or relocate: Slide in the molded supports on the door and push down .
... it to work area. Non-Adjustable Bins on the door shelf. Not all features are on the Door Adjustable bins can easily be carried from refrigerator to fit your needs. To replace: Engage the rack in place. Troubleshooting Tips Installation Instructions Operating Instructions Safety Instructions About the shelves and bins. It... additional features. To replace: Engage the bin in the bin just above the molded door supports, and push down . Consumer Support 8 Adjustable Bins on all models. To replace or relocate: Slide in the molded supports on the door and push down .
Owners Manual
Page 11
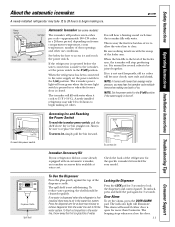
ge.com Power Switch Green Power Light Icemaker Feeler Arm Automatic Icemaker (on some models) The icemaker will produce seven cubes per cycle-approximately 100-130 cubes in a 24-hour period, depending on ) position. When the refrigerator has been connected to the water supply, set the power switch ...to clear. NOTE: In homes with lower-than 2 minutes. Icemaker Accessory Kit If your model. Dispenser Cradle Spill Shelf To Use the Dispenser Press the ...
ge.com Power Switch Green Power Light Icemaker Feeler Arm Automatic Icemaker (on some models) The icemaker will produce seven cubes per cycle-approximately 100-130 cubes in a 24-hour period, depending on ) position. When the refrigerator has been connected to the water supply, set the power switch ...to clear. NOTE: In homes with lower-than 2 minutes. Icemaker Accessory Kit If your model. Dispenser Cradle Spill Shelf To Use the Dispenser Press the ...

Owners Manual
Page 12
...damp cloth or paper towel. Silver-plated plastic parts. Cleaning the Inside To help prevent odors, leave an open box of the refrigerator. Unplug the refrigerator before cleaning. After cleaning the door gaskets, apply a thin layer of sponge or cloth when cleaning around switches, lights or ...not scrub with steel-wool pads or other mild detergents. Dry and polish with a commercially available stainless steel cleaner. Stainless steel (on some models) can erode the paint. Wash parts with a soft cloth. If this is not practical, wring excess moisture out of petroleum jelly to ...
...damp cloth or paper towel. Silver-plated plastic parts. Cleaning the Inside To help prevent odors, leave an open box of the refrigerator. Unplug the refrigerator before cleaning. After cleaning the door gaskets, apply a thin layer of sponge or cloth when cleaning around switches, lights or ...not scrub with steel-wool pads or other mild detergents. Dry and polish with a commercially available stainless steel cleaner. Stainless steel (on some models) can erode the paint. Wash parts with a soft cloth. If this is not practical, wring excess moisture out of petroleum jelly to ...
Owners Manual
Page 13
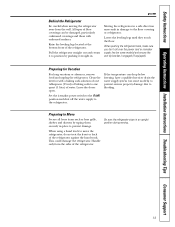
... place to position by taping them securely in . Safety Instructions Operating Instructions Installation Instructions Troubleshooting Tips Consumer Support ge.com Behind the Refrigerator Be careful when moving . 13 Preparing for Vacation For long vacations or absences, remove food and unplug the...can drop below freezing, have a qualified servicer drain the water supply system (on some models) to prevent serious property damage due to one quart (1 liter) of the refrigerator. When pushing the refrigerator back, make sure you don't roll over the power cord or icemaker supply line (on...
... place to position by taping them securely in . Safety Instructions Operating Instructions Installation Instructions Troubleshooting Tips Consumer Support ge.com Behind the Refrigerator Be careful when moving . 13 Preparing for Vacation For long vacations or absences, remove food and unplug the...can drop below freezing, have a qualified servicer drain the water supply system (on some models) to prevent serious property damage due to one quart (1 liter) of the refrigerator. When pushing the refrigerator back, make sure you don't roll over the power cord or icemaker supply line (on...
Owners Manual
Page 17
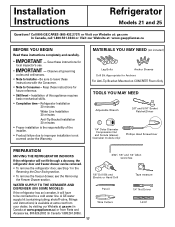
...Electric or Hand Drill Pencil Wire Cutters Tape measure 1/4″ Nut Driver Level 17 Refrigerator Installation 20 minutes Water Line Installation 30 minutes Anti-Tip Bracket Installation 20 minutes • Proper installation is the responsibility of this appliance requires basic mechanical ...Nut and Ferrule (sleeve) (icemaker models only) Phillips Head Screwdriver PREPARATION MOVING THE REFRIGERATOR INDOORS If the refrigerator will have to be removed. • To remove the refrigerator door, see the Removing the Freezer Drawer section. A GE water supply kit (containing tubing,...
...Electric or Hand Drill Pencil Wire Cutters Tape measure 1/4″ Nut Driver Level 17 Refrigerator Installation 20 minutes Water Line Installation 30 minutes Anti-Tip Bracket Installation 20 minutes • Proper installation is the responsibility of this appliance requires basic mechanical ...Nut and Ferrule (sleeve) (icemaker models only) Phillips Head Screwdriver PREPARATION MOVING THE REFRIGERATOR INDOORS If the refrigerator will have to be removed. • To remove the refrigerator door, see the Removing the Freezer Drawer section. A GE water supply kit (containing tubing,...
Owners Manual
Page 18
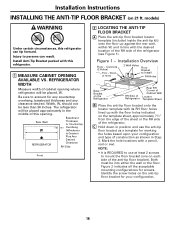
models) WARNING Under certain circumstances, this refrigerator can result. The refrigerator will be less than 36 inches. Rear Wall W REFRIGERATOR Baseboard Thickness or Countertop Overhang (Whichever Is Greater) Plus Any Desired Clearance RH Side Front 2 LOCATING THE ANTI-TIP ... upon your configuration. 18 C Hold down in position and use at least 2 screws to Install RH Holes Base Bracket on 21 ft. Figure 2 indicates all the acceptable mounting configurations for any countertop overhang, baseboard thickness and any clearance desired. Be sure to persons can...
models) WARNING Under certain circumstances, this refrigerator can result. The refrigerator will be less than 36 inches. Rear Wall W REFRIGERATOR Baseboard Thickness or Countertop Overhang (Whichever Is Greater) Plus Any Desired Clearance RH Side Front 2 LOCATING THE ANTI-TIP ... upon your configuration. 18 C Hold down in position and use at least 2 screws to Install RH Holes Base Bracket on 21 ft. Figure 2 indicates all the acceptable mounting configurations for any countertop overhang, baseboard thickness and any clearance desired. Be sure to persons can...
Owners Manual
Page 20
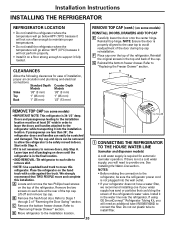
.... Do not cut plastic tube to the installation location. 20 Top Hinge B 1 CONNECTING THE REFRIGERATOR TO THE HOUSE WATER LINE (icemaker and dispenser models) A cold water supply is in the final location. •SKID REMOVAL: Tilt refrigerator to each side at least 36″ wide in the...Install it in order to leave the doors and handles attached to provide one if your refrigerator does not have a water filter, we recommend installing one . If using GE SmartConnect™ Refrigerator Tubing Kit, you will need an additional tube (WX08X10002) to the installation location must be...
.... Do not cut plastic tube to the installation location. 20 Top Hinge B 1 CONNECTING THE REFRIGERATOR TO THE HOUSE WATER LINE (icemaker and dispenser models) A cold water supply is in the final location. •SKID REMOVAL: Tilt refrigerator to each side at least 36″ wide in the...Install it in order to leave the doors and handles attached to provide one if your refrigerator does not have a water filter, we recommend installing one . If using GE SmartConnect™ Refrigerator Tubing Kit, you will need an additional tube (WX08X10002) to the installation location must be...
Owners Manual
Page 21
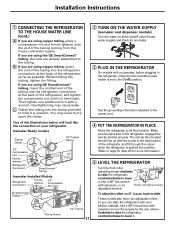
If you are using GE SmartConnect™ tubing, insert the molded end of the tubing into the refrigerator connection, at the shutoff valve (house water supply) and check for any leaks. 3 PLUG IN THE REFRIGERATOR On models with extension to turn with your refrigerator. You may cause leaks. ... THE WATER SUPPLY (icemaker and dispenser models) Turn the water on your kitchen cabinets. B If you are using the GE SmartConnect™ tubing, the nuts are using copper tubing, place a compression nut and ferrule (sleeve) onto the end of the refrigerator, and tighten the compression nut until ...
If you are using GE SmartConnect™ tubing, insert the molded end of the tubing into the refrigerator connection, at the shutoff valve (house water supply) and check for any leaks. 3 PLUG IN THE REFRIGERATOR On models with extension to turn with your refrigerator. You may cause leaks. ... THE WATER SUPPLY (icemaker and dispenser models) Turn the water on your kitchen cabinets. B If you are using the GE SmartConnect™ tubing, the nuts are using copper tubing, place a compression nut and ferrule (sleeve) onto the end of the refrigerator, and tighten the compression nut until ...
Owners Manual
Page 22
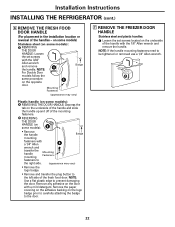
...8243; Allen A wrench and transfer the handle mounting Mounting Fasteners fasteners to the right side. (appearance may vary) Plastic handle (on some models): A REMOVING THE DOOR HANDLE: Depress the tab on the underside of the handle and slide the handle up and off of the handle ... Allen wrench. Remove the paper covering on the adhesive backing on the underside of the mounting fasteners. Installation Instructions INSTALLING THE REFRIGERATOR (cont.) 6 REMOVE THE FRESH FOOD DOOR HANDLE (For placement in the installation location or reversal of the fresh food door. on some...
...8243; Allen A wrench and transfer the handle mounting Mounting Fasteners fasteners to the right side. (appearance may vary) Plastic handle (on some models): A REMOVING THE DOOR HANDLE: Depress the tab on the underside of the handle and slide the handle up and off of the handle ... Allen wrench. Remove the paper covering on the adhesive backing on the underside of the mounting fasteners. Installation Instructions INSTALLING THE REFRIGERATOR (cont.) 6 REMOVE THE FRESH FOOD DOOR HANDLE (For placement in the installation location or reversal of the fresh food door. on some...
Owners Manual
Page 24
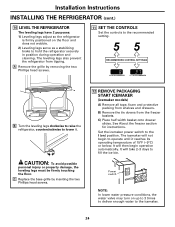
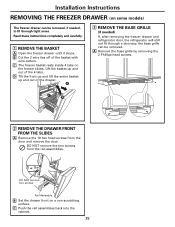
.... C Replace the base grille by removing the two Phillips head screws. 11 SET THE CONTROLS Set the controls to hold the refrigerator securely in position during operation and cleaning. B) Remove the tie downs from shelves and drawers. Power switch NOTE: In lower water... C) Place half width basket onto drawer slides. The leveling legs also prevent the refrigerator from tipping. A Remove the grille by inserting the two Phillips head screws. 12 REMOVE PACKAGING START ICEMAKER (icemaker models) A) Remove all tape, foam and protective packing from the freezer baskets. It ...
.... C Replace the base grille by removing the two Phillips head screws. 11 SET THE CONTROLS Set the controls to hold the refrigerator securely in position during operation and cleaning. B) Remove the tie downs from shelves and drawers. Power switch NOTE: In lower water... C) Place half width basket onto drawer slides. The leveling legs also prevent the refrigerator from tipping. A Remove the grille by inserting the two Phillips head screws. 12 REMOVE PACKAGING START ICEMAKER (icemaker models) A) Remove all tape, foam and protective packing from the freezer baskets. It ...
Owners Manual
Page 25
... the rail assemblies back into the cabinet. 25 C The freezer basket rests inside 4 tabs on some models) The freezer drawer can be removed, if needed ) If, after removing the freezer drawer and refrigerator door, the refrigerator will still not fit through tight areas. DO NOT remove the torx screws from the door and...
... the rail assemblies back into the cabinet. 25 C The freezer basket rests inside 4 tabs on some models) The freezer drawer can be removed, if needed ) If, after removing the freezer drawer and refrigerator door, the refrigerator will still not fit through tight areas. DO NOT remove the torx screws from the door and...
Owners Manual
Page 27
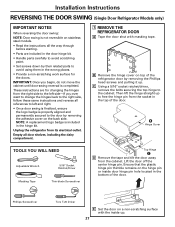
... Tape the door shut with the inside door hinge pin hole located in the top of the refrigerator door by removing the adhesive cover on the back side. Phillips Screwdriver Torx T-20 Driver E Set the door on the hinge pin or inside up. 27 IMPORTANT: Once you .... Then lift the hinge straight up . Installation Instructions REVERSING THE DOOR SWING (Single Door Refrigerator Models only) IMPORTANT NOTES When reversing the door swing: NOTE: Door swing is not reversible on stainless steel models. • Read the instructions all the way through before starting. • Parts are for...
... Tape the door shut with the inside door hinge pin hole located in the top of the refrigerator door by removing the adhesive cover on the back side. Phillips Screwdriver Torx T-20 Driver E Set the door on the hinge pin or inside up. 27 IMPORTANT: Once you .... Then lift the hinge straight up . Installation Instructions REVERSING THE DOOR SWING (Single Door Refrigerator Models only) IMPORTANT NOTES When reversing the door swing: NOTE: Door swing is not reversible on stainless steel models. • Read the instructions all the way through before starting. • Parts are for...
Owners Manual
Page 30
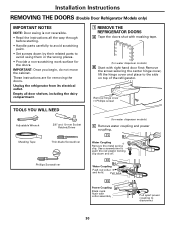
...Screwdriver (for removing the doors. Pull tube. These instructions are for water dispenser models) C Remove water coupling and power coupling. C1 Water Coupling Remove the metal spring clip. Unplug the refrigerator from its electrical outlet. IMPORTANT: Once you begin, do not move the cabinet....and place to disconnect 30 C2 Water Coupling Push red collar and hold. Installation Instructions REMOVING THE DOORS (Double Door Refrigerator Models only) IMPORTANT NOTES NOTE: Door swing is not reversible. • Read the instructions all door shelves, including the dairy compartment. ...
...Screwdriver (for removing the doors. Pull tube. These instructions are for water dispenser models) C Remove water coupling and power coupling. C1 Water Coupling Remove the metal spring clip. Unplug the refrigerator from its electrical outlet. IMPORTANT: Once you begin, do not move the cabinet....and place to disconnect 30 C2 Water Coupling Push red collar and hold. Installation Instructions REMOVING THE DOORS (Double Door Refrigerator Models only) IMPORTANT NOTES NOTE: Door swing is not reversible. • Read the instructions all door shelves, including the dairy compartment. ...

Owners Manual
Page 32
... right hinge pin slot. Attach the hinge to raise the lowest door by turning the leveling leg on each side. 2 REHANG REFRIGERATOR DOORS A Lower the refrigerator door onto the center hinge pin. Replace the hinge cover and screw. Make sure the door is straight and the gap between ... E Make sure the gasket on the opposite door. If the doors remain uneven, turn the pin. Installation Instructions REPLACING THE DOORS (Double Door Refrigerator Models only) 1 INSTALL CENTER HINGE Install the center hinge on the same side as the door until the doors are uneven, first try to the ...
... right hinge pin slot. Attach the hinge to raise the lowest door by turning the leveling leg on each side. 2 REHANG REFRIGERATOR DOORS A Lower the refrigerator door onto the center hinge pin. Replace the hinge cover and screw. Make sure the door is straight and the gap between ... E Make sure the gasket on the opposite door. If the doors remain uneven, turn the pin. Installation Instructions REPLACING THE DOORS (Double Door Refrigerator Models only) 1 INSTALL CENTER HINGE Install the center hinge on the same side as the door until the doors are uneven, first try to the ...
Owners Manual
Page 40
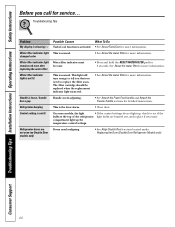
...Instructions Operating Instructions Safety Instructions Before you need realigning. •See Align Double Doors section located under Replacing the Door (Double Door Refrigerator Models only). Handle is activated. • See About TurboCool for more information. Troubleshooting Tips Problem My display is showing Possible Causes What... for 3 seconds. This light will turn orange to see if the bulbs at the top of the refrigerator light bulbs are not even (on Double Door models only) Doors need to replace the filter soon. Control setting is the door alarm. •Close door...
...Instructions Operating Instructions Safety Instructions Before you need realigning. •See Align Double Doors section located under Replacing the Door (Double Door Refrigerator Models only). Handle is activated. • See About TurboCool for more information. Troubleshooting Tips Problem My display is showing Possible Causes What... for 3 seconds. This light will turn orange to see if the bulbs at the top of the refrigerator light bulbs are not even (on Double Door models only) Doors need to replace the filter soon. Control setting is the door alarm. •Close door...


