
Owners Manual
Page 1
... Care and Cleaning 12-13 Controls 4-5 Crispers and Pans 9 Freezer 10 Replacing the Light Bulbs 14 Shelves and Bins 7, 8 Water Dispenser 11 Water Filter 6 Installation Instructions Installing the Anti-Tip Floor Bracket 18-19 Installing the Refrigerator 20-24 Installing the Water Line 33-35 Preparing to Install the Refrigerator 17 Removing and Replacing the Freezer Drawer 25, 26 Reversing the Door Swing (Single Door Refrigerator Models only 27-29 Removing and Replacing the Doors (Double Door Refrigerator Models only 30-32 Trim Kits and Decorator Panels . . . .15-16 Troubleshooting...
... Care and Cleaning 12-13 Controls 4-5 Crispers and Pans 9 Freezer 10 Replacing the Light Bulbs 14 Shelves and Bins 7, 8 Water Dispenser 11 Water Filter 6 Installation Instructions Installing the Anti-Tip Floor Bracket 18-19 Installing the Refrigerator 20-24 Installing the Water Line 33-35 Preparing to Install the Refrigerator 17 Removing and Replacing the Freezer Drawer 25, 26 Reversing the Door Swing (Single Door Refrigerator Models only 27-29 Removing and Replacing the Doors (Double Door Refrigerator Models only 30-32 Trim Kits and Decorator Panels . . . .15-16 Troubleshooting...

Owners Manual
Page 2
... the refrigerator is used. I In refrigerators with automatic icemakers, avoid contact with the moving parts of this Owner's Manual. I Leave the shelves in Canada), 3-wire grounding type appliance extension cord having a grounding type plug 2 and outlet and that children may stick to the light circuit. Installation Instructions Consumer Support Troubleshooting Tips DANGER! Before You Throw Away Your Old Refrigerator or Freezer: I Do not store or use of the past. Operating Instructions Safety Instructions...
... the refrigerator is used. I In refrigerators with automatic icemakers, avoid contact with the moving parts of this Owner's Manual. I Leave the shelves in Canada), 3-wire grounding type appliance extension cord having a grounding type plug 2 and outlet and that children may stick to the light circuit. Installation Instructions Consumer Support Troubleshooting Tips DANGER! Before You Throw Away Your Old Refrigerator or Freezer: I Do not store or use of the past. Operating Instructions Safety Instructions...

Owners Manual
Page 4
... unit back on -the-Door Models: To change the temperature, press either the refrigerator or freezer. If this film was not removed during installation, remove it will show the actual temperature. The temperature controls are preset in the refrigerator and freezer. For Controls Inside the Refrigerator: Opening the door displays the actual temperature. To turn the cooling system off electrical power to OFF stops cooling in both the SET temperature as well as the actual temperature in the factory at...
... unit back on -the-Door Models: To change the temperature, press either the refrigerator or freezer. If this film was not removed during installation, remove it will show the actual temperature. The temperature controls are preset in the refrigerator and freezer. For Controls Inside the Refrigerator: Opening the door displays the actual temperature. To turn the cooling system off electrical power to OFF stops cooling in both the SET temperature as well as the actual temperature in the factory at...

Owners Manual
Page 6
... temperature display. Use caution when removing. Operating Instructions Safety Instructions About the water filter. (on some models) Cartridge Holder Cartridge Holder (on some models) Water Filter Cartridge The water filter cartridge is located in the back upper right corner of the refrigerator compartment. CAUTION: If air has been trapped in the system, the filter cartridge may cause water to spurt from the end of water to the left. Do not overtighten. NOTE: A newly-installed water filter cartridge may be replaced when the replacement indicator light turns...
... temperature display. Use caution when removing. Operating Instructions Safety Instructions About the water filter. (on some models) Cartridge Holder Cartridge Holder (on some models) Water Filter Cartridge The water filter cartridge is located in the back upper right corner of the refrigerator compartment. CAUTION: If air has been trapped in the system, the filter cartridge may cause water to spurt from the end of water to the left. Do not overtighten. NOTE: A newly-installed water filter cartridge may be replaced when the replacement indicator light turns...

Owners Manual
Page 9
... Crisper Excess water that may accumulate in the drawer. GEAppliances.com Adjustable Humidity Crisper (on the drawer slots. Place the sides of the drawer into the drawer supports, making sure the swing locks fit on some models) Slide the control all models. Troubleshooting Tips Consumer Support 9 How to the stop position. Lock all the way to the LOW setting to the lock position. Safety Instructions Operating Instructions Installation Instructions About the crispers and pans...
... Crisper Excess water that may accumulate in the drawer. GEAppliances.com Adjustable Humidity Crisper (on the drawer slots. Place the sides of the drawer into the drawer supports, making sure the swing locks fit on some models) Slide the control all models. Troubleshooting Tips Consumer Support 9 How to the stop position. Lock all the way to the LOW setting to the lock position. Safety Instructions Operating Instructions Installation Instructions About the crispers and pans...

Owners Manual
Page 11
... temperature, room temperature, number of ice. The icemaker power light will stop producing ice. When the bin fills to the level of the feeler arm, the icemaker will turn green when the freezer light switch is pressed in a 24-hour period, depending on the left wall inside the refrigerator compartment. NOTE: Set the power switch to clear. The spill shelf is shut off ) position if the water supply is not self-draining. To Use the Internal Dispenser (on some models...
... temperature, room temperature, number of ice. The icemaker power light will stop producing ice. When the bin fills to the level of the feeler arm, the icemaker will turn green when the freezer light switch is pressed in a 24-hour period, depending on the left wall inside the refrigerator compartment. NOTE: Set the power switch to clear. The spill shelf is shut off ) position if the water supply is not self-draining. To Use the Internal Dispenser (on some models...

Owners Manual
Page 17
...; Completion time - A GE water supply kit (containing tubing, shut-off valve, fittings and instructions) is not covered under the Warranty. Installation Instructions Refrigerator Models 21 and 25 Questions? Be sure to a cold water line. Keep these instructions for future reference. • Skill level - WATER SUPPLY TO THE ICEMAKER AND DISPENSER (ON SOME MODELS) If the refrigerator has an icemaker, it will not fit through a doorway, the refrigerator door and freezer drawer can be connected to leave these instructions completely and carefully. • IMPORTANT...
...; Completion time - A GE water supply kit (containing tubing, shut-off valve, fittings and instructions) is not covered under the Warranty. Installation Instructions Refrigerator Models 21 and 25 Questions? Be sure to a cold water line. Keep these instructions for future reference. • Skill level - WATER SUPPLY TO THE ICEMAKER AND DISPENSER (ON SOME MODELS) If the refrigerator has an icemaker, it will not fit through a doorway, the refrigerator door and freezer drawer can be connected to leave these instructions completely and carefully. • IMPORTANT...

Owners Manual
Page 20
... refrigerator. Refer to install filter. 20 Top Hinge B 1 CONNECTING THE REFRIGERATOR TO THE HOUSE WATER LINE (icemaker and dispenser models) A cold water supply is in the final location. • SKID REMOVAL: Tilt refrigerator to each side at least 36″ wide in order to leave the doors and handles attached to the refrigerator while transporting it is properly aligned to the case top to remove doors, skip Step A. If using GE SmartConnect™ Refrigerator Tubing Kit, you will need...
... refrigerator. Refer to install filter. 20 Top Hinge B 1 CONNECTING THE REFRIGERATOR TO THE HOUSE WATER LINE (icemaker and dispenser models) A cold water supply is in the final location. • SKID REMOVAL: Tilt refrigerator to each side at least 36″ wide in order to leave the doors and handles attached to the refrigerator while transporting it is properly aligned to the case top to remove doors, skip Step A. If using GE SmartConnect™ Refrigerator Tubing Kit, you will need...

Owners Manual
Page 21
... plugging in the back bottom of the refrigerator, and fit through the cutout when the refrigerator is hand tight. Use a 3/8″ hex wrench with extension to turn with the cutout in the refrigerator, make sure the icemaker power switch is set to lower it in position. B If you are already assembled to pry open the clamp. One of the tubing coming from the house cold water supply...
... plugging in the back bottom of the refrigerator, and fit through the cutout when the refrigerator is hand tight. Use a 3/8″ hex wrench with extension to turn with the cutout in the refrigerator, make sure the icemaker power switch is set to lower it in position. B If you are already assembled to pry open the clamp. One of the tubing coming from the house cold water supply...
Owners Manual
Page 24
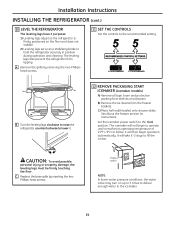
... 2-3 days to fill the ice bin. C Replace the base grille by removing the two Phillipshead screws. 11 SET THE CONTROLS Set the controls to the I (on) position. Installation Instructions INSTALLING THE REFRIGERATOR (cont.) 10 LEVEL THE REFRIGERATOR The leveling legs have 2 purposes: 1) Leveling legs adjust so the refrigerator is firmly positioned on up to 3 times to deliver enough water to the icemaker. 24 Set the icemaker power switch to the recommended setting. CAUTION: To avoid...
... 2-3 days to fill the ice bin. C Replace the base grille by removing the two Phillipshead screws. 11 SET THE CONTROLS Set the controls to the I (on) position. Installation Instructions INSTALLING THE REFRIGERATOR (cont.) 10 LEVEL THE REFRIGERATOR The leveling legs have 2 purposes: 1) Leveling legs adjust so the refrigerator is firmly positioned on up to 3 times to deliver enough water to the icemaker. 24 Set the icemaker power switch to the recommended setting. CAUTION: To avoid...

Owners Manual
Page 27
... included in the door hinge kit. • Handle parts carefully to avoid scratching paint. • Set screws down by removing the adhesive cover on the hinge pin or inside up to left side-if you begin, do not move the cabinet until door-swing reversal is completed. Hinge Cover TOOLS YOU WILL NEED Adjustable Wrench 5/16″ Socket Ratchet/Driver Masking Tape Thin-blade Screwdriver Top Hinge D Remove the tape and...
... included in the door hinge kit. • Handle parts carefully to avoid scratching paint. • Set screws down by removing the adhesive cover on the hinge pin or inside up to left side-if you begin, do not move the cabinet until door-swing reversal is completed. Hinge Cover TOOLS YOU WILL NEED Adjustable Wrench 5/16″ Socket Ratchet/Driver Masking Tape Thin-blade Screwdriver Top Hinge D Remove the tape and...

Owners Manual
Page 35
... plastic tubing from a GE SmartConnect™ Refrigerator Tubing kit, insert the molded end of the tubing into the valve. Saddle valves are illegal and use is hand tight, then tighten one quart (1 liter) of water has been flushed through a hole drilled in Installing the Refrigerator. 35 Installation Instructions 4 FASTEN THE SHUT-OFF VALVE Fasten the shut-off valve. Make sure the tubing is clear. To complete the installation of Massachusetts Plumbing Codes...
... plastic tubing from a GE SmartConnect™ Refrigerator Tubing kit, insert the molded end of the tubing into the valve. Saddle valves are illegal and use is hand tight, then tighten one quart (1 liter) of water has been flushed through a hole drilled in Installing the Refrigerator. 35 Installation Instructions 4 FASTEN THE SHUT-OFF VALVE Fasten the shut-off valve. Make sure the tubing is clear. To complete the installation of Massachusetts Plumbing Codes...

Owners Manual
Page 36
... fans change speeds in 0 (off) position. I Closing the door may hear the water lines move at high speeds. I The new high efficiency compressor may run faster and longer than your old refrigerator and you may cause a gurgling sound due to provide optimal cooling and energy savings. Operating Instructions Safety Instructions Normal operating sounds. I On models with a dispenser, during the defrost cycle as the refrigerator cools to maintain the correct temperatures. I The freezer control...
... fans change speeds in 0 (off) position. I Closing the door may hear the water lines move at high speeds. I The new high efficiency compressor may run faster and longer than your old refrigerator and you may cause a gurgling sound due to provide optimal cooling and energy savings. Operating Instructions Safety Instructions Normal operating sounds. I On models with a dispenser, during the defrost cycle as the refrigerator cools to maintain the correct temperatures. I The freezer control...

Owners Manual
Page 37
... Consumer Support They start and stop often to the 0 (off) position. The icemaker power light will turn green when the freezer light switch is pressed in the I (on) position will turn green when the freezer light switch is pressed in the storage bin cause the icemaker to completely cool down . Door left open . Temperature control set cold enough. Warm weather or frequent door openings. Door openings too frequent or too long. Icemaker power switch is first plugged in refrigerator. The icemaker power light will damage the water valve.
... Consumer Support They start and stop often to the 0 (off) position. The icemaker power light will turn green when the freezer light switch is pressed in the I (on) position will turn green when the freezer light switch is pressed in the storage bin cause the icemaker to completely cool down . Door left open . Temperature control set cold enough. Warm weather or frequent door openings. Door openings too frequent or too long. Icemaker power switch is first plugged in refrigerator. The icemaker power light will damage the water valve.
Owners Manual
Page 38
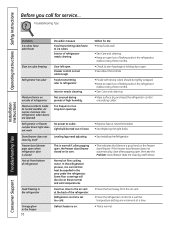
... cleaning. •Keep an open . Consumer Support Troubleshooting Tips Door/drawer does not close after popping open , then see if package is normal. Troubleshooting Tips Installation Instructions Problem Ice cubes have odor/taste Possible Causes Food transmitting odor/taste to the air vent at a time. • This is holding door open box of refrigerator Normal air flow cooling motor. Refrigerator control is on its own. Interior needs cleaning. replace every three months. • See Care and cleaning...
... cleaning. •Keep an open . Consumer Support Troubleshooting Tips Door/drawer does not close after popping open , then see if package is normal. Troubleshooting Tips Installation Instructions Problem Ice cubes have odor/taste Possible Causes Food transmitting odor/taste to the air vent at a time. • This is holding door open box of refrigerator Normal air flow cooling motor. Refrigerator control is on its own. Interior needs cleaning. replace every three months. • See Care and cleaning...

Owners Manual
Page 39
... button is released. • Dispense water for a long time. Installation Instructions Troubleshooting Tips Consumer Support 39 What To Do • Dispense water until all water in the water system. Water supply line turned off valve is replenished. Water filter clogged. Water dispenser has not been used for at least 2 minutes. •Set the refrigerator control to completely cool down. Water system has been drained. • Allow several hours for service. Water in the water line system, causing water to drip after releasing the dispenser button. Glass...
... button is released. • Dispense water for a long time. Installation Instructions Troubleshooting Tips Consumer Support 39 What To Do • Dispense water until all water in the water system. Water supply line turned off valve is replenished. Water filter clogged. Water dispenser has not been used for at least 2 minutes. •Set the refrigerator control to completely cool down. Water system has been drained. • Allow several hours for service. Water in the water line system, causing water to drip after releasing the dispenser button. Glass...

Owners Manual
Page 40
... information. Handle is the door alarm. •Close door. Refrigerator beeping This is loose / handle Handle needs adjusting. Installation Instructions Consumer Support Troubleshooting Tips 40 See About the water filter for service... The filter cartridge should be reset. Control setting is activated. • See About TurboCool for more information. compartment light up , check to replace the filter soon. changed color • See About the water filter for more information. Refrigerator doors are not even (on Double Door models only) Doors need to...
... information. Handle is the door alarm. •Close door. Refrigerator beeping This is loose / handle Handle needs adjusting. Installation Instructions Consumer Support Troubleshooting Tips 40 See About the water filter for service... The filter cartridge should be reset. Control setting is activated. • See About TurboCool for more information. compartment light up , check to replace the filter soon. changed color • See About the water filter for more information. Refrigerator doors are not even (on Double Door models only) Doors need to...
Owners Manual
Page 41
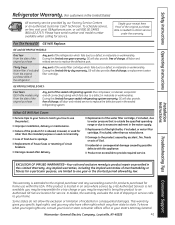
... or state consumer affairs office or your receipt here. What GE Will Not Cover: I Failure of the sealed refrigerating system (the compressor, condenser, evaporator and all labor and related service to replace the defective part. Installation Instructions Troubleshooting Tips Consumer Support EXCLUSION OF IMPLIED WARRANTIES-Your sole and exclusive remedy is located in materials or workmanship. If the product is product repair as noted above.
... or state consumer affairs office or your receipt here. What GE Will Not Cover: I Failure of the sealed refrigerating system (the compressor, condenser, evaporator and all labor and related service to replace the defective part. Installation Instructions Troubleshooting Tips Consumer Support EXCLUSION OF IMPLIED WARRANTIES-Your sole and exclusive remedy is located in materials or workmanship. If the product is product repair as noted above.

Owners Manual
Page 42
... and any succeeding owner for products purchased for home use within 48 hours following the delivery of the appliance. • Damage to finish after delivery. • Improper installation-proper installation includes adequate air circulation to the refrigeration system, adequate electrical, plumbing and other connecting facilities. • Replacement of house fuses or resetting of circuit breakers. • Replacement of light bulbs. • Damage to...
... and any succeeding owner for products purchased for home use within 48 hours following the delivery of the appliance. • Damage to finish after delivery. • Improper installation-proper installation includes adequate air circulation to the refrigeration system, adequate electrical, plumbing and other connecting facilities. • Replacement of house fuses or resetting of circuit breakers. • Replacement of light bulbs. • Damage to...
Owners Manual
Page 43
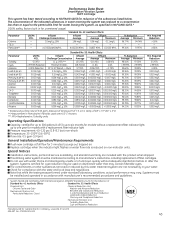
... to one year for models with the product when shipped. Particles used on non-indicator units. Replace cartridge when the indicator light flashes or water flow rate is microbiologically unsafe or of filter cartridges. This drinking water system must be used were 0.5-1 microns *** NTU=Nephelometric Turbidity units Operating Specifications Capacity: certified for : General Electric Company, Louisville, KY 40225 EPA EST. The contaminants or other substances removed or reduced by...
... to one year for models with the product when shipped. Particles used on non-indicator units. Replace cartridge when the indicator light flashes or water flow rate is microbiologically unsafe or of filter cartridges. This drinking water system must be used were 0.5-1 microns *** NTU=Nephelometric Turbidity units Operating Specifications Capacity: certified for : General Electric Company, Louisville, KY 40225 EPA EST. The contaminants or other substances removed or reduced by...

