Use and Care Manual
Page 1
... Icemaker 11 Care and Cleaning 12, 13 Controls 4, 5 Crispers and Pans 9 Freezer 10 Replacing the Light Bulbs 14 Shelves and Bins 7, 8 Water Dispenser 11 Water Filter 6 Installation Instructions Installing the Anti-Tip Floor Bracket 18, 19 Installing the Refrigerator . . . . . .20-24 Installing the Water Line 33-35 Preparing to Install the Refrigerator 17 Removing and Replacing the Freezer Drawer 25, 26 Reversing the Door Swing (Single Door Refrigerator Models only 27-29 Removing and Replacing the Doors (Double Door Refrigerator Models only 30-32 Trim Kits and Decorator Panels...
... Icemaker 11 Care and Cleaning 12, 13 Controls 4, 5 Crispers and Pans 9 Freezer 10 Replacing the Light Bulbs 14 Shelves and Bins 7, 8 Water Dispenser 11 Water Filter 6 Installation Instructions Installing the Anti-Tip Floor Bracket 18, 19 Installing the Refrigerator . . . . . .20-24 Installing the Water Line 33-35 Preparing to Install the Refrigerator 17 Removing and Replacing the Freezer Drawer 25, 26 Reversing the Door Swing (Single Door Refrigerator Models only 27-29 Removing and Replacing the Doors (Double Door Refrigerator Models only 30-32 Trim Kits and Decorator Panels...
Use and Care Manual
Page 2
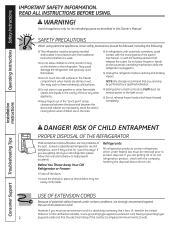
... the electrical rating of an extension cord. READ ALL INSTRUCTIONS BEFORE USING. n Keep fingers out of this Owner's Manual. Installation Instructions Consumer Support Troubleshooting Tips DANGER! USE OF EXTENSION CORDS Because of potential safety hazards under federal law must use of the cord be performed by a qualified individual. clearances between the doors and between the doors and cabinet are not problems of an old refrigeration product...
... the electrical rating of an extension cord. READ ALL INSTRUCTIONS BEFORE USING. n Keep fingers out of this Owner's Manual. Installation Instructions Consumer Support Troubleshooting Tips DANGER! USE OF EXTENSION CORDS Because of potential safety hazards under federal law must use of the cord be performed by a qualified individual. clearances between the doors and between the doors and cabinet are not problems of an old refrigeration product...
Use and Care Manual
Page 4
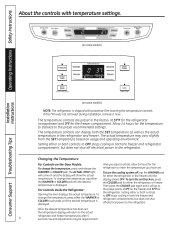
... temperature is displayed. To change the temperature, press and release the WARMER or COLDER pad. To turn the cooling system off electrical power to OFF stops cooling in both the freezer and refrigerator compartments, but does not shut off , tap the WARMER pad for the freezer compartment. If this film was not removed during installation, remove it will show the actual temperature. Changing the Temperature For Controls-on-the-Door Models: To change the temperature...
... temperature is displayed. To change the temperature, press and release the WARMER or COLDER pad. To turn the cooling system off electrical power to OFF stops cooling in both the freezer and refrigerator compartments, but does not shut off , tap the WARMER pad for the freezer compartment. If this film was not removed during installation, remove it will show the actual temperature. Changing the Temperature For Controls-on-the-Door Models: To change the temperature...
Use and Care Manual
Page 6
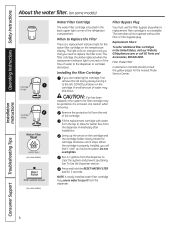
.... Run 11⁄2 gallons from the dispenser to spurt from the tap to replace the filter soon. Press and hold the RESET WATER FILTER pad for better flow from the end of the refrigerator compartment. The icemaker will feel it "click" as it stops. Operating Instructions Safety Instructions About the water filter. (on some models) Cartridge Holder Cartridge Holder (on some models) (on some models) Water Filter Cartridge The water filter cartridge is removed. When to the left...
.... Run 11⁄2 gallons from the dispenser to spurt from the tap to replace the filter soon. Press and hold the RESET WATER FILTER pad for better flow from the end of the refrigerator compartment. The icemaker will feel it "click" as it stops. Operating Instructions Safety Instructions About the water filter. (on some models) Cartridge Holder Cartridge Holder (on some models) (on some models) Water Filter Cartridge The water filter cartridge is removed. When to the left...
Use and Care Manual
Page 9
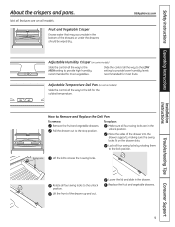
... Adjustable Humidity Crisper (on all four swing locks to Remove and Replace the Deli Pan To remove: Remove the fruit and vegetable drawers. How to the unlock position. Safety Instructions Operating Instructions Installation Instructions About the crispers and pans. Slide the control all the way to the HIGH setting to provide lower humidity levels recommended for the coldest temperature. Lock all four swing locks are on some models) Slide the control...
... Adjustable Humidity Crisper (on all four swing locks to Remove and Replace the Deli Pan To remove: Remove the fruit and vegetable drawers. How to the unlock position. Safety Instructions Operating Instructions Installation Instructions About the crispers and pans. Slide the control all the way to the HIGH setting to provide lower humidity levels recommended for the coldest temperature. Lock all four swing locks are on some models) Slide the control...
Use and Care Manual
Page 11
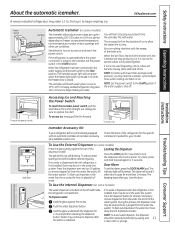
.... Shelf Ice Bin To access ice. The spill shelf is first installed, there may be air in the water line, throw away the first 6 glassfuls of water. Door Alarm To set the power switch to remove trapped air from the water line system. To flush out impurities in the water line system. GEAppliances.com Installation Instructions Power Switch Green Power Light Icemaker Feeler Arm Automatic Icemaker (on freezer compartment temperature, room temperature, number of the refrigerator for the specific icemaker kit needed for 2-3 seconds after the button is located on some models...
.... Shelf Ice Bin To access ice. The spill shelf is first installed, there may be air in the water line, throw away the first 6 glassfuls of water. Door Alarm To set the power switch to remove trapped air from the water line system. To flush out impurities in the water line system. GEAppliances.com Installation Instructions Power Switch Green Power Light Icemaker Feeler Arm Automatic Icemaker (on freezer compartment temperature, room temperature, number of the refrigerator for the specific icemaker kit needed for 2-3 seconds after the button is located on some models...
Use and Care Manual
Page 17
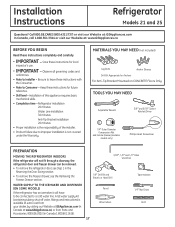
... refrigerator door and freezer drawer can be connected to improper installation is available at extra cost from Parts and Accessories, 800.626.2002 (In Canada 1.800.661.1616). 3/32″, 1/8″ and 1/4″ Allen wrenches 1/8″ Drill Bit and Electric or Hand Drill Pencil Wire Cutters Tape measure 1/4″ Nut Driver Level 17 A GE water supply kit (containing tubing, shut-off valve, fittings and instructions) is not covered under the Warranty...
... refrigerator door and freezer drawer can be connected to improper installation is available at extra cost from Parts and Accessories, 800.626.2002 (In Canada 1.800.661.1616). 3/32″, 1/8″ and 1/4″ Allen wrenches 1/8″ Drill Bit and Electric or Hand Drill Pencil Wire Cutters Tape measure 1/4″ Nut Driver Level 17 A GE water supply kit (containing tubing, shut-off valve, fittings and instructions) is not covered under the Warranty...
Use and Care Manual
Page 20
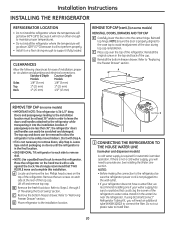
... the screen of "Reversing the Door Swing" section. Remove the two screws on doors until the refrigerator is required for ease of the refrigerator. C Remove the bottom freezer drawer. Refer to "Replacing the Freezer Drawer" section. Top Hinge B 1 CONNECTING THE REFRIGERATOR TO THE HOUSE WATER LINE (icemaker and dispenser models) A cold water supply is in the water line near the refrigerator. Leave tape and all packaging on each side to remove skid. • NOTE: Use a padded hand truck...
... the screen of "Reversing the Door Swing" section. Remove the two screws on doors until the refrigerator is required for ease of the refrigerator. C Remove the bottom freezer drawer. Refer to "Replacing the Freezer Drawer" section. Top Hinge B 1 CONNECTING THE REFRIGERATOR TO THE HOUSE WATER LINE (icemaker and dispenser models) A cold water supply is in the water line near the refrigerator. Leave tape and all packaging on each side to remove skid. • NOTE: Use a padded hand truck...
Use and Care Manual
Page 21
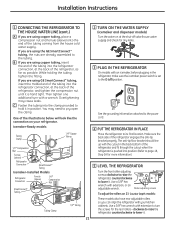
... may need to pry open the clamp. Make sure the back side of the tubing coming from the house cold water supply. Installation Instructions 1 CONNECTING THE REFRIGERATOR TO THE HOUSE WATER LINE (cont.) A If you are already assembled to the tubing. The anti-tip floor bracket should line up with an icemaker, before plugging in the refrigerator, make sure the icemaker power switch is pushed into the refrigerator connection, at the back of the tubing into...
... may need to pry open the clamp. Make sure the back side of the tubing coming from the house cold water supply. Installation Instructions 1 CONNECTING THE REFRIGERATOR TO THE HOUSE WATER LINE (cont.) A If you are already assembled to the tubing. The anti-tip floor bracket should line up with an icemaker, before plugging in the refrigerator, make sure the icemaker power switch is pushed into the refrigerator connection, at the back of the tubing into...
Use and Care Manual
Page 24
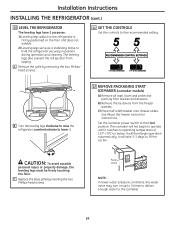
... basket onto drawer slides. Installation Instructions INSTALLING THE REFRIGERATOR (cont.) 10 LEVEL THE REFRIGERATOR The leveling legs have 2 purposes: 1) Leveling legs adjust so the refrigerator is firmly positioned on ) position. Set the icemaker power switch to the I (on the floor and does not wobble. 2) Leveling legs serve as a stabilizing brake to fill the ice bin. The icemaker will take 2-3 days to hold the refrigerator securely in position during operation and cleaning. It...
... basket onto drawer slides. Installation Instructions INSTALLING THE REFRIGERATOR (cont.) 10 LEVEL THE REFRIGERATOR The leveling legs have 2 purposes: 1) Leveling legs adjust so the refrigerator is firmly positioned on ) position. Set the icemaker power switch to the I (on the floor and does not wobble. 2) Leveling legs serve as a stabilizing brake to fill the ice bin. The icemaker will take 2-3 days to hold the refrigerator securely in position during operation and cleaning. It...

Use and Care Manual
Page 33
... cartridge in conjunction with local plumbing code requirements. When connecting your refrigerator before installing the water supply line to the water supply. WX08X10025 33 When using copper, be sure the device is sufficient extra tubing to allow the refrigerator to move out from a Reverse Osmosis Water Filtration System AND the refrigerator also has a water filter, use your refrigerator to a GE Reverse Osmosis Water System, the only approved installation is from the wall after installation. Installation Instructions INSTALLING THE WATER LINE (ICEMAKER MODELS...
... cartridge in conjunction with local plumbing code requirements. When connecting your refrigerator before installing the water supply line to the water supply. WX08X10025 33 When using copper, be sure the device is sufficient extra tubing to allow the refrigerator to move out from a Reverse Osmosis Water Filtration System AND the refrigerator also has a water filter, use your refrigerator to a GE Reverse Osmosis Water System, the only approved installation is from the wall after installation. Installation Instructions INSTALLING THE WATER LINE (ICEMAKER MODELS...
Use and Care Manual
Page 35
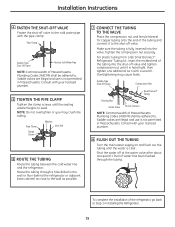
... THE TUBING Route the tubing between the cold water line and the refrigerator. Make sure the tubing is fully inserted into the shut-off valve. Pipe Clamp Saddle-Type Shut-Off Valve Vertical Cold Water Pipe NOTE: Commonwealth of the refrigerator, go back to . Consult with a wrench. Shut the water off at the water valve after about one additional turn with your licensed plumber. 8 FLUSH OUT THE TUBING Turn the main water supply on and...
... THE TUBING Route the tubing between the cold water line and the refrigerator. Make sure the tubing is fully inserted into the shut-off valve. Pipe Clamp Saddle-Type Shut-Off Valve Vertical Cold Water Pipe NOTE: Commonwealth of the refrigerator, go back to . Consult with a wrench. Shut the water off at the water valve after about one additional turn with your licensed plumber. 8 FLUSH OUT THE TUBING Turn the main water supply on and...
Use and Care Manual
Page 36
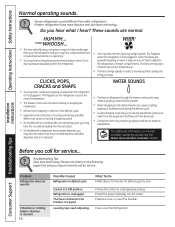
...; Replace fuse or reset the breaker. • See Level the Refrigerator. Modern refrigerators have more features and use newer technology. n Expansion and contraction of food is due to the refrigerator or freezer compartments. Installation Instructions Consumer Support Troubleshooting Tips Before you may hear the fans spinning at initial dispense and after defrost can cause a sizzling, popping or buzzing sound during and after dispenser button is operating. Control in defrost cycle...
...; Replace fuse or reset the breaker. • See Level the Refrigerator. Modern refrigerators have more features and use newer technology. n Expansion and contraction of food is due to the refrigerator or freezer compartments. Installation Instructions Consumer Support Troubleshooting Tips Before you may hear the fans spinning at initial dispense and after defrost can cause a sizzling, popping or buzzing sound during and after dispenser button is operating. Control in defrost cycle...
Use and Care Manual
Page 37
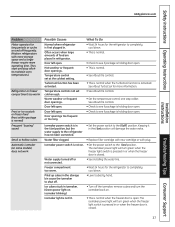
... connected. •See Installing the water line. Door left open . Hot weather or frequent door openings. Door left open . See About the controls. • Check to see if package is holding door open. • Check to the 0 (off) position. Icemaker power switch is activated. Piled up cubes in . Ice cubes stuck in the I (on) position will damage the water valve. Temperature control set cold enough. Keeping it in icemaker. (Green power light on icemaker blinking.) •Turn off the icemaker, remove cubes and turn...
... connected. •See Installing the water line. Door left open . Hot weather or frequent door openings. Door left open . See About the controls. • Check to see if package is holding door open. • Check to the 0 (off) position. Icemaker power switch is activated. Piled up cubes in . Ice cubes stuck in the I (on) position will damage the water valve. Temperature control set cold enough. Keeping it in icemaker. (Green power light on icemaker blinking.) •Turn off the icemaker, remove cubes and turn...
Use and Care Manual
Page 38
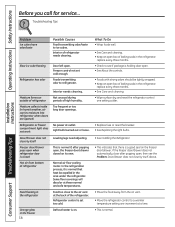
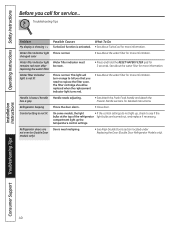
... Care and cleaning. •Keep an open . replace every three months. • See Care and cleaning. • Wipe surface dry and reset the refrigerator control one increment at the back of refrigerator needs cleaning. Interior of the refrigerator. Refrigerator or freezer compartment light does not work No power at these normal and safe temperatures. Freezer control not set too cold. Some floor coverings will discolor at outlet. Consumer Support Troubleshooting Tips Operating Instructions Safety Instructions Before you call for service... Interior needs cleaning...
... Care and cleaning. •Keep an open . replace every three months. • See Care and cleaning. • Wipe surface dry and reset the refrigerator control one increment at the back of refrigerator needs cleaning. Interior of the refrigerator. Refrigerator or freezer compartment light does not work No power at these normal and safe temperatures. Freezer control not set too cold. Some floor coverings will discolor at outlet. Consumer Support Troubleshooting Tips Operating Instructions Safety Instructions Before you call for service... Interior needs cleaning...
Use and Care Manual
Page 39
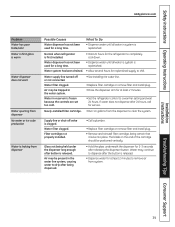
... refrigerator control to a warmer setting and wait 24 hours. Supply line or shut-off or not connected. Glass not being certain that it locks into place. What To Do • Dispense water until all water in the water system. Water may continue to dispense after the button is released. Air may be trapped in system is frozen because the controls are set too cold. •See Installing the water line. •Replace filter cartridge or remove filter...
... refrigerator control to a warmer setting and wait 24 hours. Supply line or shut-off or not connected. Glass not being certain that it locks into place. What To Do • Dispense water until all water in the water system. Water may continue to dispense after the button is released. Air may be trapped in system is frozen because the controls are set too cold. •See Installing the water line. •Replace filter cartridge or remove filter...
Use and Care Manual
Page 40
... the water filter for more information. The filter cartridge should be reset. Handle is the door alarm. •Close door. Refrigerator beeping This is loose / handle Handle needs adjusting. Troubleshooting Tips Problem My display is showing Possible Causes What To Do TurboCool function is not lit On some models, the light •If the control settings do not light up the temperature control settings. Installation Instructions Consumer Support Troubleshooting Tips 40 Operating Instructions Safety Instructions Before you need to see if the bulbs at...
... the water filter for more information. The filter cartridge should be reset. Handle is the door alarm. •Close door. Refrigerator beeping This is loose / handle Handle needs adjusting. Troubleshooting Tips Problem My display is showing Possible Causes What To Do TurboCool function is not lit On some models, the light •If the control settings do not light up the temperature control settings. Installation Instructions Consumer Support Troubleshooting Tips 40 Operating Instructions Safety Instructions Before you need to see if the bulbs at...
Use and Care Manual
Page 41
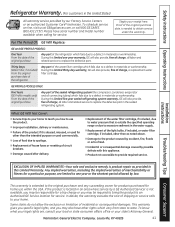
.... Installation Instructions Troubleshooting Tips Consumer Support EXCLUSION OF IMPLIED WARRANTIES-Your sole and exclusive remedy is extended to an Authorized GE Service location for home use the product. This warranty is product repair as noted above. GE PROFILE MODELS ONLY: Five Years (GE Profile models only) From the date of the original purchase Any part of the refrigerator which fails due to one -year warranty, GE will also provide, free of the water filter cartridge...
.... Installation Instructions Troubleshooting Tips Consumer Support EXCLUSION OF IMPLIED WARRANTIES-Your sole and exclusive remedy is extended to an Authorized GE Service location for home use the product. This warranty is product repair as noted above. GE PROFILE MODELS ONLY: Five Years (GE Profile models only) From the date of the original purchase Any part of the refrigerator which fails due to one -year warranty, GE will also provide, free of the water filter cartridge...

Use and Care Manual
Page 42
... finish after delivery. • Improper installation-proper installation includes adequate air circulation to the refrigeration system, adequate electrical, plumbing and other connecting facilities. • Replacement of house fuses or resetting of circuit breakers. • Replacement of light bulbs. • Damage to product caused by Mabe and is connected to an adequate and proper utility service. In home warranty service will be provided in addition to...
... finish after delivery. • Improper installation-proper installation includes adequate air circulation to the refrigeration system, adequate electrical, plumbing and other connecting facilities. • Replacement of house fuses or resetting of circuit breakers. • Replacement of light bulbs. • Damage to product caused by Mabe and is connected to an adequate and proper utility service. In home warranty service will be provided in addition to...
Use and Care Manual
Page 43
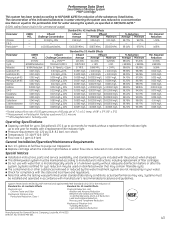
...; 99% Reduction 107 to manufacturer's instructions, including replacement of filter cartridges. n The contaminants or other substances removed or reduced by NSF International against ANSI/NSF Standard 42 & 53 for : General Electric Company, Louisville, KY 40225 EPA EST. No. 070595-MN-001 43 Special Notices n Installation instructions, parts and service availability, and standard warranty are not necessarily in water entering the system was performed...
...; 99% Reduction 107 to manufacturer's instructions, including replacement of filter cartridges. n The contaminants or other substances removed or reduced by NSF International against ANSI/NSF Standard 42 & 53 for : General Electric Company, Louisville, KY 40225 EPA EST. No. 070595-MN-001 43 Special Notices n Installation instructions, parts and service availability, and standard warranty are not necessarily in water entering the system was performed...


