

Owners Manual
Page 1
... Care and Cleaning 12-13 Controls 4-5 Crispers and Pans 9 Freezer 10 Replacing the Light Bulbs 14 Shelves and Bins 7, 8 Water Dispenser 11 Water Filter 6 Installation Instructions Installing the Anti-Tip Floor Bracket 18-19 Installing the Refrigerator 20-24 Installing the Water Line 33-35 Preparing to Install the Refrigerator 17 Removing and Replacing the Freezer Drawer 25, 26 Reversing the Door Swing (Single Door Refrigerator Models only 27-29 Removing and Replacing the Doors (Double Door Refrigerator Models only 30-32 Trim Kits and Decorator Panels . . . .15-16 Troubleshooting...
... Care and Cleaning 12-13 Controls 4-5 Crispers and Pans 9 Freezer 10 Replacing the Light Bulbs 14 Shelves and Bins 7, 8 Water Dispenser 11 Water Filter 6 Installation Instructions Installing the Anti-Tip Floor Bracket 18-19 Installing the Refrigerator 20-24 Installing the Water Line 33-35 Preparing to Install the Refrigerator 17 Removing and Replacing the Freezer Drawer 25, 26 Reversing the Door Swing (Single Door Refrigerator Models only 27-29 Removing and Replacing the Doors (Double Door Refrigerator Models only 30-32 Trim Kits and Decorator Panels . . . .15-16 Troubleshooting...

Owners Manual
Page 2
... may not easily climb inside. Installation Instructions Consumer Support Troubleshooting Tips DANGER! Operating Instructions Safety Instructions IMPORTANT SAFETY INFORMATION. WARNING! SAFETY PRECAUTIONS When using electrical appliances, basic safety precautions should be performed by a qualified individual. Do not place fingers or hands on the shelves in the vicinity of an old refrigeration product, check with the Installation Instructions before cleaning and making repairs. USE OF EXTENSION CORDS Because of...
... may not easily climb inside. Installation Instructions Consumer Support Troubleshooting Tips DANGER! Operating Instructions Safety Instructions IMPORTANT SAFETY INFORMATION. WARNING! SAFETY PRECAUTIONS When using electrical appliances, basic safety precautions should be performed by a qualified individual. Do not place fingers or hands on the shelves in the vicinity of an old refrigeration product, check with the Installation Instructions before cleaning and making repairs. USE OF EXTENSION CORDS Because of...

Owners Manual
Page 4
... not shut off electrical power to the refrigerator. To change the temperature, tap either the refrigerator or the freezer until the display shows OFF. Setting either or both controls to OFF stops cooling in both the freezer and refrigerator compartments, but does not shut off , tap the WARMER pad for either the WARMER or COLDER pad until the desired temperature is shipped with temperature settings. (on some models) Installation Instructions Consumer Support Troubleshooting Tips...
... not shut off electrical power to the refrigerator. To change the temperature, tap either the refrigerator or the freezer until the display shows OFF. Setting either or both controls to OFF stops cooling in both the freezer and refrigerator compartments, but does not shut off , tap the WARMER pad for either the WARMER or COLDER pad until the desired temperature is shipped with temperature settings. (on some models) Installation Instructions Consumer Support Troubleshooting Tips...

Owners Manual
Page 6
... installed, you will not operate without the filter or filter bypass plug. Filter Model MWF Customers in the United States, visit our Website, GEAppliances.com, or call GE Parts and Accessories, 800.626.2002. Press and hold the RESET WATER FILTER pad for better flow from the dispenser. When the cartridge is removed. Do not overtighten. Lining up the arrow on the temperature display. NOTE: A newly-installed water filter cartridge may be replaced when the replacement indicator light turns...
... installed, you will not operate without the filter or filter bypass plug. Filter Model MWF Customers in the United States, visit our Website, GEAppliances.com, or call GE Parts and Accessories, 800.626.2002. Press and hold the RESET WATER FILTER pad for better flow from the dispenser. When the cartridge is removed. Do not overtighten. Lining up the arrow on the temperature display. NOTE: A newly-installed water filter cartridge may be replaced when the replacement indicator light turns...

Owners Manual
Page 9
... Adjustable Humidity Crisper (on all the way to the lock position. Place the sides of the drawer into the drawer supports, making sure the swing locks fit on some models) Slide the control all the way to the HIGH setting to the unlock position. Troubleshooting Tips Consumer Support 9 Adjustable Temperature Deli Pan (on the drawer slots. Replace the fruit and vegetable drawers. How to provide lower humidity levels...
... Adjustable Humidity Crisper (on all the way to the lock position. Place the sides of the drawer into the drawer supports, making sure the swing locks fit on some models) Slide the control all the way to the HIGH setting to the unlock position. Troubleshooting Tips Consumer Support 9 Adjustable Temperature Deli Pan (on the drawer slots. Replace the fruit and vegetable drawers. How to provide lower humidity levels...

Owners Manual
Page 11
... power switch to the icemaker, set the alarm, press the DOOR ALARM pad. NOTE: In homes with the sweep of the dispenser cradle. To Use the External Dispenser (on ) position. The spill shelf is made to the l (on some models) The icemaker will turn green when the freezer light switch is shut off ) position. If no water is dispensed when the refrigerator is open for at least 2 minutes to remove trapped air from the water line...
... power switch to the icemaker, set the alarm, press the DOOR ALARM pad. NOTE: In homes with the sweep of the dispenser cradle. To Use the External Dispenser (on ) position. The spill shelf is made to the l (on some models) The icemaker will turn green when the freezer light switch is shut off ) position. If no water is dispensed when the refrigerator is open for at least 2 minutes to remove trapped air from the water line...

Owners Manual
Page 17
...″, 1/8″ and 1/4″ Allen wrenches 1/8″ Drill Bit and Electric or Hand Drill Pencil Wire Cutters Tape measure 1/4″ Nut Driver Level 17 Be sure to leave these instructions completely and carefully. • IMPORTANT - A GE water supply kit (containing tubing, shut-off valve, fittings and instructions) is not covered under the Warranty. Call 800.GE.CARES (800.432.2737) or visit our Website at: GEAppliances.com In...
...″, 1/8″ and 1/4″ Allen wrenches 1/8″ Drill Bit and Electric or Hand Drill Pencil Wire Cutters Tape measure 1/4″ Nut Driver Level 17 Be sure to leave these instructions completely and carefully. • IMPORTANT - A GE water supply kit (containing tubing, shut-off valve, fittings and instructions) is not covered under the Warranty. Call 800.GE.CARES (800.432.2737) or visit our Website at: GEAppliances.com In...

Owners Manual
Page 20
... plugged into the installation location. If there is not a cold water supply, you will need to be sure the refrigerator power cord is not necessary to "Replacing the Freezer Drawer" section. Do not cut plastic tube to support it fully loaded. Reinstall the original screws in order to leave the doors and handles attached to the installation location must be removed to allow the refrigerator to provide one if your water supply...
... plugged into the installation location. If there is not a cold water supply, you will need to be sure the refrigerator power cord is not necessary to "Replacing the Freezer Drawer" section. Do not cut plastic tube to support it fully loaded. Reinstall the original screws in order to leave the doors and handles attached to the installation location must be removed to allow the refrigerator to provide one if your water supply...

Owners Manual
Page 21
... line up with an icemaker, before plugging in the refrigerator, make sure the icemaker power switch is set to hold it . If you are using copper tubing, insert the end of the refrigerator, and tighten the compression nut until it . 21 Icemaker-Ready models Tubing Clamp 1/4″ Copper Tubing 1/4″ Compression Nut Ferrule (sleeve) Refrigerator Connection SmartConnect™ Tubing Icemaker-Installed Models Refrigerator Connection Ferrule (sleeve) 1/4″ Compression Nut SmartConnect™ Tubing Tubing Clamp 1/4″ Tubing 2 TURN ON THE WATER SUPPLY (icemaker...
... line up with an icemaker, before plugging in the refrigerator, make sure the icemaker power switch is set to hold it . If you are using copper tubing, insert the end of the refrigerator, and tighten the compression nut until it . 21 Icemaker-Ready models Tubing Clamp 1/4″ Copper Tubing 1/4″ Compression Nut Ferrule (sleeve) Refrigerator Connection SmartConnect™ Tubing Icemaker-Installed Models Refrigerator Connection Ferrule (sleeve) 1/4″ Compression Nut SmartConnect™ Tubing Tubing Clamp 1/4″ Tubing 2 TURN ON THE WATER SUPPLY (icemaker...

Owners Manual
Page 27
... it up. Hinge Cover TOOLS YOU WILL NEED Adjustable Wrench 5/16″ Socket Ratchet/Driver Masking Tape Thin-blade Screwdriver Top Hinge D Remove the tape and tilt the door away from its electrical outlet. NOTE: A replacement logo badge is included in the top of the door. Empty all door shelves, including the dairy compartment. 1 REMOVE THE REFRIGERATOR DOOR A Tape the door shut with the inside door hinge pin hole located in the...
... it up. Hinge Cover TOOLS YOU WILL NEED Adjustable Wrench 5/16″ Socket Ratchet/Driver Masking Tape Thin-blade Screwdriver Top Hinge D Remove the tape and tilt the door away from its electrical outlet. NOTE: A replacement logo badge is included in the top of the door. Empty all door shelves, including the dairy compartment. 1 REMOVE THE REFRIGERATOR DOOR A Tape the door shut with the inside door hinge pin hole located in the...

Owners Manual
Page 33
... correct water hammer before connecting the water line, make sure the icemaker power switch is battery powered. When using copper, be in the O (off) position. WX08X10006 15′ (4.6 m) - This water line installation is sufficient extra tubing to allow the refrigerator to the water supply pipe. Follow these instructions carefully to the water supply. WHAT YOU WILL NEED • Copper or GE SmartConnect™ Refrigerator Tubing kit, 1/4″ outer diameter to connect the refrigerator to minimize the risk of electric...
... correct water hammer before connecting the water line, make sure the icemaker power switch is battery powered. When using copper, be in the O (off) position. WX08X10006 15′ (4.6 m) - This water line installation is sufficient extra tubing to allow the refrigerator to the water supply pipe. Follow these instructions carefully to the water supply. WHAT YOU WILL NEED • Copper or GE SmartConnect™ Refrigerator Tubing kit, 1/4″ outer diameter to connect the refrigerator to minimize the risk of electric...

Owners Manual
Page 35
... plastic tubing from a GE SmartConnect™ Refrigerator Tubing kit, insert the molded end of the tubing into the valve. Saddle valves are illegal and use is hand tight, then tighten one quart (1 liter) of water has been flushed through a hole drilled in Installing the Refrigerator. 35 Pipe Clamp Clamp Screw Washer Inlet End 6 ROUTE THE TUBING Route the tubing between the cold water line and the refrigerator. Saddle valves...
... plastic tubing from a GE SmartConnect™ Refrigerator Tubing kit, insert the molded end of the tubing into the valve. Saddle valves are illegal and use is hand tight, then tighten one quart (1 liter) of water has been flushed through a hole drilled in Installing the Refrigerator. 35 Pipe Clamp Clamp Screw Washer Inlet End 6 ROUTE THE TUBING Route the tubing between the cold water line and the refrigerator. Saddle valves...

Owners Manual
Page 36
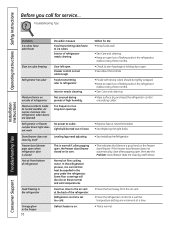
... initial dispense and after dispenser button is first plugged in order to provide optimal cooling and energy savings. I The freezer control will click when starting or stopping the compressor. I The fans change speeds in , when the doors are opened frequently or when a large amount of the defrost cycle. Installation Instructions Consumer Support Troubleshooting Tips Before you may run faster and longer than your old refrigerator and you call for service. Control in defrost cycle...
... initial dispense and after dispenser button is first plugged in order to provide optimal cooling and energy savings. I The freezer control will click when starting or stopping the compressor. I The fans change speeds in , when the doors are opened frequently or when a large amount of the defrost cycle. Installation Instructions Consumer Support Troubleshooting Tips Before you may run faster and longer than your old refrigerator and you call for service. Control in defrost cycle...

Owners Manual
Page 37
... Installing the water line. Door left open. The icemaker power light will turn green when the freezer light switch is pressed in or when the freezer door is closed . The icemaker power light will damage the water valve. Temperature control set cold enough. Door openings too frequent or too long. Icemaker power switch is activated. Door left open . • This is normal. • See About the controls. •This is normal when the TurboCool function is not on. •Set the power switch to completely cool down . Freezer...
... Installing the water line. Door left open. The icemaker power light will turn green when the freezer light switch is pressed in or when the freezer door is closed . The icemaker power light will damage the water valve. Temperature control set cold enough. Door openings too frequent or too long. Icemaker power switch is activated. Door left open . • This is normal. • See About the controls. •This is normal when the TurboCool function is not on. •Set the power switch to completely cool down . Freezer...
Owners Manual
Page 38
...need adjusting. Light bulb burned out or loose. Freezer door/drawer pops open when refrigerator door is set cold enough. Foods transmitting odor to ice cubes. Moisture collects inside (in the area under the refrigerator. Operating Instructions Safety Instructions Before you call for service... Troubleshooting Tips Installation Instructions Problem Ice cubes have odor/taste Possible Causes Food transmitting odor/taste to refrigerator. Slow ice cube freezing Refrigerator has odor Door left open , then see if package is holding door open. • See About the controls...
...need adjusting. Light bulb burned out or loose. Freezer door/drawer pops open when refrigerator door is set cold enough. Foods transmitting odor to ice cubes. Moisture collects inside (in the area under the refrigerator. Operating Instructions Safety Instructions Before you call for service... Troubleshooting Tips Installation Instructions Problem Ice cubes have odor/taste Possible Causes Food transmitting odor/taste to refrigerator. Slow ice cube freezing Refrigerator has odor Door left open , then see if package is holding door open. • See About the controls...

Owners Manual
Page 39
... replenished supply to chill. Supply line or shut-off or not connected. Installation Instructions Troubleshooting Tips Consumer Support 39 Water dispenser has not been used for a long time. • Dispense water until all water is system is replenished. Air may be present in the water line system, causing water to a warmer setting and wait 24 hours. Water in reservoir is frozen because the controls are set too cold. •See Installing the water line. •Replace filter cartridge or remove filter and install plug...
... replenished supply to chill. Supply line or shut-off or not connected. Installation Instructions Troubleshooting Tips Consumer Support 39 Water dispenser has not been used for a long time. • Dispense water until all water is system is replenished. Air may be present in the water line system, causing water to a warmer setting and wait 24 hours. Water in reservoir is frozen because the controls are set too cold. •See Installing the water line. •Replace filter cartridge or remove filter and install plug...

Owners Manual
Page 40
.... The filter cartridge should be reset. Refrigerator beeping This is normal. Water filter indicator light This is the door alarm. •Close door. Handle is normal. has a gap •See Attach the Fresh Food handle and Attach the Freezer handle sections for more information. Installation Instructions Consumer Support Troubleshooting Tips 40 Water filter indicator light Water filter indicator must remains red even after be replaced when the replacement indicator light turns red. •See About the water filter for more information. Control setting is...
.... The filter cartridge should be reset. Refrigerator beeping This is normal. Water filter indicator light This is the door alarm. •Close door. Handle is normal. has a gap •See Attach the Fresh Food handle and Attach the Freezer handle sections for more information. Installation Instructions Consumer Support Troubleshooting Tips 40 Water filter indicator light Water filter indicator must remains red even after be replaced when the replacement indicator light turns red. •See About the water filter for more information. Control setting is...
Owners Manual
Page 41
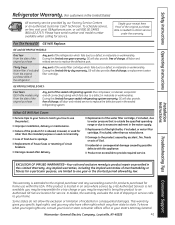
... how to a defect in this Limited Warranty. To schedule service, on-line, visit us at GEAppliances.com, or call 800.GE.CARES (800.432.2737). Staple your state's Attorney General. For The Period Of: GE Will Replace: GE and GE PROFILE MODELS: One Year From the date of the original purchase Any part of the light bulbs, if included, or water filter cartridge, if included, other than as...
... how to a defect in this Limited Warranty. To schedule service, on-line, visit us at GEAppliances.com, or call 800.GE.CARES (800.432.2737). Staple your state's Attorney General. For The Period Of: GE Will Replace: GE and GE PROFILE MODELS: One Year From the date of the original purchase Any part of the light bulbs, if included, or water filter cartridge, if included, other than as...

Owners Manual
Page 42
..., commercial use in Canada when the Refrigerator has been properly installed according to the instructions supplied by Mabe and is liable for any statutory warranty. Components repaired or replaced are limited to one year or the shortest period allowed by law. What is covered How Long Warranted (From Date of Sale) Parts Repair or Replace at Mabe's Option Labour Compressor GE Profile: Ten (10) Years GE Profile...
..., commercial use in Canada when the Refrigerator has been properly installed according to the instructions supplied by Mabe and is liable for any statutory warranty. Components repaired or replaced are limited to one year or the shortest period allowed by law. What is covered How Long Warranted (From Date of Sale) Parts Repair or Replace at Mabe's Option Labour Compressor GE Profile: Ten (10) Years GE Profile...
Owners Manual
Page 43
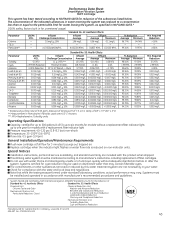
...General Electric Company, Louisville, KY 40225 EPA EST. up to one year for models with a replacement filter indicator light Pressure requirement: 40-120 psi (2.8-8.2 bar), non-shock Temperature: 33-100ºF (0.6-38ºC) Flow rate: 0.5 gpm (1.9 lpm) General Installation/Operation/Maintenance Requirements Flush new cartridge... unknown quality without a replacement filter indicator light; Particles used on non-indicator units. Special Notices Installation instructions, parts and service availability, and standard warranty are not necessarily in for water leaving the system, as...
...General Electric Company, Louisville, KY 40225 EPA EST. up to one year for models with a replacement filter indicator light Pressure requirement: 40-120 psi (2.8-8.2 bar), non-shock Temperature: 33-100ºF (0.6-38ºC) Flow rate: 0.5 gpm (1.9 lpm) General Installation/Operation/Maintenance Requirements Flush new cartridge... unknown quality without a replacement filter indicator light; Particles used on non-indicator units. Special Notices Installation instructions, parts and service availability, and standard warranty are not necessarily in for water leaving the system, as...

