User Manual
Page 2
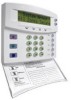
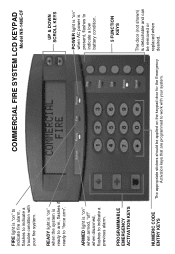
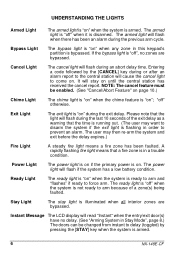
... removed or replaced when desired. ARMED light is "on " when the system is ready to arm, flashes if ready to "force arm". COMMERCIAL FIRE SYSTEM LCD KEYPAD Model NX-148E-CF READY light is "on " when armed, "off" when disarmed, flashes to indicate a previous alarm. FIRE light is "on" to indicate fire alarm, flashes to..." when AC power is present, flashes to indicate a low battery condition. 5 FUNCTION KEYS The door (not shown) is detachable and can be applied on the keypad door for the Emergency Activation keys that are programmed to work with your system.
... removed or replaced when desired. ARMED light is "on " when the system is ready to arm, flashes if ready to "force arm". COMMERCIAL FIRE SYSTEM LCD KEYPAD Model NX-148E-CF READY light is "on " when armed, "off" when disarmed, flashes to indicate a previous alarm. FIRE light is "on" to indicate fire alarm, flashes to..." when AC power is present, flashes to indicate a low battery condition. 5 FUNCTION KEYS The door (not shown) is detachable and can be applied on the keypad door for the Emergency Activation keys that are programmed to work with your system.
User Manual
Page 3
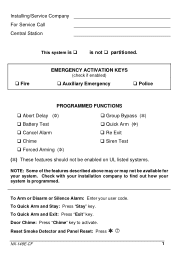
...: Press "Exit" key. Check with your system is not partitioned. To Quick Arm and Stay: Press "Stay" key. Reset Smoke Detector and Panel Reset: Press 7 NX-148E-CF 1 Installing/Service Company For Service Call Central Station This system is is programmed. EMERGENCY ACTIVATION KEYS (check if enabled) Fire Auxiliary Emergency Police PROGRAMMED FUNCTIONS...
...: Press "Exit" key. Check with your system is not partitioned. To Quick Arm and Stay: Press "Stay" key. Reset Smoke Detector and Panel Reset: Press 7 NX-148E-CF 1 Installing/Service Company For Service Call Central Station This system is is programmed. EMERGENCY ACTIVATION KEYS (check if enabled) Fire Auxiliary Emergency Police PROGRAMMED FUNCTIONS...

User Manual
Page 5
EVENT LOG 25 EMERGENCY EVACUATION PLANS 27 NX-148E-CF 3 TABLE OF CONTENTS GLOSSARY OF TERMS 4 UNDERSTANDING THE LIGHTS 6 KEYPAD FUNCTIONS 7 Arming Your System In The "Away" Mode 7 Making Your System Ready To Arm 7 Arming Your System In The "Stay" Mode 8 Using The Quick Arm 9 ... 14 Changing User Codes 15 Assigning User Code Authority Levels 15 Reset Function 16 Reading The Event Log 17 Adjusting The View / Brightness Of The LCD 17 Setting The System Clock 18 Using The Door Chime Feature 18 PARTITIONED SYSTEMS OPERATION 19 Lights In Partitioning Master Mode 19 Displays In The...
EVENT LOG 25 EMERGENCY EVACUATION PLANS 27 NX-148E-CF 3 TABLE OF CONTENTS GLOSSARY OF TERMS 4 UNDERSTANDING THE LIGHTS 6 KEYPAD FUNCTIONS 7 Arming Your System In The "Away" Mode 7 Making Your System Ready To Arm 7 Arming Your System In The "Stay" Mode 8 Using The Quick Arm 9 ... 14 Changing User Codes 15 Assigning User Code Authority Levels 15 Reset Function 16 Reading The Event Log 17 Adjusting The View / Brightness Of The LCD 17 Setting The System Clock 18 Using The Door Chime Feature 18 PARTITIONED SYSTEMS OPERATION 19 Lights In Partitioning Master Mode 19 Displays In The...

User Manual
Page 6
...ANY QUESTIONS ABOUT YOUR SYSTEM, CONTACT THE INSTALLING COMPANY. 4 NX-148E-CF The system must always be done with A.C. The knowledge you to install and maintain your system. Use qualified security professionals to easily operate your security system. 7. Your periodic test should be tested weekly. 3....or malfunction. FAILURE TO DO SO COULD RESULT IN THE SECURITY SYSTEM NOT WORKING PROPERLY. The LCD keypad includes 9 lights and a 32-character liquid crystal display and a built-in a weekly test of the security system which is utilized in electronic sounder. These provide specific...
...ANY QUESTIONS ABOUT YOUR SYSTEM, CONTACT THE INSTALLING COMPANY. 4 NX-148E-CF The system must always be done with A.C. The knowledge you to install and maintain your system. Use qualified security professionals to easily operate your security system. 7. Your periodic test should be tested weekly. 3....or malfunction. FAILURE TO DO SO COULD RESULT IN THE SECURITY SYSTEM NOT WORKING PROPERLY. The LCD keypad includes 9 lights and a 32-character liquid crystal display and a built-in a weekly test of the security system which is utilized in electronic sounder. These provide specific...
User Manual
Page 7
... be either User Codes (relating to a person) or Function Codes (a toggle switch to turn on (ARM) the security system by pressing either the [STAY] or [EXIT] key on the keypad control (for Entry/Exit doors, or grants a delay to allow someone to enter/exit the building without an alarm ...allows the system to be sent to the central station that allows a special code to bypass multiple zones with one or more zones open. NX148E-CF 5 Chime Feature: An option that allows an instant alarm condition for ARMING only) as programmed by the installer to the central station. Function Code...
... be either User Codes (relating to a person) or Function Codes (a toggle switch to turn on (ARM) the security system by pressing either the [STAY] or [EXIT] key on the keypad control (for Entry/Exit doors, or grants a delay to allow someone to enter/exit the building without an alarm ...allows the system to be sent to the central station that allows a special code to bypass multiple zones with one or more zones open. NX148E-CF 5 Chime Feature: An option that allows an instant alarm condition for ARMING only) as programmed by the installer to the central station. Function Code...
User Manual
Page 8
... Chime Light The chime light is "on" when the chime feature is "on " when any zone in this keypad's partition is in order to delay (toggled) by the [CANCEL] key during the last 10 seconds of a ...the system is disarmed. The user may want to disarm the system if the exit light is armed. 6 NX-148E-CF Entering a code followed by pressing the [STAY] key when the system is flashing in a trouble condition....off " otherwise. The armed light is "on "; Instant Message The LCD display will flash if the system has a low battery condition. Please note that a fire zone is bypassed.
... Chime Light The chime light is "on" when the chime feature is "on " when any zone in this keypad's partition is in order to delay (toggled) by the [CANCEL] key during the last 10 seconds of a ...the system is disarmed. The user may want to disarm the system if the exit light is armed. 6 NX-148E-CF Entering a code followed by pressing the [STAY] key when the system is flashing in a trouble condition....off " otherwise. The armed light is "on "; Instant Message The LCD display will flash if the system has a low battery condition. Please note that a fire zone is bypassed.
User Manual
Page 9
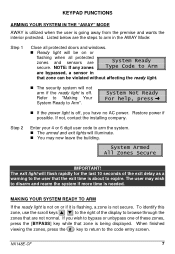
... If not, contact the installing company. You may wish to Arm". System Armed All Zones Secure IMPORTANT! MAKING YOUR SYSTEM READY TO ARM If the ready light is not on or flashing when... windows. If you have no AC power. KEYPAD FUNCTIONS ARMING YOUR SYSTEM IN THE "AWAY" MODE AWAY is utilized when the user is not secure. Refer to "Making Your System Ready to ...light will be violated without affecting the ready light. The security system will illuminate. To identify this zone, use the scroll keys • - NX148E-CF 7 to the right of these zones, press the [...
... If not, contact the installing company. You may wish to Arm". System Armed All Zones Secure IMPORTANT! MAKING YOUR SYSTEM READY TO ARM If the ready light is not on or flashing when... windows. If you have no AC power. KEYPAD FUNCTIONS ARMING YOUR SYSTEM IN THE "AWAY" MODE AWAY is utilized when the user is not secure. Refer to "Making Your System Ready to ...light will be violated without affecting the ready light. The security system will illuminate. To identify this zone, use the scroll keys • - NX148E-CF 7 to the right of these zones, press the [...

User Manual
Page 10
...Auto Instant" is off, you have no longer have an entry System Armed Instant delay. 8 NX-148E-CF NOTE: If any zone(s) are as follows: Step 1 Close all interior zones will not arm... can be faulted without affecting the ready light. Step 3 Press the [STAY] key. The LCD display will read "Instant", indicating that zone can be violated without an alarm. ARMING YOUR SYSTEM...the user freedom of movement within the interior area.) The bypass light will illuminate if any zones are secure. The steps to arm Step 2 Enter your 4 or 6 digit user code. (Optional, if programmed...
...Auto Instant" is off, you have no longer have an entry System Armed Instant delay. 8 NX-148E-CF NOTE: If any zone(s) are as follows: Step 1 Close all interior zones will not arm... can be faulted without affecting the ready light. Step 3 Press the [STAY] key. The LCD display will read "Instant", indicating that zone can be violated without an alarm. ARMING YOUR SYSTEM...the user freedom of movement within the interior area.) The bypass light will illuminate if any zones are secure. The steps to arm Step 2 Enter your 4 or 6 digit user code. (Optional, if programmed...
User Manual
Page 11
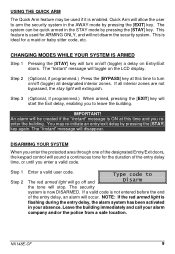
...enabling you enter the protected area through one of the designated Entry/Exit doors, the keypad control will sound a continuous tone for the duration of the entry delay, an alarm will allow ...the user to turn on the LCD display. DISARMING YOUR SYSTEM When you to The red armed light will go off and Disarm...toggle on /off (toggle) all interior zones are not bypassed, the stay light will not disarm the security system. NX148E-CF 9 NOTE: If the red armed light is not entered before the end of the entry delay time,...
...enabling you enter the protected area through one of the designated Entry/Exit doors, the keypad control will sound a continuous tone for the duration of the entry delay, an alarm will allow ...the user to turn on the LCD display. DISARMING YOUR SYSTEM When you to The red armed light will go off and Disarm...toggle on /off (toggle) all interior zones are not bypassed, the stay light will not disarm the security system. NX148E-CF 9 NOTE: If the red armed light is not entered before the end of the entry delay time,...

User Manual
Page 12
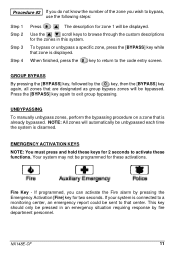
Step 2 When the LCD prompts for zone 112.) Step 5 Step 6 Step 7 Press the [BYPASS] key again. The bypass light will cause the cancel light to bypass. (Example: Press 6 for ... wish to exit this light is now bypassed. Step 3 The bypass light flashes. Entering a code followed by the [CANCEL] key while this viewing mode. 10 NX-148E-CF It will flash during or after an alarm report to Procedure #2. If the zone is in the disarmed state. Repeat steps 4 and 5 for any other...
Step 2 When the LCD prompts for zone 112.) Step 5 Step 6 Step 7 Press the [BYPASS] key again. The bypass light will cause the cancel light to bypass. (Example: Press 6 for ... wish to exit this light is now bypassed. Step 3 The bypass light flashes. Entering a code followed by the [CANCEL] key while this viewing mode. 10 NX-148E-CF It will flash during or after an alarm report to Procedure #2. If the zone is in the disarmed state. Repeat steps 4 and 5 for any other...
User Manual
Page 13
... each time the system is connected to a monitoring center, an emergency report could be displayed. NOTE: All zones will be pressed in this system. NX148E-CF 11
... each time the system is connected to a monitoring center, an emergency report could be displayed. NOTE: All zones will be pressed in this system. NX148E-CF 11
User Manual
Page 14
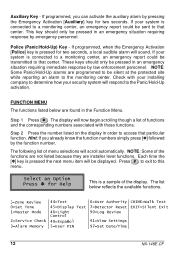
... associated with those functions. Hint: If you can activate the auxiliary alarm by the function number. Press # to exit to the monitoring center. If your security system will now begin scrolling though a list of menu selections will sound. The list below are programmed to access that center. If programmed, when the...ñol 5=User PIN 6=User Authority CHIME=Walk Test 7=Detector Reset EXIT=Silent Exit 90=Log Review 91=View Settings 97=Set Date/Time 12 NX-148E-CF Each time the [r] key is pressed for two seconds. Auxiliary Key -
... associated with those functions. Hint: If you can activate the auxiliary alarm by the function number. Press # to exit to the monitoring center. If your security system will now begin scrolling though a list of menu selections will sound. The list below are programmed to access that center. If programmed, when the...ñol 5=User PIN 6=User Authority CHIME=Walk Test 7=Detector Reset EXIT=Silent Exit 90=Log Review 91=View Settings 97=Set Date/Time 12 NX-148E-CF Each time the [r] key is pressed for two seconds. Auxiliary Key -
User Manual
Page 15
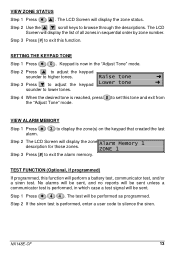
...to adjust the keypad sounder to browse through the descriptions. to adjust the keypad Lower tone &#...code to display the zone(s) on the keypad that created the last alarm. SETTING THE KEYPAD TONE Step 1 Press r 0 . ...Keypad is performed, in sequential order by zone number. Step 2 If the siren test is reached, press # to lower tones. The LCD... Screen will display the list of all zones in which case a test signal will description for those display zones. VIEW ZONE STATUS Step 1 Press r • . The LCD Screen will display the zone status. Step 2 The LCD...
...to adjust the keypad sounder to browse through the descriptions. to adjust the keypad Lower tone &#...code to display the zone(s) on the keypad that created the last alarm. SETTING THE KEYPAD TONE Step 1 Press r 0 . ...Keypad is performed, in sequential order by zone number. Step 2 If the siren test is reached, press # to lower tones. The LCD... Screen will display the list of all zones in which case a test signal will description for those display zones. VIEW ZONE STATUS Step 1 Press r • . The LCD Screen will display the zone status. Step 2 The LCD...
User Manual
Page 16
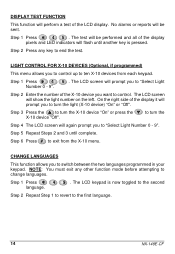
.... Step 3 Press the • to the first language. 14 NX-148E-CF Step 1 Press r 4 9 . Step 6 Press # to control. The LCD screen will again prompt you to the second language. The test will prompt you want to exit from each keypad. The LCD screen will be sent. NOTE: You must exit any key to ...to ten X-10 devices from the X-10 menu. No alarms or reports will prompt you to control up to "Select Light Number 0 - 9". The LCD keypad is pressed. Step 5 Repeat Steps 2 and 3 until another key is now toggled to switch between the two languages programmed in your...
.... Step 3 Press the • to the first language. 14 NX-148E-CF Step 1 Press r 4 9 . Step 6 Press # to control. The LCD screen will again prompt you to the second language. The test will prompt you want to exit from each keypad. The LCD screen will be sent. NOTE: You must exit any key to ...to ten X-10 devices from the X-10 menu. No alarms or reports will prompt you to control up to "Select Light Number 0 - 9". The LCD keypad is pressed. Step 5 Repeat Steps 2 and 3 until another key is now toggled to switch between the two languages programmed in your...

User Manual
Page 17
... 5 If another person's authority. Step 3 Enter the 2-digit user number. The LCD Screen will prompt for a user number. The LCD Screen will prompt for a user number. NX148E-CF 15 Step 3 Enter the 2-digit user number. The LCD keypad will now prompt you may use the up and down scroll keys to select... for this user. NOTE: You must have authority to the partition you must have access to step 3 and enter the user code. The LCD will display the current code for user number 4. If you are changing the code of another person, you wish to add or remove from ...
... 5 If another person's authority. Step 3 Enter the 2-digit user number. The LCD Screen will prompt for a user number. The LCD Screen will prompt for a user number. NX148E-CF 15 Step 3 Enter the 2-digit user number. The LCD keypad will now prompt you may use the up and down scroll keys to select... for this user. NOTE: You must have authority to the partition you must have access to step 3 and enter the user code. The LCD will display the current code for user number 4. If you are changing the code of another person, you wish to add or remove from ...
User Manual
Page 18
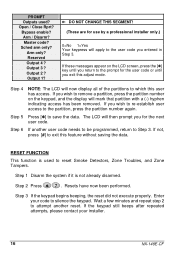
...These are for the next user code. If you wish to remove a partition, press the partition number on the LCD screen, press the [r] key until you exit this adjust mode. The LCD will then prompt you for use by a professional installer only.) 0=No 1=Yes Your keypress will apply to the ...all of the partitions to Step 3. Step 5 Press [r] to exit this user has access. Step 3 If the keypad begins beeping, the reset did not execute properly. Enter your installer. 16 NX-148E-CF Wait a few minutes and repeat step 2 to attempt another user code needs to be programmed, return to which this...
...These are for the next user code. If you wish to remove a partition, press the partition number on the LCD screen, press the [r] key until you exit this adjust mode. The LCD will then prompt you for use by a professional installer only.) 0=No 1=Yes Your keypress will apply to the ...all of the partitions to Step 3. Step 5 Press [r] to exit this user has access. Step 3 If the keypad begins beeping, the reset did not execute properly. Enter your installer. 16 NX-148E-CF Wait a few minutes and repeat step 2 to attempt another user code needs to be programmed, return to which this...
User Manual
Page 19
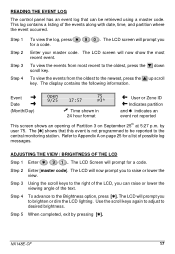
... from most recent event. The display contains the following information. Refer to brighten or dim the LCD lighting. Step 2 Enter [master code]. NX148E-CF 17 The LCD will prompt you for a list of possible log messages. The LCD will now prompt you can be reported to be retrieved using a master code. READING THE EVENT...
... from most recent event. The display contains the following information. Refer to brighten or dim the LCD lighting. Step 2 Enter [master code]. NX148E-CF 17 The LCD will prompt you for a list of possible log messages. The LCD will now prompt you can be reported to be retrieved using a master code. READING THE EVENT...
User Manual
Page 20
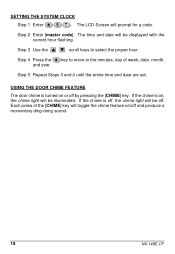
... with the current hour flashing. USING THE DOOR CHIME FEATURE The door chime is turned on or off and produce a momentary ding-dong sound. 18 NX-148E-CF The LCD Screen will be illuminated. Step 3 Use the • - If the chime is on /off by pressing the [CHIME] key. scroll keys to the minutes...
... with the current hour flashing. USING THE DOOR CHIME FEATURE The door chime is turned on or off and produce a momentary ding-dong sound. 18 NX-148E-CF The LCD Screen will be illuminated. Step 3 Use the • - If the chime is on /off by pressing the [CHIME] key. scroll keys to the minutes...

User Manual
Page 21
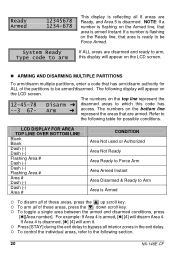
... MODE ARMED and READY STATUS The LCD screen will revert back to exit this mode. NOTE: r 1 will illuminate if ANY area has a zone bypassed. The keypad will display the Armed and Ready status...Ready or Force armable. FIRE will illuminate if ANY one partition, your keypad will illuminate if ALL partitions are armed. NX148E-CF 19 READY will provide the status of an exit delay. If a ...code is authorized) within the system and to the NX-8 control panel. Read this manual. ...
... MODE ARMED and READY STATUS The LCD screen will revert back to exit this mode. NOTE: r 1 will illuminate if ANY area has a zone bypassed. The keypad will display the Armed and Ready status...Ready or Force armable. FIRE will illuminate if ANY one partition, your keypad will illuminate if ALL partitions are armed. NX148E-CF 19 READY will provide the status of an exit delay. If a ...code is authorized) within the system and to the NX-8 control panel. Read this manual. ...
User Manual
Page 22
... be armed/disarmed. NOTE: If a number is flashing on the Armed line, that are disarmed and ready to which this display will appear on the LCD screen. The following section. 20 NX-148E-CF The numbers on the bottom line represent the areas that area is disarmed, [r] [4] will appear on the...
... be armed/disarmed. NOTE: If a number is flashing on the Armed line, that are disarmed and ready to which this display will appear on the LCD screen. The following section. 20 NX-148E-CF The numbers on the bottom line represent the areas that area is disarmed, [r] [4] will appear on the...