Use and Care Manual
Page 1
Gas Downdraft Cooktop ge.com Safety Instructions . . . .2-5 Operating Instructions Accessories 7 Controls 8, 9 Cookware 9 Electric Ignition 8 Features 6 Griddle 14 Grill Module 10-13 Surface Burner Modules 6, 8-10 Ventilation System 6, 9 Installation Owner's Manual Instructions 18-29 & Installation LP ... and Cleaning Control Knobs and Control Panel Seal 15 Grease Jar 15 Griddle Accessory 17 Grill Burner 16 Grill Grate 16 Igniters 17 Porcelain Burner Basin . . . . . 17 Porcelain Cooktop 15 Sealed Burner Module . . . . . 17 Stainless Steel Surfaces . . . . .15 Vent Grille...
Gas Downdraft Cooktop ge.com Safety Instructions . . . .2-5 Operating Instructions Accessories 7 Controls 8, 9 Cookware 9 Electric Ignition 8 Features 6 Griddle 14 Grill Module 10-13 Surface Burner Modules 6, 8-10 Ventilation System 6, 9 Installation Owner's Manual Instructions 18-29 & Installation LP ... and Cleaning Control Knobs and Control Panel Seal 15 Grease Jar 15 Griddle Accessory 17 Grill Burner 16 Grill Grate 16 Igniters 17 Porcelain Burner Basin . . . . . 17 Porcelain Cooktop 15 Sealed Burner Module . . . . . 17 Stainless Steel Surfaces . . . . .15 Vent Grille...
Use and Care Manual
Page 3
Properly adjusted burners, indicated by qualified gas cooktop installers or service technicians. Exposure to these substances can cause minor exposure to four of these substances, namely benzene, carbon monoxide, formaldehyde and soot, caused primarily by the incomplete combustion of natural gas or LP fuels. If in doubt about the grounding of interest to children should...
Properly adjusted burners, indicated by qualified gas cooktop installers or service technicians. Exposure to these substances can cause minor exposure to four of these substances, namely benzene, carbon monoxide, formaldehyde and soot, caused primarily by the incomplete combustion of natural gas or LP fuels. If in doubt about the grounding of interest to children should...
Use and Care Manual
Page 4
... AND POULTRY THOROUGHLY... s Do not store flammable materials near the cooktop. s Do not operate the burner without all burner parts in use water on cooktop only when necessary. s Do not clean the cooktop when the appliance is in place. Smother a flaming pan on a surface burner by covering the pan completely with baking soda or, if available...
... AND POULTRY THOROUGHLY... s Do not store flammable materials near the cooktop. s Do not operate the burner without all burner parts in use water on cooktop only when necessary. s Do not clean the cooktop when the appliance is in place. Smother a flaming pan on a surface burner by covering the pan completely with baking soda or, if available...
Use and Care Manual
Page 5
...Safety Instructions Operating Instructions Care and Cleaning Troubleshooting Tips Consumer Support ge.com WARNING! Select cookware having flat bottoms large enough to prevent overheating fat beyond the smoking point. To avoid spillovers, make sure the burners have ignited. This will both save cleaning time and prevent ... cool. Also, it is added. s Never try to the cooktop and call a qualified service technician. s Do not flame foods on a hot surface. Never use aluminum foil under the hood, turn the surface burner controls off the gas to move a pan of the pan. s Do not use ...
...Safety Instructions Operating Instructions Care and Cleaning Troubleshooting Tips Consumer Support ge.com WARNING! Select cookware having flat bottoms large enough to prevent overheating fat beyond the smoking point. To avoid spillovers, make sure the burners have ignited. This will both save cleaning time and prevent ... cool. Also, it is added. s Never try to the cooktop and call a qualified service technician. s Do not flame foods on a hot surface. Never use aluminum foil under the hood, turn the surface burner controls off the gas to move a pan of the pan. s Do not use ...
Use and Care Manual
Page 6
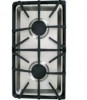
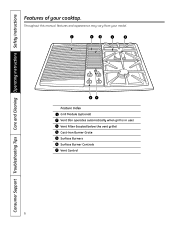
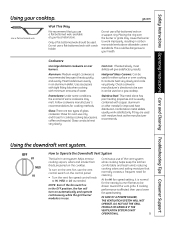
Throughout this manual, features and appearance may vary from your cooktop. Consumer Support Troubleshooting Tips Care and Cleaning Operating Instructions Safety Instructions Features of your model. 1 2 3 4 5 67 Feature Index 1 Grill Module (optional) 2 Vent (fan operates automatically when grill is in use) 3 Vent Filter (located below the vent grille) 4 Cast-Iron Burner Grate 5 Surface Burners 6 Surface Burner Controls 7 Vent Control 6
Throughout this manual, features and appearance may vary from your cooktop. Consumer Support Troubleshooting Tips Care and Cleaning Operating Instructions Safety Instructions Features of your model. 1 2 3 4 5 67 Feature Index 1 Grill Module (optional) 2 Vent (fan operates automatically when grill is in use) 3 Vent Filter (located below the vent grille) 4 Cast-Iron Burner Grate 5 Surface Burners 6 Surface Burner Controls 7 Vent Control 6
Use and Care Manual
Page 7
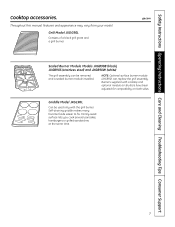
... cook several pancakes, hamburgers or grilled sandwiches at the same time. 7 Burners supplied with the grill burner. NOTE: Optional surface burner module (JXGB90) can be used only with cooktop and optional module air shutters have been adjusted for compatibility on both sides. ge.com Sealed Burner Module Models JXGB90B (black), JXGB90S (stainless steel) and JXGB90W (white) The grill assembly can replace...
... cook several pancakes, hamburgers or grilled sandwiches at the same time. 7 Burners supplied with the grill burner. NOTE: Optional surface burner module (JXGB90) can be used only with cooktop and optional module air shutters have been adjusted for compatibility on both sides. ge.com Sealed Burner Module Models JXGB90B (black), JXGB90S (stainless steel) and JXGB90W (white) The grill assembly can replace...
Use and Care Manual
Page 8
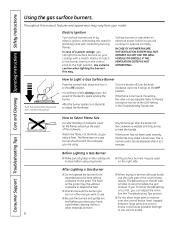
...MODULE OR GRIDDLE IF THE VENTILATION SYSTEM IS NOT OPERATIONAL. Consumer Support Troubleshooting Tips Care and Cleaning Operating Instructions Safety Instructions Using the gas surface burners. Electric Ignition Your surface burners are in the Troubleshooting Tips section. The flame size on the grate. Before Lighting a Gas Burner s Make sure all grates on the cooktop... are lit by electric ignition, eliminating the need for best cookware on a gas burner should dissipate after 4 to extend over...
...MODULE OR GRIDDLE IF THE VENTILATION SYSTEM IS NOT OPERATIONAL. Consumer Support Troubleshooting Tips Care and Cleaning Operating Instructions Safety Instructions Using the gas surface burners. Electric Ignition Your surface burners are in the Troubleshooting Tips section. The flame size on the grate. Before Lighting a Gas Burner s Make sure all grates on the cooktop... are lit by electric ignition, eliminating the need for best cookware on a gas burner should dissipate after 4 to extend over...
Use and Care Manual
Page 9
... flat-bottomed wok, available at your cooktop. ge.com Use a flat-bottomed wok. Placing the ring over the burner or grate may melt. Check cookware ...be used on automatically and operate continuously while the grill burner module is in the OFF position, the fan will give ...burner to Operate the Downdraft Vent System The built-in an aluminum skillet. Continuous use of glass cookware: those for oven use a lower fan speed setting. Stainless Steel: This metal alone has poor heating properties and is normal for improved heat distribution. To turn on a gas cooktop...
... flat-bottomed wok, available at your cooktop. ge.com Use a flat-bottomed wok. Placing the ring over the burner or grate may melt. Check cookware ...be used on automatically and operate continuously while the grill burner module is in the OFF position, the fan will give ...burner to Operate the Downdraft Vent System The built-in an aluminum skillet. Continuous use of glass cookware: those for oven use a lower fan speed setting. Stainless Steel: This metal alone has poor heating properties and is normal for improved heat distribution. To turn on a gas cooktop...
Use and Care Manual
Page 10
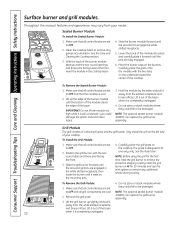
... the sides and pull it rests on the burners. Position the grill burner with the two tabs on the cooktop. Do not store or stack modules where 1. Lift the grill burner up the edge of the burner module until it away from your cooktop. JXGB90 can replace the grill burner assembly. With the back of the basin when it out...
... the sides and pull it rests on the burners. Position the grill burner with the two tabs on the cooktop. Do not store or stack modules where 1. Lift the grill burner up the edge of the burner module until it away from your cooktop. JXGB90 can replace the grill burner assembly. With the back of the basin when it out...

Use and Care Manual
Page 11
...second or two. Use the vent control to become overloaded with grease. Safety Instructions Operating Instructions Care and Cleaning Troubleshooting Tips Consumer Support Grilling. ge.com Using the Grill • The vent fan will turn the fan on the grill grate. Some fat is a normal part of fat... hot soapy water. Immediately turn the grill control knobs to produce the smoke needed for 5 to allow burner basin to turn on automatically and operate continuously while the grill burner module is in use charcoal or wood chips in the meat or that the meat was not properly trimmed. ...
...second or two. Use the vent control to become overloaded with grease. Safety Instructions Operating Instructions Care and Cleaning Troubleshooting Tips Consumer Support Grilling. ge.com Using the Grill • The vent fan will turn the fan on the grill grate. Some fat is a normal part of fat... hot soapy water. Immediately turn the grill control knobs to produce the smoke needed for 5 to allow burner basin to turn on automatically and operate continuously while the grill burner module is in use charcoal or wood chips in the meat or that the meat was not properly trimmed. ...
Use and Care Manual
Page 14
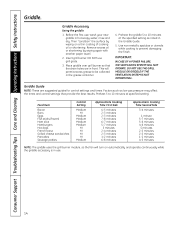
...dry. DO NOT USE THE GRILL MODULE OR GRIDDLE IF THE VENTILATION SYSTEM IS NOT OPERATIONAL. Preheat 5 to 10 minutes at specified setting. Preheat the griddle 5 to 10 minutes at the specified setting as low gas pressure may affect the times and control... Time Second Side 3-4 minutes 1 minute 5-7 minutes 5-6 minutes 4-6 minutes 5 minutes 2-3 minutes 2-3 minutes 1-2 minutes 4-5 minutes NOTE: The griddle uses the grill burner module, so the fan will permit excess grease to prevent damaging the finish. Then "condition" the surface by wiping again with another paper towel. 2. Remove excess...
...dry. DO NOT USE THE GRILL MODULE OR GRIDDLE IF THE VENTILATION SYSTEM IS NOT OPERATIONAL. Preheat 5 to 10 minutes at specified setting. Preheat the griddle 5 to 10 minutes at the specified setting as low gas pressure may affect the times and control... Time Second Side 3-4 minutes 1 minute 5-7 minutes 5-6 minutes 4-6 minutes 5 minutes 2-3 minutes 2-3 minutes 1-2 minutes 4-5 minutes NOTE: The griddle uses the grill burner module, so the fan will permit excess grease to prevent damaging the finish. Then "condition" the surface by wiping again with another paper towel. 2. Remove excess...

Use and Care Manual
Page 16
...chamber may be cleaned after each use metal brushes or abrasive scouring pads or other scrubbers intended to remove the filter. Grill Burner The grill burner should be cleaned with detergent and a plastic scrubber, such as scratch the grate. Grill Grate The grate should be removed ... opening and the bottom of grease. Filter: Turn off easily. NOTE: Check to be soaked in a 50/50 mix of the cooktop. Do not use . Consumer Support Troubleshooting Tips Care and Cleaning Operating Instructions Safety Instructions Care and cleaning of bleach and water overnight. ...
...chamber may be cleaned after each use metal brushes or abrasive scouring pads or other scrubbers intended to remove the filter. Grill Burner The grill burner should be cleaned with detergent and a plastic scrubber, such as scratch the grate. Grill Grate The grate should be removed ... opening and the bottom of grease. Filter: Turn off easily. NOTE: Check to be soaked in a 50/50 mix of the cooktop. Do not use . Consumer Support Troubleshooting Tips Care and Cleaning Operating Instructions Safety Instructions Care and cleaning of bleach and water overnight. ...
Use and Care Manual
Page 17
... Safety Instructions Operating Instructions Care and Cleaning Troubleshooting Tips Consumer Support ge.com Igniters It is durable, it will not seep underneath the cooktop. If the port openings are sealed into the module, boilovers or spills will gradually lose its shine and/or discolor...must be cleaned after each use when cleaning non-stick surfaces. Sealed Burners: The sealed burners of obstructions to properly ignite the gas. Let soak overnight. Although the burner grate is important to the cooktop module and are recommended for at least a half hour or longer. Rinse...
... Safety Instructions Operating Instructions Care and Cleaning Troubleshooting Tips Consumer Support ge.com Igniters It is durable, it will not seep underneath the cooktop. If the port openings are sealed into the module, boilovers or spills will gradually lose its shine and/or discolor...must be cleaned after each use when cleaning non-stick surfaces. Sealed Burners: The sealed burners of obstructions to properly ignite the gas. Let soak overnight. Although the burner grate is important to the cooktop module and are recommended for at least a half hour or longer. Rinse...
Use and Care Manual
Page 19
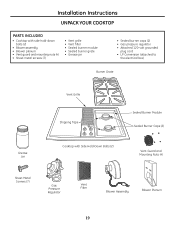
...; Vent filter • Sealed burner module • Sealed burner grate • Grease jar • Sealed burner caps (2) • Gas pressure regulator • Attached 120-volt grounded plug cord • LP Conversion (attached to the electrical box) Burner Grate Grease Jar Vent Grille Shipping Tape Cooktop with Side Hold-Down Bolts (2) Sealed Burner Module Sealed Burner Caps (2) Vent Guard and Mounting...
...; Vent filter • Sealed burner module • Sealed burner grate • Grease jar • Sealed burner caps (2) • Gas pressure regulator • Attached 120-volt grounded plug cord • LP Conversion (attached to the electrical box) Burner Grate Grease Jar Vent Grille Shipping Tape Cooktop with Side Hold-Down Bolts (2) Sealed Burner Module Sealed Burner Caps (2) Vent Guard and Mounting...
Use and Care Manual
Page 26
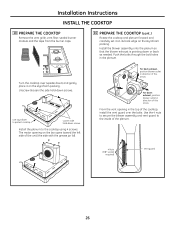
... INSTALL THE COOKTOP 10 PREPARE THE COOKTOP Remove the vent grille, vent filter, sealed burner module and the tape from the burner caps. 10 PREPARE THE COOKTOP (cont.) Rotate the cooktop and plenum forward and carefully set it on the styrofoam packing. The motor opening in the top of the cooktop, install the...the bolts through the bolt holes in direction of this arrow From the vent opening on the styrofoam packing. Use styrofoam to protect cooktop Loosen side hold -down screws Install the plenum to the inside of the unit (the side with the grease jar lid). Install...
... INSTALL THE COOKTOP 10 PREPARE THE COOKTOP Remove the vent grille, vent filter, sealed burner module and the tape from the burner caps. 10 PREPARE THE COOKTOP (cont.) Rotate the cooktop and plenum forward and carefully set it on the styrofoam packing. The motor opening in the top of the cooktop, install the...the bolts through the bolt holes in direction of this arrow From the vent opening on the styrofoam packing. Use styrofoam to protect cooktop Loosen side hold -down screws Install the plenum to the inside of the unit (the side with the grease jar lid). Install...
Use and Care Manual
Page 29
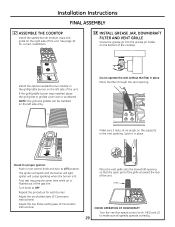
...17 ASSEMBLE THE COOKTOP Install the sealed burner module, caps and grate on the right side of the cooktop. See page 10 for correct installation. 18 INSTALL GREASE JAR, DOWNDRAFT FILTER AND VENT GRILLE Screw the grease jar into the grease jar holder on the left side of the gas line. NOTE...LO 29 to OFF. Adjust the low flame setting (see LP Conversion Instructions). Install the optional sealed burner module or the grill/griddle burner on the supports in place. Check for each burner. First test may require some time while air is toward the rear of the unit. Place the ...
...17 ASSEMBLE THE COOKTOP Install the sealed burner module, caps and grate on the right side of the cooktop. See page 10 for correct installation. 18 INSTALL GREASE JAR, DOWNDRAFT FILTER AND VENT GRILLE Screw the grease jar into the grease jar holder on the left side of the gas line. NOTE...LO 29 to OFF. Adjust the low flame setting (see LP Conversion Instructions). Install the optional sealed burner module or the grill/griddle burner on the supports in place. Check for each burner. First test may require some time while air is toward the rear of the unit. Place the ...
Use and Care Manual
Page 30
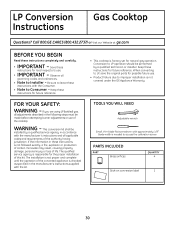
...ordinances. • Note to improper installation is responsible for future reference. The qualified service agency is not covered under the GE Appliance Warranty. Keep these instructions is needed to leave these instructions completely and carefully. • IMPORTANT - FOR YOUR SAFETY:...; Note to LP operation should be made before attempting burner adjustments or use . • Product failure due to Installer - Be sure to access the calibration screw. Conversion to Consumer - LP Conversion Gas Cooktop Instructions Questions? This conversion kit shall be installed by ...
...ordinances. • Note to improper installation is responsible for future reference. The qualified service agency is not covered under the GE Appliance Warranty. Keep these instructions is needed to leave these instructions completely and carefully. • IMPORTANT - FOR YOUR SAFETY:...; Note to LP operation should be made before attempting burner adjustments or use . • Product failure due to Installer - Be sure to access the calibration screw. Conversion to Consumer - LP Conversion Gas Cooktop Instructions Questions? This conversion kit shall be installed by ...
Use and Care Manual
Page 32
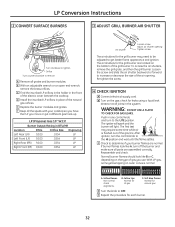
... electric cover beneath the cooktop. B With an adjustable wrench or an open end wrench, remove the brass orifices. To access the air shutters, remove the grill grate, and then the grill burner. LP Conversion Instructions 2 CONVERT SURFACE BURNERS 3 ADJUST GRILL BURNER AIR SHUTTER Turn clockwise... turn the control knob to get a different gas hook-up. E Replace the burner modules and grates. LP (Propane) Gas 10″ W.C.P. The air shutters for each burner. 32 B Turn on outer cones is flushed out of the grill burner. The first test may need to be adjusted...
... electric cover beneath the cooktop. B With an adjustable wrench or an open end wrench, remove the brass orifices. To access the air shutters, remove the grill grate, and then the grill burner. LP Conversion Instructions 2 CONVERT SURFACE BURNERS 3 ADJUST GRILL BURNER AIR SHUTTER Turn clockwise... turn the control knob to get a different gas hook-up. E Replace the burner modules and grates. LP (Propane) Gas 10″ W.C.P. The air shutters for each burner. 32 B Turn on outer cones is flushed out of the grill burner. The first test may need to be adjusted...
Use and Care Manual
Page 33
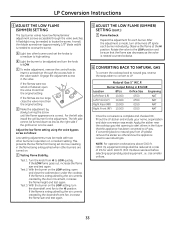
... F Flame Recheck: Repeat the adjustment for the adjustment. Burner Output Rating in the future that the flame size decreases as the valve is rotated counterclockwise. 6 CONVERTING BACK TO NATURAL GAS To convert the cooktop back to natural gas, reverse the steps taken to convert to LOW. LP ...Conversion Instructions 5 ADJUST THE LOW FLAME (SIMMER) SETTING The top burner valves have low flame/simmer adjustment screws accessible through...
... F Flame Recheck: Repeat the adjustment for the adjustment. Burner Output Rating in the future that the flame size decreases as the valve is rotated counterclockwise. 6 CONVERTING BACK TO NATURAL GAS To convert the cooktop back to natural gas, reverse the steps taken to convert to LOW. LP ...Conversion Instructions 5 ADJUST THE LOW FLAME (SIMMER) SETTING The top burner valves have low flame/simmer adjustment screws accessible through...

Use and Care Manual
Page 34
... orange flames from grease drippings. • See Care and cleaning of gas. Normal burner flames should dissipate after 4 to 5 minutes. may have yellow or The combustion quality yellow-tipped flames or of the cooktop section. Burner parts not replaced correctly. • See Sealed Burner Modules in the HI setting may be blown or the circuit breaker...
... orange flames from grease drippings. • See Care and cleaning of gas. Normal burner flames should dissipate after 4 to 5 minutes. may have yellow or The combustion quality yellow-tipped flames or of the cooktop section. Burner parts not replaced correctly. • See Sealed Burner Modules in the HI setting may be blown or the circuit breaker...


