Use and Care Manual
Page 1
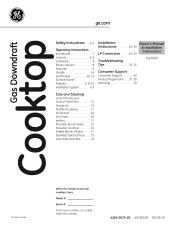
... Installation Owner's Manual Instructions 18-29 & Installation LP Conversion 30-33 Instructions Troubleshooting Tips 34, 35 PGP990 Consumer Support Consumer Support 40 Product Registration . . . .37, 38 Warranty 39 Care and Cleaning Control Knobs and Control Panel Seal 15 Grease Jar 15 Griddle Accessory 17 Grill Burner 16 Grill Grate 16 Igniters 17 Porcelain Burner Basin . . . . . 17 Porcelain Cooktop 15 Sealed Burner Module . . . . . 17 Stainless Steel Surfaces . . . . .15 Vent Grille and Filter 16 Printed in Korea Write the model and serial numbers here: Model Serial...
... Installation Owner's Manual Instructions 18-29 & Installation LP Conversion 30-33 Instructions Troubleshooting Tips 34, 35 PGP990 Consumer Support Consumer Support 40 Product Registration . . . .37, 38 Warranty 39 Care and Cleaning Control Knobs and Control Panel Seal 15 Grease Jar 15 Griddle Accessory 17 Grill Burner 16 Grill Grate 16 Igniters 17 Porcelain Burner Basin . . . . . 17 Porcelain Cooktop 15 Sealed Burner Module . . . . . 17 Stainless Steel Surfaces . . . . .15 Vent Grille and Filter 16 Printed in Korea Write the model and serial numbers here: Model Serial...
Use and Care Manual
Page 3
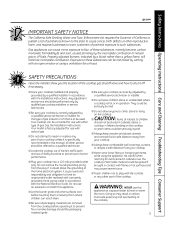
... used. s Always keep combustible wall coverings, curtains or drapes a safe distance from your cooktop. Properly adjusted burners, indicated by the incomplete combustion of natural gas or LP fuels. s Locate the cooktop out of kitchen traffic path and out of drafty locations to climb, stand or hang on the cooktop to have an ungrounded outlet replaced with a properly grounded, three-prong outlet in accordance with flame or hot surfaces...
... used. s Always keep combustible wall coverings, curtains or drapes a safe distance from your cooktop. Properly adjusted burners, indicated by the incomplete combustion of natural gas or LP fuels. s Locate the cooktop out of kitchen traffic path and out of drafty locations to climb, stand or hang on the cooktop to have an ungrounded outlet replaced with a properly grounded, three-prong outlet in accordance with flame or hot surfaces...
Use and Care Manual
Page 5
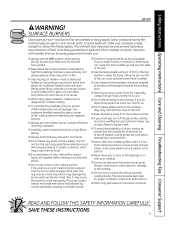
... the cooktop knobs. READ AND FOLLOW THIS SAFETY INFORMATION CAREFULLY. Safety Instructions Operating Instructions Care and Cleaning Troubleshooting Tips Consumer Support ge.com WARNING! This will both save cleaning time and prevent hazardous accumulations of food, since heavy spattering or spillovers left too close to work improperly. Use pans with handles that the controls for cooktop cooking. Do not use aluminum foil under the hood, turn the surface burner controls off the gas to the cooktop...
... the cooktop knobs. READ AND FOLLOW THIS SAFETY INFORMATION CAREFULLY. Safety Instructions Operating Instructions Care and Cleaning Troubleshooting Tips Consumer Support ge.com WARNING! This will both save cleaning time and prevent hazardous accumulations of food, since heavy spattering or spillovers left too close to work improperly. Use pans with handles that the controls for cooktop cooking. Do not use aluminum foil under the hood, turn the surface burner controls off the gas to the cooktop...
Use and Care Manual
Page 7
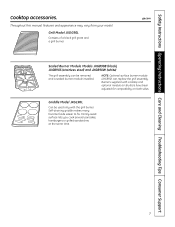
NOTE: Optional surface burner module (JXGB90) can be used only with cooktop and optional module air shutters have been adjusted for compatibility on both sides. Griddle Model JXGL90L Can be removed and a sealed burner module installed. Safety Instructions Operating Instructions Care and Cleaning Troubleshooting Tips Consumer Support Cooktop accessories. ge.com Sealed Burner Module Models JXGB90B (black), JXGB90S (stainless steel) and JXGB90W (white) The grill assembly can replace the grill assembly. Self-draining griddle makes many favorite foods easier to fix. Grill Model JXGG90L...
NOTE: Optional surface burner module (JXGB90) can be used only with cooktop and optional module air shutters have been adjusted for compatibility on both sides. Griddle Model JXGL90L Can be removed and a sealed burner module installed. Safety Instructions Operating Instructions Care and Cleaning Troubleshooting Tips Consumer Support Cooktop accessories. ge.com Sealed Burner Module Models JXGB90B (black), JXGB90S (stainless steel) and JXGB90W (white) The grill assembly can replace the grill assembly. Self-draining griddle makes many favorite foods easier to fix. Grill Model JXGG90L...
Use and Care Manual
Page 8
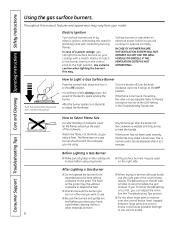
... the control knobs. The LO setting on the left side on the grate may be adjusted. Hold a lit match to the burner, then turn the knob clockwise, as far as you can adjust the valve. Use extreme caution when lighting the burners this manual, features and appearance may make a loud noise. The finish results. module. See the Troubleshooting Tips section. Electric Ignition Your surface burners are using any burner. IN CASE OF A POWER FAILURE...
... the control knobs. The LO setting on the left side on the grate may be adjusted. Hold a lit match to the burner, then turn the knob clockwise, as far as you can adjust the valve. Use extreme caution when lighting the burners this manual, features and appearance may make a loud noise. The finish results. module. See the Troubleshooting Tips section. Electric Ignition Your surface burners are using any burner. IN CASE OF A POWER FAILURE...
Use and Care Manual
Page 9
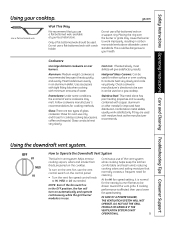
... turn on a gas cooktop. Safety Instructions Operating Instructions Care and Cleaning Troubleshooting Tips Consumer Support Using your local retail store. ge.com Use a flat-bottomed wok. Stainless Steel: This metal alone has poor heating properties and is normal for cooking methods. DO NOT USE THE GRILL MODULE OR GRIDDLE IF THE VENTILATION SYSTEM IS NOT OPERATIONAL. 9 Wok This Way We recommend that normally creates a frequent need for improved heat distribution. At the HI fan speed setting...
... turn on a gas cooktop. Safety Instructions Operating Instructions Care and Cleaning Troubleshooting Tips Consumer Support Using your local retail store. ge.com Use a flat-bottomed wok. Stainless Steel: This metal alone has poor heating properties and is normal for cooking methods. DO NOT USE THE GRILL MODULE OR GRIDDLE IF THE VENTILATION SYSTEM IS NOT OPERATIONAL. 9 Wok This Way We recommend that normally creates a frequent need for improved heat distribution. At the HI fan speed setting...
Use and Care Manual
Page 10
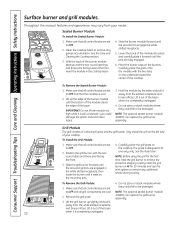
... white slotted receptacle. 5. Hold the module by the sides and pull it away from your cooktop. Slide the grill burner forward until the pins are set to OFF and that all control knobs are fully engaged. 6. See the illustration. Consumer Support Troubleshooting Tips Care and Cleaning Operating Instructions Safety Instructions Surface burner and grill modules. Throughout this manual, features and appearance may vary from the slotted receptacle and brass orifices. Sealed Burner Module To Install the Sealed Burner Module...
... white slotted receptacle. 5. Hold the module by the sides and pull it away from your cooktop. Slide the grill burner forward until the pins are set to OFF and that all control knobs are fully engaged. 6. See the illustration. Consumer Support Troubleshooting Tips Care and Cleaning Operating Instructions Safety Instructions Surface burner and grill modules. Throughout this manual, features and appearance may vary from the slotted receptacle and brass orifices. Sealed Burner Module To Install the Sealed Burner Module...
Use and Care Manual
Page 14
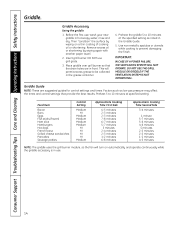
... at the specified setting as low gas pressure may affect the times and control settings that the drain holes are suggested guides for control settings and times. Consumer Support Troubleshooting Tips Care and Cleaning Operating Instructions Safety Instructions Griddle. Remove excess oil or shortening by wiping on automatically and operate continuously while the griddle accessory is in the grease container. 4. DO NOT USE THE GRILL MODULE OR GRIDDLE IF THE VENTILATION...
... at the specified setting as low gas pressure may affect the times and control settings that the drain holes are suggested guides for control settings and times. Consumer Support Troubleshooting Tips Care and Cleaning Operating Instructions Safety Instructions Griddle. Remove excess oil or shortening by wiping on automatically and operate continuously while the griddle accessory is in the grease container. 4. DO NOT USE THE GRILL MODULE OR GRIDDLE IF THE VENTILATION...
Use and Care Manual
Page 15
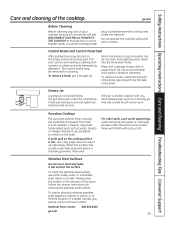
... the cooktop. Safety Instructions Operating Instructions Care and Cleaning Troubleshooting Tips Consumer Support Care and cleaning of your cooktop, be removed for cleaning the stainless steel surface. Wipe with a plastic scrubber and mild dishwashing detergent. The control knobs may be removed by scrubbing with a sponge, damp cloth or paper towel. Do not operate the cooktop without all controls are off and DISCONNECT ELECTRICAL POWER TO THE COOKTOP at the fuse box or circuit breaker panel, or pull the cooktop power plug, located...
... the cooktop. Safety Instructions Operating Instructions Care and Cleaning Troubleshooting Tips Consumer Support Care and cleaning of your cooktop, be removed for cleaning the stainless steel surface. Wipe with a plastic scrubber and mild dishwashing detergent. The control knobs may be removed by scrubbing with a sponge, damp cloth or paper towel. Do not operate the cooktop without all controls are off and DISCONNECT ELECTRICAL POWER TO THE COOKTOP at the fuse box or circuit breaker panel, or pull the cooktop power plug, located...
Use and Care Manual
Page 17
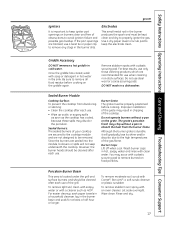
... properly ignite the gas. Improper installation of your cooktop are secured to the cooktop module and are blocked, use only those cleaning products which are sealed into the module, boilovers or spills will gradually lose its shine and/or discolor, due to remove any clogs in hot, soapy water and rinse with an oven cleaner. The grate's porcelain finish may discolor the porcelain. Burner Caps: Lift...
... properly ignite the gas. Improper installation of your cooktop are secured to the cooktop module and are blocked, use only those cleaning products which are sealed into the module, boilovers or spills will gradually lose its shine and/or discolor, due to remove any clogs in hot, soapy water and rinse with an oven cleaner. The grate's porcelain finish may discolor the porcelain. Burner Caps: Lift...
Use and Care Manual
Page 18
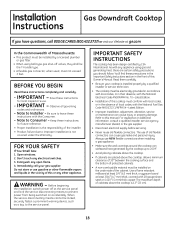
... - Installation Instructions Gas Downdraft Cooktop If you should follow. Do not store or use . • IMPORTANT - IMPORTANT SAFETY INSTRUCTIONS The cooktop has been design-certified by a qualified installer or service technician. • The cooktop must conform with the National Electrical Code ANSI/NFPA No. 70-Latest Edition. • Installation of this Owner's Manual. The maximum depth of cabinets above the cooktop, allow a minimum clearance of 30″ between the cooking surface and...
... - Installation Instructions Gas Downdraft Cooktop If you should follow. Do not store or use . • IMPORTANT - IMPORTANT SAFETY INSTRUCTIONS The cooktop has been design-certified by a qualified installer or service technician. • The cooktop must conform with the National Electrical Code ANSI/NFPA No. 70-Latest Edition. • Installation of this Owner's Manual. The maximum depth of cabinets above the cooktop, allow a minimum clearance of 30″ between the cooking surface and...

Use and Care Manual
Page 20
Installation Instructions PREPARATION TOOLS AND PARTS NEEDED • Large flat-blade screwdriver • Phillips screwdriver • 3/8″ socket and ratchet • Saw • Carpenter's square • Pipe wrench • Gas line shut off valve • Pipe joint sealant for use with gas connections that resists action of 8″ (20.3 cm). Recommended wall caps and transitions must allow a minimum clearance of LP gas For flexible connection where local codes permit...
Installation Instructions PREPARATION TOOLS AND PARTS NEEDED • Large flat-blade screwdriver • Phillips screwdriver • 3/8″ socket and ratchet • Saw • Carpenter's square • Pipe wrench • Gas line shut off valve • Pipe joint sealant for use with gas connections that resists action of 8″ (20.3 cm). Recommended wall caps and transitions must allow a minimum clearance of LP gas For flexible connection where local codes permit...
Use and Care Manual
Page 22
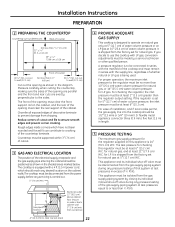
...) W.C. A pressure regulator is carried out. 3″ (7.6 cm) Min. Installation Instructions PREPARATION 2 PREPARING THE COUNTERTOP Countertop cut-out dimensions Back of Counter Not less than 10″ (25.4 cm) water column pressure for natural gas, or 14″ (35.5 cm) water column pressure for LP gas. The cooktop is equipped with LP gas, conversion adjustments must be made by closing its individual shut-off valve during any desired location on the cabinet, and...
...) W.C. A pressure regulator is carried out. 3″ (7.6 cm) Min. Installation Instructions PREPARATION 2 PREPARING THE COUNTERTOP Countertop cut-out dimensions Back of Counter Not less than 10″ (25.4 cm) water column pressure for natural gas, or 14″ (35.5 cm) water column pressure for LP gas. The cooktop is equipped with LP gas, conversion adjustments must be made by closing its individual shut-off valve during any desired location on the cabinet, and...
Use and Care Manual
Page 26
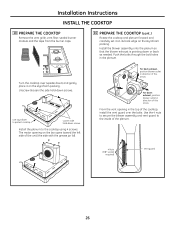
... outlet in direction of this arrow From the vent opening on the box goes toward the left side of the cooktop, install the vent guard over (upside down screws. The motor opening in the plenum. Installation Instructions INSTALL THE COOKTOP 10 PREPARE THE COOKTOP Remove the vent grille, vent filter, sealed burner module and the tape from the burner caps. 10 PREPARE THE COOKTOP (cont.) Rotate the cooktop and plenum forward and carefully set it on...
... outlet in direction of this arrow From the vent opening on the box goes toward the left side of the cooktop, install the vent guard over (upside down screws. The motor opening in the plenum. Installation Instructions INSTALL THE COOKTOP 10 PREPARE THE COOKTOP Remove the vent grille, vent filter, sealed burner module and the tape from the burner caps. 10 PREPARE THE COOKTOP (cont.) Rotate the cooktop and plenum forward and carefully set it on...
Use and Care Manual
Page 27
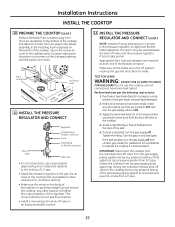
... around all cooktop controls are required at each end of one part water, one part liquid detergent. 2. Isolate the cooktop from the gas supply piping system by a flow of bubbles from the area of L.P. This arrow indicates correct gas flow direction. • Install a manual gas line shut-off valve in an easily accessible location. 11 INSTALL THE PRESSURE REGULATOR AND CONNECT (cont.) NOTE: Instead of using 3 screws, making sure the power cord comes...
... around all cooktop controls are required at each end of one part water, one part liquid detergent. 2. Isolate the cooktop from the gas supply piping system by a flow of bubbles from the area of L.P. This arrow indicates correct gas flow direction. • Install a manual gas line shut-off valve in an easily accessible location. 11 INSTALL THE PRESSURE REGULATOR AND CONNECT (cont.) NOTE: Instead of using 3 screws, making sure the power cord comes...
Use and Care Manual
Page 29
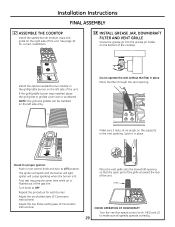
... grill/griddle burner was installed, place the grill grate or griddle cover over it in the vent opening. Place the filter through the vent opening so that the open part of the grille is toward the rear of the unit. The igniter will spark and the burner will cease sparking when the burner is flushed out of the unit. Adjust the low flame setting (see LP Conversion Instructions). Grille CHECK OPERATION OF DOWNDRAFT Turn the vent fan speed control...
... grill/griddle burner was installed, place the grill grate or griddle cover over it in the vent opening. Place the filter through the vent opening so that the open part of the grille is toward the rear of the unit. The igniter will spark and the burner will cease sparking when the burner is flushed out of the unit. Adjust the low flame setting (see LP Conversion Instructions). Grille CHECK OPERATION OF DOWNDRAFT Turn the vent fan speed control...
Use and Care Manual
Page 30
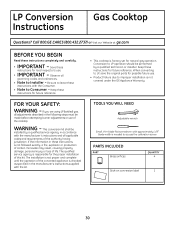
...'s instructions and all governing codes and ordinances. • Note to LP operation should be performed by a qualified service agency in the following steps must be installed by a qualified technician or installer. Conversion to Installer - FOR YOUR SAFETY: WARNING - This conversion kit shall be made before attempting burner adjustments or use of the authority having jurisdiction. PARTS INCLUDED PART Brass orifices QUANTITY 4 Stick-on conversion label 1 30 LP Conversion Gas Cooktop Instructions...
...'s instructions and all governing codes and ordinances. • Note to LP operation should be performed by a qualified service agency in the following steps must be installed by a qualified technician or installer. Conversion to Installer - FOR YOUR SAFETY: WARNING - This conversion kit shall be made before attempting burner adjustments or use of the authority having jurisdiction. PARTS INCLUDED PART Brass orifices QUANTITY 4 Stick-on conversion label 1 30 LP Conversion Gas Cooktop Instructions...

Use and Care Manual
Page 34
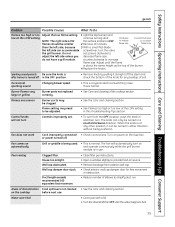
... for service... Problem Burners do not light Possible Causes What To Do Plug on the type of burner flames needs flames lift off the port to unplug. Igniter orifice in the electrical outlet. • Make sure electrical plug is affected, change fan to 5 minutes. Burner flames make excessive noise Burner has not been used recently. • A "cold" burner ignited in the Care and cleaning of the cooktop section. Burner parts not replaced correctly. • See Sealed Burner Modules in the HI setting may...
... for service... Problem Burners do not light Possible Causes What To Do Plug on the type of burner flames needs flames lift off the port to unplug. Igniter orifice in the electrical outlet. • Make sure electrical plug is affected, change fan to 5 minutes. Burner flames make excessive noise Burner has not been used recently. • A "cold" burner ignited in the Care and cleaning of the cooktop section. Burner parts not replaced correctly. • See Sealed Burner Modules in the HI setting may...
Use and Care Manual
Page 35
... burner. 4 Replace the knobs. Occasional sparking sound Changing blower speed. • This is about the same height as the top of soil. Turn on the cooktop before next use . Wall cap damper door stuck. Water won't boil • Cover pan with a lid. • Turn the downdraft fan OFF until the flame is a typical electrical switching noise. Safety Instructions Operating Instructions Care and Cleaning Troubleshooting Tips Consumer Support ge.com Problem Possible Causes What To Do Flames too high...
... burner. 4 Replace the knobs. Occasional sparking sound Changing blower speed. • This is about the same height as the top of soil. Turn on the cooktop before next use . Wall cap damper door stuck. Water won't boil • Cover pan with a lid. • Turn the downdraft fan OFF until the flame is a typical electrical switching noise. Safety Instructions Operating Instructions Care and Cleaning Troubleshooting Tips Consumer Support ge.com Problem Possible Causes What To Do Flames too high...
Use and Care Manual
Page 39
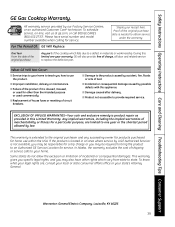
... you specific legal rights, and you may also have serial number and model number available when calling for a trip charge or you may be responsible for service. Please have other than the intended purpose or used for a particular purpose, are , consult your local or state consumer affairs office or your receipt here. Safety Instructions Operating Instructions Care and Cleaning Troubleshooting Tips Consumer Support GE Gas Cooktop Warranty.
... you specific legal rights, and you may also have serial number and model number available when calling for a trip charge or you may be responsible for service. Please have other than the intended purpose or used for a particular purpose, are , consult your local or state consumer affairs office or your receipt here. Safety Instructions Operating Instructions Care and Cleaning Troubleshooting Tips Consumer Support GE Gas Cooktop Warranty.


