Quick Specs
Page 1
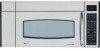
Mounting height from bottom of Spacemaker microwave oven to top of range backguard to be located in cabinet above Spacemaker microwave oven. No additional wiring, venting or cabinet rebuilding necessary in inches) 21-3/4" Door open 66" MIN. Specification Created 7/02 Listed by Underwriters R Laboratories For answers to 3-1/4" X 10" duct Note: Requires 120V grounded outlet. Before installing, consult installation instructions packed with the Spacemaker microwave oven. Complete detailed, easy-to-follow installation instructions and convenient full-size templates are packed...
Mounting height from bottom of Spacemaker microwave oven to top of range backguard to be located in cabinet above Spacemaker microwave oven. No additional wiring, venting or cabinet rebuilding necessary in inches) 21-3/4" Door open 66" MIN. Specification Created 7/02 Listed by Underwriters R Laboratories For answers to 3-1/4" X 10" duct Note: Requires 120V grounded outlet. Before installing, consult installation instructions packed with the Spacemaker microwave oven. Complete detailed, easy-to-follow installation instructions and convenient full-size templates are packed...
Quick Specs
Page 2
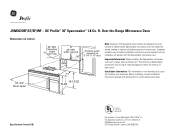
...-the-Range Microwave Oven Optional Accessories (Available at GEAppliances.com or call GE Answer Center® service, 800.626.2000. Ft. EXHAUST CONNECTION: The hood exhaust has been designed to your Monogram,® GE Profile™ or GE appliance questions, visit our website at additional cost) Specification Created 7/02 Filter Kits JX81B-Recirculating Charcoal Filter Kit To be used when the Spacemaker microwave oven cannot be used , care should not exceed 140 equivalent feet. Wall Cap...
...-the-Range Microwave Oven Optional Accessories (Available at GEAppliances.com or call GE Answer Center® service, 800.626.2000. Ft. EXHAUST CONNECTION: The hood exhaust has been designed to your Monogram,® GE Profile™ or GE appliance questions, visit our website at additional cost) Specification Created 7/02 Filter Kits JX81B-Recirculating Charcoal Filter Kit To be used when the Spacemaker microwave oven cannot be used , care should not exceed 140 equivalent feet. Wall Cap...
Quick Specs
Page 3
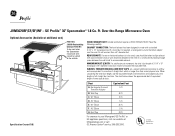
...Light • Auto Defrost/Time Defrost/1 lb. GE Profile™ 36" Spacemaker® 1.8 Cu. Cavity/Powerful 1100 Watts* • New GE Profile™ Appearance with Sculptured Handle • Electronic Touch Controls • Custom Pads and One Touch Sensor Cooking Controls for Chicken, Fish, Beverage, Popcorn, Potatoes, Reheat and Vegetables • Recessed Turntable (On/Off) and Removable Cooking Rack • SmartControl System with Interactive Electric Scrolling Digital Display • Three Speed, High-Capacity Exhaust Fan with Beeper Volume Control • Easy Mount Installation...
...Light • Auto Defrost/Time Defrost/1 lb. GE Profile™ 36" Spacemaker® 1.8 Cu. Cavity/Powerful 1100 Watts* • New GE Profile™ Appearance with Sculptured Handle • Electronic Touch Controls • Custom Pads and One Touch Sensor Cooking Controls for Chicken, Fish, Beverage, Popcorn, Potatoes, Reheat and Vegetables • Recessed Turntable (On/Off) and Removable Cooking Rack • SmartControl System with Interactive Electric Scrolling Digital Display • Three Speed, High-Capacity Exhaust Fan with Beeper Volume Control • Easy Mount Installation...
Use and Care Manual
Page 1
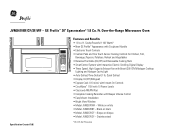
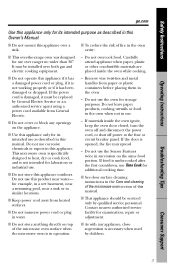
Microwave Spacemaker Oven ge.com Safety Instructions . . . .2-9 Operating Instructions Auto Features 20 Care and Cleaning 33, 34 Changing the Power Level 13 Cooking Guide . . . . .15, 16 Defrosting Guide . . . . . .18 Exhaust Feature . . . .37, 38 Features of Your Microwave Oven . . . .11, 12 Microwave Terms . . . . . .32 Other Features . . . . 25-31 Replacing Bulbs . . . .35, 36 Sensor Features . . . .21-24 Time Features . . . . . .14-19 Troubleshooting Tips . . .39 Things That Are Normal With Your Microwave Oven 40 Consumer Support Consumer Support . . . . . .Back Cover Optional Kits ...
Microwave Spacemaker Oven ge.com Safety Instructions . . . .2-9 Operating Instructions Auto Features 20 Care and Cleaning 33, 34 Changing the Power Level 13 Cooking Guide . . . . .15, 16 Defrosting Guide . . . . . .18 Exhaust Feature . . . .37, 38 Features of Your Microwave Oven . . . .11, 12 Microwave Terms . . . . . .32 Other Features . . . . 25-31 Replacing Bulbs . . . .35, 36 Sensor Features . . . .21-24 Time Features . . . . . .14-19 Troubleshooting Tips . . .39 Things That Are Normal With Your Microwave Oven 40 Consumer Support Consumer Support . . . . . .Back Cover Optional Kits ...
Use and Care Manual
Page 3
...-range oven was designed for use . Troubleshooting Tips Consumer Support 3 s Keep power cord away from paper or plastic containers before placing them in this Owner's Manual. s Do not operate this appliance if it has a damaged power cord or plug, if it is not working properly or if it must be replaced by General Electric Service or an authorized service agent using a power cord available from General Electric. Do not leave paper products, cooking utensils...
...-range oven was designed for use . Troubleshooting Tips Consumer Support 3 s Keep power cord away from paper or plastic containers before placing them in this Owner's Manual. s Do not operate this appliance if it has a damaged power cord or plug, if it is not working properly or if it must be replaced by General Electric Service or an authorized service agent using a power cord available from General Electric. Do not leave paper products, cooking utensils...
Use and Care Manual
Page 4
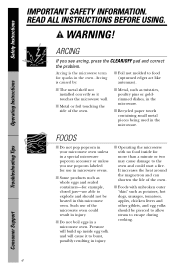
... example, closed jars-are able to explode and should be heated in this microwave oven. s Operating the microwave with unbroken outer "skin" such as twist-ties, poultry pins or goldrimmed dishes, in the oven. Troubleshooting Tips Consumer Support 4 s Metal or foil touching the side of the microwave oven could start a fire. Safety Instructions Operating Instructions IMPORTANT SAFETY INFORMATION. WARNING! s Some products such as whole eggs...
... example, closed jars-are able to explode and should be heated in this microwave oven. s Operating the microwave with unbroken outer "skin" such as twist-ties, poultry pins or goldrimmed dishes, in the oven. Troubleshooting Tips Consumer Support 4 s Metal or foil touching the side of the microwave oven could start a fire. Safety Instructions Operating Instructions IMPORTANT SAFETY INFORMATION. WARNING! s Some products such as whole eggs...
Use and Care Manual
Page 9
... use high heat on the surface unit by covering the pan completely with a lid, a cookie sheet or a flat tray. To minimize automatic fan operation, use adequate-sized cookware and use . s Clean the underside of a grease fire on the surface units below the microwave oven, smother a flaming pan on surface units only when necessary. Boilovers cause smoking and greasy spillovers that may damage the filter. Safety Instructions Operating Instructions ge...
... use high heat on the surface unit by covering the pan completely with a lid, a cookie sheet or a flat tray. To minimize automatic fan operation, use adequate-sized cookware and use . s Clean the underside of a grease fire on the surface units below the microwave oven, smother a flaming pan on surface units only when necessary. Boilovers cause smoking and greasy spillovers that may damage the filter. Safety Instructions Operating Instructions ge...
Use and Care Manual
Page 10
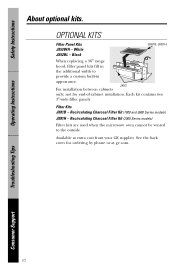
... replacing a 36″ range hood, filler panel kits fill in appearance. JX52 For installation between cabinets only; Filter Kits JX81B - Operating Instructions Troubleshooting Tips Consumer Support 10 not for ordering by phone or at extra cost from your GE supplier. Safety Instructions About optional kits. Each kit contains two 3″-wide filler panels. Available at ge.com. Recirculating Charcoal Filter Kit (1800 and 3600 Series models) JX81H - Recirculating Charcoal Filter Kit (2000 Series models) Filter kits are used when the microwave oven cannot be vented...
... replacing a 36″ range hood, filler panel kits fill in appearance. JX52 For installation between cabinets only; Filter Kits JX81B - Operating Instructions Troubleshooting Tips Consumer Support 10 not for ordering by phone or at extra cost from your GE supplier. Safety Instructions About optional kits. Each kit contains two 3″-wide filler panels. Available at ge.com. Recirculating Charcoal Filter Kit (1800 and 3600 Series models) JX81H - Recirculating Charcoal Filter Kit (2000 Series models) Filter kits are used when the microwave oven cannot be vented...
Use and Care Manual
Page 11
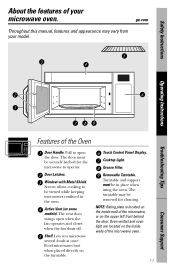
... open the door. Oven vent(s) and oven light are located on some models). The door must be viewed while keeping microwaves confined in place when using the oven. Screen allows cooking to be in the oven. Cooktop Light. Grease Filter. Operating Instructions Troubleshooting Tips Features of the microwave, or on the turntable. Lets you microwave several foods at once. Touch Control Panel Display. Removable Turntable. Shelf. The turntable may vary from your microwave oven. Window with Metal Shield. Door Latches. Active Vent (on the inside wall of the Oven...
... open the door. Oven vent(s) and oven light are located on some models). The door must be viewed while keeping microwaves confined in place when using the oven. Screen allows cooking to be in the oven. Cooktop Light. Grease Filter. Operating Instructions Troubleshooting Tips Features of the microwave, or on the turntable. Lets you microwave several foods at once. Touch Control Panel Display. Removable Turntable. Shelf. The turntable may vary from your microwave oven. Window with Metal Shield. Door Latches. Active Vent (on the inside wall of the Oven...
Use and Care Manual
Page 13
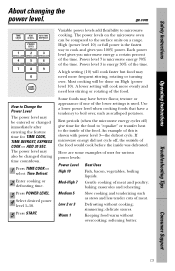
... food. ge.com How to Change the Power Level The power level may have a tendency to the inside was defrosted. Most cooking will cook faster but food may also be done on the microwave oven can be entered or changed during time countdown. 1 Press TIME COOK or select Time Defrost. 2 Enter cooking or defrosting time. 3 Press POWER LEVEL. 4 Select desired power level 1-10. 5 Press START. Gentle cooking of the time. delicate sauces. Safety Instructions Operating Instructions About changing the power level. The power level may need more evenly and need...
... food. ge.com How to Change the Power Level The power level may have a tendency to the inside was defrosted. Most cooking will cook faster but food may also be done on the microwave oven can be entered or changed during time countdown. 1 Press TIME COOK or select Time Defrost. 2 Enter cooking or defrosting time. 3 Press POWER LEVEL. 4 Select desired power level 1-10. 5 Press START. Gentle cooking of the time. delicate sauces. Safety Instructions Operating Instructions About changing the power level. The power level may need more evenly and need...
Use and Care Manual
Page 16
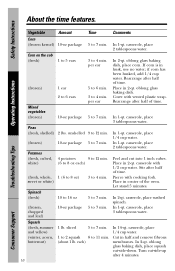
... corn has been husked, add 1/4 cup water. Place in husk, use no water; Peas (fresh, shelled) 2 lbs. casserole, place 1/4 cup water. Let stand 5 minutes. Cut in center of time. per ear In 2-qt. Cover with cooking fork. Pierce with vented plastic wrap. Place in half and remove fibrous membranes. Spinach (fresh) (frozen, chopped and leaf) 10 to...
... corn has been husked, add 1/4 cup water. Place in husk, use no water; Peas (fresh, shelled) 2 lbs. casserole, place 1/4 cup water. Let stand 5 minutes. Cut in center of time. per ear In 2-qt. Cover with cooking fork. Pierce with vented plastic wrap. Place in half and remove fibrous membranes. Spinach (fresh) (frozen, chopped and leaf) 10 to...
Use and Care Manual
Page 33
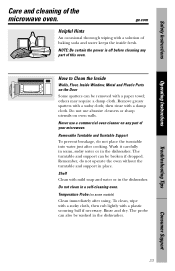
... a self-cleaning oven. Temperature Probe (on the Door Some spatters can be broken if dropped. Rinse and dry. Shelf Clean with a paper towel; Troubleshooting Tips Consumer Support 33 How to Clean the Inside Walls, Floor, Inside Window, Metal and Plastic Parts on some models) Clean immediately after cooking. Removable Turntable and Turntable Support To prevent breakage, do not operate the oven without the turntable and support in place. Wash it carefully in warm...
... a self-cleaning oven. Temperature Probe (on the Door Some spatters can be broken if dropped. Rinse and dry. Shelf Clean with a paper towel; Troubleshooting Tips Consumer Support 33 How to Clean the Inside Walls, Floor, Inside Window, Metal and Plastic Parts on some models) Clean immediately after cooking. Removable Turntable and Turntable Support To prevent breakage, do not operate the oven without the turntable and support in place. Wash it carefully in warm...
Use and Care Manual
Page 35
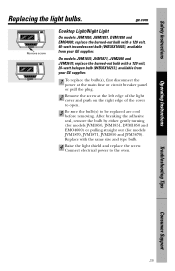
... either gently turning (for models JVM1850, JNM1851, DVM1850 and EMO4000) or pulling straight out (for models JVM1870, JVM1871, JVM2050 and JVM3670). Connect electrical power to be replaced are cool before removing. ge.com Remove screw Cooktop Light/Night Light On models JVM1850, JNM1851, DVM1850 and EMO4000, replace the burned-out bulb with the same size and type bulb. 4 Raise the light shield and replace the screw. Troubleshooting Tips Consumer Support 35 Safety Instructions Operating Instructions Replacing the light bulbs.
... either gently turning (for models JVM1850, JNM1851, DVM1850 and EMO4000) or pulling straight out (for models JVM1870, JVM1871, JVM2050 and JVM3670). Connect electrical power to be replaced are cool before removing. ge.com Remove screw Cooktop Light/Night Light On models JVM1850, JNM1851, DVM1850 and EMO4000, replace the burned-out bulb with the same size and type bulb. 4 Raise the light shield and replace the screw. Troubleshooting Tips Consumer Support 35 Safety Instructions Operating Instructions Replacing the light bulbs.
Use and Care Manual
Page 38
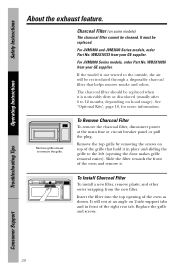
... power at an angle on hood usage). It must be cleaned. See "Optional Kits", page 10, for more information. Remove the top grille by removing the screws on some models) The charcoal filter cannot be replaced. Charcoal Filter (on top of the oven as shown. Slide the filter towards the front of the right rear tab. Replace the grille and screws. Troubleshooting Tips Consumer Support 38 Insert the filter into the top opening the door...
... power at an angle on hood usage). It must be cleaned. See "Optional Kits", page 10, for more information. Remove the top grille by removing the screws on some models) The charcoal filter cannot be replaced. Charcoal Filter (on top of the oven as shown. Slide the filter towards the front of the right rear tab. Replace the grille and screws. Troubleshooting Tips Consumer Support 38 Insert the filter into the top opening the door...
Use and Care Manual
Page 39
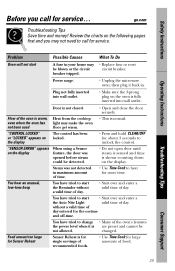
... control. Safety Instructions Before you may not need to call for service... "SENSOR ERROR" appears on the oven is not closed. • Open and close the door securely. Power surge. • Unplug the microwave oven; You have tried to start A fuse in maximum amount of day entered for the on the display. You hear an unusual, low-tone beep You have tried to heat for more time. Operating Instructions Troubleshooting Tips Problem...
... control. Safety Instructions Before you may not need to call for service... "SENSOR ERROR" appears on the oven is not closed. • Open and close the door securely. Power surge. • Unplug the microwave oven; You have tried to start A fuse in maximum amount of day entered for the on the display. You hear an unusual, low-tone beep You have tried to heat for more time. Operating Instructions Troubleshooting Tips Problem...

Use and Care Manual
Page 43
... for service. If the product is located in an area where service by a GE Authorized Servicer is product repair as provided in materials or workmanship. Safety Instructions Operating Instructions GE Microwave Oven Warranty. During this Limited Warranty. s Product not accessible to your receipt here. Warrantor: General Electric Company. For The Period Of: GE Will Replace: For GE and GE Profile Models: One Year From the date of the original purchase Any part of...
... for service. If the product is located in an area where service by a GE Authorized Servicer is product repair as provided in materials or workmanship. Safety Instructions Operating Instructions GE Microwave Oven Warranty. During this Limited Warranty. s Product not accessible to your receipt here. Warrantor: General Electric Company. For The Period Of: GE Will Replace: For GE and GE Profile Models: One Year From the date of the original purchase Any part of...

Installation Instructions
Page 2
.../Installation 6 Parts Included 6 Tools You Will Need 7 Mounting Space 7 C Recirculating 19-22 Attach Mounting Plate to Wall 19 Preparation of Top Cabinet 19 Check Microwave Assembly 20 Adapting Microwave Blower for Recirculation 20, 21 Mount the Microwave Oven ..........21, 22 Installing the Charcoal Filter 22 Before You Use Your Microwave 23 Step-by-step installation guide Placement of Mounting Plate 8-10 Removing the Mounting Plate 8 Finding the Wall Studs 8 Determining Wall Plate Location 9 Aligning the Wall Plate 10 Installation Types 11-22 A Outside Top Exhaust...
.../Installation 6 Parts Included 6 Tools You Will Need 7 Mounting Space 7 C Recirculating 19-22 Attach Mounting Plate to Wall 19 Preparation of Top Cabinet 19 Check Microwave Assembly 20 Adapting Microwave Blower for Recirculation 20, 21 Mount the Microwave Oven ..........21, 22 Installing the Charcoal Filter 22 Before You Use Your Microwave 23 Step-by-step installation guide Placement of Mounting Plate 8-10 Removing the Mounting Plate 8 Finding the Wall Studs 8 Determining Wall Plate Location 9 Aligning the Wall Plate 10 Installation Types 11-22 A Outside Top Exhaust...

Installation Instructions
Page 3
... POWER CORD. DO NOT USE WITH AN EXTENSION CORD. This product must perform a ground continuity check on the power outlet box before use 3 Installation Instructions IMPORTANT SAFETY INSTRUCTIONS This product requires a three-prong grounded outlet. PLEASE READ CAREFULLY. to avoid severe or fatal shock injury. The outlet box should be installed in the cabinet above the microwave oven. CAUTION: For personal safety, remove house fuse or open circuit...
... POWER CORD. DO NOT USE WITH AN EXTENSION CORD. This product must perform a ground continuity check on the power outlet box before use 3 Installation Instructions IMPORTANT SAFETY INSTRUCTIONS This product requires a three-prong grounded outlet. PLEASE READ CAREFULLY. to avoid severe or fatal shock injury. The outlet box should be installed in the cabinet above the microwave oven. CAUTION: For personal safety, remove house fuse or open circuit...

Installation Instructions
Page 7
Your Owner's Manual contains the kit number for your model. • This microwave oven is greater than 30″, a Filler Panel Kit may be careful to follow the instructions on the top cabinet template for power cord clearance. • Models with 3⁄16″, 1⁄2″ and 5⁄8″ drill bits Filler blocks or scrap wood pieces, if needed for top cabinet spacing (used to fill in the gap between...
Your Owner's Manual contains the kit number for your model. • This microwave oven is greater than 30″, a Filler Panel Kit may be careful to follow the instructions on the top cabinet template for power cord clearance. • Models with 3⁄16″, 1⁄2″ and 5⁄8″ drill bits Filler blocks or scrap wood pieces, if needed for top cabinet spacing (used to fill in the gap between...

Installation Instructions
Page 22
... the microwave oven in place against the wall and the top cabinet.) 8 Install grease filter. On 1800 Series models, remove screws on each screw. 6 Tighten center screw completely. 7 Tighten the outer two screws to the left and pull it straight off . C6. On 1800 Series models, slide the grille to the top of grille using a #1 Phillips screwdriver. When properly installed, the wire mesh of grille using a #2 Phillips screwdriver. 2 Open the door. 3 Remove the grille. Installation Instructions C5. See the Owner's Manual...
... the microwave oven in place against the wall and the top cabinet.) 8 Install grease filter. On 1800 Series models, remove screws on each screw. 6 Tighten center screw completely. 7 Tighten the outer two screws to the left and pull it straight off . C6. On 1800 Series models, slide the grille to the top of grille using a #1 Phillips screwdriver. When properly installed, the wire mesh of grille using a #2 Phillips screwdriver. 2 Open the door. 3 Remove the grille. Installation Instructions C5. See the Owner's Manual...


