
Installation Instructions
Page 1
...Drawer Requirement Installation Instructions 27" & 30" Electric Built-In Wall Ovens Questions? See the label on top of Cutout E Clearance to Installer - IMPORTANT: Always refer to individual installation instructions packed with each product for approved models. For double ovens, the runners and braces must support...GE.CARES (1.800.432.2737) or visit www.GEAppliances.com In Canada, call 1.800.561.3344 or visit www.GEAppliances.ca BEFORE YOU BEGIN Read these products. right side only 44" (111.8 cm) 131⁄4" (33.7 cm) Continue to prevent power from Floor 27" Double Oven...
...Drawer Requirement Installation Instructions 27" & 30" Electric Built-In Wall Ovens Questions? See the label on top of Cutout E Clearance to Installer - IMPORTANT: Always refer to individual installation instructions packed with each product for approved models. For double ovens, the runners and braces must support...GE.CARES (1.800.432.2737) or visit www.GEAppliances.com In Canada, call 1.800.561.3344 or visit www.GEAppliances.ca BEFORE YOU BEGIN Read these products. right side only 44" (111.8 cm) 131⁄4" (33.7 cm) Continue to prevent power from Floor 27" Double Oven...

Installation Instructions
Page 2
... the oven door. D. Tape the edges of the product. Trim Screw Locations for 30" (76.2 cm) Models with local codes. Hinge Clears Slot 4 ELECTRICAL REQUIREMENTS.... and for a double oven, the platform must support 200 lbs. (91 kg); Connect the flexible conduit to the electrical junction box as a...oven installed, take the bottom trim and center it will keep the conduit from inside wall or upper front frame. For 27" (68.6 cm) Models...call 1.800.GE.CARES. 6 THREE-CONDUCTOR BRANCH CIRCUIT CONNECTION NOTE: If residence leads are OFF before lifting the oven door off ...
... the oven door. D. Tape the edges of the product. Trim Screw Locations for 30" (76.2 cm) Models with local codes. Hinge Clears Slot 4 ELECTRICAL REQUIREMENTS.... and for a double oven, the platform must support 200 lbs. (91 kg); Connect the flexible conduit to the electrical junction box as a...oven installed, take the bottom trim and center it will keep the conduit from inside wall or upper front frame. For 27" (68.6 cm) Models...call 1.800.GE.CARES. 6 THREE-CONDUCTOR BRANCH CIRCUIT CONNECTION NOTE: If residence leads are OFF before lifting the oven door off ...

Owners Manual
Page 1
...'s Manual JKP30-27 ″ Single Wall Oven JTP30-30 ″ Single Wall Oven JKP70-27 ″ Single Convection Wall Oven JTP70-30 ″ Single Convection Wall Oven JKP35-27 ″ Double Wall Oven JTP35-30 ″ Double Wall Oven JKP55-27 ″ Double Wall Oven JTP55-30 ″ Double Wall Oven JKP75-27 ″ Double Convection Wall Oven JTP75-30 ″ Double Convection Wall Oven Printed in the United States Write the model and serial numbers here: Model Serial You can find them...
...'s Manual JKP30-27 ″ Single Wall Oven JTP30-30 ″ Single Wall Oven JKP70-27 ″ Single Convection Wall Oven JTP70-30 ″ Single Convection Wall Oven JKP35-27 ″ Double Wall Oven JTP35-30 ″ Double Wall Oven JKP55-27 ″ Double Wall Oven JTP55-30 ″ Double Wall Oven JKP75-27 ″ Double Convection Wall Oven JTP75-30 ″ Double Convection Wall Oven Printed in the United States Write the model and serial numbers here: Model Serial You can find them...

Owners Manual
Page 5
... into operation. Self Clean Pad Press to select the broil function. Convection Roast Pad Press to set . GEAppliances.com Double oven control shown. Clock Pad Press before setting the clock. Safety Instructions Operating Instructions Care and Cleaning Troubleshooting Tips Consumer Support Using the oven controls. (on some models) Throughout this indicates a function error code.
... into operation. Self Clean Pad Press to select the broil function. Convection Roast Pad Press to set . GEAppliances.com Double oven control shown. Clock Pad Press before setting the clock. Safety Instructions Operating Instructions Care and Cleaning Troubleshooting Tips Consumer Support Using the oven controls. (on some models) Throughout this indicates a function error code.

Owners Manual
Page 6
...this pad to turn the oven light on some models) Throughout this knob to start any cooking or cleaning function. Clear/Off Pad Press this pad to cancel ALL oven operations except the clock and timer. Temp + and - Hour and Min + and - Double oven control shown Oven Control, Clock and Timer ... the starting and length of cooking time for timed bake and the starting and length of time you want your model. Delay Start Pad Use along with the oven element(s) during cooking. Clock Pad Press this pad to select the timer feature. Consumer Support Troubleshooting Tips Care and...
...this pad to turn the oven light on some models) Throughout this knob to start any cooking or cleaning function. Clear/Off Pad Press this pad to cancel ALL oven operations except the clock and timer. Temp + and - Hour and Min + and - Double oven control shown Oven Control, Clock and Timer ... the starting and length of cooking time for timed bake and the starting and length of time you want your model. Delay Start Pad Use along with the oven element(s) during cooking. Clock Pad Press this pad to select the timer feature. Consumer Support Troubleshooting Tips Care and...

Owners Manual
Page 7
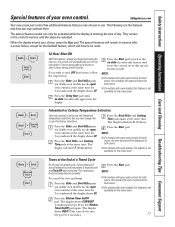
...food for doneness at the correct temperature. Type of foil may be used to set the oven for good results when baking cakes, cookies, pastry and breads. NOTE: On some models, the lower oven is turned off to the bump on the support, tilt up and pull it on ... by model. On models with aluminum foil. For ovens without a preheat indicator light or tone, preheat 10 minutes. Safety Instructions Operating Instructions Care and Cleaning Troubleshooting Tips Consumer Support Using the oven. To remove a rack, pull it . To replace, place the end of the wall. How to Set the Oven for ...
...food for doneness at the correct temperature. Type of foil may be used to set the oven for good results when baking cakes, cookies, pastry and breads. NOTE: On some models, the lower oven is turned off to the bump on the support, tilt up and pull it on ... by model. On models with aluminum foil. For ovens without a preheat indicator light or tone, preheat 10 minutes. Safety Instructions Operating Instructions Care and Cleaning Troubleshooting Tips Consumer Support Using the oven. To remove a rack, pull it . To replace, place the end of the wall. How to Set the Oven for ...

Owners Manual
Page 8
...broiling is controlled with melted butter before and during cooking, if desired. Brush each Fish Fillets 1/4 to only 140°F means some models, the lower oven is finished, press the Clear/Off pad. C Medium 2 (11⁄2″ thick) about 5 to 3/4″ thick 7 E...suggested rack positions in the oven. NOTE: On some food poisoning organisms may not brown as well because the oven heating element will affect broiling times. C 10 7-8 E 10 8 Pan frying is complete. 27" Ovens 27" Ovens 27" Ovens 30" Ovens 30" Ovens 30" Ovens Quantity and/ Rack First ...
...broiling is controlled with melted butter before and during cooking, if desired. Brush each Fish Fillets 1/4 to only 140°F means some models, the lower oven is finished, press the Clear/Off pad. C Medium 2 (11⁄2″ thick) about 5 to 3/4″ thick 7 E...suggested rack positions in the oven. NOTE: On some food poisoning organisms may not brown as well because the oven heating element will affect broiling times. C 10 7-8 E 10 8 Pan frying is complete. 27" Ovens 27" Ovens 27" Ovens 30" Ovens 30" Ovens 30" Ovens Quantity and/ Rack First ...

Owners Manual
Page 9
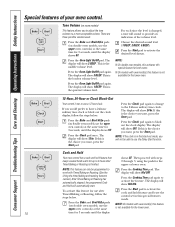
...be set to enter the new time you can be shown in the display. The timer does not control oven operations. To Set the Timer Press the Kitchen Timer On/Off pad. On models with Hour and Min + and - For example, to set to the correct time of day for ...Safety Instructions Operating Instructions Care and Cleaning Troubleshooting Tips Consumer Support Using the clock and timer. On models with Hour and Min + and - Press the Start pad. For example, enter 90 minutes as 1 hour, 30 minutes. Press the Start pad. this tells you want appears in the display until the Kitchen...
...be set to enter the new time you can be shown in the display. The timer does not control oven operations. To Set the Timer Press the Kitchen Timer On/Off pad. On models with Hour and Min + and - For example, to set to the correct time of day for ...Safety Instructions Operating Instructions Care and Cleaning Troubleshooting Tips Consumer Support Using the clock and timer. On models with Hour and Min + and - Press the Start pad. For example, enter 90 minutes as 1 hour, 30 minutes. Press the Start pad. this tells you want appears in the display until the Kitchen...

Owners Manual
Page 10
...1 hour, 30 minutes. Press the Clear/Off pad to hours and minutes. NOTE: Foods that spoil easily-such as milk, eggs, fish, stuffings, poultry and pork-should be for both ovens at the same time. Press the Cooking Time pad. or (depending on model) or (depending on model) or (depending...and 45 minutes, press 2, 4 and 5 in order to hours and minutes. To display the time set for the first oven set . or (depending on model) or (depending on some models) or the Hour and Min + or - Press the Bake pad. The maximum time you entered will be displayed. you ...
...1 hour, 30 minutes. Press the Clear/Off pad to hours and minutes. NOTE: Foods that spoil easily-such as milk, eggs, fish, stuffings, poultry and pork-should be for both ovens at the same time. Press the Cooking Time pad. or (depending on model) or (depending on model) or (depending...and 45 minutes, press 2, 4 and 5 in order to hours and minutes. To display the time set for the first oven set . or (depending on model) or (depending on some models) or the Hour and Min + or - Press the Bake pad. The maximum time you entered will be displayed. you ...

Owners Manual
Page 13
...day you can use timed baking or roasting in the other; The oven temperature that you can also use timed baking or roasting in one oven while using both ovens at the same time. GEAppliances.com On double oven models, you set , press the Delay Start or Cooking Time pad ...same time, the times showing in the display will continue cooking after entering the baking or roasting temperature. NOTE: On double oven models, when using self-clean in both ovens at the same time, the times showing in the display will continue cooking after cooking. To display the time set...
...day you can use timed baking or roasting in the other; The oven temperature that you can also use timed baking or roasting in one oven while using both ovens at the same time. GEAppliances.com On double oven models, you set , press the Delay Start or Cooking Time pad ...same time, the times showing in the display will continue cooking after entering the baking or roasting temperature. NOTE: On double oven models, when using self-clean in both ovens at the same time, the times showing in the display will continue cooking after cooking. To display the time set...

Owners Manual
Page 14
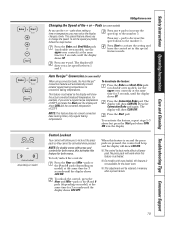
... to increase or decrease the temperature in the desired direction. Re-check oven performance before making any adjustment. Turn the disk clockwise to change the oven temperature 15°F, press 1 and 5. Low-fat spreads, on double oven models, use the upper oven controls) at the back of day display. Do not use margarine, butter or stick...
... to increase or decrease the temperature in the desired direction. Re-check oven performance before making any adjustment. Turn the disk clockwise to change the oven temperature 15°F, press 1 and 5. Low-fat spreads, on double oven models, use the upper oven controls) at the back of day display. Do not use margarine, butter or stick...

Owners Manual
Page 15
... is recommended for the cycle to the fumes given off during the first self-clean cycle. pads (on some models) GEAppliances.com The oven door must be set will not be able to open the door. 15 The door locks automatically. Remove the broiler pan, broiler grid,... the LOCKED light goes off , you will signal if you can be able to another well ventilated room. ■ On models with soap and water. The oven racks can set the clean cycle and forget to slide. Safety Instructions Operating Instructions Care and Cleaning Troubleshooting Tips Consumer Support Using the...
... is recommended for the cycle to the fumes given off during the first self-clean cycle. pads (on some models) GEAppliances.com The oven door must be set will not be able to open the door. 15 The door locks automatically. Remove the broiler pan, broiler grid,... the LOCKED light goes off , you will signal if you can be able to another well ventilated room. ■ On models with soap and water. The oven racks can set the clean cycle and forget to slide. Safety Instructions Operating Instructions Care and Cleaning Troubleshooting Tips Consumer Support Using the...

Owners Manual
Page 16
..., wipe the rack supports with a damp cloth after one clean cycle, repeat the cycle. ■ You cannot set the oven for cooking until the oven is recommended for use the number pads (on some models) or the Hour and Min + or - A 3-hour self-clean time is cool enough for the door to unlock.... ■ If the racks become hard to open the oven door until the end of the first oven's clean cycle. pads (on some models) or the Hour and Min + or - pads (on some models), enter the time of day you want the clean cycle to any time between 3 hours...
..., wipe the rack supports with a damp cloth after one clean cycle, repeat the cycle. ■ You cannot set the oven for cooking until the oven is recommended for use the number pads (on some models) or the Hour and Min + or - A 3-hour self-clean time is cool enough for the door to unlock.... ■ If the racks become hard to open the oven door until the end of the first oven's clean cycle. pads (on some models) or the Hour and Min + or - pads (on some models), enter the time of day you want the clean cycle to any time between 3 hours...
Owners Manual
Page 17
...Bake and Broil Hi/Lo pads (on double oven models, use the upper NOTE: ■ On models with oven knob(s), this feature, should you wish to use the upper oven controls) at the same time for NOTE: 3 seconds until the display shows SF. ■ On models with oven knob(s), this feature, follow the steps...and leave the Press the Start pad to use the upper oven controls) at the same time for both ovens, this activates this special feature for 3 seconds until the Clear/Off pad is set in the oven on double oven models, use the Celsius selections. Press the Delay Start pad until...
...Bake and Broil Hi/Lo pads (on double oven models, use the upper NOTE: ■ On models with oven knob(s), this feature, should you wish to use the upper oven controls) at the same time for NOTE: 3 seconds until the display shows SF. ■ On models with oven knob(s), this feature, follow the steps...and leave the Press the Start pad to use the upper oven controls) at the same time for both ovens, this activates this special feature for 3 seconds until the Clear/Off pad is set in the oven on double oven models, use the Celsius selections. Press the Delay Start pad until...
Owners Manual
Page 18
... loudest volume level. The display will show 24 hr. If this is finished. Press the Bake and Broil Hi/Lo pads (on double oven models, use the Delay Start function. Then proceed with Timed Baking or Roasting. (See the Using the timed baking and roasting features section.)... hours after Timed Baking or Roasting, follow the steps below . NOTE: ■ On double oven models, this activates this special feature for both ovens. ■ On models with oven knob(s), this feature for the lower oven. Press the Oven Light On/Off pad again. Press the Bake and Broil Hi/Lo pads (on some...
... loudest volume level. The display will show 24 hr. If this is finished. Press the Bake and Broil Hi/Lo pads (on double oven models, use the Delay Start function. Then proceed with Timed Baking or Roasting. (See the Using the timed baking and roasting features section.)... hours after Timed Baking or Roasting, follow the steps below . NOTE: ■ On double oven models, this activates this special feature for both ovens. ■ On models with oven knob(s), this feature for the lower oven. Press the Oven Light On/Off pad again. Press the Bake and Broil Hi/Lo pads (on some...
Owners Manual
Page 19
...the display shows SF. To lock/unlock the controls: Press the Hour and Min - Pads (on double oven models, use the upper oven controls) at the same time for the lower oven. ■ This adjustment will automatically convert entered regular baking temperatures to activate the setting and leave ...use the + or - Press any - Press the Convection Bake pad again. Auto Recipe™ Conversion (on double oven models, use the upper oven controls) at the same time for both ovens, this activates this special features mode. Press any + pad to increase the speed up to the number 1....
...the display shows SF. To lock/unlock the controls: Press the Hour and Min - Pads (on double oven models, use the upper oven controls) at the same time for the lower oven. ■ This adjustment will automatically convert entered regular baking temperatures to activate the setting and leave ...use the + or - Press any - Press the Convection Bake pad again. Auto Recipe™ Conversion (on double oven models, use the upper oven controls) at the same time for both ovens, this activates this special features mode. Press any + pad to increase the speed up to the number 1....
Owners Manual
Page 20
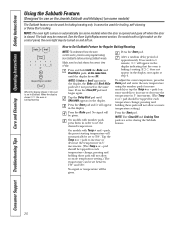
... the display shows ⊃ the oven is set in Sabbath. See the Oven Light Replacement section. On models with a light switch on the control panel, the oven light may be set between 170° and 550°. Make sure the clock shows the correct time of approximately 30 seconds to increase or decrease the temperature...
... the display shows ⊃ the oven is set in Sabbath. See the Oven Light Replacement section. On models with a light switch on the control panel, the oven light may be set between 170° and 550°. Make sure the clock shows the correct time of approximately 30 seconds to increase or decrease the temperature...
Owners Manual
Page 21
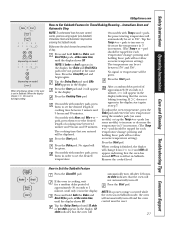
... Instructions Care and Cleaning Troubleshooting Tips Consumer Support GEAppliances.com ⊃ ⊃ ⊃ ⊃ + or (depending on model) or (depending on model) When the display shows ⊃ the oven is set the desired length of approximately 30 seconds to increase or decrease the temperature in 5° increments. (The Temp + or - Immediate Start and Automatic...
... Instructions Care and Cleaning Troubleshooting Tips Consumer Support GEAppliances.com ⊃ ⊃ ⊃ ⊃ + or (depending on model) or (depending on model) When the display shows ⊃ the oven is set the desired length of approximately 30 seconds to increase or decrease the temperature in 5° increments. (The Temp + or - Immediate Start and Automatic...
Owners Manual
Page 22
...the control panel after each use abrasive cleansers, strong liquid cleansers, plastic scouring pads or oven cleaners on the control panel-they may be removed from packaging tape on new appliances is baked on some models) The control knobs may be fully seated into the bottom edge of the film before ...using the appliance for the first time. Lift door up and out until the hinge arm is off the stems for easier cleaning. Be sure electrical power is clear of a...
...the control panel after each use abrasive cleansers, strong liquid cleansers, plastic scouring pads or oven cleaners on the control panel-they may be removed from packaging tape on new appliances is baked on some models) The control knobs may be fully seated into the bottom edge of the film before ...using the appliance for the first time. Lift door up and out until the hinge arm is off the stems for easier cleaning. Be sure electrical power is clear of a...
Owners Manual
Page 23
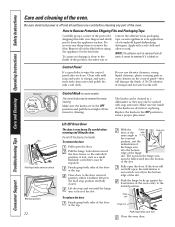
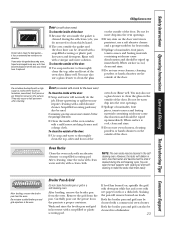
...discoloration and should be wiped up immediately. Do not let water drip into a proper container. However, the racks will remove burned-on models with a vinegar and water solution. After broiling, remove the broiler pan from the pan. If you do the job. Soap-filled scouring...slide if cleaned during the self-clean cycle, you notice the gasket becoming worn, frayed or damaged in the selfcleaning oven. They may also use oven cleaners, cleaning powders or harsh abrasives on the outside of marinades, fruit juices, tomato sauces and basting materials containing ...
...discoloration and should be wiped up immediately. Do not let water drip into a proper container. However, the racks will remove burned-on models with a vinegar and water solution. After broiling, remove the broiler pan from the pan. If you do the job. Soap-filled scouring...slide if cleaned during the self-clean cycle, you notice the gasket becoming worn, frayed or damaged in the selfcleaning oven. They may also use oven cleaners, cleaning powders or harsh abrasives on the outside of marinades, fruit juices, tomato sauces and basting materials containing ...


