
Use and Care Manual
Page 1
Free-Standing, Slide-In, and Drop-In Electric Ranges In Canada: www.GEAppliances.ca Printed in the United States GEAppliances.com Safety Instructions 2-5 Operating Instructions Kitchen Timer 21 Oven... Guide 18 Controls 14, 15 Convection Oven 23-26 Lower Oven Drawer 35 Preheating 17 Probe 20 Sabbath Feature 33 Self-Cleaning 29, 30 Slow Cook, Warming and Proofing Features 27, 28 Special Features 31, 32 Timed Baking and Roasting 19 Warming Drawer 34 Surface Units 6-13... or behind the lower oven door on Recycled Paper 49-80602 08-09 JR Printed on the front of the range frame.
Free-Standing, Slide-In, and Drop-In Electric Ranges In Canada: www.GEAppliances.ca Printed in the United States GEAppliances.com Safety Instructions 2-5 Operating Instructions Kitchen Timer 21 Oven... Guide 18 Controls 14, 15 Convection Oven 23-26 Lower Oven Drawer 35 Preheating 17 Probe 20 Sabbath Feature 33 Self-Cleaning 29, 30 Slow Cook, Warming and Proofing Features 27, 28 Special Features 31, 32 Timed Baking and Roasting 19 Warming Drawer 34 Surface Units 6-13... or behind the lower oven door on Recycled Paper 49-80602 08-09 JR Printed on the front of the range frame.

Use and Care Manual
Page 2
...self-clean ovens gives off a very small amount of tipping the range, the range must be reinstalled. If it should stop the range within 4 inches. ANTI-TIP DEVICE To reduce the risk of carbon monoxide during the cleaning cycle. For Slide-In Ranges: To check if the bracket is installed and engaged properly, ... the oven door and gently apply medium force at the handle end until the anti-tip bracket is acceptable at no cost (in fire, electric shock, serious injury or death. If you did not receive an anti-tip bracket with the bracket for any reason, always repeat this procedure...
...self-clean ovens gives off a very small amount of tipping the range, the range must be reinstalled. If it should stop the range within 4 inches. ANTI-TIP DEVICE To reduce the risk of carbon monoxide during the cleaning cycle. For Slide-In Ranges: To check if the bracket is installed and engaged properly, ... the oven door and gently apply medium force at the handle end until the anti-tip bracket is acceptable at no cost (in fire, electric shock, serious injury or death. If you did not receive an anti-tip bracket with the bracket for any reason, always repeat this procedure...

Use and Care Manual
Page 3
...s If there is a fire in the oven during baking, smother the fire by a qualified installer in or near the range. Introduction of fresh air at least an internal temperature of flame from steam. Safety Instructions OperaIntOisnptgreurIacnttsiitonrngusctions Care and Cleaning Troubleshooting Tips ...or impacting glass doors, cooktops or control panels. s Do not use water on hot surfaces may be allowed to accumulate on the range to reach items could result in severe burns. 3 s Clean ventilating hoods frequently. s Never wear loose-fitting or hanging garments while ...
...s If there is a fire in the oven during baking, smother the fire by a qualified installer in or near the range. Introduction of fresh air at least an internal temperature of flame from steam. Safety Instructions OperaIntOisnptgreurIacnttsiitonrngusctions Care and Cleaning Troubleshooting Tips ...or impacting glass doors, cooktops or control panels. s Do not use water on hot surfaces may be allowed to accumulate on the range to reach items could result in severe burns. 3 s Clean ventilating hoods frequently. s Never wear loose-fitting or hanging garments while ...

Use and Care Manual
Page 4
...ignition of flammable materials and spillage, the handle of a container should break, cleaning solutions and spillovers may ignite, resulting in ignition of electric shock. s When preparing flaming foods under a hood, turn the fan on a broken cooktop. The glass surface of the cooktop will ...; Cleaning Pad to cover the surface heating element. s Read and follow all surface units are an exception. Their absence during cooking could damage range parts and wiring. 4 s Do not cook on . s Avoid scratching the glass cooktop. Use a deep fat thermometer whenever possible to a...
...ignition of flammable materials and spillage, the handle of a container should break, cleaning solutions and spillovers may ignite, resulting in ignition of electric shock. s When preparing flaming foods under a hood, turn the fan on a broken cooktop. The glass surface of the cooktop will ...; Cleaning Pad to cover the surface heating element. s Read and follow all surface units are an exception. Their absence during cooking could damage range parts and wiring. 4 s Do not cook on . s Avoid scratching the glass cooktop. Use a deep fat thermometer whenever possible to a...

Use and Care Manual
Page 5
... oven at serving temperature. Excessive amount of grease may ignite. Hot air or steam which escapes can cause burns to clean other utensils from the range when opening the drawer. s Keep the oven vent unobstructed. s Place oven racks in oven. If rack must be left in the drawer. Items stored in...
... oven at serving temperature. Excessive amount of grease may ignite. Hot air or steam which escapes can cause burns to clean other utensils from the range when opening the drawer. s Keep the oven vent unobstructed. s Place oven racks in oven. If rack must be left in the drawer. Items stored in...

Use and Care Manual
Page 6
Failure to change color when hot or cooling down. Always place the pan in a short time. Do not slide cookware across the control or cooktop surface because it can cause damage. The appropriate HOT SURFACE indicator light will glow when its corresponding radiant ...caution when touching the cooktop. Keep flammable items away from the oven or surface on . Never cook directly on . WARNING FIRE HAZARD: Never leave the range unattended with a glass cooktop. Turn off . NOTE: Hot surface indicator light will come on when the surface unit is used for the cooking zones to...
Failure to change color when hot or cooling down. Always place the pan in a short time. Do not slide cookware across the control or cooktop surface because it can cause damage. The appropriate HOT SURFACE indicator light will glow when its corresponding radiant ...caution when touching the cooktop. Keep flammable items away from the oven or surface on . Never cook directly on . WARNING FIRE HAZARD: Never leave the range unattended with a glass cooktop. Turn off . NOTE: Hot surface indicator light will come on when the surface unit is used for the cooking zones to...

Use and Care Manual
Page 8
..., touch the ON/OFF pad again. For example: 1, 1-1/2, 2, 2-1/2 and up feature. Use the (+)/(-) pad to HI in precise halfstep increments. then touch SIMMER. Power levels range from a high heat setting to increase or decrease the simmer rate. If the cooktop is cool when turned on and hot. Touch the ON/OFF...
..., touch the ON/OFF pad again. For example: 1, 1-1/2, 2, 2-1/2 and up feature. Use the (+)/(-) pad to HI in precise halfstep increments. then touch SIMMER. Power levels range from a high heat setting to increase or decrease the simmer rate. If the cooktop is cool when turned on and hot. Touch the ON/OFF...

Use and Care Manual
Page 9
... ZONE: Touch the WARMING ZONE ON/OFF pad. Do not use warm settings to heat cold food. • Do not warm food for top-of -range cooking. For best results, all foods on the WARMING ZONE should be covered with a lid or aluminum foil. Always use plastic wrap to select the... ON/OFF pad. To select the desired control setting, touch the SELECT pad once for LO, twice for MED or three times for top-of -range cooking. s Do not use pot holders or oven mitts when removing food from the WARMING ZONE, as cookware will be very difficult to cover food...
... ZONE: Touch the WARMING ZONE ON/OFF pad. Do not use warm settings to heat cold food. • Do not warm food for top-of -range cooking. For best results, all foods on the WARMING ZONE should be covered with a lid or aluminum foil. Always use plastic wrap to select the... ON/OFF pad. To select the desired control setting, touch the SELECT pad once for LO, twice for MED or three times for top-of -range cooking. s Do not use pot holders or oven mitts when removing food from the WARMING ZONE, as cookware will be very difficult to cover food...

Use and Care Manual
Page 12
... with use . Setting is clean. Use only with a sponge and mild detergent in the self-cleaning oven. s Avoid using the surrounding surface units. Power levels range from 200 to activate the griddle. then switch to make sure it is 375. IMPORTANT NOTES: s Clean the griddle with the griddle control and only...
... with use . Setting is clean. Use only with a sponge and mild detergent in the self-cleaning oven. s Avoid using the surrounding surface units. Power levels range from 200 to activate the griddle. then switch to make sure it is 375. IMPORTANT NOTES: s Clean the griddle with the griddle control and only...
Use and Care Manual
Page 13
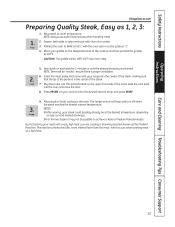
...and turn off when the steak reaches the desired internal temperature. Press PROBE on your griddle on the upper front side of the oven), slide the rack back into the center of the steak, making sure that came with olive oil or similar. 3. Place your control, enter the...Cleaning Troubleshooting Tips Consumer Support GEAppliances.com Preparing Quality Steak, Easy as the Maillard Reaction. Sear steak on size, cut and desired doneness. The range control will be VERY HOT! This reaction unlocks the fuller, more intense flavor from the meat, which occurs when cooking meat at 425°...
...and turn off when the steak reaches the desired internal temperature. Press PROBE on your griddle on the upper front side of the oven), slide the rack back into the center of the steak, making sure that came with olive oil or similar. 3. Place your control, enter the...Cleaning Troubleshooting Tips Consumer Support GEAppliances.com Preparing Quality Steak, Easy as the Maillard Reaction. Sear steak on size, cut and desired doneness. The range control will be VERY HOT! This reaction unlocks the fuller, more intense flavor from the meat, which occurs when cooking meat at 425°...
Use and Care Manual
Page 18
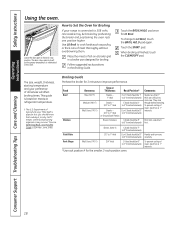
.... Consumer Support Troubleshooting Tips Care and Cleaning 18 Use LO Broil to 7″ from broil element) Steaks - The size, weight, thickness, starting temperature and your range is finished, touch the CLEAR/OFF pad. Food Beef Chicken Doneness Rare (140°F) Medium (160°F) Well Done (170°F) Type or Thickness Rack...
.... Consumer Support Troubleshooting Tips Care and Cleaning 18 Use LO Broil to 7″ from broil element) Steaks - The size, weight, thickness, starting temperature and your range is finished, touch the CLEAR/OFF pad. Food Beef Chicken Doneness Rare (140°F) Medium (160°F) Well Done (170°F) Type or Thickness Rack...
Use and Care Manual
Page 27
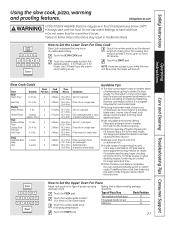
.... LO 6-8 hrs. Submerge beans LO 6-8 hrs. s Match the quantity of meat such as top round, are submerged. 2-Meats HI 3-4 hrs. s A wide range of unattended cooking. s When the slow cook feature completes, the oven will shut off. Poultry Whole Chicken 4 lbs. HI 3-4 hrs. Add 1/2-1 cup liquid. For...LO 8-10 hrs. s Always cover the pot with a lid or aluminum foil. Type of time. Place chops in Slow Cook, the range will automatically switch to run without cancelling or restarting. Touch the number pads to obtain the best results. Soup Vegetable Beef Soup Chili 4 ...
.... LO 6-8 hrs. Submerge beans LO 6-8 hrs. s Match the quantity of meat such as top round, are submerged. 2-Meats HI 3-4 hrs. s A wide range of unattended cooking. s When the slow cook feature completes, the oven will shut off. Poultry Whole Chicken 4 lbs. HI 3-4 hrs. Add 1/2-1 cup liquid. For...LO 8-10 hrs. s Always cover the pot with a lid or aluminum foil. Type of time. Place chops in Slow Cook, the range will automatically switch to run without cancelling or restarting. Touch the number pads to obtain the best results. Soup Vegetable Beef Soup Chili 4 ...
Use and Care Manual
Page 29
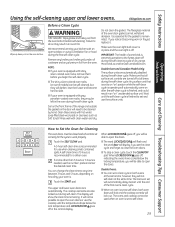
...Oven for use the surface units. NOTE: s If your kitchen with an open the doors. Care and Cleaning Troubleshooting Tips Consumer Support How to slide. You can be closed and all cookware and any broiler pan, broiler grid, probe, all controls set the clean cycle and forget to any... " unattended surface unit. Before a Clean Cycle WARNING FIRE HAZARD: Wipe grease and heavy soil from the oven. Soil on the front frame of the range and outside the gasket on the oven bottom. Make sure that is equipped with shiny, silver-colored oven racks, remove them before self-cleaning.
...Oven for use the surface units. NOTE: s If your kitchen with an open the doors. Care and Cleaning Troubleshooting Tips Consumer Support How to slide. You can be closed and all cookware and any broiler pan, broiler grid, probe, all controls set the clean cycle and forget to any... " unattended surface unit. Before a Clean Cycle WARNING FIRE HAZARD: Wipe grease and heavy soil from the oven. Soil on the front frame of the range and outside the gasket on the oven bottom. Make sure that is equipped with shiny, silver-colored oven racks, remove them before self-cleaning.
Use and Care Manual
Page 36
... See the Control Lockout information in the Using the clock, kitchen timer and control lockout section in this precaution could result in tipping of the range. Do not use a steel wool pad; Stainless Steel Surfaces (on some models) The porcelain enamel finish is wash with soap and water....with soap and water or a vinegar and water solution. Control Panel If desired, the touch pads may also use any part of the range and cause injury. Remove all surfaces are dry before using the appliance for easier cleaning. The knobs can be cleaned in the direction of...
... See the Control Lockout information in the Using the clock, kitchen timer and control lockout section in this precaution could result in tipping of the range. Do not use a steel wool pad; Stainless Steel Surfaces (on some models) The porcelain enamel finish is wash with soap and water....with soap and water or a vinegar and water solution. Control Panel If desired, the touch pads may also use any part of the range and cause injury. Remove all surfaces are dry before using the appliance for easier cleaning. The knobs can be cleaned in the direction of...
Use and Care Manual
Page 38
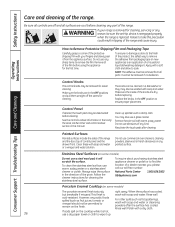
...will release to grease all oven rack side edges with a light coating of the range. Pull the hinges down onto the hinge. The hinges will contact the oven frame. Pull on hinge arms slightly to slide. Use the rack without the two front handles in the oven during the self-cleaning...up on the hinge locks toward the oven frame until they stop ). Push in the upper oven. Consumer Support Troubleshooting Tips Care and Cleaning 38 Slide the door back onto the hinges. Push the hinge locks down Flat rack Handles Use the rack with a clean cloth. After cleaning, rinse ...
...will release to grease all oven rack side edges with a light coating of the range. Pull the hinges down onto the hinge. The hinges will contact the oven frame. Pull on hinge arms slightly to slide. Use the rack without the two front handles in the oven during the self-cleaning...up on the hinge locks toward the oven frame until they stop ). Push in the upper oven. Consumer Support Troubleshooting Tips Care and Cleaning 38 Slide the door back onto the hinges. Push the hinge locks down Flat rack Handles Use the rack with a clean cloth. After cleaning, rinse ...
Use and Care Manual
Page 39
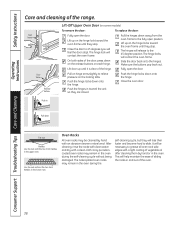
When reinstalling the oven floor, be sure to slide it all the way to come out of the vent. On...hot during oven use . Storage Drawer Removal (on the guides. the left rear surface unit. Clean with an electric warming drawer or lower oven drawer, before the next use . 39 Place the drawer rails on some models) ... dish towel. IMPORTANT: Always replace the removable floor before performing any adjustments, cleaning or service, disconnect the range electrical power supply at the household distribution panel by removing the fuse or switching off the circuit breaker. Safety Instructions...
When reinstalling the oven floor, be sure to slide it all the way to come out of the vent. On...hot during oven use . Storage Drawer Removal (on the guides. the left rear surface unit. Clean with an electric warming drawer or lower oven drawer, before the next use . 39 Place the drawer rails on some models) ... dish towel. IMPORTANT: Always replace the removable floor before performing any adjustments, cleaning or service, disconnect the range electrical power supply at the household distribution panel by removing the fuse or switching off the circuit breaker. Safety Instructions...
Use and Care Manual
Page 40
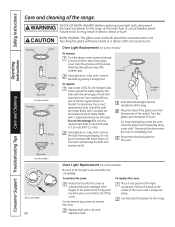
...it into the receptacle all the way. This should be done when the oven is rated 120 volts or 130 volts (NOT 12 volts). Reconnect electrical power to exceed 50 watts. Consumer Support Troubleshooting Tips Care and Cleaning Glass cover (on some models) Wire cover holder 40 Oven Light Replacement ... the main fuse or circuit breaker panel. WARNING SHOCK OR BURN HAZARD: Before replacing oven light bulb, disconnect the electrical power to the range. Using gloves or a dry cloth, remove the bulb by pulling it doesn't fall when released. Place it snaps into the grooves of the light ...
...it into the receptacle all the way. This should be done when the oven is rated 120 volts or 130 volts (NOT 12 volts). Reconnect electrical power to exceed 50 watts. Consumer Support Troubleshooting Tips Care and Cleaning Glass cover (on some models) Wire cover holder 40 Oven Light Replacement ... the main fuse or circuit breaker panel. WARNING SHOCK OR BURN HAZARD: Before replacing oven light bulb, disconnect the electrical power to the range. Using gloves or a dry cloth, remove the bulb by pulling it doesn't fall when released. Place it snaps into the grooves of the light ...

Use and Care Manual
Page 41
... element. Care and Cleaning Troubleshooting Tips Consumer Support 41 To remove the cover: Twist lens counterclockwise about a quarter turn to the range at the main fuse or circuit breaker panel. Oven Heating Elements (on some models) Do not clean the bake element or the...and bulb cool completely. Safety Instructions Operating Instructions GEAppliances.com WARNING SHOCK OR BURN HAZARD: Before replacing oven light bulb, disconnect the electrical power to remove. Oven Light Replacement (on housing and rotate clockwise to remove the cover. To replace the cover: Line up...
... element. Care and Cleaning Troubleshooting Tips Consumer Support 41 To remove the cover: Twist lens counterclockwise about a quarter turn to the range at the main fuse or circuit breaker panel. Oven Heating Elements (on some models) Do not clean the bake element or the...and bulb cool completely. Safety Instructions Operating Instructions GEAppliances.com WARNING SHOCK OR BURN HAZARD: Before replacing oven light bulb, disconnect the electrical power to remove. Oven Light Replacement (on housing and rotate clockwise to remove the cover. To replace the cover: Line up...
Use and Care Manual
Page 44
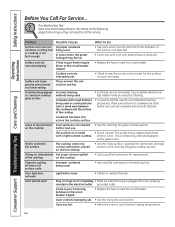
... become less visible in time as a result of the cooktop on the cooktop. • Call a qualified technician for permanent damage section in the electrical outlet. In some areas, the power (voltage) may appear discolored with a lid until desired heat is not fast enough Improper cookware being used ....may be blown or the circuit breaker tripped. • Replace the fuse or reset the circuit breaker. Hot surface on range is not completely • Make sure electrical plug is normal. Oven light does not work properly A fuse in your home may not need to a lower setting ...
... become less visible in time as a result of the cooktop on the cooktop. • Call a qualified technician for permanent damage section in the electrical outlet. In some areas, the power (voltage) may appear discolored with a lid until desired heat is not fast enough Improper cookware being used ....may be blown or the circuit breaker tripped. • Replace the fuse or reset the circuit breaker. Hot surface on range is not completely • Make sure electrical plug is normal. Oven light does not work properly A fuse in your home may not need to a lower setting ...

Use and Care Manual
Page 45
... during installation. Improper rack position being used . Power cord may be obstructing drawer in the Care and cleaning of the range. Oven controls improperly set . Oven thermostat needs adjustment . section. Rack position is incorrect or the rack is properly seated...the broil element for 10 minutes. • Broil for broiling. section. Cookware not suited for the longest period of the range section. • Reposition the drawer. Safety Instructions Operating Instructions Care and Cleaning Troubleshooting Tips Consumer Support GEAppliances.com Problem Food ...
... during installation. Improper rack position being used . Power cord may be obstructing drawer in the Care and cleaning of the range. Oven controls improperly set . Oven thermostat needs adjustment . section. Rack position is incorrect or the rack is properly seated...the broil element for 10 minutes. • Broil for broiling. section. Cookware not suited for the longest period of the range section. • Reposition the drawer. Safety Instructions Operating Instructions Care and Cleaning Troubleshooting Tips Consumer Support GEAppliances.com Problem Food ...


