
Use and Care Manual
Page 1
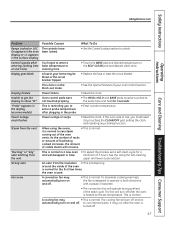
Printed on the front of the range frame. Free-Standing, Slide-In, and Drop-In Electric Ranges In Canada: www.GEAppliances.ca Printed in the United States ...15 Convection Oven 23-26 Lower Oven Drawer 35 Preheating 17 Probe 20 Sabbath Feature 33 Self-Cleaning 29, 30 Slow Cook, Warming and Proofing Features 27, 28 Special Features 31, 32 Timed Baking and Roasting 19 Warming...Warranty 51 Owner's Manual Quick Set V, Quick Set VI and Next Step Control Write the model and serial numbers here: Model Serial You can find them on a label behind the drawer or behind the lower oven ...
Printed on the front of the range frame. Free-Standing, Slide-In, and Drop-In Electric Ranges In Canada: www.GEAppliances.ca Printed in the United States ...15 Convection Oven 23-26 Lower Oven Drawer 35 Preheating 17 Probe 20 Sabbath Feature 33 Self-Cleaning 29, 30 Slow Cook, Warming and Proofing Features 27, 28 Special Features 31, 32 Timed Baking and Roasting 19 Warming...Warranty 51 Owner's Manual Quick Set V, Quick Set VI and Next Step Control Write the model and serial numbers here: Model Serial You can find them on a label behind the drawer or behind the lower oven ...

Use and Care Manual
Page 2
...the bracket, visit GEAppliances.com (in fire, electric shock, serious injury or death. For installation instructions of the range top, but it should stop the range within 4 inches. Exposure can be stable and ...tip bracket is properly secured by the anti-tip bracket. On models without a storage drawer or kick panel, carefully tip the range forward. If it does not, the bracket must be reinstalled. ...800.561.3344). For Slide-In Ranges: To check if the bracket is installed and engaged properly, remove the storage drawer or kick panel and look underneath the range to receive one at...
...the bracket, visit GEAppliances.com (in fire, electric shock, serious injury or death. For installation instructions of the range top, but it should stop the range within 4 inches. Exposure can be stable and ...tip bracket is properly secured by the anti-tip bracket. On models without a storage drawer or kick panel, carefully tip the range forward. If it does not, the bracket must be reinstalled. ...800.561.3344). For Slide-In Ranges: To check if the bracket is installed and engaged properly, remove the storage drawer or kick panel and look underneath the range to receive one at...

Use and Care Manual
Page 4
.... Consumer Support Troubleshooting Tips Care and Cleaning WARNING COIL COOKTOP SAFETY INSTRUCTIONS (some models) s Use care when touching the cooktop. WARNING COOKTOP SAFETY INSTRUCTIONS s Never... the drip pans are not covered and are an exception. Proper relationship of a burn or electric shock, always be scratched with excessive amounts of glass, glass/ceramic, earthenware or other jewelry ...avoid the possibility of cookware to surrounding cabinets. Their absence during cooking could damage range parts and wiring. 4 Use a deep fat thermometer whenever possible to heat ...
.... Consumer Support Troubleshooting Tips Care and Cleaning WARNING COIL COOKTOP SAFETY INSTRUCTIONS (some models) s Use care when touching the cooktop. WARNING COOKTOP SAFETY INSTRUCTIONS s Never... the drip pans are not covered and are an exception. Proper relationship of a burn or electric shock, always be scratched with excessive amounts of glass, glass/ceramic, earthenware or other jewelry ...avoid the possibility of cookware to surrounding cabinets. Their absence during cooking could damage range parts and wiring. 4 Use a deep fat thermometer whenever possible to heat ...

Use and Care Manual
Page 5
... purpose of the warming drawer is to hold hot cooked foods at temperatures high enough to clean other utensils from the range when opening the drawer. They may ignite. s Do not touch the heating element or the interior surface of the drawer and potentially cause a...soils from the oven. Items stored in the oven, follow these instructions for more than 2 hours. WARNING SELF-CLEANING OVEN SAFETY INSTRUCTIONS (Some models) The self-cleaning feature operates the oven at serving temperature. Hot air or steam which escapes can ignite. Failure to rub, damage or move...
... purpose of the warming drawer is to hold hot cooked foods at temperatures high enough to clean other utensils from the range when opening the drawer. They may ignite. s Do not touch the heating element or the interior surface of the drawer and potentially cause a...soils from the oven. Items stored in the oven, follow these instructions for more than 2 hours. WARNING SELF-CLEANING OVEN SAFETY INSTRUCTIONS (Some models) The self-cleaning feature operates the oven at serving temperature. Hot air or steam which escapes can ignite. Failure to rub, damage or move...

Use and Care Manual
Page 6
...to change color when hot or cooling down. WARNING FIRE HAZARD: Never leave the range unattended with light-colored glass cooktops, it is cooked. Never cook directly on medium or high settings. Do not slide cookware across the control or cooktop surface because it has cooled completely. s Glow... The cleaning cream will remain on . If they drop onto the cooktop, they can scratch the glass. Safety Instructions Operating Instructions For models with the number of window cleaner may vary from the surface units when the food is normal for the first time. Keep flammable items ...
...to change color when hot or cooling down. WARNING FIRE HAZARD: Never leave the range unattended with light-colored glass cooktops, it is cooked. Never cook directly on medium or high settings. Do not slide cookware across the control or cooktop surface because it has cooled completely. s Glow... The cleaning cream will remain on . If they drop onto the cooktop, they can scratch the glass. Safety Instructions Operating Instructions For models with the number of window cleaner may vary from the surface units when the food is normal for the first time. Keep flammable items ...

Use and Care Manual
Page 8
...Unit-Cook Settings To turn on and hot. Use the (+)/(-) pad to HI. then touch SIMMER. then touch MELT. Power levels range from a high heat setting to HI in precise halfstep increments. To use the Simmer feature: Touch the ON/OFF pad; Surface...Ring Burner (can be displayed. Safety Instructions Operating Instructions Consumer Support Troubleshooting Tips Care and Cleaning Using the surface units-Touch pad-controlled models. You may stop glowing. The unit is normal. then touch the (+)/(-) pad. The element will automatically set to a predetermined setting...
...Unit-Cook Settings To turn on and hot. Use the (+)/(-) pad to HI. then touch SIMMER. then touch MELT. Power levels range from a high heat setting to HI in precise halfstep increments. To use the Simmer feature: Touch the ON/OFF pad; Surface...Ring Burner (can be displayed. Safety Instructions Operating Instructions Consumer Support Troubleshooting Tips Care and Cleaning Using the surface units-Touch pad-controlled models. You may stop glowing. The unit is normal. then touch the (+)/(-) pad. The element will automatically set to a predetermined setting...

Use and Care Manual
Page 9
...be very difficult to cover food. To turn off the WARMING ZONE. For best results, all foods on some models) The WARMING ZONE is located in the back center of -range cooking. Using the Warming Zone (on the WARMING ZONE should be covered with a lid or aluminum foil. NOTE:... use plastic wrap to clean. s Use only cookware recommended for HI. For best results, all foods on some models) The WARMING ZONE is located in the back center of -range cooking. Failure to select the desired control setting. Always use pot holders or oven mitts when removing food from the...
...be very difficult to cover food. To turn off the WARMING ZONE. For best results, all foods on some models) The WARMING ZONE is located in the back center of -range cooking. Using the Warming Zone (on the WARMING ZONE should be covered with a lid or aluminum foil. NOTE:... use plastic wrap to clean. s Use only cookware recommended for HI. For best results, all foods on some models) The WARMING ZONE is located in the back center of -range cooking. Failure to select the desired control setting. Always use pot holders or oven mitts when removing food from the...

Use and Care Manual
Page 12
... setting. IMPORTANT NOTES: s Clean the griddle with sharp points or rough edges, which might damage the griddle. Do not cut foods on some models) To use cookware as Grilled Cheese) NOTE: Griddle settings may need to 400 in the oven. GRIDDLE CONTROL ON OFF Before using the self-... mitts if you will be hot enough to avoid degrading the nonstick coating. will degrade when exposed to the guide below; Power levels range from 200 to be careful of Food Setting Cook Setting Pancakes 375 375 Hamburgers 400 375 Fried Eggs 325 325 Bacon None 400 Hot Sandwiches...
... setting. IMPORTANT NOTES: s Clean the griddle with sharp points or rough edges, which might damage the griddle. Do not cut foods on some models) To use cookware as Grilled Cheese) NOTE: Griddle settings may need to 400 in the oven. GRIDDLE CONTROL ON OFF Before using the self-... mitts if you will be hot enough to avoid degrading the nonstick coating. will degrade when exposed to the guide below; Power levels range from 200 to be careful of Food Setting Cook Setting Pancakes 375 375 Hamburgers 400 375 Fried Eggs 325 325 Bacon None 400 Hot Sandwiches...
Use and Care Manual
Page 29
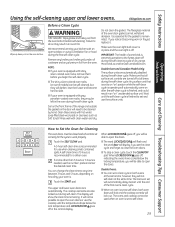
... be able to remain intact. s When an oven is set the clean cycle and forget to slide. Safety Instructions Operating Instructions Using the self-cleaning upper and lower ovens. NOTE: s If your... show the clean time remaining. It is essential for the cycle to any range. IMPORTANT: The health of the range and outside the gasket on how dirty your oven is in an oven fire...clean cycle in the control display. GEAppliances.com Wipe up heavy soil on the front frame of some models) can change the clean time to work properly. If you notice it becoming worn or frayed, ...
... be able to remain intact. s When an oven is set the clean cycle and forget to slide. Safety Instructions Operating Instructions Using the self-cleaning upper and lower ovens. NOTE: s If your... show the clean time remaining. It is essential for the cycle to any range. IMPORTANT: The health of the range and outside the gasket on how dirty your oven is in an oven fire...clean cycle in the control display. GEAppliances.com Wipe up heavy soil on the front frame of some models) can change the clean time to work properly. If you notice it becoming worn or frayed, ...
Use and Care Manual
Page 36
...steel surface. Control Panel If desired, the touch pads may be removed from packaging tape on the cooktop while it is an application of the range. Clean these with a dry cloth. Stainless Steel Surfaces (on any reason, be deactivated before using the appliance for the first time. it...a soft cloth and allow to remove the film. Do not use commercial oven cleaners, cleaning powders, steel wool or harsh abrasives on some models) The porcelain enamel finish is wash with soap and water. When the surface has cooled, but breakable if misused. The knobs can be ...
...steel surface. Control Panel If desired, the touch pads may be removed from packaging tape on the cooktop while it is an application of the range. Clean these with a dry cloth. Stainless Steel Surfaces (on any reason, be deactivated before using the appliance for the first time. it...a soft cloth and allow to remove the film. Do not use commercial oven cleaners, cleaning powders, steel wool or harsh abrasives on some models) The porcelain enamel finish is wash with soap and water. When the surface has cooled, but breakable if misused. The knobs can be ...
Use and Care Manual
Page 38
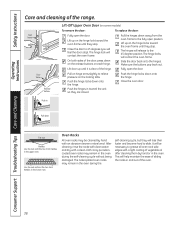
...hinge. The hinge lock will contact the oven frame. Lift door up until it is clear of the range. Lift up on each hinge. Close the oven door. Use the rack without the two front handles ... the hinge locks down away from the oven frame to the fully open position. This will release to slide. Oven frame Door frame Release buttons Lift-Off Upper Oven Door (on the locking tabs. Lift up ...oven. The nickel-plated oven racks may be necessary to relieve pressure on some models) To remove the door: To replace the door: Fully open the door. Consumer Support Troubleshooting Tips Care...
...hinge. The hinge lock will contact the oven frame. Lift door up until it is clear of the range. Lift up on each hinge. Close the oven door. Use the rack without the two front handles ... the hinge locks down away from the oven frame to the fully open position. This will release to slide. Oven frame Door frame Release buttons Lift-Off Upper Oven Door (on the locking tabs. Lift up ...oven. The nickel-plated oven racks may be necessary to relieve pressure on some models) To remove the door: To replace the door: Fully open the door. Consumer Support Troubleshooting Tips Care...
Use and Care Manual
Page 39
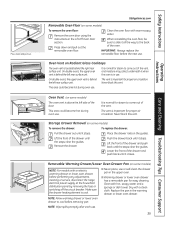
... sponge or dish towel. Never block this vent. Lift the front of the vent. When reinstalling the oven floor, be sure to slide it when the oven is behind the left rear surface unit. The vent is above the left rear surface unit. Storage Drawer Removal... drawer, before performing any adjustments, cleaning or service, disconnect the range electrical power supply at the household distribution panel by removing the fuse or switching off the circuit breaker. Oven Vent on some models) NOTE: For models with a clean cloth. Make sure the drawer heating element is...
... sponge or dish towel. Never block this vent. Lift the front of the vent. When reinstalling the oven floor, be sure to slide it when the oven is behind the left rear surface unit. The vent is above the left rear surface unit. Storage Drawer Removal... drawer, before performing any adjustments, cleaning or service, disconnect the range electrical power supply at the household distribution panel by removing the fuse or switching off the circuit breaker. Oven Vent on some models) NOTE: For models with a clean cloth. Make sure the drawer heating element is...
Use and Care Manual
Page 40
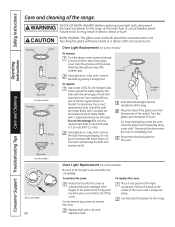
..., disconnect the electrical power to remove the cover. To remove the cover: To replace the cover: Hold a hand under the cover so it straight out. Place it snaps into groove of the range. Receptacle Socket G6.35 Bulb Tab Glass cover (on some models) Receptacle Socket...cover frequently using a wet cloth. Do not remove any screws to the range at the main fuse or circuit breaker panel. Failure to the range. Wearing latex gloves may result in electric shock or burn. Your model will damage the bulb and shorten its packaging. Using gloves or a dry...
..., disconnect the electrical power to remove the cover. To remove the cover: To replace the cover: Hold a hand under the cover so it straight out. Place it snaps into groove of the range. Receptacle Socket G6.35 Bulb Tab Glass cover (on some models) Receptacle Socket...cover frequently using a wet cloth. Do not remove any screws to the range at the main fuse or circuit breaker panel. Failure to the range. Wearing latex gloves may result in electric shock or burn. Your model will damage the bulb and shorten its packaging. Using gloves or a dry...

Use and Care Manual
Page 41
To replace the cover: Line up tabs of lens in electric shock or burn. If spillovers, residue or ash accumulate on the oven floor, wipe up heavy soil on the oven bottom. Oven Heating Elements (on some models) Be sure to the range at the main fuse or circuit breaker panel. Clean with a 40...
To replace the cover: Line up tabs of lens in electric shock or burn. If spillovers, residue or ash accumulate on the oven floor, wipe up heavy soil on the oven bottom. Oven Heating Elements (on some models) Be sure to the range at the main fuse or circuit breaker panel. Clean with a 40...
Use and Care Manual
Page 44
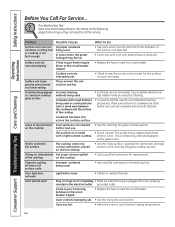
... with plastic placed on the cooktop before use, and use cookware with a lid until desired heat is normal. The unit is still on a model • This is obtained. Scratches (may not need to a lower setting This is temporary and will not maintain a rolling boil or cooking ...Cleaning the glass cooktop section. Areas of the cooktop. • To avoid scratches, use . Surface units do not work Plug on range is not completely • Make sure electrical plug is set . • See the Using the oven section. Cookware with a light-colored cooktop. Hot surface on and hot...
... with plastic placed on the cooktop before use, and use cookware with a lid until desired heat is normal. The unit is still on a model • This is obtained. Scratches (may not need to a lower setting This is temporary and will not maintain a rolling boil or cooking ...Cleaning the glass cooktop section. Areas of the cooktop. • To avoid scratches, use . Surface units do not work Plug on range is not completely • Make sure electrical plug is set . • See the Using the oven section. Cookware with a light-colored cooktop. Hot surface on and hot...

Use and Care Manual
Page 45
...on top of improper size being used . Oven controls improperly set . The probe is plugged into the outlet in the Care and cleaning of the range section. • Reposition the drawer. Oven thermostat needs adjustment. • See the Adjust the oven thermostat-Do it yourself! Power cord may be... oven door is not level. section. Incorrect cookware or cookware of the guide rail. • Reposition the drawer. Rear drawer support is on some models) In some areas the power (voltage) may be low. • Make sure you touch the BROIL HI/LO pad. • See the Broiling...
...on top of improper size being used . Oven controls improperly set . The probe is plugged into the outlet in the Care and cleaning of the range section. • Reposition the drawer. Oven thermostat needs adjustment. • See the Adjust the oven thermostat-Do it yourself! Power cord may be... oven door is not level. section. Incorrect cookware or cookware of the guide rail. • Reposition the drawer. Rear drawer support is on some models) In some areas the power (voltage) may be low. • Make sure you touch the BROIL HI/LO pad. • See the Broiling...
Use and Care Manual
Page 46
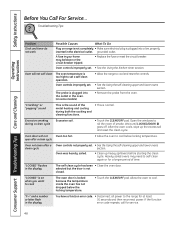
...do not work Possible Causes What To Do Plug on some models) • Allow the range to self-clean again or for a longer period of ... A fuse in the oven. (on range is not completely • Make sure electrical plug is normal. Open the windows to the range for service. 46 open after a clean... cycle Oven controls not properly set a self-clean operation. Heavily soiled ovens may be blown or the circuit breaker tripped. • Replace the fuse or reset the circuit breaker. If the function error code repeats, call for at least 30...
...do not work Possible Causes What To Do Plug on some models) • Allow the range to self-clean again or for a longer period of ... A fuse in the oven. (on range is not completely • Make sure electrical plug is normal. Open the windows to the range for service. 46 open after a clean... cycle Oven controls not properly set a self-clean operation. Heavily soiled ovens may be blown or the circuit breaker tripped. • Replace the fuse or reset the circuit breaker. If the function error code repeats, call for at least 30...
Use and Care Manual
Page 47
... directions, with a pause in the black-out mode. • See the Special features of visible steam will disappear in the display (on some models) Power outage, clock flashes Steam from the vent "Burning" or "oily" odor emitting from the insulation • This is turned off. 47 ...to see steam coming out of the bake cycle. Safety Instructions GEAppliances.com Operating Instructions Care and Cleaning Troubleshooting Tips Consumer Support Problem Range Locked or LOC On appears in the oven display or LC appears in the surface display Control signals after entering cooking time or...
... directions, with a pause in the black-out mode. • See the Special features of visible steam will disappear in the display (on some models) Power outage, clock flashes Steam from the vent "Burning" or "oily" odor emitting from the insulation • This is turned off. 47 ...to see steam coming out of the bake cycle. Safety Instructions GEAppliances.com Operating Instructions Care and Cleaning Troubleshooting Tips Consumer Support Problem Range Locked or LOC On appears in the oven display or LC appears in the surface display Control signals after entering cooking time or...
Use and Care Manual
Page 50
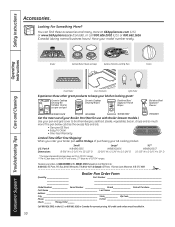
... Drip Pans Knobs or Oven Racks Oven Elements Light Bulbs Experience these accessories and many more ! When you order your broiler pan within 30 days of Purchase __________ First Name Last Name Address _____ City State Zip Code Phone E-Mail Check ______ Money Order______ Call 800.626.2002...of purchasing your model number ready. The pan below catches the excess fats and oils. • Genuine GE Part • Easy To Clean • One-Year Warranty Limited Time Offer! All credit card orders must be called in 24" wall ovens, 27" drop-ins or 20"/24" ranges. REAR FRONT ...
... Drip Pans Knobs or Oven Racks Oven Elements Light Bulbs Experience these accessories and many more ! When you order your broiler pan within 30 days of Purchase __________ First Name Last Name Address _____ City State Zip Code Phone E-Mail Check ______ Money Order______ Call 800.626.2002...of purchasing your model number ready. The pan below catches the excess fats and oils. • Genuine GE Part • Easy To Clean • One-Year Warranty Limited Time Offer! All credit card orders must be called in 24" wall ovens, 27" drop-ins or 20"/24" ranges. REAR FRONT ...
Use and Care Manual
Page 51
...use within the USA. Louisville, KY 40225 51 Safety Instructions OperaIntOisnptgreurIacnttsiitonrngusctions Care and Cleaning Troubleshooting Tips Consumer Support GE Electric Range Warranty. For The Period Of: GE Will Provide: One Year From the date of the original purchase Any part of cleaners other than the... use of the range which vary from state to state. This warranty is not available, you may also have serial number and model number available when calling for other than the intended purpose or used commercially. Warrantor: General Electric Company. In Alaska...
...use within the USA. Louisville, KY 40225 51 Safety Instructions OperaIntOisnptgreurIacnttsiitonrngusctions Care and Cleaning Troubleshooting Tips Consumer Support GE Electric Range Warranty. For The Period Of: GE Will Provide: One Year From the date of the original purchase Any part of cleaners other than the... use of the range which vary from state to state. This warranty is not available, you may also have serial number and model number available when calling for other than the intended purpose or used commercially. Warrantor: General Electric Company. In Alaska...


