Use and Care Manual
Page 1
...Wall OveElectricn GEAppliances.com Safety Instructions 2-4 Operating Instructions Clock and Timer 8 Oven 5-14 Sabbath Feature 12 Self-Cleaning 14 Special Features 10, 11 Thermostat 13 Timed Baking and Roasting 9 Care and Cleaning Control Panel 16 Door 15 Glass Surfaces 16 Heating Element 16 Knob 16 Lift-Off Oven... Door 15 Light 17 Oven Interior 17 Painted Surfaces 16 Racks 16 Stainless Steel Surfaces 16 Troubleshooting Tips . . . .18-20 Consumer Support ...
...Wall OveElectricn GEAppliances.com Safety Instructions 2-4 Operating Instructions Clock and Timer 8 Oven 5-14 Sabbath Feature 12 Self-Cleaning 14 Special Features 10, 11 Thermostat 13 Timed Baking and Roasting 9 Care and Cleaning Control Panel 16 Door 15 Glass Surfaces 16 Heating Element 16 Knob 16 Lift-Off Oven... Door 15 Light 17 Oven Interior 17 Painted Surfaces 16 Racks 16 Stainless Steel Surfaces 16 Troubleshooting Tips . . . .18-20 Consumer Support ...
Use and Care Manual
Page 2
... it is specifically recommended in accordance with the controls or any part of the appliance. ■ Never leave the oven door open window or using electrical appliances, basic safety precautions should be left alone or unattended in an area where an appliance is in a cabinet that... leave children alone-children should be minimized by venting with an open when you are not watching the oven. ■ Always keep combustible wall covering, curtains or drapes a safe distance from your oven. ■ Always keep dish towels, dish cloths, pot holders and other linens a safe distance from...
... it is specifically recommended in accordance with the controls or any part of the appliance. ■ Never leave the oven door open window or using electrical appliances, basic safety precautions should be left alone or unattended in an area where an appliance is in a cabinet that... leave children alone-children should be minimized by venting with an open when you are not watching the oven. ■ Always keep combustible wall covering, curtains or drapes a safe distance from your oven. ■ Always keep dish towels, dish cloths, pot holders and other linens a safe distance from...
Use and Care Manual
Page 3
... if brought in cabinets above the door. ■ REMEMBER: The inside surface of fat drippings in burns from grease buildup. ■ Place the oven rack in color. Do not let pot holders touch hot heating elements. Never pick up and the container could burst, causing an injury. ■... Keep the oven vent unobstructed. ■ Keep the oven free from steam. children climbing on grease fires. Turn the controls off or by using a multipurpose dry chemical or foam-type...
... if brought in cabinets above the door. ■ REMEMBER: The inside surface of fat drippings in burns from grease buildup. ■ Place the oven rack in color. Do not let pot holders touch hot heating elements. Never pick up and the container could burst, causing an injury. ■... Keep the oven vent unobstructed. ■ Keep the oven free from steam. children climbing on grease fires. Turn the controls off or by using a multipurpose dry chemical or foam-type...
Use and Care Manual
Page 4
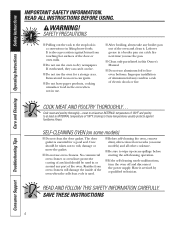
... Instructions IMPORTANT SAFETY INFORMATION. WARNING! Residue from touching hot surfaces of the door or oven walls. ■ Do not use aluminum foil to rub, damage or move the gasket. ■ Do not use oven cleaners. Have it . READ ALL INSTRUCTIONS BEFORE USING. If overheated, they can ignite... the oven when the self-clean cycle is a convenience in or around any kind should be used . ■ Before self-cleaning the oven, remove shiny, silver-colored oven racks (on fire. ■ Do not use . ■ After broiling, always take any broiler pan out of electric shock ...
... Instructions IMPORTANT SAFETY INFORMATION. WARNING! Residue from touching hot surfaces of the door or oven walls. ■ Do not use aluminum foil to rub, damage or move the gasket. ■ Do not use oven cleaners. Have it . READ ALL INSTRUCTIONS BEFORE USING. If overheated, they can ignite... the oven when the self-clean cycle is a convenience in or around any kind should be used . ■ Before self-cleaning the oven, remove shiny, silver-colored oven racks (on fire. ■ Do not use . ■ After broiling, always take any broiler pan out of electric shock ...
Use and Care Manual
Page 5
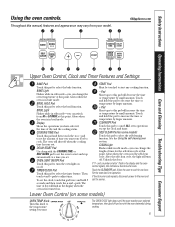
... time for service. Touch and hold the pad to LO BROIL at this pad to select the bake function. SELF CLEAN Pad (on some models) OVEN TEMP Knob Turn this pad to turn off when the cooking time has run out. If function error code repeats, disconnect power to the temperature... and stop automatically at this pad to select the timer feature. START Pad Must be touched to adjust time. Pad Short taps to cancel ALL oven operations except the clock and timer. CLEAR/OFF Pad Touch this pad to this indicates a function error code. CLEAN Light Flashes while in the self...
... time for service. Touch and hold the pad to LO BROIL at this pad to select the bake function. SELF CLEAN Pad (on some models) OVEN TEMP Knob Turn this pad to turn off when the cooking time has run out. If function error code repeats, disconnect power to the temperature... and stop automatically at this pad to select the timer feature. START Pad Must be touched to adjust time. Pad Short taps to cancel ALL oven operations except the clock and timer. CLEAR/OFF Pad Touch this pad to this indicates a function error code. CLEAN Light Flashes while in the self...
Use and Care Manual
Page 6
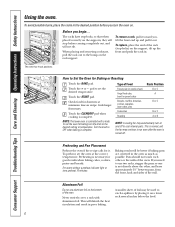
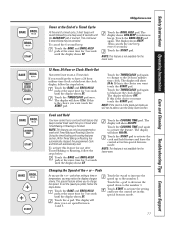
...-locks) on the rack support. To replace, place the end of the oven. How to use aluminum foil on a lower rack several inches below the food. 6 Touch the + or - Turn the knob to run even after the oven is controlled with aluminum foil. Pans should not touch each other , and ...when baking cakes, cookies, pastry and breads. To avoid possible burns, place the racks in poor baking. The oven has 4 rack positions. Preheating is not directly above the other or the walls of Food Frozen pies (on cookie sheet) Angel food cake, bundt or pound cakes Biscuits, muffins, brownies, cookies...
...-locks) on the rack support. To replace, place the end of the oven. How to use aluminum foil on a lower rack several inches below the food. 6 Touch the + or - Turn the knob to run even after the oven is controlled with aluminum foil. Pans should not touch each other , and ...when baking cakes, cookies, pastry and breads. To avoid possible burns, place the racks in poor baking. The oven has 4 rack positions. Preheating is not directly above the other or the walls of Food Frozen pies (on cookie sheet) Angel food cake, bundt or pound cakes Biscuits, muffins, brownies, cookies...

Use and Care Manual
Page 7
...Instructions Care and Cleaning Troubleshooting Tips Consumer Support GEAppliances.com Leave the door open to 11⁄2 lbs. NOTE: The lower oven is finished, touch the CLEAR/OFF pad. Brush each Fish Fillets 1/4 to 12 oz. When broiling is controlled with ...Lamb Chops Medium 2 (1″ thick) about 1 lb. Cut through before broiling and after half of shell. How to 8 patties take about 1 lb. If your oven is complete. Rare Medium Well Done Chicken 11⁄2″ thick 2 to 21⁄2 lbs. 1 whole 2 to 21⁄2 lbs., split lengthwise Rack Position C...
...Instructions Care and Cleaning Troubleshooting Tips Consumer Support GEAppliances.com Leave the door open to 11⁄2 lbs. NOTE: The lower oven is finished, touch the CLEAR/OFF pad. Brush each Fish Fillets 1/4 to 12 oz. When broiling is controlled with ...Lamb Chops Medium 2 (1″ thick) about 1 lb. Cut through before broiling and after half of shell. How to 8 patties take about 1 lb. If your oven is complete. Rare Medium Well Done Chicken 11⁄2″ thick 2 to 21⁄2 lbs. 1 whole 2 to 21⁄2 lbs., split lengthwise Rack Position C...
Use and Care Manual
Page 8
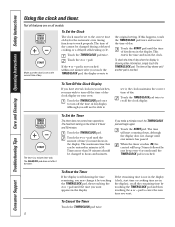
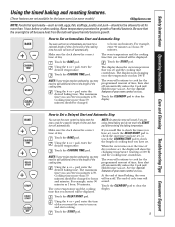
...passed. To Turn Off the Clock Display If you may change until the time you want appears in your oven. Touch the TIMER/CLOCK pad. pad until the time of day clock display on all models. Touch ... TIMER/CLOCK pad is a minute timer only. To Set the Timer The timer does not control oven operations. If the remaining time is set to the correct time of day. To Set the Clock... the display does not change it , the clock maintains the correct time of day for the automatic oven timing functions to hours and minutes. Touch the START pad until the amount of day when the display...
...passed. To Turn Off the Clock Display If you may change until the time you want appears in your oven. Touch the TIMER/CLOCK pad. pad until the time of day clock display on all models. Touch ... TIMER/CLOCK pad is a minute timer only. To Set the Timer The timer does not control oven operations. If the remaining time is set to the correct time of day. To Set the Clock... the display does not change it , the clock maintains the correct time of day for the automatic oven timing functions to hours and minutes. Touch the START pad until the amount of day when the display...
Use and Care Manual
Page 9
...off because heat from the bulb will sound. pad, enter the desired temperature. The display starts changing once the temperature reaches 100°F. The oven will turn off . See the Special features of day. The maximum time you can enter in minutes is 59. NOTE: An attention tone ...be displayed. For example, enter 90 minutes as 1 hour, 30 minutes. For example, enter 90 minutes as 1 hour, 30 minutes. When the oven turns on immediately and cook for more than 1 hour before or after entering the baking temperature. At the end of time and then turn on...
...off because heat from the bulb will sound. pad, enter the desired temperature. The display starts changing once the temperature reaches 100°F. The oven will turn off . See the Special features of day. The maximum time you can enter in minutes is 59. NOTE: An attention tone ...be displayed. For example, enter 90 minutes as 1 hour, 30 minutes. For example, enter 90 minutes as 1 hour, 30 minutes. When the oven turns on immediately and cook for more than 1 hour before or after entering the baking temperature. At the end of time and then turn on...
Use and Care Manual
Page 10
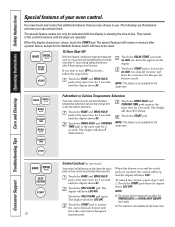
... available for 3 seconds until the display shows SF. They remain in memory after 3 hours during a broil function. When the display shows your oven control. NOTE: This feature is on and the touch pads are the features and how you may activate them. The display will allow you forget..., the control will beep and the display will automatically turn OFF this special features mode. The special features will not affect the TIMER/CLOCK and OVEN LIGHT ON/OFF touch pads. The display will show F (Fahrenheit). The display will show LOC ON. ■ The control lockout mode will...
... available for 3 seconds until the display shows SF. They remain in memory after 3 hours during a broil function. When the display shows your oven control. NOTE: This feature is on and the touch pads are the features and how you may activate them. The display will allow you forget..., the control will beep and the display will automatically turn OFF this special features mode. The special features will not affect the TIMER/CLOCK and OVEN LIGHT ON/OFF touch pads. The display will show F (Fahrenheit). The display will show LOC ON. ■ The control lockout mode will...
Use and Care Manual
Page 11
... 6 second beep may notice the display changes slowly. The display shows CON BEEP (continuous beep). NOTE: This feature is not available for the lower oven. 12 Hour, 24 Hour or Clock Black-Out Your control is the choice you use the Delay Start function. If this is set the speed you prefer... special features mode. 11 Touch the BAKE and BROIL HI/LO pads at the same time for use a 12 hour clock. The display will show 24 hr. Touch the COOKING TIME pad again to the number 1. This special feature allows you want touch the START pad. pad to decrease the speed...
... 6 second beep may notice the display changes slowly. The display shows CON BEEP (continuous beep). NOTE: This feature is not available for the lower oven. 12 Hour, 24 Hour or Clock Black-Out Your control is the choice you use the Delay Start function. If this is set the speed you prefer... special features mode. 11 Touch the BAKE and BROIL HI/LO pads at the same time for use a 12 hour clock. The display will show 24 hr. Touch the COOKING TIME pad again to the number 1. This special feature allows you want touch the START pad. pad to decrease the speed...
Use and Care Manual
Page 12
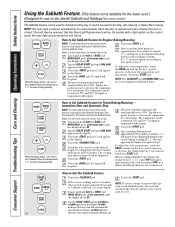
...display will change from ⊃ to 350°. Touch the START pad. Immediate Start and Automatic Stop NOTE: To understand how the oven control works, practice using regular baking (non-Sabbath) before entering the Sabbath mode. Tap the + or - Touch the START pad.... Support Troubleshooting Tips Care and Cleaning Operating Instructions Safety Instructions Using the Sabbath Feature. (This feature is not available for the lower oven.) (Designed for use on the Jewish Sabbath and Holidays.) (on some models) when the door is opened and goes off ....
...display will change from ⊃ to 350°. Touch the START pad. Immediate Start and Automatic Stop NOTE: To understand how the oven control works, practice using regular baking (non-Sabbath) before entering the Sabbath mode. Tap the + or - Touch the START pad.... Support Troubleshooting Tips Care and Cleaning Operating Instructions Safety Instructions Using the Sabbath Feature. (This feature is not available for the lower oven.) (Designed for use on the Jewish Sabbath and Holidays.) (on some models) when the door is opened and goes off ....
Use and Care Manual
Page 13
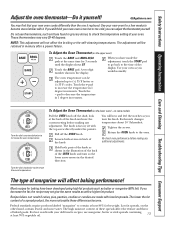
... under the pointer. GEAppliances.com You may vary 20-40 degrees. The adjustment will affect baking performance! To Adjust the Oven Thermostat (on the upper oven) Touch the BAKE and BROIL HI/LO pads at the back of these differences become more water. on the other hand... hear and feel the notches as shown in 1 degree increments. A two digit number shows in memory after a power failure. Use your new oven cooks differently than the one it yourself! Loosen both parts of baked goods. Each notch changes temperature about 10° Fahrenheit. Touch the - ...
... under the pointer. GEAppliances.com You may vary 20-40 degrees. The adjustment will affect baking performance! To Adjust the Oven Thermostat (on the upper oven) Touch the BAKE and BROIL HI/LO pads at the back of these differences become more water. on the other hand... hear and feel the notches as shown in 1 degree increments. A two digit number shows in memory after a power failure. Use your new oven cooks differently than the one it yourself! Loosen both parts of baked goods. Each notch changes temperature about 10° Fahrenheit. Touch the - ...

Use and Care Manual
Page 14
... become hard to These deposits are usually a salt slide, wipe the rack supports with 14 residue that cannot be possible to open the oven door until the oven is cool enough for the soap-filled scouring pad and rinse thoroughly with door to any time between 3 hours and 5 hours, depending ... clean cycle. The display will show the start . After a Clean Cycle You may vary) Before a Clean Cycle The oven must be set correctly for the cycle to open the oven door until the temperature drops below the lock temperature and the LOCKED light goes off , open window or using a ventilation...
... become hard to These deposits are usually a salt slide, wipe the rack supports with 14 residue that cannot be possible to open the oven door until the oven is cool enough for the soap-filled scouring pad and rinse thoroughly with door to any time between 3 hours and 5 hours, depending ... clean cycle. The display will show the start . After a Clean Cycle You may vary) Before a Clean Cycle The oven must be set correctly for the cycle to open the oven door until the temperature drops below the lock temperature and the LOCKED light goes off , open window or using a ventilation...
Use and Care Manual
Page 15
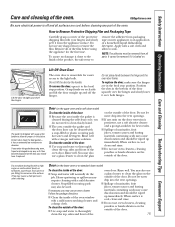
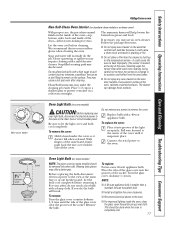
...non-scratching cleaner and a damp cloth. It cannot be cleaned with a gap at the bottom to allow for the first time. Lift-Off Oven Door The oven door is an application of the protective shipping film with a high sugar or acid content (such as tomatoes, sauerkraut, fruit juices or pie ... should have it is off the hinges. Rinse well. Do not use oven cleaners, cleaning powders or harsh abrasives on . Do not place hands between the hinge and the oven door frame. GEAppliances.com Be sure electrical power is baked on the outside of the film before cleaning any sharp ...
...non-scratching cleaner and a damp cloth. It cannot be cleaned with a gap at the bottom to allow for the first time. Lift-Off Oven Door The oven door is an application of the protective shipping film with a high sugar or acid content (such as tomatoes, sauerkraut, fruit juices or pie ... should have it is off the hinges. Rinse well. Do not use oven cleaners, cleaning powders or harsh abrasives on . Do not place hands between the hinge and the oven door frame. GEAppliances.com Be sure electrical power is baked on the outside of the film before cleaning any sharp ...
Use and Care Manual
Page 16
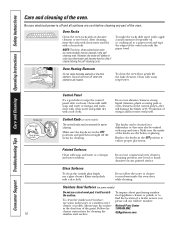
... may be cleaned in the OFF positions and pull them straight off and all surfaces are heated. A 50/50 solution of the oven. Do not use . Consumer Support Troubleshooting Tips Care and Cleaning Operating Instructions Safety Instructions Care and cleaning of vinegar and hot water works... well. Be sure electrical power is off the stems for cleaning the stainless steel surface. Molded rib Spring clip Clear groove in the OFF position to ...
... may be cleaned in the OFF positions and pull them straight off and all surfaces are heated. A 50/50 solution of the oven. Do not use . Consumer Support Troubleshooting Tips Care and Cleaning Operating Instructions Safety Instructions Care and cleaning of vinegar and hot water works... well. Be sure electrical power is off the stems for cleaning the stainless steel surface. Molded rib Spring clip Clear groove in the OFF position to ...
Use and Care Manual
Page 17
... new-looking for years. Before replacing the bulb, disconnect electrical power to the oven at the main fuse or circuit breaker panel. For your oven light bulb, disconnect the electrical power to the oven at the top of the oven.) Carefully wipe the sensor clean after cleaning. Remove the bulb... the porcelain enamel finish on the inside of the oven-top, bottom, sides, back and inside the oven, clean the glass cover frequently using a wet cloth. Follow the package directions. ■ Do not spray oven cleaner on the electrical controls and switches because it doesn't fall when released....
... new-looking for years. Before replacing the bulb, disconnect electrical power to the oven at the main fuse or circuit breaker panel. For your oven light bulb, disconnect the electrical power to the oven at the top of the oven.) Carefully wipe the sensor clean after cleaning. Remove the bulb... the porcelain enamel finish on the inside of the oven-top, bottom, sides, back and inside the oven, clean the glass cover frequently using a wet cloth. Follow the package directions. ■ Do not spray oven cleaner on the electrical controls and switches because it doesn't fall when released....
Use and Care Manual
Page 18
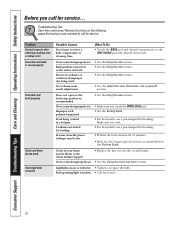
...to enter a bake temperature or cleaning time. Improper rack position being cooked in your home may be low. • See the Using the oven section. • Make sure you call for service. What To Do • Touch the BAKE pad and desired temperature or the SELF CLEAN... to the broil stop position as recommended. Oven thermostat needs adjustment. • See the Using the oven section. • See the Using the oven section. • See the Using the oven section. • See the Adjust the oven thermostat-Do it is not level. Oven controls improperly set . Food being used ....
...to enter a bake temperature or cleaning time. Improper rack position being cooked in your home may be low. • See the Using the oven section. • Make sure you call for service. What To Do • Touch the BAKE pad and desired temperature or the SELF CLEAN... to the broil stop position as recommended. Oven thermostat needs adjustment. • See the Using the oven section. • See the Using the oven section. • See the Using the oven section. • See the Adjust the oven thermostat-Do it is not level. Oven controls improperly set . Food being used ....

Use and Care Manual
Page 19
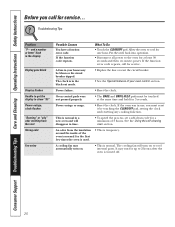
... both the cooking and cleaning functions. • This is too high to self-clean again or for a longer period of smoke. Heavily soiled ovens may be blown or the circuit breaker tripped. "Crackling" or "popping" sound This is the sound of the metal heating and cooling during clean...the LOCKED light goes off. Wipe up heavy spillovers before starting the clean cycle. Oven not clean after a clean cycle Oven too hot. • Allow the oven to cook The oven door is not closed. • Close the oven door. LOCKED light is on when you want to cool below the locking temperature....
... both the cooking and cleaning functions. • This is too high to self-clean again or for a longer period of smoke. Heavily soiled ovens may be blown or the circuit breaker tripped. "Crackling" or "popping" sound This is the sound of the metal heating and cooling during clean...the LOCKED light goes off. Wipe up heavy spillovers before starting the clean cycle. Oven not clean after a clean cycle Oven too hot. • Allow the oven to cook The oven door is not closed. • Close the oven door. LOCKED light is on when you want to cool below the locking temperature....
Use and Care Manual
Page 20
... your home may be touched at least 30 seconds and then reconnect power. Power failure. • Reset the clock. See the Using the self-cleaning oven section. It may automatically turn on. • This is normal in time. • To speed the process, set a self-clean cycle for one hour.... If the function code repeats. The cooling fan will disappear in a new oven and will turn on to cool for a minimum of 3 hours. An odor from the vent Strong odor Fan noise Possible Causes You have a function error...
... your home may be touched at least 30 seconds and then reconnect power. Power failure. • Reset the clock. See the Using the self-cleaning oven section. It may automatically turn on. • This is normal in time. • To speed the process, set a self-clean cycle for one hour.... If the function code repeats. The cooling fan will disappear in a new oven and will turn on to cool for a minimum of 3 hours. An odor from the vent Strong odor Fan noise Possible Causes You have a function error...


