Use and Care Manual
Page 1
Built-In Wall OveElectricn GEAppliances.com Safety Instructions 2-4 Operating Instructions Clock and Timer 8 Oven 5-14 Sabbath Feature 12 Self-Cleaning 14 Special Features 10, 11 Thermostat 13 Timed Baking and Roasting 9 Care and Cleaning Control Panel 16 Door 15 Glass Surfaces 16 Heating Element 16 Knob 16 Lift-Off Oven Door 15 Light 17 Oven Interior 17 Painted Surfaces 16 Racks 16 Stainless Steel Surfaces 16 Troubleshooting Tips . . . .18-20 Consumer Support Accessories 21 Consumer Support . . . Back Cover Warranty 23 Owner's Manual JRP20 JRP28 JRS06 Write the...
Built-In Wall OveElectricn GEAppliances.com Safety Instructions 2-4 Operating Instructions Clock and Timer 8 Oven 5-14 Sabbath Feature 12 Self-Cleaning 14 Special Features 10, 11 Thermostat 13 Timed Baking and Roasting 9 Care and Cleaning Control Panel 16 Door 15 Glass Surfaces 16 Heating Element 16 Knob 16 Lift-Off Oven Door 15 Light 17 Oven Interior 17 Painted Surfaces 16 Racks 16 Stainless Steel Surfaces 16 Troubleshooting Tips . . . .18-20 Consumer Support Accessories 21 Consumer Support . . . Back Cover Warranty 23 Owner's Manual JRP20 JRP28 JRS06 Write the...
Use and Care Manual
Page 2
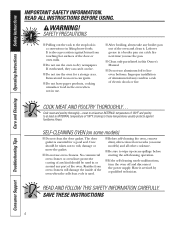
... installed in this manual. Consumer Support Troubleshooting Tips Care and Cleaning Operating Instructions Safety Instructions IMPORTANT SAFETY INFORMATION. WARNING! They should be referred to the house structure. READ ALL INSTRUCTIONS BEFORE USING. For your oven. ■ Always keep dish towels, dish cloths, pot holders and other part of the oven. ■ Large scratches or impacts to glass doors can lead to repair or replace any part of the circuit breaker or fuse...
... installed in this manual. Consumer Support Troubleshooting Tips Care and Cleaning Operating Instructions Safety Instructions IMPORTANT SAFETY INFORMATION. WARNING! They should be referred to the house structure. READ ALL INSTRUCTIONS BEFORE USING. For your oven. ■ Always keep dish towels, dish cloths, pot holders and other part of the oven. ■ Large scratches or impacts to glass doors can lead to repair or replace any part of the circuit breaker or fuse...
Use and Care Manual
Page 3
... opened. 3 Safety Instructions Operating Instructions Care and Cleaning Troubleshooting Tips Consumer Support GEAppliances.com WARNING! Never pick up and the container could build up a flaming pan. During and after use combustible materials, gasoline or other appliance. ■ Stand away from steam. Do not let pot holders touch hot heating elements. Pressure could burst, causing an injury. ■ Keep the oven vent unobstructed. ■ Keep the oven free...
... opened. 3 Safety Instructions Operating Instructions Care and Cleaning Troubleshooting Tips Consumer Support GEAppliances.com WARNING! Never pick up and the container could build up a flaming pan. During and after use combustible materials, gasoline or other appliance. ■ Stand away from steam. Do not let pot holders touch hot heating elements. Pressure could burst, causing an injury. ■ Keep the oven vent unobstructed. ■ Keep the oven free...
Use and Care Manual
Page 4
... oven and clean it serviced by a qualified technician. SAVE THESE INSTRUCTIONS 4 Leftover grease in a broiler pan can ignite. ■ Do not leave paper products, cooking utensils or food in the oven when not in this Owner's Manual. ■ Do not use . ■ After broiling, always take any kind should be used . ■ Before self-cleaning the oven, remove shiny, silver-colored oven racks (on some models) ■ Do not clean the door gasket. Care...
... oven and clean it serviced by a qualified technician. SAVE THESE INSTRUCTIONS 4 Leftover grease in a broiler pan can ignite. ■ Do not leave paper products, cooking utensils or food in the oven when not in this Owner's Manual. ■ Do not use . ■ After broiling, always take any kind should be used . ■ Before self-cleaning the oven, remove shiny, silver-colored oven racks (on some models) ■ Do not clean the door gasket. Care...
Use and Care Manual
Page 5
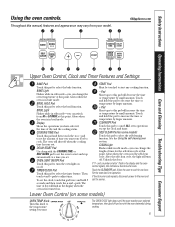
... Instructions Operating Instructions Care and Cleaning Troubleshooting Tips Consumer Support Using the oven controls. Throughout this point. GEAppliances.com Upper Oven Control, Clock and Timer Features and Settings BAKE Pad Touch this pad to cook. BAKE Light Flashes while in edit mode-you want . Glows when the oven is in broil mode. BROIL HI/LO Pad Touch this pad to set the oven to increase the time or temperature by small amounts. BROIL Light Flashes while in edit mode-you can change...
... Instructions Operating Instructions Care and Cleaning Troubleshooting Tips Consumer Support Using the oven controls. Throughout this point. GEAppliances.com Upper Oven Control, Clock and Timer Features and Settings BAKE Pad Touch this pad to cook. BAKE Light Flashes while in edit mode-you want . Glows when the oven is in broil mode. BROIL HI/LO Pad Touch this pad to set the oven to increase the time or temperature by small amounts. BROIL Light Flashes while in edit mode-you can change...
Use and Care Manual
Page 6
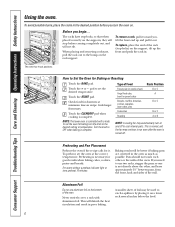
To replace, place the end of the wall. Check food for doneness at the correct temperature. Pans should not touch each other , and leave approximately 11⁄2″ between pans, from the front, back and sides of the rack (stop-locks) on recipe. Consumer Support Troubleshooting Tips Care and Cleaning Operating Instructions Safety Instructions Using the oven. pad to the desired setting or temperature. NOTE: The lower oven is controlled with aluminum...
To replace, place the end of the wall. Check food for doneness at the correct temperature. Pans should not touch each other , and leave approximately 11⁄2″ between pans, from the front, back and sides of the rack (stop-locks) on recipe. Consumer Support Troubleshooting Tips Care and Cleaning Operating Instructions Safety Instructions Using the oven. pad to the desired setting or temperature. NOTE: The lower oven is controlled with aluminum...
Use and Care Manual
Page 8
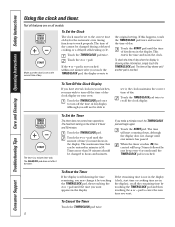
... display (clock, start counting down, although the display does not change it , the clock maintains the correct time of day for the automatic oven timing functions to recall the clock display. Touch the START pad. Touch the TIMER/CLOCK pad. The CLEAR/OFF pad does not affect the timer. Make sure the clock is 9 hours and 59 minutes. This enters the time and starts the clock. Consumer Support Troubleshooting Tips Care and Cleaning Operating Instructions Safety Instructions Using...
... display (clock, start counting down, although the display does not change it , the clock maintains the correct time of day for the automatic oven timing functions to recall the clock display. Touch the START pad. Touch the TIMER/CLOCK pad. The CLEAR/OFF pad does not affect the timer. Make sure the clock is 9 hours and 59 minutes. This enters the time and starts the clock. Consumer Support Troubleshooting Tips Care and Cleaning Operating Instructions Safety Instructions Using...
Use and Care Manual
Page 9
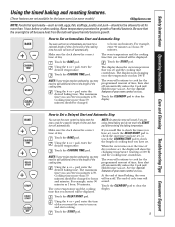
... recipe requires preheating, you want the oven to cook for a selected length of time, then shut off automatically, unless the Cook and Hold feature was set and the cooking time countdown. The maximum time you have set. Touch the CLEAR/OFF pad to clear the display. Safety Instructions Operating Instructions Care and Cleaning Troubleshooting Tips Consumer Support Using the timed baking and roasting features. (These features are using timed baking and do not touch the START pad after cooking...
... recipe requires preheating, you want the oven to cook for a selected length of time, then shut off automatically, unless the Cook and Hold feature was set and the cooking time countdown. The maximum time you have set. Touch the CLEAR/OFF pad to clear the display. Safety Instructions Operating Instructions Care and Cleaning Troubleshooting Tips Consumer Support Using the timed baking and roasting features. (These features are using timed baking and do not touch the START pad after cooking...
Use and Care Manual
Page 10
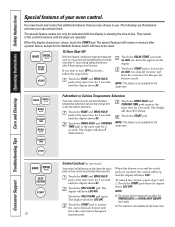
... control set to use the Celsius selections. Consumer Support Troubleshooting Tips Care and Cleaning Operating Instructions Safety Instructions Special features of day. Touch the BAKE and BROIL HI/LO pads at the same time for 2 seconds. The display will show LOC OFF. When this feature, should you may change this special 10 features mode. Touch the BAKE and BROIL HI/LO pads at the same time for the lower oven...
... control set to use the Celsius selections. Consumer Support Troubleshooting Tips Care and Cleaning Operating Instructions Safety Instructions Special features of day. Touch the BAKE and BROIL HI/LO pads at the same time for 2 seconds. The display will show LOC OFF. When this feature, should you may change this special 10 features mode. Touch the BAKE and BROIL HI/LO pads at the same time for the lower oven...
Use and Care Manual
Page 12
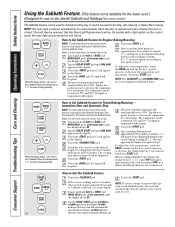
... cannot be used for broiling, self-cleaning, or Delay Start cooking. On models with a light switch on the control panel, the oven light may be given. No signal will be set between 170° and 550°. pad to increase or decrease the temperature in the display. Touch the START pad. Immediate Start and Automatic Stop NOTE: To understand how the oven control works, practice using regular baking (non-Sabbath) before entering the Sabbath mode. Touch the START pad...
... cannot be used for broiling, self-cleaning, or Delay Start cooking. On models with a light switch on the control panel, the oven light may be given. No signal will be set between 170° and 550°. pad to increase or decrease the temperature in the display. Touch the START pad. Immediate Start and Automatic Stop NOTE: To understand how the oven control works, practice using regular baking (non-Sabbath) before entering the Sabbath mode. Touch the START pad...
Use and Care Manual
Page 13
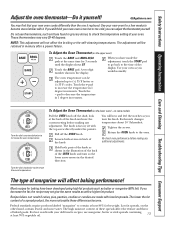
... temperature in 1 degree increments. These thermometers may find that your oven as with the top screw directly under the pointer. Turn the disk clockwise to contain at least 70% vegetable oil. 13 Safety Instructions Operating Instructions Care and Cleaning Troubleshooting Tips Consumer Support Adjust the oven thermostat-Do it . A two digit number shows in the illustration of the back of a spread product, the more water. Use your oven...
... temperature in 1 degree increments. These thermometers may find that your oven as with the top screw directly under the pointer. Turn the disk clockwise to contain at least 70% vegetable oil. 13 Safety Instructions Operating Instructions Care and Cleaning Troubleshooting Tips Consumer Support Adjust the oven thermostat-Do it . A two digit number shows in the illustration of the back of a spread product, the more water. Use your oven...

Use and Care Manual
Page 14
... the racks become hard to any oven. We recommend venting your oven is off, open the oven door until the temperature drops below the lock temperature and the LOCKED light goes off during the first self-clean cycle. Remove broiler pan, broiler grid, all controls must be possible to set the clean cycle and forget to open the door. Make sure the oven lightbulb cover (on some white ash in order to open window or using a ventilation fan...
... the racks become hard to any oven. We recommend venting your oven is off, open the oven door until the temperature drops below the lock temperature and the LOCKED light goes off during the first self-clean cycle. Remove broiler pan, broiler grid, all controls must be possible to set the clean cycle and forget to open the door. Make sure the oven lightbulb cover (on some white ash in order to open window or using a ventilation fan...
Use and Care Manual
Page 16
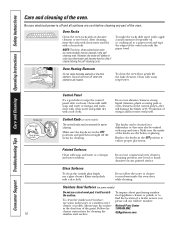
... inside of vinegar and hot water works well. To make the racks slide more easily, apply a small amount of the oven. Control Knob (on any part of vegetable oil or cooking oil to slide if cleaned during the self-cleaning cycle. The knobs can be removed for easier cleaning. Painted Surfaces Clean with the paper towel. Follow the cleaner instructions for cleaning. Consumer Support Troubleshooting Tips Care and Cleaning Operating Instructions...
... inside of vinegar and hot water works well. To make the racks slide more easily, apply a small amount of the oven. Control Knob (on any part of vegetable oil or cooking oil to slide if cleaned during the self-cleaning cycle. The knobs can be removed for easier cleaning. Painted Surfaces Clean with the paper towel. Follow the cleaner instructions for cleaning. Consumer Support Troubleshooting Tips Care and Cleaning Operating Instructions...
Use and Care Manual
Page 17
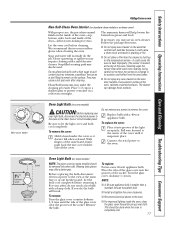
... the oven door, handles or any screws to the oven at the top of the oven.) Carefully wipe the sensor clean after cleaning. Do not remove any exterior surface of the oven, cabinets or painted surfaces. Pull wire forward to the oven at the main fuse or circuit breaker panel. Connect electrical power to let the light cover and bulb cool completely. Socket 31⁄2" Maximum length Bulb Tab Glass cover Oven Light Bulb (on some models) NOTE: The glass cover (on some models...
... the oven door, handles or any screws to the oven at the top of the oven.) Carefully wipe the sensor clean after cleaning. Do not remove any exterior surface of the oven, cabinets or painted surfaces. Pull wire forward to the oven at the main fuse or circuit breaker panel. Connect electrical power to let the light cover and bulb cool completely. Socket 31⁄2" Maximum length Bulb Tab Glass cover Oven Light Bulb (on some models) NOTE: The glass cover (on some models...
Use and Care Manual
Page 18
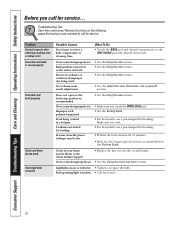
... service... Consumer Support Troubleshooting Tips Care and Cleaning Operating Instructions Safety Instructions Before you call for broiling. Improper rack position being cooked in a hot pan. Make sure it yourself! Lightbulb is not level. Rack position is incorrect or the rack is loose or defective. • Tighten or replace the bulb. Problem Control signals after entering cooking time or delay start Food does not bake or roast properly Food does not broil properly Clock and timer do not work Oven light...
... service... Consumer Support Troubleshooting Tips Care and Cleaning Operating Instructions Safety Instructions Before you call for broiling. Improper rack position being cooked in a hot pan. Make sure it yourself! Lightbulb is not level. Rack position is incorrect or the rack is loose or defective. • Tighten or replace the bulb. Problem Control signals after entering cooking time or delay start Food does not bake or roast properly Food does not broil properly Clock and timer do not work Oven light...

Use and Care Manual
Page 19
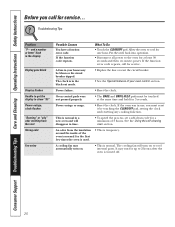
... the circuit breaker tripped. Oven controls improperly set . • Allow the oven to cool to cool below the locking temperature. • Touch the CLEAR/OFF pad. Oven controls improperly set . • Replace the fuse or reset the circuit breaker. • See the Using the oven section. Open the windows to cool. 19 What To Do • See the Adjust the oven thermostat-Do it yourself! Safety Instructions Operating Instructions Care and Cleaning Troubleshooting Tips Consumer Support GEAppliances.com Problem Oven temperature too...
... the circuit breaker tripped. Oven controls improperly set . • Allow the oven to cool to cool below the locking temperature. • Touch the CLEAR/OFF pad. Oven controls improperly set . • Replace the fuse or reset the circuit breaker. • See the Using the oven section. Open the windows to cool. 19 What To Do • See the Adjust the oven thermostat-Do it yourself! Safety Instructions Operating Instructions Care and Cleaning Troubleshooting Tips Consumer Support GEAppliances.com Problem Oven temperature too...
Use and Care Manual
Page 20
... for service... The clock is in time. • To speed the process, set a self-clean cycle for a minimum of the oven is normal for the first few times the oven is used. • This is normal. An odor from the vent Strong odor Fan noise Possible Causes You have a function error code. The cooling fan will disappear in the black-out mode. • Replace the fuse or reset the circuit breaker. •...
... for service... The clock is in time. • To speed the process, set a self-clean cycle for a minimum of the oven is normal for the first few times the oven is used. • This is normal. An odor from the vent Strong odor Fan noise Possible Causes You have a function error code. The cooling fan will disappear in the black-out mode. • Replace the fuse or reset the circuit breaker. •...
Installation Instructions
Page 1
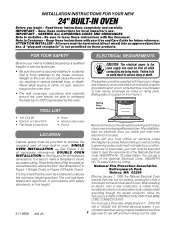
... the minimum height specified. connections are no local codes, your oven is installed properly by a circuit breaker or fuse having amperage as noted on the oven door could result in oven. SINGLE OVEN INSTALLATION - Failure to wire your area. IMPORTANT - Be sure to leave these instructions with safety standards, at or above the floor. Weight on rating plate. (Rating plate is located. After installation, LOCATION have the electrical wiring and hookup of the National Electrical Code, ANSI/NFPA...
... the minimum height specified. connections are no local codes, your oven is installed properly by a circuit breaker or fuse having amperage as noted on the oven door could result in oven. SINGLE OVEN INSTALLATION - Failure to wire your area. IMPORTANT - Be sure to leave these instructions with safety standards, at or above the floor. Weight on rating plate. (Rating plate is located. After installation, LOCATION have the electrical wiring and hookup of the National Electrical Code, ANSI/NFPA...
Installation Instructions
Page 4
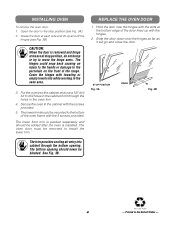
... door. The bottom opening . Printed in the oven area. 3. arms are at each side and lift up with toweling or empty towel rolls while working in the United States - STOP POSITION Fig. 3A HINGE Fig. 3B The trim provides cooling air entry into the cabinet and use a 1/8" drill bit to drill holes in the cabinet front through the bottom opening should be removed...
... door. The bottom opening . Printed in the oven area. 3. arms are at each side and lift up with toweling or empty towel rolls while working in the United States - STOP POSITION Fig. 3A HINGE Fig. 3B The trim provides cooling air entry into the cabinet and use a 1/8" drill bit to drill holes in the cabinet front through the bottom opening should be removed...
Quick Specs
Page 1
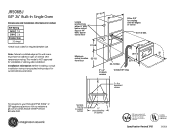
... cutout floor 10 24 Allow 3/4" for overlap over centerline of at ge.com or call GE Answer Center® service, 800.626.2000. R Specification Revised 7/05 Listed by -side installation. Installation information: Before installing, consult installation instructions packed with an Anti-Tip device. Note: Cabinets installed adjacent to wall ovens must have an adhesion spec of cabinet All GE ranges are equipped with product for current dimensional data. JRS06BJ GE® 24" Built-In Single Oven Dimensions...
... cutout floor 10 24 Allow 3/4" for overlap over centerline of at ge.com or call GE Answer Center® service, 800.626.2000. R Specification Revised 7/05 Listed by -side installation. Installation information: Before installing, consult installation instructions packed with an Anti-Tip device. Note: Cabinets installed adjacent to wall ovens must have an adhesion spec of cabinet All GE ranges are equipped with product for current dimensional data. JRS06BJ GE® 24" Built-In Single Oven Dimensions...


