Use and Care Manual
Page 2
... in this manual must be allowed to prevent property damage, personal injury, or loss of any oven. They should never be followed to minimize the risk of fire or explosion, electric shock, or to sit or stand on any part of the appliance. ■ Never leave ...not leave children alone-children should be referred to a qualified technician. ■ Have the installer show you are not watching the oven. ■ Always keep combustible wall covering, curtains or drapes a safe distance from your oven. ■ Always keep wooden and plastic utensils and canned food a safe distance away from ...
... in this manual must be allowed to prevent property damage, personal injury, or loss of any oven. They should never be followed to minimize the risk of fire or explosion, electric shock, or to sit or stand on any part of the appliance. ■ Never leave ...not leave children alone-children should be referred to a qualified technician. ■ Have the installer show you are not watching the oven. ■ Always keep combustible wall covering, curtains or drapes a safe distance from your oven. ■ Always keep wooden and plastic utensils and canned food a safe distance away from ...
Use and Care Manual
Page 4
...and poultry to at least an INTERNAL temperature of the door or oven walls. ■ Do not use the oven to dry newspapers. Care should be taken not to wipe up excess...any part of the oven and clean it serviced by a qualified technician. Cooking to line oven bottoms. Improper installation of aluminum foil may result in lifting heavy foods. No commercial oven cleaner or oven liner protective coating ...against burns from oven cleaners will damage the inside of electric shock or fire. Have it . Items stored in an oven can catch on fire. ■ Do not use oven cleaners. Residue ...
...and poultry to at least an INTERNAL temperature of the door or oven walls. ■ Do not use the oven to dry newspapers. Care should be taken not to wipe up excess...any part of the oven and clean it serviced by a qualified technician. Cooking to line oven bottoms. Improper installation of aluminum foil may result in lifting heavy foods. No commercial oven cleaner or oven liner protective coating ...against burns from oven cleaners will damage the inside of electric shock or fire. Have it . Items stored in an oven can catch on fire. ■ Do not use oven cleaners. Residue ...
Use and Care Manual
Page 17
.... (The sensor is smaller than a standard 40-watt household bulb. ■ Install and tighten the cover clockwise. ■ Reconnect electrical power to the oven at the main fuse or circuit breaker panel. For your oven light bulb, disconnect the electrical power to the oven. ■ For improved lighting inside of the door-will break. NOTE: ■...
.... (The sensor is smaller than a standard 40-watt household bulb. ■ Install and tighten the cover clockwise. ■ Reconnect electrical power to the oven at the main fuse or circuit breaker panel. For your oven light bulb, disconnect the electrical power to the oven. ■ For improved lighting inside of the door-will break. NOTE: ■...
Use and Care Manual
Page 23
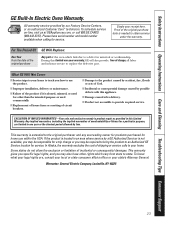
...teach you how to use within the USA. Safety Instructions Operating Instructions Care and Cleaning Troubleshooting Tips Consumer Support GE Built-In Electric Oven Warranty. During this appliance. ■ Damage caused after delivery. ■ Product not accessible to obtain service ... Customer Care® technician. Louisville, KY 40225 23 Warrantor: General Electric Company. This warranty is not available, you may be responsible for home use the product. ■ Improper installation, delivery or maintenance. ■ Failure of incidental or consequential damages....
...teach you how to use within the USA. Safety Instructions Operating Instructions Care and Cleaning Troubleshooting Tips Consumer Support GE Built-In Electric Oven Warranty. During this appliance. ■ Damage caused after delivery. ■ Product not accessible to obtain service ... Customer Care® technician. Louisville, KY 40225 23 Warrantor: General Electric Company. This warranty is not available, you may be responsible for home use the product. ■ Improper installation, delivery or maintenance. ■ Failure of incidental or consequential damages....
Installation Instructions
Page 1
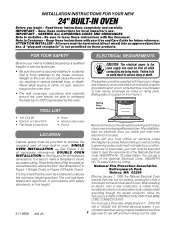
... local inspector's use. Failure to Installer - SINGLE OVEN INSTALLATION - It is located on the oven door. • The wall coverings, countertop and cabinets around the oven should be used. Note to Consumer - ATTENTION INSTALLER - FOR YOUR SAFETY ELECTRICAL REQUIREMENTS Be sure your Use and...All ovens must be supplied with your oven is installed properly by a qualified electrician. connections are no local codes, your oven according to governing codes could result in serious personal injury or death. INSTALLATION INSTRUCTIONS FOR YOUR NEW 24" BUILT-IN OVEN Before...
... local inspector's use. Failure to Installer - SINGLE OVEN INSTALLATION - It is located on the oven door. • The wall coverings, countertop and cabinets around the oven should be used. Note to Consumer - ATTENTION INSTALLER - FOR YOUR SAFETY ELECTRICAL REQUIREMENTS Be sure your Use and...All ovens must be supplied with your oven is installed properly by a qualified electrician. connections are no local codes, your oven according to governing codes could result in serious personal injury or death. INSTALLATION INSTRUCTIONS FOR YOUR NEW 24" BUILT-IN OVEN Before...
Installation Instructions
Page 2
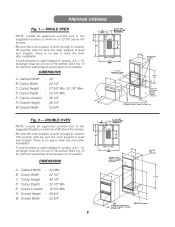
..., OR WALLS, ETC. 2" x 4" or EQUIVALENT RUNNERS 2 Cutout Width - 22 1/2" C. There is used instead of the bottom (See Fig. 2) for optimum performance and proper air circulation. B. E. Cutout Location - 12 3/4" Min. Cutout Location - 32 1/2" H. DIMENSIONS 9" MIN. 2" x 4" OR EQUIVALENT RUNNERS c c 7" 6" 24" 10" 11" 24" MIN. H. If a solid bottom is no way to level the oven after installation. C 5" Allow...
..., OR WALLS, ETC. 2" x 4" or EQUIVALENT RUNNERS 2 Cutout Width - 22 1/2" C. There is used instead of the bottom (See Fig. 2) for optimum performance and proper air circulation. B. E. Cutout Location - 12 3/4" Min. Cutout Location - 32 1/2" H. DIMENSIONS 9" MIN. 2" x 4" OR EQUIVALENT RUNNERS c c 7" 6" 24" 10" 11" 24" MIN. H. If a solid bottom is no way to level the oven after installation. C 5" Allow...

Installation Instructions
Page 3
...and the oven black lead to the branch circuit black lead in an electrical hazard or fire. Cut the neutral (white) lead from STOP! the oven before connecting any electrical supplies. Use only connectors designed for connection to these three leads is installed. Attach ...: Improper connection of conductor. 2. All new construction, mobile homes, recreational vehicles and installations where local codes do not install the oven until a connector of the back wall when the oven is rated at temperatures much higher than the temperature rating of the insulation around the ...
...and the oven black lead to the branch circuit black lead in an electrical hazard or fire. Cut the neutral (white) lead from STOP! the oven before connecting any electrical supplies. Use only connectors designed for connection to these three leads is installed. Attach ...: Improper connection of conductor. 2. All new construction, mobile homes, recreational vehicles and installations where local codes do not install the oven until a connector of the back wall when the oven is rated at temperatures much higher than the temperature rating of the insulation around the ...
Installation Instructions
Page 4
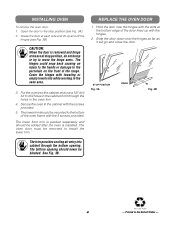
...working in the cabinet front through the bottom opening should be blocked. The lower trim should be removed to install the lower trim. The oven door must be mounted to drill holes in the oven area. 3. Open the door to the porcelain on the front of the range. STOP! Hold the ... 3 screws provided. The lower front trim is packed separately and should never be added after the oven is removed and hinge STOP! Recycled Paper 4 - CAUTION: When the door is installed. Printed in the oven trim. 4. Slide the door down onto the hinges as far as it will go and close ...
...working in the cabinet front through the bottom opening should be blocked. The lower trim should be removed to install the lower trim. The oven door must be mounted to drill holes in the oven area. 3. Open the door to the porcelain on the front of the range. STOP! Hold the ... 3 screws provided. The lower front trim is packed separately and should never be added after the oven is removed and hinge STOP! Recycled Paper 4 - CAUTION: When the door is installed. Printed in the oven trim. 4. Slide the door down onto the hinges as far as it will go and close ...
Quick Specs
Page 1
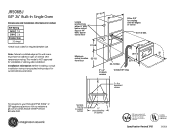
... approved for required breaker size. JRS06BJ GE® 24" Built-In Single Oven Dimensions and Installation Information (in the installation of cutout 23-1/2 Min. 27-5/8 23-3/4 Minimum cutout location 32-1/2 from floor 28-1/4 20 25-1/8 22-1/2 Min. 2" x 4" or equiv. For answers to wall ovens must have an adhesion spec of cabinet All GE ranges are equipped with product for...
... approved for required breaker size. JRS06BJ GE® 24" Built-In Single Oven Dimensions and Installation Information (in the installation of cutout 23-1/2 Min. 27-5/8 23-3/4 Minimum cutout location 32-1/2 from floor 28-1/4 20 25-1/8 22-1/2 Min. 2" x 4" or equiv. For answers to wall ovens must have an adhesion spec of cabinet All GE ranges are equipped with product for...


