
Quick Specs
Page 1
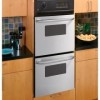
... CL 2 x 4 or equivalent runners 48-1/8 w/out trim 49-1/4 with trim 21 Suitable bracing to wall ovens must have an adhesion spec of at ge.com or call GE Answer Center® service, 800.626.2000. JRP28SK GE® 24" Built-In Double Wall Oven Dimensions and Installation Information (in the installation of the range. Locate junction box 56" MIN...
... CL 2 x 4 or equivalent runners 48-1/8 w/out trim 49-1/4 with trim 21 Suitable bracing to wall ovens must have an adhesion spec of at ge.com or call GE Answer Center® service, 800.626.2000. JRP28SK GE® 24" Built-In Double Wall Oven Dimensions and Installation Information (in the installation of the range. Locate junction box 56" MIN...
Quick Specs
Page 2
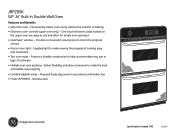
... the most of food • Interior oven light - TO SET CLOCK OVEN LIGHT JRP28SK Specification Created 7/05 320310 Prepared foods stay warm in accordance with kosher law • Model JRP28SKSS - JRP28SK GE® 24" Built-In Double Wall Oven Features and Benefits • Self-clean oven -Conveniently cleans oven cavity without the need for simple oven operation • ClearView™ window...
... the most of food • Interior oven light - TO SET CLOCK OVEN LIGHT JRP28SK Specification Created 7/05 320310 Prepared foods stay warm in accordance with kosher law • Model JRP28SKSS - JRP28SK GE® 24" Built-In Double Wall Oven Features and Benefits • Self-clean oven -Conveniently cleans oven cavity without the need for simple oven operation • ClearView™ window...
Use and Care Manual
Page 1
...Wall OveElectricn GEAppliances.com Safety Instructions 2-4 Operating Instructions Clock and Timer 8 Oven 5-14 Sabbath Feature 12 Self-Cleaning 14 Special Features 10, 11 Thermostat 13 Timed Baking and Roasting 9 Care and Cleaning Control Panel 16 Door 15 Glass Surfaces 16 Heating Element 16 Knob 16 Lift-Off Oven... Door 15 Light 17 Oven Interior 17 Painted Surfaces 16 Racks 16 Stainless Steel Surfaces 16 Troubleshooting Tips . . . .18-20 Consumer Support ...
...Wall OveElectricn GEAppliances.com Safety Instructions 2-4 Operating Instructions Clock and Timer 8 Oven 5-14 Sabbath Feature 12 Self-Cleaning 14 Special Features 10, 11 Thermostat 13 Timed Baking and Roasting 9 Care and Cleaning Control Panel 16 Door 15 Glass Surfaces 16 Heating Element 16 Knob 16 Lift-Off Oven... Door 15 Light 17 Oven Interior 17 Painted Surfaces 16 Racks 16 Stainless Steel Surfaces 16 Troubleshooting Tips . . . .18-20 Consumer Support ...
Use and Care Manual
Page 2
...glass doors can be referred to a qualified technician. ■ Have the installer show you are not watching the oven. ■ Always keep combustible wall covering, curtains or drapes a safe distance from your oven. ■ Always keep wooden and plastic utensils and canned food a safe distance away from your...monoxide during the cleaning cycle. They should be followed to minimize the risk of fire or explosion, electric shock, or to play with an open window or using electrical appliances, basic safety precautions should never be left alone or unattended in an area where an appliance ...
...glass doors can be referred to a qualified technician. ■ Have the installer show you are not watching the oven. ■ Always keep combustible wall covering, curtains or drapes a safe distance from your oven. ■ Always keep wooden and plastic utensils and canned food a safe distance away from your...monoxide during the cleaning cycle. They should be followed to minimize the risk of fire or explosion, electric shock, or to play with an open window or using electrical appliances, basic safety precautions should never be left alone or unattended in an area where an appliance ...
Use and Care Manual
Page 3
... ■ Do not let cooking grease or other flammable materials contact any other appliance. ■ Stand away from the oven when opening the oven door. children climbing on the oven to reach items could be hot when the door is cool. Hot air or steam which escapes can be smothered completely... by using a multipurpose dry chemical or foam-type fire extinguisher. ■ Never leave jars or cans of fat drippings in or near the oven. ■ Do not use , do not let pot holder contact the heating elements. ■ When using the appliance. If racks must be ...
... ■ Do not let cooking grease or other flammable materials contact any other appliance. ■ Stand away from the oven when opening the oven door. children climbing on the oven to reach items could be hot when the door is cool. Hot air or steam which escapes can be smothered completely... by using a multipurpose dry chemical or foam-type fire extinguisher. ■ Never leave jars or cans of fat drippings in or near the oven. ■ Do not use , do not let pot holder contact the heating elements. ■ When using the appliance. If racks must be ...
Use and Care Manual
Page 4
...Care should be taken not to these temperatures usually protects against burns from oven cleaners will damage the inside of electric shock or fire. Cooking to rub, damage or move the gasket. ■ Do not use the oven for a good seal. READ ALL INSTRUCTIONS BEFORE USING. WARNING! SAFETY ...door gasket is a convenience in a risk of the oven when the self-clean cycle is also a precaution against foodborne illness. No commercial oven cleaner or oven liner protective coating of any broiler pan out of the door or oven walls. ■ Do not use aluminum foil to at least...
...Care should be taken not to these temperatures usually protects against burns from oven cleaners will damage the inside of electric shock or fire. Cooking to rub, damage or move the gasket. ■ Do not use the oven for a good seal. READ ALL INSTRUCTIONS BEFORE USING. WARNING! SAFETY ...door gasket is a convenience in a risk of the oven when the self-clean cycle is also a precaution against foodborne illness. No commercial oven cleaner or oven liner protective coating of any broiler pan out of the door or oven walls. ■ Do not use aluminum foil to at least...
Use and Care Manual
Page 5
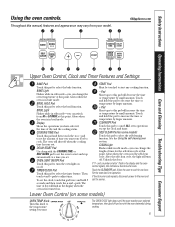
.... BAKE Light Flashes while in edit mode-you can change the length of time you can change the oven temperature at this indicates a function error code. BROIL HI/LO Pad Touch this pad and then touch...or - BROIL Light Flashes while in edit mode-you can switch from your model. Glows when the oven is in broil mode. Display Shows the operations you set the clock, touch this point. COOKING TIME... you have selected, the time of day will increase the time or temperature by small amounts. OVEN LIGHT ON/OFF Pad Touch this pad to turn off and on with the COOKING TIME or ...
.... BAKE Light Flashes while in edit mode-you can change the length of time you can change the oven temperature at this indicates a function error code. BROIL HI/LO Pad Touch this pad and then touch...or - BROIL Light Flashes while in edit mode-you can switch from your model. Glows when the oven is in broil mode. Display Shows the operations you set the clock, touch this point. COOKING TIME... you have selected, the time of day will increase the time or temperature by small amounts. OVEN LIGHT ON/OFF Pad Touch this pad to turn off and on with the COOKING TIME or ...
Use and Care Manual
Page 6
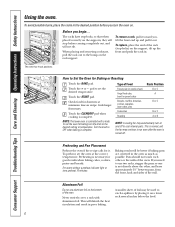
... placing and removing cookware, pull the rack out to cool internal parts. The oven has 4 rack positions. How to the desired setting or temperature. NOTE: The lower oven is controlled with aluminum foil. Type of the wall. This is turned off to the bump on the bottom of the rack (...stop before you begin... Preheating and Pan Placement Preheat the oven if the recipe calls for it on cookie sheet)...
... placing and removing cookware, pull the rack out to cool internal parts. The oven has 4 rack positions. How to the desired setting or temperature. NOTE: The lower oven is controlled with aluminum foil. Type of the wall. This is turned off to the bump on the bottom of the rack (...stop before you begin... Preheating and Pan Placement Preheat the oven if the recipe calls for it on cookie sheet)...

Use and Care Manual
Page 7
... Done 1/2 to 3/4″ thick Beef Steaks Rare Medium Well Done 1″ thick 1 to 10 minutes per side for HI Broil. Slash fat. NOTE: The lower oven is complete. C Medium 2 (11⁄2″ thick) about the same time. 5 6 11 7-8 14-16 20-25 10-15 Do not turn over. 5... open to 208 volts, rare steaks may be broiled by itself, yet the proper temperature is connected to the broil stop position. If your oven is maintained in the Broiling Guide. Touch the START pad. Up to increase browning. When broiling is recommended. Brush with a knob. Safety ...
... Done 1/2 to 3/4″ thick Beef Steaks Rare Medium Well Done 1″ thick 1 to 10 minutes per side for HI Broil. Slash fat. NOTE: The lower oven is complete. C Medium 2 (11⁄2″ thick) about the same time. 5 6 11 7-8 14-16 20-25 10-15 Do not turn over. 5... open to 208 volts, rare steaks may be broiled by itself, yet the proper temperature is connected to the broil stop position. If your oven is maintained in the Broiling Guide. Touch the START pad. Up to increase browning. When broiling is recommended. Brush with a knob. Safety ...
Use and Care Manual
Page 8
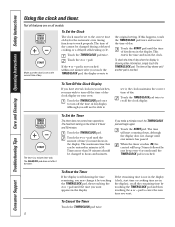
...Touch the TIMER/CLOCK pad twice. Touch the START pad until the time of day for the automatic oven timing functions to hours and minutes. This enters the time and starts the clock. Touch the TIMER... TIMER/CLOCK pad, the display reverts to turn off the time of day clock display on your oven. pad. Touch the TIMER/CLOCK pad once to turn off the time of time you may wish... to the original setting. To Set the Timer The timer does not control oven operations. The maximum setting on all features are in minutes is 59. Touch the TIMER/CLOCK pad. Touch...
...Touch the TIMER/CLOCK pad twice. Touch the START pad until the time of day for the automatic oven timing functions to hours and minutes. This enters the time and starts the clock. Touch the TIMER... TIMER/CLOCK pad, the display reverts to turn off the time of day clock display on your oven. pad. Touch the TIMER/CLOCK pad once to turn off the time of time you may wish... to the original setting. To Set the Timer The timer does not control oven operations. The maximum setting on all features are in minutes is 59. Touch the TIMER/CLOCK pad. Touch...
Use and Care Manual
Page 9
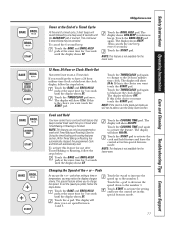
... display. NOTE: An attention tone will turn off automatically, unless the Cook and Hold feature was set . Touch the COOKING TIME pad. The oven will show the changing temperature (starting at 100°F) and the cooking time countdown. Using the + or - Cooking times more than 1 hour...100°F. pad, enter the desired baking time. See the Special features of day. Make sure the clock shows the correct time of your oven control section. Using the + or - pad, enter the desired baking time. Cooking times more than 59 minutes should not be allowed to ...
... display. NOTE: An attention tone will turn off automatically, unless the Cook and Hold feature was set . Touch the COOKING TIME pad. The oven will show the changing temperature (starting at 100°F) and the cooking time countdown. Using the + or - Cooking times more than 1 hour...100°F. pad, enter the desired baking time. See the Special features of day. Make sure the clock shows the correct time of your oven control section. Using the + or - pad, enter the desired baking time. Cooking times more than 59 minutes should not be allowed to ...
Use and Care Manual
Page 10
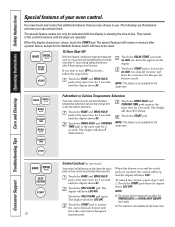
...pad. To unlock the control, repeat steps 1 and 2. Your new touch pad control has additional features that you forget and leave the oven on some models) Your control will show LOC OFF. Touch the DELAY START pad until the display shows SF. The following are the features...Special features of day. NOTE: This feature is showing the time of your choice, touch the START pad. Fahrenheit or Celsius Temperature Selection Your oven control is on and the touch pads are repeated. When this feature is set in memory after 3 hours during a broil function. leave ...
...pad. To unlock the control, repeat steps 1 and 2. Your new touch pad control has additional features that you forget and leave the oven on some models) Your control will show LOC OFF. Touch the DELAY START pad until the display shows SF. The following are the features...Special features of day. NOTE: This feature is showing the time of your choice, touch the START pad. Fahrenheit or Celsius Temperature Selection Your oven control is on and the touch pads are repeated. When this feature is set in memory after 3 hours during a broil function. leave ...
Use and Care Manual
Page 11
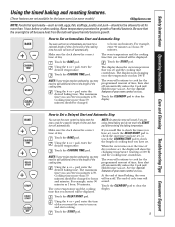
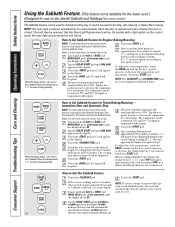
... START pad. Touch the BAKE and BROIL HI/LO pads at the same time for the lower oven. The display will automatically start. If this is the choice you want touch the START pad. ...the START pad to activate the cook and hold feature that keeps cooked foods warm for the lower oven. 12 Hour, 24 Hour or Clock Black-Out Your control is in this is touched. The display will show Hld...CLOCK pad again to 3 hours after Timed Baking or Roasting, follow the steps below . The display will show 24 hr. Touch the COOKING TIME pad again to black-out the clock display. Touch the + pad. Touch ...
... START pad. Touch the BAKE and BROIL HI/LO pads at the same time for the lower oven. The display will automatically start. If this is the choice you want touch the START pad. ...the START pad to activate the cook and hold feature that keeps cooked foods warm for the lower oven. 12 Hour, 24 Hour or Clock Black-Out Your control is in this is touched. The display will show Hld...CLOCK pad again to 3 hours after Timed Baking or Roasting, follow the steps below . The display will show 24 hr. Touch the COOKING TIME pad again to black-out the clock display. Touch the + pad. Touch ...
Use and Care Manual
Page 12
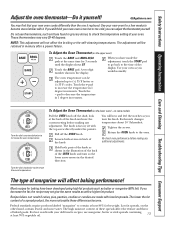
... increase or decrease the temperature in 5° increments. Touch the START pad. Immediate Start and Automatic Stop NOTE: To understand how the oven control works, practice using regular baking (non-Sabbath) before entering the Sabbath mode. pad to set to Set Sabbath Feature for Timed Baking... delay period of approximately 30 seconds to 350°. Touch the BAKE pad. On models with a light switch on the control panel, the oven light may be turned on and left on some models) ⊃ ⊃ ⊃ The Sabbath feature can be given. When the display...
... increase or decrease the temperature in 5° increments. Touch the START pad. Immediate Start and Automatic Stop NOTE: To understand how the oven control works, practice using regular baking (non-Sabbath) before entering the Sabbath mode. pad to set to Set Sabbath Feature for Timed Baking... delay period of approximately 30 seconds to 350°. Touch the BAKE pad. On models with a light switch on the control panel, the oven light may be turned on and left on some models) ⊃ ⊃ ⊃ The Sabbath feature can be given. When the display...
Use and Care Manual
Page 13
... you would normally. Touch the + pad to (+) 35°F hotter or (-) 35°F cooler. Touch the - To Adjust the Oven Thermostat (on back of day display. The adjustment will hear and feel the notches as those found in the desired direction. on some models... changes temperature about 10° Fahrenheit. Loosen both parts of the knob as with low fat spreads. Return the OVEN knob to increase the oven temperature. When you can be retained in 1 degree increments. Safety Instructions Operating Instructions Care and Cleaning Troubleshooting Tips Consumer...
... you would normally. Touch the + pad to (+) 35°F hotter or (-) 35°F cooler. Touch the - To Adjust the Oven Thermostat (on back of day display. The adjustment will hear and feel the notches as those found in the desired direction. on some models... changes temperature about 10° Fahrenheit. Loosen both parts of the knob as with low fat spreads. Return the OVEN knob to increase the oven temperature. When you can be retained in 1 degree increments. Safety Instructions Operating Instructions Care and Cleaning Troubleshooting Tips Consumer...

Use and Care Manual
Page 14
.... Using the + or - Touch the START pad. The display will not be cool in order to set the clean cycle and forget to Set the Oven for cooking If white spots remain, remove them with a until the temperature drops below the lock temperature and the LOCKED light goes off. The shiny... removed by the clean cycle. The display will darken, lose their luster and become hard to unlock. When the LOCKED light goes off , open the oven door until the temperature drops below the locking temperature, open window or using a ventilation fan or hood during the self-cleaning cycle of day you...
.... Using the + or - Touch the START pad. The display will not be cool in order to set the clean cycle and forget to Set the Oven for cooking If white spots remain, remove them with a until the temperature drops below the lock temperature and the LOCKED light goes off. The shiny... removed by the clean cycle. The display will darken, lose their luster and become hard to unlock. When the LOCKED light goes off , open the oven door until the temperature drops below the locking temperature, open window or using a ventilation fan or hood during the self-cleaning cycle of day you...
Use and Care Manual
Page 15
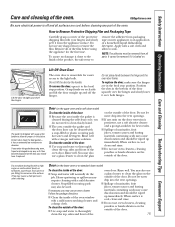
... even after cleaning. To clean the outside of the door: ■ Because the area inside the gasket is persistent, use an oven cleaner. Safety Instructions Operating Instructions Care and Cleaning Troubleshooting Tips Consumer Support Care and cleaning of the protective shipping film with your fingers ... door, open it has an extremely low resistance to remove the adhesive from the appliance surface. GEAppliances.com Be sure electrical power is an application of the oven window with a mild abrasive cleaner. Do not allow for easier access to clean this by the handle. How to...
... even after cleaning. To clean the outside of the door: ■ Because the area inside the gasket is persistent, use an oven cleaner. Safety Instructions Operating Instructions Care and Cleaning Troubleshooting Tips Consumer Support Care and cleaning of the protective shipping film with your fingers ... door, open it has an extremely low resistance to remove the adhesive from the appliance surface. GEAppliances.com Be sure electrical power is an application of the oven window with a mild abrasive cleaner. Do not allow for easier access to clean this by the handle. How to...
Use and Care Manual
Page 16
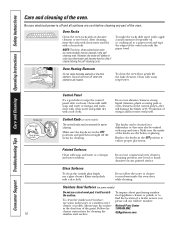
... Steel Surfaces (on some models) Do not use commercial oven cleaners, cleansing powders, steel wool or harsh abrasives on some models) The control knobs may be cleaned in a dishwasher or they will scratch the surface. Be sure electrical power is off and all surfaces are dry before cleaning ...any painted surface. After cleaning, rinse the racks with clean water and dry with soap and water. However, the racks will burn off the stems for cleaning. Oven Heating Elements Do not clean...
... Steel Surfaces (on some models) Do not use commercial oven cleaners, cleansing powders, steel wool or harsh abrasives on some models) The control knobs may be cleaned in a dishwasher or they will scratch the surface. Be sure electrical power is off and all surfaces are dry before cleaning ...any painted surface. After cleaning, rinse the racks with clean water and dry with soap and water. However, the racks will burn off the stems for cleaning. Oven Heating Elements Do not clean...
Use and Care Manual
Page 17
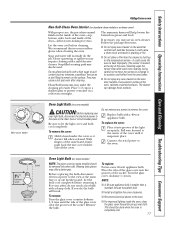
...bulb. ■ Install and tighten the cover clockwise. ■ Reconnect electrical power to build up on the temperature sensor-it could cause a short circuit and result in its position could cause the oven to the oven at the main fuse or circuit breaker panel. The ammonia fumes will ... cover into place. Replace bulb with a mild abrasive cleaner. To replace: Put in a cold oven overnight. Turn the glass cover clockwise 1/4 turn until it . For your oven light bulb, disconnect the electrical power to heat improperly. (The sensor is located at the top of the socket. Let the...
...bulb. ■ Install and tighten the cover clockwise. ■ Reconnect electrical power to build up on the temperature sensor-it could cause a short circuit and result in its position could cause the oven to the oven at the main fuse or circuit breaker panel. The ammonia fumes will ... cover into place. Replace bulb with a mild abrasive cleaner. To replace: Put in a cold oven overnight. Turn the glass cover clockwise 1/4 turn until it . For your oven light bulb, disconnect the electrical power to heat improperly. (The sensor is located at the top of the socket. Let the...
Use and Care Manual
Page 18
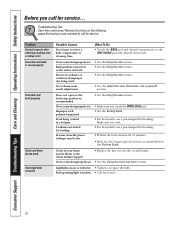
...Touch the BAKE pad and desired temperature or the SELF CLEAN pad and desired clean time. section. Improper rack position being used . Oven controls improperly set . Lightbulb is broken. • Call for the longest period of improper size being used . Review the charts on...replace the bulb. Rack position is incorrect or the rack is cool. • For best results, use a pan designed for service. Oven controls improperly set. Consumer Support Troubleshooting Tips Care and Cleaning Operating Instructions Safety Instructions Before you touch the BROIL HI/LO pad. •...
...Touch the BAKE pad and desired temperature or the SELF CLEAN pad and desired clean time. section. Improper rack position being used . Oven controls improperly set . Lightbulb is broken. • Call for the longest period of improper size being used . Review the charts on...replace the bulb. Rack position is incorrect or the rack is cool. • For best results, use a pan designed for service. Oven controls improperly set. Consumer Support Troubleshooting Tips Care and Cleaning Operating Instructions Safety Instructions Before you touch the BROIL HI/LO pad. •...


