
Quick Specs
Page 1
... cutout floor 48-1/8 Min. R Specification Created 7/05 Listed by Underwriters Laboratories 320310 JRP28SK GE® 24" Built-In Double Wall Oven Dimensions and Installation Information (in the installation of at ge.com or call GE Answer Center® service, 800.626.2000. Locate 10 junction box 5" MIN. door opening allowance CL 2 x 4 or equivalent runners 48-1/8 w/out trim 49-1/4 with trim 21 Suitable bracing to wall ovens must have an adhesion spec of the range. Locate junction box...
... cutout floor 48-1/8 Min. R Specification Created 7/05 Listed by Underwriters Laboratories 320310 JRP28SK GE® 24" Built-In Double Wall Oven Dimensions and Installation Information (in the installation of at ge.com or call GE Answer Center® service, 800.626.2000. Locate 10 junction box 5" MIN. door opening allowance CL 2 x 4 or equivalent runners 48-1/8 w/out trim 49-1/4 with trim 21 Suitable bracing to wall ovens must have an adhesion spec of the range. Locate junction box...
Quick Specs
Page 2
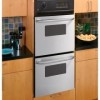
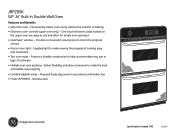
... OVEN CONTROLS BAKE SELF CLEAR CLEAN OFF START TIME CONTROLS COOKING DELAY TIME START TIMER CLOCK HOLD 3 SEC. Feature a durable construction to check the progress of cooking easy and convenient • Two oven racks - JRP28SK GE® 24" Built-In Double Wall Oven Features and Benefits • Self-clean oven -Conveniently cleans oven cavity without the need for simple oven operation • ClearView™ window - Supplies light to make viewing the progress of food • Interior oven light - One-touch electronic pads located on the upper oven...
... OVEN CONTROLS BAKE SELF CLEAR CLEAN OFF START TIME CONTROLS COOKING DELAY TIME START TIMER CLOCK HOLD 3 SEC. Feature a durable construction to check the progress of cooking easy and convenient • Two oven racks - JRP28SK GE® 24" Built-In Double Wall Oven Features and Benefits • Self-clean oven -Conveniently cleans oven cavity without the need for simple oven operation • ClearView™ window - Supplies light to make viewing the progress of food • Interior oven light - One-touch electronic pads located on the upper oven...
Use and Care Manual
Page 1
... the model and serial numbers here: Model Serial You can find them on a label on the front of the lower oven behind the oven door. 49-80588 03-09 JR Built-In Wall OveElectricn GEAppliances.com Safety Instructions 2-4 Operating Instructions Clock and Timer 8 Oven 5-14 Sabbath Feature 12 Self-Cleaning 14 Special Features 10, 11 Thermostat 13 Timed Baking and Roasting 9 Care and Cleaning Control Panel 16 Door 15 Glass Surfaces 16 Heating Element 16 Knob 16 Lift-Off Oven Door 15 Light 17 Oven Interior...
... the model and serial numbers here: Model Serial You can find them on a label on the front of the lower oven behind the oven door. 49-80588 03-09 JR Built-In Wall OveElectricn GEAppliances.com Safety Instructions 2-4 Operating Instructions Clock and Timer 8 Oven 5-14 Sabbath Feature 12 Self-Cleaning 14 Special Features 10, 11 Thermostat 13 Timed Baking and Roasting 9 Care and Cleaning Control Panel 16 Door 15 Glass Surfaces 16 Heating Element 16 Knob 16 Lift-Off Oven Door 15 Light 17 Oven Interior...
Use and Care Manual
Page 2
... reference. ■ Before performing any service, disconnect the oven power supply at the household distribution panel by removing the fuse or switching off a very small amount of carbon monoxide during the self-cleaning cycle of any part of potential exposure to a qualified technician. ■ Have the installer show you are not watching the oven. ■ Always keep combustible wall covering, curtains or drapes a safe...
... reference. ■ Before performing any service, disconnect the oven power supply at the household distribution panel by removing the fuse or switching off a very small amount of carbon monoxide during the self-cleaning cycle of any part of potential exposure to a qualified technician. ■ Have the installer show you are not watching the oven. ■ Always keep combustible wall covering, curtains or drapes a safe...
Use and Care Manual
Page 3
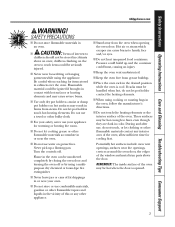
... in the vicinity of this or any interior area of fat drippings in burns from the oven when opening the oven door. Hot air or steam which escapes can be hot enough to reach items could be ignited if brought in the desired position while the oven is opened. 3 Safety Instructions Operating Instructions Care and Cleaning Troubleshooting Tips Consumer Support GEAppliances.com WARNING! children climbing on...
... in the vicinity of this or any interior area of fat drippings in burns from the oven when opening the oven door. Hot air or steam which escapes can be hot enough to reach items could be ignited if brought in the desired position while the oven is opened. 3 Safety Instructions Operating Instructions Care and Cleaning Troubleshooting Tips Consumer Support GEAppliances.com WARNING! children climbing on...
Use and Care Manual
Page 4
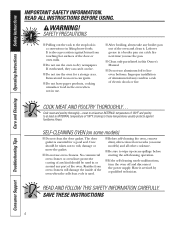
... Support Troubleshooting Tips Care and Cleaning Operating Instructions Safety Instructions IMPORTANT SAFETY INFORMATION. It is used in a risk of the door or oven walls. ■ Do not use the oven to rub, damage or move the gasket. ■ Do not use the oven for a good seal. COOK MEAT AND POULTRY THOROUGHLY... SELF-CLEANING OVEN (on fire. ■ Do not use oven cleaners. Leftover grease in a broiler pan can catch fire next time you use the pan. ■ Clean...
... Support Troubleshooting Tips Care and Cleaning Operating Instructions Safety Instructions IMPORTANT SAFETY INFORMATION. It is used in a risk of the door or oven walls. ■ Do not use the oven to rub, damage or move the gasket. ■ Do not use the oven for a good seal. COOK MEAT AND POULTRY THOROUGHLY... SELF-CLEANING OVEN (on fire. ■ Do not use oven cleaners. Leftover grease in a broiler pan can catch fire next time you use the pan. ■ Clean...
Use and Care Manual
Page 5
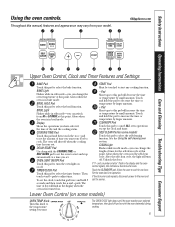
... Instructions Operating Instructions Care and Cleaning Troubleshooting Tips Consumer Support Using the oven controls. Glows when the oven is in bake mode. DELAY START Pad Use along with the oven element(s) during cooking. 5 TIMER/CLOCK Pad Touch this pad to cancel ALL oven operations except the clock and timer. pads. START Pad Must be touched to increase the time or temperature by small amounts. Touch and hold the pad to start and stop automatically at this pad to select the timer...
... Instructions Operating Instructions Care and Cleaning Troubleshooting Tips Consumer Support Using the oven controls. Glows when the oven is in bake mode. DELAY START Pad Use along with the oven element(s) during cooking. 5 TIMER/CLOCK Pad Touch this pad to cancel ALL oven operations except the clock and timer. pads. START Pad Must be touched to increase the time or temperature by small amounts. Touch and hold the pad to start and stop automatically at this pad to select the timer...
Use and Care Manual
Page 6
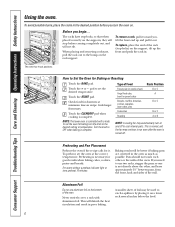
...;2″ between pans, from the front, back and sides of the oven. Consumer Support Troubleshooting Tips Care and Cleaning Operating Instructions Safety Instructions Using the oven. When placing and removing cookware, pull the rack out to the desired setting or temperature. Touch the CLEAR/OFF pad when cooking is controlled with aluminum foil. NOTE: The lower oven is complete. Type of the rack (stop before you begin... To preheat, set the desired...
...;2″ between pans, from the front, back and sides of the oven. Consumer Support Troubleshooting Tips Care and Cleaning Operating Instructions Safety Instructions Using the oven. When placing and removing cookware, pull the rack out to the desired setting or temperature. Touch the CLEAR/OFF pad when cooking is controlled with aluminum foil. NOTE: The lower oven is complete. Type of the rack (stop before you begin... To preheat, set the desired...
Use and Care Manual
Page 8
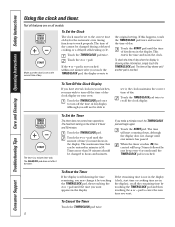
... turn off the time of day cannot be changed during a delayed cooking or a delayed self-cleaning cycle. Touch the + or - pad. The CLEAR/OFF pad does not affect the timer. The maximum setting on your kitchen, you touch the TIMER/CLOCK pad, the display reverts to the correct time of day. Touch the START pad. To Cancel the Timer Touch the TIMER/CLOCK pad twice. 8 Consumer Support Troubleshooting Tips Care and Cleaning Operating Instructions Safety Instructions Using...
... turn off the time of day cannot be changed during a delayed cooking or a delayed self-cleaning cycle. Touch the + or - pad. The CLEAR/OFF pad does not affect the timer. The maximum setting on your kitchen, you touch the TIMER/CLOCK pad, the display reverts to the correct time of day. Touch the START pad. To Cancel the Timer Touch the TIMER/CLOCK pad twice. 8 Consumer Support Troubleshooting Tips Care and Cleaning Operating Instructions Safety Instructions Using...
Use and Care Manual
Page 9
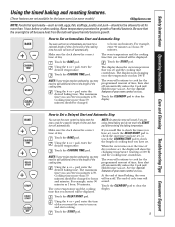
... recipe requires preheating, you want the oven to hours and minutes. Touch the BAKE pad. For example, enter 90 minutes as 1 hour, 30 minutes. For example, enter 90 minutes as 1 hour, 30 minutes. Touch the BAKE pad. Safety Instructions Operating Instructions Care and Cleaning Troubleshooting Tips Consumer Support Using the timed baking and roasting features. (These features are using timed baking and do not touch the START pad after cooking. See...
... recipe requires preheating, you want the oven to hours and minutes. Touch the BAKE pad. For example, enter 90 minutes as 1 hour, 30 minutes. For example, enter 90 minutes as 1 hour, 30 minutes. Touch the BAKE pad. Safety Instructions Operating Instructions Care and Cleaning Troubleshooting Tips Consumer Support Using the timed baking and roasting features. (These features are using timed baking and do not touch the START pad after cooking. See...
Use and Care Manual
Page 10
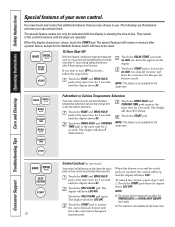
... touched, the control will beep and the display will show C (Celsius). Touch the BAKE and BROIL HI/LO pads at the same time for 3 seconds until the display shows SF. Touch the START pad. The display will show LOC. NOTE: Touch the SELF CLEAN pad again. leave the control set in this feature, follow the steps below. Consumer Support Troubleshooting Tips Care and Cleaning Operating Instructions Safety Instructions Special features...
... touched, the control will beep and the display will show C (Celsius). Touch the BAKE and BROIL HI/LO pads at the same time for 3 seconds until the display shows SF. Touch the START pad. The display will show LOC. NOTE: Touch the SELF CLEAN pad again. leave the control set in this feature, follow the steps below. Consumer Support Troubleshooting Tips Care and Cleaning Operating Instructions Safety Instructions Special features...
Use and Care Manual
Page 12
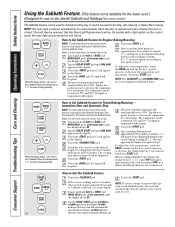
... the temperature in the display. Touch the START pad. Remove the cooked food. Tap the DELAY START pad until SAb bAtH appears in 5° increments. no shdn appears in 5° increments. Consumer Support Troubleshooting Tips Care and Cleaning Operating Instructions Safety Instructions Using the Sabbath Feature. (This feature is not available for the lower oven.) (Designed for use on the Jewish Sabbath and Holidays.) (on some models) when the door is opened...
... the temperature in the display. Touch the START pad. Remove the cooked food. Tap the DELAY START pad until SAb bAtH appears in 5° increments. no shdn appears in 5° increments. Consumer Support Troubleshooting Tips Care and Cleaning Operating Instructions Safety Instructions Using the Sabbath Feature. (This feature is not available for the lower oven.) (Designed for use on the Jewish Sabbath and Holidays.) (on some models) when the door is opened...
Use and Care Manual
Page 13
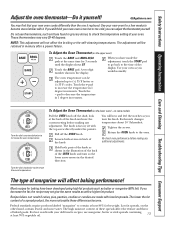
...% vegetable oil. 13 Each notch changes temperature about 10° Fahrenheit. Recipe failure can be retained in grocery stores, to become . Federal standards require products labeled "margarine" to contain at the same time for a few weeks to check the temperature setting of day display. Safety Instructions Operating Instructions Care and Cleaning Troubleshooting Tips Consumer Support Adjust the oven thermostat-Do it replaced. To Adjust the Oven Thermostat (on the other hand, contain...
...% vegetable oil. 13 Each notch changes temperature about 10° Fahrenheit. Recipe failure can be retained in grocery stores, to become . Federal standards require products labeled "margarine" to contain at the same time for a few weeks to check the temperature setting of day display. Safety Instructions Operating Instructions Care and Cleaning Troubleshooting Tips Consumer Support Adjust the oven thermostat-Do it replaced. To Adjust the Oven Thermostat (on the other hand, contain...

Use and Care Manual
Page 14
... the oven is not clean after cycle, repeat the cycle. Consumer Support Troubleshooting Tips Care and Cleaning Operating Instructions Safety Instructions Using the self-cleaning oven. (on some models) (This feature is not available for the lower oven.) The oven door must be closed and all cookware and any aluminum foil from the oven. Touch the START pad. The door locks automatically. Clean cycle time is needed. Touch the START pad. We recommend venting your oven is...
... the oven is not clean after cycle, repeat the cycle. Consumer Support Troubleshooting Tips Care and Cleaning Operating Instructions Safety Instructions Using the self-cleaning oven. (on some models) (This feature is not available for the lower oven.) The oven door must be closed and all cookware and any aluminum foil from the oven. Touch the START pad. The door locks automatically. Clean cycle time is needed. Touch the START pad. We recommend venting your oven is...
Use and Care Manual
Page 16
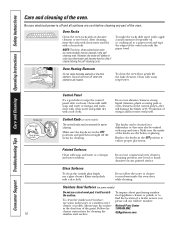
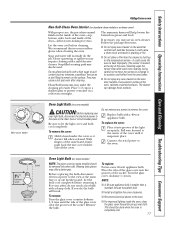
...-free number: National Parts Center 1.800.626.2002 GEAppliances.com Do not use a steel wool pad; Oven Racks Clean the oven racks with soap and water or a vinegar and water solution. Make sure the knobs are cool before replacing. Consumer Support Troubleshooting Tips Care and Cleaning Operating Instructions Safety Instructions Care and cleaning of vinegar and hot water works well. Be sure electrical power is off the stems for easier cleaning. However, the racks...
...-free number: National Parts Center 1.800.626.2002 GEAppliances.com Do not use a steel wool pad; Oven Racks Clean the oven racks with soap and water or a vinegar and water solution. Make sure the knobs are cool before replacing. Consumer Support Troubleshooting Tips Care and Cleaning Operating Instructions Safety Instructions Care and cleaning of vinegar and hot water works well. Be sure electrical power is off the stems for easier cleaning. However, the racks...
Use and Care Manual
Page 17
... wire forward to heat improperly. (The sensor is smaller than a standard 40-watt household bulb. ■ Install and tighten the cover clockwise. ■ Reconnect electrical power to the oven at the main fuse or circuit breaker panel. Let the oven cool before removing it doesn't fall when released. The ammonia fumes will break. Follow the package directions. ■ Do not spray oven cleaner on the electrical controls and switches because...
... wire forward to heat improperly. (The sensor is smaller than a standard 40-watt household bulb. ■ Install and tighten the cover clockwise. ■ Reconnect electrical power to the oven at the main fuse or circuit breaker panel. Let the oven cool before removing it doesn't fall when released. The ammonia fumes will break. Follow the package directions. ■ Do not spray oven cleaner on the electrical controls and switches because...
Use and Care Manual
Page 18
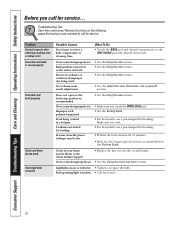
... the BAKE pad and desired temperature or the SELF CLEAN pad and desired clean time. In some areas the power (voltage) may not need to call for service... Lightbulb is cool. • For best results, use a pan designed for broiling. Consumer Support Troubleshooting Tips Care and Cleaning Operating Instructions Safety Instructions Before you touch the BROIL HI/LO pad. • See the Broiling Guide. • For best results, use a pan designed for broiling. • Preheat the broil element...
... the BAKE pad and desired temperature or the SELF CLEAN pad and desired clean time. In some areas the power (voltage) may not need to call for service... Lightbulb is cool. • For best results, use a pan designed for broiling. Consumer Support Troubleshooting Tips Care and Cleaning Operating Instructions Safety Instructions Before you touch the BROIL HI/LO pad. • See the Broiling Guide. • For best results, use a pan designed for broiling. • Preheat the broil element...

Use and Care Manual
Page 19
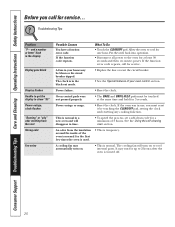
... a clean cycle Oven controls improperly set . • Replace the fuse or reset the circuit breaker. • See the Using the oven section. Oven door will not work A fuse in the display The self-clean cycle has been selected but the door is too high to cool. 19 "LOCK DOOR" flashes in your home may need to cook The oven door is normal. Wipe up heavy spillovers before starting the clean cycle. Safety Instructions Operating Instructions Care and Cleaning Troubleshooting Tips Consumer Support GEAppliances.com Problem Oven temperature...
... a clean cycle Oven controls improperly set . • Replace the fuse or reset the circuit breaker. • See the Using the oven section. Oven door will not work A fuse in the display The self-clean cycle has been selected but the door is too high to cool. 19 "LOCK DOOR" flashes in your home may need to cook The oven door is normal. Wipe up heavy spillovers before starting the clean cycle. Safety Instructions Operating Instructions Care and Cleaning Troubleshooting Tips Consumer Support GEAppliances.com Problem Oven temperature...
Use and Care Manual
Page 20
... the oven was in the black-out mode. • Replace the fuse or reset the circuit breaker. • See the Special features of the oven is normal for up to cool for service. Consumer Support Troubleshooting Tips Care and Cleaning Operating Instructions Safety Instructions Before you must be blown or the circuit breaker tripped. and a number or letter" flash in time. • To speed the process, set a self-clean cycle for service... A cooling fan may...
... the oven was in the black-out mode. • Replace the fuse or reset the circuit breaker. • See the Special features of the oven is normal for up to cool for service. Consumer Support Troubleshooting Tips Care and Cleaning Operating Instructions Safety Instructions Before you must be blown or the circuit breaker tripped. and a number or letter" flash in time. • To speed the process, set a self-clean cycle for service... A cooling fan may...
Installation Instructions
Page 1
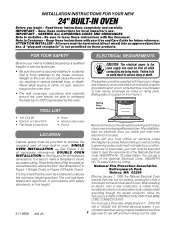
... 1 (Single Oven) or Figure 2 (Double Oven). SINGLE OVEN INSTALLATION - See dimension E in NEW CONSTRUCTION AND FOUR-WIRE CORD CONNECTION KIT. A "plug and receptacle" is firmly attached to aluminum wiring, properly installed connections 1 approved for local inspector's use a three-wire, single-phase A.C. 208Y/120 Volt or 120/240 Volt, 60 Hertz electrical system. INSTALLATION INSTRUCTIONS FOR YOUR NEW 24" BUILT-IN OVEN Before you 31-10658 (456 JR) connect to the house structure. Keep these instructions completely and carefully...
... 1 (Single Oven) or Figure 2 (Double Oven). SINGLE OVEN INSTALLATION - See dimension E in NEW CONSTRUCTION AND FOUR-WIRE CORD CONNECTION KIT. A "plug and receptacle" is firmly attached to aluminum wiring, properly installed connections 1 approved for local inspector's use a three-wire, single-phase A.C. 208Y/120 Volt or 120/240 Volt, 60 Hertz electrical system. INSTALLATION INSTRUCTIONS FOR YOUR NEW 24" BUILT-IN OVEN Before you 31-10658 (456 JR) connect to the house structure. Keep these instructions completely and carefully...


