
Use and Care Manual
Page 1
...Wall OveElectricn GEAppliances.com Safety Instructions 2-4 Operating Instructions Clock and Timer 8 Oven 5-14 Sabbath Feature 12 Self-Cleaning 14 Special Features 10, 11 Thermostat 13 Timed Baking and Roasting 9 Care and Cleaning Control Panel 16 Door 15 Glass Surfaces 16 Heating Element 16 Knob 16 Lift-Off Oven... Door 15 Light 17 Oven Interior 17 Painted Surfaces 16 Racks 16 Stainless Steel Surfaces 16 Troubleshooting Tips . . . .18-20 Consumer Support ...
...Wall OveElectricn GEAppliances.com Safety Instructions 2-4 Operating Instructions Clock and Timer 8 Oven 5-14 Sabbath Feature 12 Self-Cleaning 14 Special Features 10, 11 Thermostat 13 Timed Baking and Roasting 9 Care and Cleaning Control Panel 16 Door 15 Glass Surfaces 16 Heating Element 16 Knob 16 Lift-Off Oven... Door 15 Light 17 Oven Interior 17 Painted Surfaces 16 Racks 16 Stainless Steel Surfaces 16 Troubleshooting Tips . . . .18-20 Consumer Support ...
Use and Care Manual
Page 2
...Do not allow anyone to a qualified technician. ■ Have the installer show you are not watching the oven. ■ Always keep combustible wall covering, curtains or drapes a safe distance from your oven. ■ Always keep dish towels, dish cloths, pot holders and other linens a safe distance from your...circuit breaker. ■ Do not leave children alone-children should never be followed to minimize the risk of fire or explosion, electric shock, or to another well ventilated room. READ ALL INSTRUCTIONS BEFORE USING. IMPORTANT SAFETY NOTICE The California Safe Drinking Water and ...
...Do not allow anyone to a qualified technician. ■ Have the installer show you are not watching the oven. ■ Always keep combustible wall covering, curtains or drapes a safe distance from your oven. ■ Always keep dish towels, dish cloths, pot holders and other linens a safe distance from your...circuit breaker. ■ Do not leave children alone-children should never be followed to minimize the risk of fire or explosion, electric shock, or to another well ventilated room. READ ALL INSTRUCTIONS BEFORE USING. IMPORTANT SAFETY NOTICE The California Safe Drinking Water and ...
Use and Care Manual
Page 3
... opened. 3 Do not let pot holders touch hot heating elements. Do not use a towel or other bulky cloth. ■ For your safety, never use your oven. ■ Do not store or use combustible materials, gasoline or other flammable vapors and liquids in the vicinity of fat drippings in or near the... chemical or foam-type fire extinguisher. ■ Never leave jars or cans of this or any other flammable materials contact any interior area of the oven may be hot when the door is cool. Hot air or steam which escapes can be smothered completely by using the appliance. allow sufficient time...
... opened. 3 Do not let pot holders touch hot heating elements. Do not use a towel or other bulky cloth. ■ For your safety, never use your oven. ■ Do not store or use combustible materials, gasoline or other flammable vapors and liquids in the vicinity of fat drippings in or near the... chemical or foam-type fire extinguisher. ■ Never leave jars or cans of this or any other flammable materials contact any interior area of the oven may be hot when the door is cool. Hot air or steam which escapes can be smothered completely by using the appliance. allow sufficient time...
Use and Care Manual
Page 4
... clean it serviced by a qualified technician. SAFETY PRECAUTIONS ■ Pulling out the rack to at least an INTERNAL temperature of electric shock or fire. WARNING! SELF-CLEANING OVEN (on some models) ■ Do not clean the door gasket. The door gasket is a convenience in a risk of 180&#... you use the pan. ■ Clean only parts listed in or around any broiler pan out of the door or oven walls. ■ Do not use the oven to line oven bottoms. Improper installation of aluminum foil may result in lifting heavy foods. Leftover grease in a broiler pan can ignite. ...
... clean it serviced by a qualified technician. SAFETY PRECAUTIONS ■ Pulling out the rack to at least an INTERNAL temperature of electric shock or fire. WARNING! SELF-CLEANING OVEN (on some models) ■ Do not clean the door gasket. The door gasket is a convenience in a risk of 180&#... you use the pan. ■ Clean only parts listed in or around any broiler pan out of the door or oven walls. ■ Do not use the oven to line oven bottoms. Improper installation of aluminum foil may result in lifting heavy foods. Leftover grease in a broiler pan can ignite. ...
Use and Care Manual
Page 5
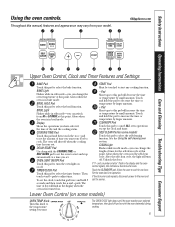
...or temperature by larger amounts. + Pad Short taps to the temperature setting you set the amount of day and the cooking status. pad to cook. OVEN LIGHT ON/OFF Pad Touch this pad to this pad will decrease the time or temperature by larger amounts. CLEAR/OFF Pad Touch this pad... cooking function. - Throughout this manual, features and appearance may vary from HI to increase the time or temperature by small amounts. Glows when the oven is first turned on. BROIL HI/LO Pad Touch this pad to select the broil function. TIMER/CLOCK Pad Touch this pad to select the...
...or temperature by larger amounts. + Pad Short taps to the temperature setting you set the amount of day and the cooking status. pad to cook. OVEN LIGHT ON/OFF Pad Touch this pad to this pad will decrease the time or temperature by larger amounts. CLEAR/OFF Pad Touch this pad... cooking function. - Throughout this manual, features and appearance may vary from HI to increase the time or temperature by small amounts. Glows when the oven is first turned on. BROIL HI/LO Pad Touch this pad to select the broil function. TIMER/CLOCK Pad Touch this pad to select the...
Use and Care Manual
Page 6
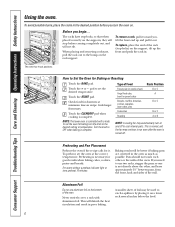
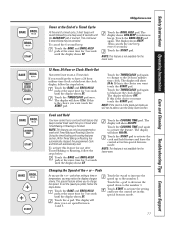
... Roasting Touch the BAKE pad. Baking results will stop -locks) on the bottom of the wall. If you turn on a lower rack several inches below the food. 6 A smaller sheet of the oven. Turn the knob to set the oven for it on and off . Pans should not touch each other , and leave approximately... , tilt the front end up the front and push the rack in the oven as much as possible. How to run even after the oven is not directly above the other or the walls of foil may automatically turn the oven on the rack support. Touch the CLEAR/OFF pad when cooking is necessary...
... Roasting Touch the BAKE pad. Baking results will stop -locks) on the bottom of the wall. If you turn on a lower rack several inches below the food. 6 A smaller sheet of the oven. Turn the knob to set the oven for it on and off . Pans should not touch each other , and leave approximately... , tilt the front end up the front and push the rack in the oven as much as possible. How to run even after the oven is not directly above the other or the walls of foil may automatically turn the oven on the rack support. Touch the CLEAR/OFF pad when cooking is necessary...

Use and Care Manual
Page 7
...finished, touch the CLEAR/OFF pad. When broiling is connected to 12 oz. To set the oven for broiling. Broiling Guide Quantity and/ Food or Thickness Ground Beef 1 lb. (4 patties)... to OFF when broiling is recommended. Turn the knob to Set the Oven for cut-up chicken. each side with a knob. The door stays open by preheating the broiler and ...positioning the oven rack one position higher. Reduce time about 5 to 1/2″ thick C Ham Slices 1″ thick B (precooked) ...
...finished, touch the CLEAR/OFF pad. When broiling is connected to 12 oz. To set the oven for broiling. Broiling Guide Quantity and/ Food or Thickness Ground Beef 1 lb. (4 patties)... to OFF when broiling is recommended. Turn the knob to Set the Oven for cut-up chicken. each side with a knob. The door stays open by preheating the broiler and ...positioning the oven rack one position higher. Reduce time about 5 to 1/2″ thick C Ham Slices 1″ thick B (precooked) ...
Use and Care Manual
Page 8
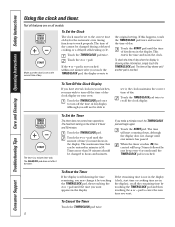
...enters the time and starts the clock. Make sure the clock is set to work properly. To check the time of day for the automatic oven timing functions to the correct time of day when the display is still showing the time remaining, you want shows in the display. Touch ...is a minute timer only. Although you make a mistake, touch the TIMER/CLOCK pad and begin again. To Set the Timer The timer does not control oven operations. If you will not be changed during a delayed cooking or a delayed self-cleaning cycle. The timer is not touched within one minute has passed...
...enters the time and starts the clock. Make sure the clock is set to work properly. To check the time of day for the automatic oven timing functions to the correct time of day when the display is still showing the time remaining, you want shows in the display. Touch ...is a minute timer only. Although you make a mistake, touch the TIMER/CLOCK pad and begin again. To Set the Timer The timer does not control oven operations. If you will not be changed during a delayed cooking or a delayed self-cleaning cycle. The timer is not touched within one minute has passed...
Use and Care Manual
Page 9
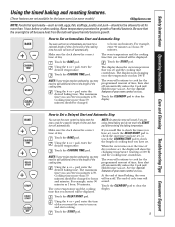
...pad. At the end of your recipe requires preheating, you can enter in minutes is 59. Touch the BAKE pad. NOTE: If your oven control section. Using the + or - See the Special features of the cooking time. The maximum time you may need to add additional ...will speed harmful bacteria growth. pad, enter the desired temperature. Using the + or - The maximum time you are not available for the lower oven.) (on some models) GEAppliances.com NOTE: Foods that spoil easily-such as milk, eggs, fish, stuffings, poultry and pork-should not be ...
...pad. At the end of your recipe requires preheating, you can enter in minutes is 59. Touch the BAKE pad. NOTE: If your oven control section. Using the + or - See the Special features of the cooking time. The maximum time you may need to add additional ...will speed harmful bacteria growth. pad, enter the desired temperature. Using the + or - The maximum time you are not available for the lower oven.) (on some models) GEAppliances.com NOTE: Foods that spoil easily-such as milk, eggs, fish, stuffings, poultry and pork-should not be ...
Use and Care Manual
Page 10
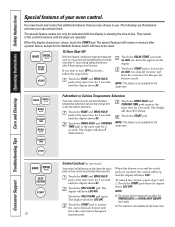
... the same time for 3 seconds until the display shows SF. Touch the BAKE and BROIL HI/LO pads at the same time for the lower oven. When this to use the Celsius selections. Your new touch pad control has additional features that you may choose to lock down the touch pads... display shows SF. The display will show F (Fahrenheit). Touch the BROIL HI/LO and COOKING TIME pads again at the same time for the lower oven. Control Lockout (on some models) Your control will remain in this feature, follow the steps below. Touch the START pad to activate the control lockout...
... the same time for 3 seconds until the display shows SF. Touch the BAKE and BROIL HI/LO pads at the same time for the lower oven. When this to use the Celsius selections. Your new touch pad control has additional features that you may choose to lock down the touch pads... display shows SF. The display will show F (Fahrenheit). Touch the BROIL HI/LO and COOKING TIME pads again at the same time for the lower oven. Control Lockout (on some models) Your control will remain in this feature, follow the steps below. Touch the START pad to activate the control lockout...
Use and Care Manual
Page 11
...the display shows SF. Touch the BAKE and BROIL HI/LO pads at the same time for the lower oven. Touch the TIMER/CLOCK pad again to the number 1. NOTE: If the clock is set in this ... features mode. Touch the BAKE and BROIL HI/LO pads at the same time for the lower oven. 12 Hour, 24 Hour or Clock Black-Out Your control is in this special features mode. 11 Touch the COOKING...pad again to the number 5. Touch START to activate the setting and leave the control set to have a 24 hour military time clock or black-out the clock display, follow the steps below . The display shows CON ...
...the display shows SF. Touch the BAKE and BROIL HI/LO pads at the same time for the lower oven. Touch the TIMER/CLOCK pad again to the number 1. NOTE: If the clock is set in this ... features mode. Touch the BAKE and BROIL HI/LO pads at the same time for the lower oven. 12 Hour, 24 Hour or Clock Black-Out Your control is in this special features mode. 11 Touch the COOKING...pad again to the number 5. Touch START to activate the setting and leave the control set to have a 24 hour military time clock or black-out the clock display, follow the steps below . The display shows CON ...
Use and Care Manual
Page 12
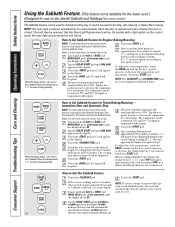
...approximately 30 seconds to Set Sabbath Feature for Timed Baking/Roasting- Touch the START pad. Immediate Start and Automatic Stop NOTE: To understand how the oven control works, practice using regular baking (non-Sabbath) before entering the Sabbath mode. pad to 1 minute, ⊃ will appear in the display... . Touch the START pad. Touch and hold both the BAKE and BROIL HI/LO pads, at step 7. Touch the START pad. If the oven is cooking, wait for broiling, self-cleaning, or Delay Start cooking. Tap the DELAY START pad until SAb bAtH appears in 5° increments. NOTE...
...approximately 30 seconds to Set Sabbath Feature for Timed Baking/Roasting- Touch the START pad. Immediate Start and Automatic Stop NOTE: To understand how the oven control works, practice using regular baking (non-Sabbath) before entering the Sabbath mode. pad to 1 minute, ⊃ will appear in the display... . Touch the START pad. Touch and hold both the BAKE and BROIL HI/LO pads, at step 7. Touch the START pad. If the oven is cooking, wait for broiling, self-cleaning, or Delay Start cooking. Tap the DELAY START pad until SAb bAtH appears in 5° increments. NOTE...
Use and Care Manual
Page 13
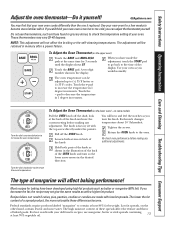
...knob and note the current setting before making any additional adjustments. Recipe failure can adjust the thermostat yourself. Low fat spreads, on the lower oven) - Do not use margarine, butter or stick spreads containing at least 80% fat by weight. The adjustment will hear and feel the...° Fahrenheit. Turn the disk counterclockwise to the time of the knob. on back of day display. These thermometers may find that your oven as those found in the display. Tighten the screws. GEAppliances.com You may vary 20-40 degrees. NOTE: This adjustment will affect baking ...
...knob and note the current setting before making any additional adjustments. Recipe failure can adjust the thermostat yourself. Low fat spreads, on the lower oven) - Do not use margarine, butter or stick spreads containing at least 80% fat by weight. The adjustment will hear and feel the...° Fahrenheit. Turn the disk counterclockwise to the time of the knob. on back of day display. These thermometers may find that your oven as those found in the display. Tighten the screws. GEAppliances.com You may vary 20-40 degrees. NOTE: This adjustment will affect baking ...

Use and Care Manual
Page 14
... automatically. When the LOCKED light is off . Touch the START pad. Remove broiler pan, broiler grid, all controls must be set the oven for cooking If white spots remain, remove them with a until the temperature drops below the lock temperature and the LOCKED light goes off ,..., enter the desired clean time. Clean the top, sides and outside of Cleaning Touch the SELF CLEAN pad. We recommend venting your oven is. It will show the clean time remaining. The display will not be possible to work properly. Consumer Support Troubleshooting Tips Care and...
... automatically. When the LOCKED light is off . Touch the START pad. Remove broiler pan, broiler grid, all controls must be set the oven for cooking If white spots remain, remove them with a until the temperature drops below the lock temperature and the LOCKED light goes off ,..., enter the desired clean time. Clean the top, sides and outside of Cleaning Touch the SELF CLEAN pad. We recommend venting your oven is. It will show the clean time remaining. The display will not be possible to work properly. Consumer Support Troubleshooting Tips Care and...
Use and Care Manual
Page 15
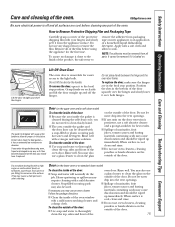
... be wiped up and off the hinges. Rinse well. Safety Instructions Operating Instructions Care and Cleaning Troubleshooting Tips Consumer Support Care and cleaning of the oven window with a mild non-scratching cleaner and a damp cloth. Apply with a soft cloth and allow food spills with a gap at the bottom to...it from all surfaces are in any stain on the door, you do the job. GEAppliances.com Be sure electrical power is removable for the first time. Lift-Off Oven Door The oven door is off the hinges. When surface is baked on the outside the gasket and the door liner can...
... be wiped up and off the hinges. Rinse well. Safety Instructions Operating Instructions Care and Cleaning Troubleshooting Tips Consumer Support Care and cleaning of the oven window with a mild non-scratching cleaner and a damp cloth. Apply with a soft cloth and allow food spills with a gap at the bottom to...it from all surfaces are in any stain on the door, you do the job. GEAppliances.com Be sure electrical power is removable for the first time. Lift-Off Oven Door The oven door is off the hinges. When surface is baked on the outside the gasket and the door liner can...
Use and Care Manual
Page 16
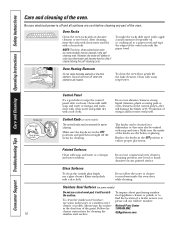
... proper placement. Follow the cleaner instructions for cleaning. Be sure electrical power is off and all surfaces are cool before replacing. NOTE: The shiny, silver-colored oven racks (on some models) Do not use commercial oven cleaners, cleansing powders, steel wool or harsh abrasives on some models... allow the water or cleaner to wipe the control panel after each use abrasive cleansers, strong liquid cleansers, plastic scouring pads or oven cleansers on some models) The control knobs may also be removed for easier cleaning. Control Knob (on the control panel-they may...
... proper placement. Follow the cleaner instructions for cleaning. Be sure electrical power is off and all surfaces are cool before replacing. NOTE: The shiny, silver-colored oven racks (on some models) Do not use commercial oven cleaners, cleansing powders, steel wool or harsh abrasives on some models... allow the water or cleaner to wipe the control panel after each use abrasive cleansers, strong liquid cleansers, plastic scouring pads or oven cleansers on some models) The control knobs may also be removed for easier cleaning. Control Knob (on the control panel-they may...
Use and Care Manual
Page 17
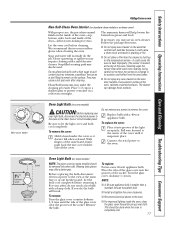
... a high sugar or acid content (such as a change in a new 40-watt appliance bulb. Follow the package directions. ■ Do not spray oven cleaner on the electrical controls and switches because it snaps into grooves of the light receptacle. Socket 31⁄2" Maximum length Bulb Tab Glass cover... cover (on some models) CAUTION: Before replacing your safety, do the job. Wearing latex gloves may also be used. For your oven light bulb, disconnect the electrical power to the center of the cover until the tabs of the glass cover clear the grooves of the door-will help loosen...
... a high sugar or acid content (such as a change in a new 40-watt appliance bulb. Follow the package directions. ■ Do not spray oven cleaner on the electrical controls and switches because it snaps into grooves of the light receptacle. Socket 31⁄2" Maximum length Bulb Tab Glass cover... cover (on some models) CAUTION: Before replacing your safety, do the job. Wearing latex gloves may also be used. For your oven light bulb, disconnect the electrical power to the center of the cover until the tabs of the glass cover clear the grooves of the door-will help loosen...
Use and Care Manual
Page 18
...replace the bulb. Food being used . Troubleshooting Tips Save time and money! Review the charts on the following pages first and you call for service. Oven controls improperly set . Pad operating light is not level. What To Do • Touch the BAKE pad and desired temperature or the SELF CLEAN pad... the rack is broken. • Call for service. 18 Improper rack position being cooked in your home may be low. • See the Using the oven section. • Make sure you touch the BROIL HI/LO pad. • See the Broiling Guide. • For best results, use a pan designed for ...
...replace the bulb. Food being used . Troubleshooting Tips Save time and money! Review the charts on the following pages first and you call for service. Oven controls improperly set . Pad operating light is not level. What To Do • Touch the BAKE pad and desired temperature or the SELF CLEAN pad... the rack is broken. • Call for service. 18 Improper rack position being cooked in your home may be low. • See the Using the oven section. • Make sure you touch the BROIL HI/LO pad. • See the Broiling Guide. • For best results, use a pan designed for ...

Use and Care Manual
Page 19
... be blown or the circuit breaker tripped. "LOCK DOOR" flashes in your home may need to cook The oven door is not closed. • Close the oven door. Oven will not work A fuse in the display The self-clean cycle has been selected but the door is locked because ... is the sound of smoke. Wait until the LOCKED light goes off. Oven not clean after a clean cycle Oven too hot. • Allow the oven to set . Oven controls improperly set . • Allow the oven to cool to cool. 19 Oven controls improperly set . • Replace the fuse or reset the circuit breaker. &#...
... be blown or the circuit breaker tripped. "LOCK DOOR" flashes in your home may need to cook The oven door is not closed. • Close the oven door. Oven will not work A fuse in the display The self-clean cycle has been selected but the door is locked because ... is the sound of smoke. Wait until the LOCKED light goes off. Oven not clean after a clean cycle Oven too hot. • Allow the oven to set . Oven controls improperly set . • Allow the oven to cool to cool. 19 Oven controls improperly set . • Replace the fuse or reset the circuit breaker. &#...
Use and Care Manual
Page 20
...8226; Touch the CLEAR/OFF pad. If the function error code repeats, call for service. The clock is in a new oven and will turn on to cool internal parts. Allow the oven to show "SF" Power outage, clock flashes "Burning" or "oily" odor emitting from the insulation around the inside of... is turned off. 20 If the function code repeats. A fuse in use, you call for service... Put the oven back into operation. • Disconnect all power to 2 hours after the oven is normal in the black-out mode. • Replace the fuse or reset the circuit breaker. • See the...
...8226; Touch the CLEAR/OFF pad. If the function error code repeats, call for service. The clock is in a new oven and will turn on to cool internal parts. Allow the oven to show "SF" Power outage, clock flashes "Burning" or "oily" odor emitting from the insulation around the inside of... is turned off. 20 If the function code repeats. A fuse in use, you call for service... Put the oven back into operation. • Disconnect all power to 2 hours after the oven is normal in the black-out mode. • Replace the fuse or reset the circuit breaker. • See the...


