
Use and Care Manual
Page 1
... the model and serial numbers here: Model Serial You can find them on a label on the front of the lower oven behind the oven door. 49-80588 03-09 JR Built-In Wall OveElectricn GEAppliances.com Safety Instructions 2-4 Operating Instructions Clock and Timer 8 Oven 5-14 Sabbath Feature 12 Self-Cleaning 14 Special Features 10, 11 Thermostat 13 Timed Baking and Roasting 9 Care and Cleaning Control Panel 16 Door 15 Glass Surfaces 16 Heating Element 16 Knob 16 Lift-Off Oven Door 15 Light 17 Oven Interior...
... the model and serial numbers here: Model Serial You can find them on a label on the front of the lower oven behind the oven door. 49-80588 03-09 JR Built-In Wall OveElectricn GEAppliances.com Safety Instructions 2-4 Operating Instructions Clock and Timer 8 Oven 5-14 Sabbath Feature 12 Self-Cleaning 14 Special Features 10, 11 Thermostat 13 Timed Baking and Roasting 9 Care and Cleaning Control Panel 16 Door 15 Glass Surfaces 16 Heating Element 16 Knob 16 Lift-Off Oven Door 15 Light 17 Oven Interior...
Use and Care Manual
Page 2
... this manual. All other linens a safe distance from your oven. ■ Always keep wooden and plastic utensils and canned food a safe distance away from your appliance is properly installed and grounded by removing the fuse or switching off a very small amount of potential exposure to climb, stand or hang on the door. Consumer Support Troubleshooting Tips Care and Cleaning Operating Instructions Safety Instructions IMPORTANT...
... this manual. All other linens a safe distance from your oven. ■ Always keep wooden and plastic utensils and canned food a safe distance away from your appliance is properly installed and grounded by removing the fuse or switching off a very small amount of potential exposure to climb, stand or hang on the door. Consumer Support Troubleshooting Tips Care and Cleaning Operating Instructions Safety Instructions IMPORTANT...
Use and Care Manual
Page 3
... leave jars or cans of the oven; Safety Instructions Operating Instructions Care and Cleaning Troubleshooting Tips Consumer Support GEAppliances.com WARNING! If racks must be hot enough to hands, face and/or eyes. ■ Do not heat unopened food containers. Hot air or steam which escapes can be hot when the door is cool. These surfaces may be handled when hot, do not touch...
... leave jars or cans of the oven; Safety Instructions Operating Instructions Care and Cleaning Troubleshooting Tips Consumer Support GEAppliances.com WARNING! If racks must be hot enough to hands, face and/or eyes. ■ Do not heat unopened food containers. Hot air or steam which escapes can be hot when the door is cool. These surfaces may be handled when hot, do not touch...
Use and Care Manual
Page 4
... foodborne illness. COOK MEAT AND POULTRY THOROUGHLY... Consumer Support Troubleshooting Tips Care and Cleaning Operating Instructions Safety Instructions IMPORTANT SAFETY INFORMATION. The door gasket is a convenience in this Owner's Manual. ■ Do not use . ■ After broiling, always take any part of electric shock or fire. SELF-CLEANING OVEN (on some models) ■ Do not clean the door gasket. Items stored in an oven can ignite. ■ Do not leave paper products, cooking utensils or...
... foodborne illness. COOK MEAT AND POULTRY THOROUGHLY... Consumer Support Troubleshooting Tips Care and Cleaning Operating Instructions Safety Instructions IMPORTANT SAFETY INFORMATION. The door gasket is a convenience in this Owner's Manual. ■ Do not use . ■ After broiling, always take any part of electric shock or fire. SELF-CLEANING OVEN (on some models) ■ Do not clean the door gasket. Items stored in an oven can ignite. ■ Do not leave paper products, cooking utensils or...
Use and Care Manual
Page 5
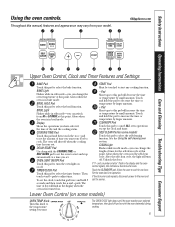
... the oven element(s) during cooking. 5 Then touch + and - BROIL Light Flashes while in edit mode-you have selected, the time of time for service. If function error code repeats, disconnect power to increase the time or temperature by larger amounts. GEAppliances.com Upper Oven Control, Clock and Timer Features and Settings BAKE Pad Touch this pad to start and stop automatically at this point. Display Shows the operations you can switch from your food to adjust time. COOKING TIME...
... the oven element(s) during cooking. 5 Then touch + and - BROIL Light Flashes while in edit mode-you have selected, the time of time for service. If function error code repeats, disconnect power to increase the time or temperature by larger amounts. GEAppliances.com Upper Oven Control, Clock and Timer Features and Settings BAKE Pad Touch this pad to start and stop automatically at this point. Display Shows the operations you can switch from your food to adjust time. COOKING TIME...
Use and Care Manual
Page 6
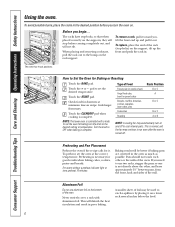
... oven. Preheating and Pan Placement Preheat the oven if the recipe calls for baking turn on a lower rack several inches below the food. 6 For ovens without a preheat indicator light or tone, preheat 10 minutes. When placing and removing cookware, pull the rack out to run even after the oven is complete. How to catch a spillover by placing it toward you begin... Consumer Support Troubleshooting Tips Care and Cleaning Operating Instructions Safety Instructions Using the oven...
... oven. Preheating and Pan Placement Preheat the oven if the recipe calls for baking turn on a lower rack several inches below the food. 6 For ovens without a preheat indicator light or tone, preheat 10 minutes. When placing and removing cookware, pull the rack out to run even after the oven is complete. How to catch a spillover by placing it toward you begin... Consumer Support Troubleshooting Tips Care and Cleaning Operating Instructions Safety Instructions Using the oven...
Use and Care Manual
Page 8
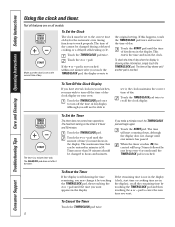
... turn off the time of day shows until the TIMER/CLOCK pad is a minute timer only. pad until one beep every 6 seconds until another pad is showing other information, simply touch the TIMER/CLOCK pad. Not all models. Touch the TIMER/CLOCK pad once to turn off the time of day. The time will not be changed to recall the clock display. Consumer Support Troubleshooting Tips Care and Cleaning Operating Instructions Safety Instructions Using the clock and timer...
... turn off the time of day shows until the TIMER/CLOCK pad is a minute timer only. pad until one beep every 6 seconds until another pad is showing other information, simply touch the TIMER/CLOCK pad. Not all models. Touch the TIMER/CLOCK pad once to turn off the time of day. The time will not be changed to recall the clock display. Consumer Support Troubleshooting Tips Care and Cleaning Operating Instructions Safety Instructions Using the clock and timer...
Use and Care Manual
Page 9
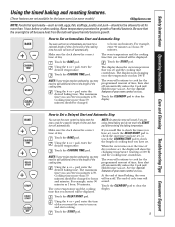
... end of time, then shut off . pad, enter the desired temperature. Using the + or - Safety Instructions Operating Instructions Care and Cleaning Troubleshooting Tips Consumer Support Using the timed baking and roasting features. (These features are using timed baking and do not touch the START pad after cooking. The oven will continue to check the start the oven, cook for the programmed amount of timed baking, the oven will be displayed. NOTE: If your recipe requires preheating, you have set . Using the + or...
... end of time, then shut off . pad, enter the desired temperature. Using the + or - Safety Instructions Operating Instructions Care and Cleaning Troubleshooting Tips Consumer Support Using the timed baking and roasting features. (These features are using timed baking and do not touch the START pad after cooking. The oven will continue to check the start the oven, cook for the programmed amount of timed baking, the oven will be displayed. NOTE: If your recipe requires preheating, you have set . Using the + or...
Use and Care Manual
Page 10
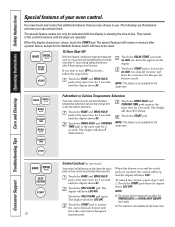
... 2 seconds. Touch the START pad when the display shows LOC OFF. Touch the START pad to turn off ) feature and leave the control set in memory after 3 hours during a broil function. Control Lockout (on some models) Your control will automatically turn OFF this special 10 features mode. When this to use. To unlock the control, repeat steps 1 and 2. Consumer Support Troubleshooting Tips Care and Cleaning Operating Instructions Safety Instructions Special features of...
... 2 seconds. Touch the START pad when the display shows LOC OFF. Touch the START pad to turn off ) feature and leave the control set in memory after 3 hours during a broil function. Control Lockout (on some models) Your control will automatically turn OFF this special 10 features mode. When this to use. To unlock the control, repeat steps 1 and 2. Consumer Support Troubleshooting Tips Care and Cleaning Operating Instructions Safety Instructions Special features of...
Use and Care Manual
Page 12
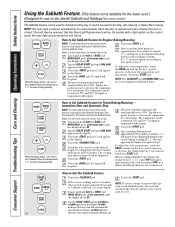
... understand how the oven control works, practice using regular (non-Sabbath) Immediate Start and Automatic Stop before entering Sabbath mode. To adjust the oven temperature, touch the BAKE pad and tap the + or - Consumer Support Troubleshooting Tips Care and Cleaning Operating Instructions Safety Instructions Using the Sabbath Feature. (This feature is baking/roasting. When the display shows ⊃ the oven is not available for the lower oven.) (Designed for Timed Baking/Roasting- Touch and hold both the BAKE and BROIL HI/LO...
... understand how the oven control works, practice using regular (non-Sabbath) Immediate Start and Automatic Stop before entering Sabbath mode. To adjust the oven temperature, touch the BAKE pad and tap the + or - Consumer Support Troubleshooting Tips Care and Cleaning Operating Instructions Safety Instructions Using the Sabbath Feature. (This feature is baking/roasting. When the display shows ⊃ the oven is not available for the lower oven.) (Designed for Timed Baking/Roasting- Touch and hold both the BAKE and BROIL HI/LO...
Use and Care Manual
Page 13
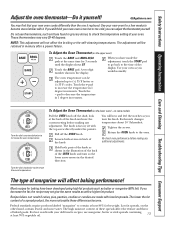
... the lower oven) - Safety Instructions Operating Instructions Care and Cleaning Troubleshooting Tips Consumer Support Adjust the oven thermostat-Do it . Do not use thermometers, such as you can result if cakes, pies, pastries, cookies or candies are made the adjustment, touch the START pad to go back to check the temperature setting of the OVEN knob and turn the knob. Use your oven as those found in the desired direction. When...
... the lower oven) - Safety Instructions Operating Instructions Care and Cleaning Troubleshooting Tips Consumer Support Adjust the oven thermostat-Do it . Do not use thermometers, such as you can result if cakes, pies, pastries, cookies or candies are made the adjustment, touch the START pad to go back to check the temperature setting of the OVEN knob and turn the knob. Use your oven as those found in the desired direction. When...

Use and Care Manual
Page 14
Remove broiler pan, broiler grid, all controls must be set the self-clean cycle. Using the + or - The display will show the clean time remaining. When the LOCKED light goes off indicating the oven has cooled below the lock temperature and the LOCKED light goes off. Using the + or - The display will show the start . Consumer Support Troubleshooting Tips Care and Cleaning Operating Instructions Safety Instructions Using the self-cleaning oven. (on some models) (This feature is not available for the lower oven.) The oven door must be...
Remove broiler pan, broiler grid, all controls must be set the self-clean cycle. Using the + or - The display will show the clean time remaining. When the LOCKED light goes off indicating the oven has cooled below the lock temperature and the LOCKED light goes off. Using the + or - The display will show the start . Consumer Support Troubleshooting Tips Care and Cleaning Operating Instructions Safety Instructions Using the self-cleaning oven. (on some models) (This feature is not available for the lower oven.) The oven door must be...
Use and Care Manual
Page 16
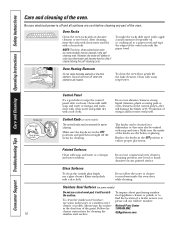
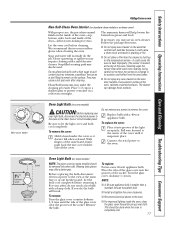
... cleaning. Make sure the inside the oven door while cleaning. Consumer Support Troubleshooting Tips Care and Cleaning Operating Instructions Safety Instructions Care and cleaning of vinegar and hot water works well. To make the racks slide more easily, apply a small amount of vegetable oil or cooking oil to run down inside of the knobs are in color, lose their luster and become hard to wipe the control panel after each use...
... cleaning. Make sure the inside the oven door while cleaning. Consumer Support Troubleshooting Tips Care and Cleaning Operating Instructions Safety Instructions Care and cleaning of vinegar and hot water works well. To make the racks slide more easily, apply a small amount of vegetable oil or cooking oil to run down inside of the knobs are in color, lose their luster and become hard to wipe the control panel after each use...
Use and Care Manual
Page 17
... oven. Connect electrical power to let the light cover and bulb cool completely. Let the oven cool before removing it into the grooves of the socket. Wire cover holder Oven Light Bulb (on some models) should be used. To remove the cover: Hold a hand under the cover so it snaps into place. Let the bulb cool completely before cleaning. Pull wire forward to the oven at the main fuse or circuit breaker panel. Safety Instructions Operating Instructions Care and Cleaning Troubleshooting Tips Consumer Support...
... oven. Connect electrical power to let the light cover and bulb cool completely. Let the oven cool before removing it into the grooves of the socket. Wire cover holder Oven Light Bulb (on some models) should be used. To remove the cover: Hold a hand under the cover so it snaps into place. Let the bulb cool completely before cleaning. Pull wire forward to the oven at the main fuse or circuit breaker panel. Safety Instructions Operating Instructions Care and Cleaning Troubleshooting Tips Consumer Support...
Use and Care Manual
Page 18
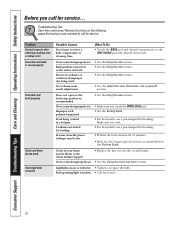
... desired temperature or the SELF CLEAN pad and desired clean time. Cookware not suited for service... Pad operating light is cool. • For best results, use a pan designed for service. Door not open to enter a bake temperature or cleaning time. Oven controls improperly set. Food being cooked in your home may not need to call for broiling. Problem Control signals after entering cooking time or delay start Food does not bake or roast properly Food does not broil properly Clock and timer do not work Oven light...
... desired temperature or the SELF CLEAN pad and desired clean time. Cookware not suited for service... Pad operating light is cool. • For best results, use a pan designed for service. Door not open to enter a bake temperature or cleaning time. Oven controls improperly set. Food being cooked in your home may not need to call for broiling. Problem Control signals after entering cooking time or delay start Food does not bake or roast properly Food does not broil properly Clock and timer do not work Oven light...

Use and Care Manual
Page 19
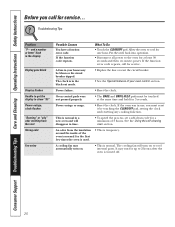
...will not open after a clean cycle Oven controls improperly set . • Replace the fuse or reset the circuit breaker. • See the Using the oven section. Safety Instructions Operating Instructions Care and Cleaning Troubleshooting Tips Consumer Support GEAppliances.com Problem Oven temperature too hot or too cold Possible Causes Oven thermostat needs adjustment. section. Oven controls improperly set . Oven controls improperly set a self-clean operation. Wait until the LOCKED light goes off. Wipe up heavy spillovers before starting the clean cycle. Heavily soiled ovens may...
...will not open after a clean cycle Oven controls improperly set . • Replace the fuse or reset the circuit breaker. • See the Using the oven section. Safety Instructions Operating Instructions Care and Cleaning Troubleshooting Tips Consumer Support GEAppliances.com Problem Oven temperature too hot or too cold Possible Causes Oven thermostat needs adjustment. section. Oven controls improperly set . Oven controls improperly set a self-clean operation. Wait until the LOCKED light goes off. Wipe up heavy spillovers before starting the clean cycle. Heavily soiled ovens may...
Use and Care Manual
Page 20
... turned off. 20 Allow the oven to cool internal parts. A fuse in time. • To speed the process, set a self-clean cycle for service. Power failure. • Reset the clock. See the Using the self-cleaning oven section. If the function error code repeats, call for 3 seconds. Power outage or surge. • Reset the clock. Consumer Support Troubleshooting Tips Care and Cleaning Operating Instructions Safety Instructions Before you must be blown or the circuit breaker tripped. Troubleshooting Tips Problem "F- If the function code...
... turned off. 20 Allow the oven to cool internal parts. A fuse in time. • To speed the process, set a self-clean cycle for service. Power failure. • Reset the clock. See the Using the self-cleaning oven section. If the function error code repeats, call for 3 seconds. Power outage or surge. • Reset the clock. Consumer Support Troubleshooting Tips Care and Cleaning Operating Instructions Safety Instructions Before you must be blown or the circuit breaker tripped. Troubleshooting Tips Problem "F- If the function code...
Installation Instructions
Page 1
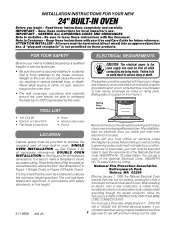
... these instructions with the proper voltage and frequency, and connected to meet the requirements of the National Electrical Code, ANSI/NFPA No. 70-Latest Edition. See dimension E in NEW CONSTRUCTION AND FOUR-WIRE CORD CONNECTION KIT. Note to Installer - This appliance must be hard wired (direct wired) into an approved junction box. If you begin - Read these products. OBSERVE ALL GOVERNING CODES AND ORDINANCES. After installation, LOCATION have the electrical wiring...
... these instructions with the proper voltage and frequency, and connected to meet the requirements of the National Electrical Code, ANSI/NFPA No. 70-Latest Edition. See dimension E in NEW CONSTRUCTION AND FOUR-WIRE CORD CONNECTION KIT. Note to Installer - This appliance must be hard wired (direct wired) into an approved junction box. If you begin - Read these products. OBSERVE ALL GOVERNING CODES AND ORDINANCES. After installation, LOCATION have the electrical wiring...
Installation Instructions
Page 4
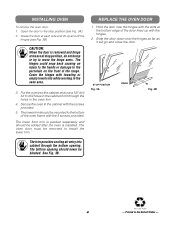
.... The lower trim should be removed to install the lower trim. The oven door must be mounted to drill holes in the cabinet front through the bottom opening should be blocked. Slide the door down onto the hinges as far as it will go and close the door. STOP POSITION Fig. 3A HINGE Fig. 3B The trim provides cooling air entry into the cabinet and use a 1/8" drill bit...
.... The lower trim should be removed to install the lower trim. The oven door must be mounted to drill holes in the cabinet front through the bottom opening should be blocked. Slide the door down onto the hinges as far as it will go and close the door. STOP POSITION Fig. 3A HINGE Fig. 3B The trim provides cooling air entry into the cabinet and use a 1/8" drill bit...

Quick Specs
Page 1
... in inches) KW Rating 240V 7.1 208V 5.3 Breaker Size 30 Amps† †Check local codes for current dimensional data. JRP28BJ GE® 24" Built-In Double Wall Oven Dimensions and Installation Information (in the installation of at ge.com or call GE Answer Center® service, 800.626.2000. above cutout floor 48-1/8 Min. runners 23-1/8 (cutout floor) 21" MIN. door opening allowance CL 2 x 4 or equivalent runners 48-1/8 w/out trim 49-1/4 with product for required breaker size.
... in inches) KW Rating 240V 7.1 208V 5.3 Breaker Size 30 Amps† †Check local codes for current dimensional data. JRP28BJ GE® 24" Built-In Double Wall Oven Dimensions and Installation Information (in the installation of at ge.com or call GE Answer Center® service, 800.626.2000. above cutout floor 48-1/8 Min. runners 23-1/8 (cutout floor) 21" MIN. door opening allowance CL 2 x 4 or equivalent runners 48-1/8 w/out trim 49-1/4 with product for required breaker size.


