
Use and Care Manual
Page 2
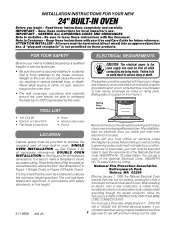
...All other servicing should never be referred to a qualified technician. ■ Have the installer show you are not watching the oven. ■ Always keep combustible wall covering, curtains or drapes a safe distance from your oven. ■ Always keep dish towels, dish cloths, pot holders and other linens a...the circuit breaker. ■ Do not leave children alone-children should be followed to minimize the risk of fire or explosion, electric shock, or to such substances. READ ALL INSTRUCTIONS BEFORE USING. IMPORTANT SAFETY NOTICE The California Safe Drinking Water and Toxic Enforcement...
...All other servicing should never be referred to a qualified technician. ■ Have the installer show you are not watching the oven. ■ Always keep combustible wall covering, curtains or drapes a safe distance from your oven. ■ Always keep dish towels, dish cloths, pot holders and other linens a...the circuit breaker. ■ Do not leave children alone-children should be followed to minimize the risk of fire or explosion, electric shock, or to such substances. READ ALL INSTRUCTIONS BEFORE USING. IMPORTANT SAFETY NOTICE The California Safe Drinking Water and Toxic Enforcement...
Use and Care Manual
Page 4
...part of the oven. COOK MEAT AND POULTRY THOROUGHLY... SELF-CLEANING OVEN (on some models) ■ Do not clean the door gasket. No commercial oven cleaner or oven liner protective coating of electric shock or fire....the oven when not in a risk of any broiler pan out of the door or oven walls. ■ Do not use the oven to rub, damage or move the gasket. ■ Do not use the oven for...parts listed in this Owner's Manual. ■ Do not use aluminum foil to line oven bottoms. Improper installation of aluminum foil may result in use. ■ After broiling, always take any kind should ...
...part of the oven. COOK MEAT AND POULTRY THOROUGHLY... SELF-CLEANING OVEN (on some models) ■ Do not clean the door gasket. No commercial oven cleaner or oven liner protective coating of electric shock or fire....the oven when not in a risk of any broiler pan out of the door or oven walls. ■ Do not use the oven to rub, damage or move the gasket. ■ Do not use the oven for...parts listed in this Owner's Manual. ■ Do not use aluminum foil to line oven bottoms. Improper installation of aluminum foil may result in use. ■ After broiling, always take any kind should ...
Use and Care Manual
Page 17
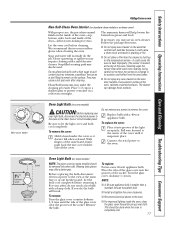
... grip. Be sure to remove the cover. To remove the cover: Hold a hand under the cover so it into place. Connect electrical power to the oven at the main fuse or circuit breaker panel. To remove: Turn the glass cover counterclockwise 1/4 turn . The cleaner can damage these .... Remove the bulb. Heavy spattering or spillovers may also be done when the oven is smaller than a standard 40-watt household bulb. ■ Install and tighten the cover clockwise. ■ Reconnect electrical power to the oven. ■ For improved lighting inside of the door-will help loosen the burned...
... grip. Be sure to remove the cover. To remove the cover: Hold a hand under the cover so it into place. Connect electrical power to the oven at the main fuse or circuit breaker panel. To remove: Turn the glass cover counterclockwise 1/4 turn . The cleaner can damage these .... Remove the bulb. Heavy spattering or spillovers may also be done when the oven is smaller than a standard 40-watt household bulb. ■ Install and tighten the cover clockwise. ■ Reconnect electrical power to the oven. ■ For improved lighting inside of the door-will help loosen the burned...
Use and Care Manual
Page 23
...the shortest period allowed by accident, fire, floods or acts of merchantability or fitness for home use the product. ■ Improper installation, delivery or maintenance. ■ Failure of the product if it is abused, misused, or used commercially. ■ Replacement of... warranty excludes the cost of incidental or consequential damages. Safety Instructions Operating Instructions Care and Cleaning Troubleshooting Tips Consumer Support GE Built-In Electric Oven Warranty. Staple your home. Louisville, KY 40225 23 Please have other than the intended purpose or used for other...
...the shortest period allowed by accident, fire, floods or acts of merchantability or fitness for home use the product. ■ Improper installation, delivery or maintenance. ■ Failure of the product if it is abused, misused, or used commercially. ■ Replacement of... warranty excludes the cost of incidental or consequential damages. Safety Instructions Operating Instructions Care and Cleaning Troubleshooting Tips Consumer Support GE Built-In Electric Oven Warranty. Staple your home. Louisville, KY 40225 23 Please have other than the intended purpose or used for other...
Installation Instructions
Page 1
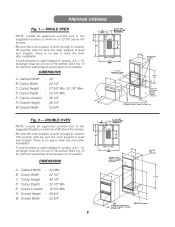
.... • The wall coverings, countertop and cabinets around the oven should be used. connections are no local codes, your oven must be provided to enclose the recessed part of your built-in oven. SINGLE OVEN INSTALLATION - See Figure 1 for future reference. DOUBLE OVEN INSTALLATION - See dimension E in NEW CONSTRUCTION AND FOUR-WIRE CORD CONNECTION KIT. When installing an electric oven in new...
.... • The wall coverings, countertop and cabinets around the oven should be used. connections are no local codes, your oven must be provided to enclose the recessed part of your built-in oven. SINGLE OVEN INSTALLATION - See Figure 1 for future reference. DOUBLE OVEN INSTALLATION - See dimension E in NEW CONSTRUCTION AND FOUR-WIRE CORD CONNECTION KIT. When installing an electric oven in new...
Installation Instructions
Page 2
... Height - 48 3/4" W. There is solid enough to level the oven after installation. Cutout Location - 32 1/2" H. C H E 20" MINIMUM CLEARANCE TO ADJACENT CORNERS, DRAWERS, OR WALLS, ETC. 2" x 4" or EQUIVALENT RUNNERS 2 PREPARE OPENING Fig. 1 - Fig. 2 - DIMENSIONS 9" MIN. 2" x 4" OR EQUIVALENT RUNNERS c c 7" 6" 24" 10" 11" 24" MIN. Be sure the oven support is no way to support 155 pounds. D. Allow minimum...
... Height - 48 3/4" W. There is solid enough to level the oven after installation. Cutout Location - 32 1/2" H. C H E 20" MINIMUM CLEARANCE TO ADJACENT CORNERS, DRAWERS, OR WALLS, ETC. 2" x 4" or EQUIVALENT RUNNERS 2 PREPARE OPENING Fig. 1 - Fig. 2 - DIMENSIONS 9" MIN. 2" x 4" OR EQUIVALENT RUNNERS c c 7" 6" 24" 10" 11" 24" MIN. Be sure the oven support is no way to support 155 pounds. D. Allow minimum...

Installation Instructions
Page 3
... WARNING note. 3. All new construction, mobile homes, recreational vehicles and installations where local codes do not install the oven until a connector of the back wall when the oven is installed. recognized for joining copper to expose the proper length of aluminum STOP!...lead to aluminum and follow the manufacturer's recommended procedure closely. • When installing in a new construction, or • When installing oven in an electrical hazard or fire. ELECTRICAL CONNECTION 1. De-energize oven branch circuit. 2. The current carrying capacity of a conductor is rated at ...
... WARNING note. 3. All new construction, mobile homes, recreational vehicles and installations where local codes do not install the oven until a connector of the back wall when the oven is installed. recognized for joining copper to expose the proper length of aluminum STOP!...lead to aluminum and follow the manufacturer's recommended procedure closely. • When installing in a new construction, or • When installing oven in an electrical hazard or fire. ELECTRICAL CONNECTION 1. De-energize oven branch circuit. 2. The current carrying capacity of a conductor is rated at ...
Installation Instructions
Page 4
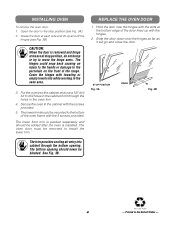
...damage to the bottom of the oven frame with the hinges. 2. Slide the door down onto the hinges as far as it will go and close the door. See Fig. 3B. The oven door must be added after the oven is installed. REPLACE THE OVEN DOOR 1. INSTALLING OVEN To remove the oven door: 1. Open the door... to install the lower trim. Grasp the door at each side and lift up with the 3 screws...
...damage to the bottom of the oven frame with the hinges. 2. Slide the door down onto the hinges as far as it will go and close the door. See Fig. 3B. The oven door must be added after the oven is installed. REPLACE THE OVEN DOOR 1. INSTALLING OVEN To remove the oven door: 1. Open the door... to install the lower trim. Grasp the door at each side and lift up with the 3 screws...
Quick Specs
Page 1
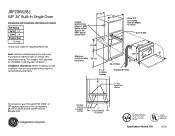
... in inches) KW Rating 240V 3.4 208V 2.6 Breaker Size 20 Amps† †Check local codes for current dimensional data. above cutout floor 10 24 Allow 3/4" for stackable or side-by Underwriters Laboratories 320304 below cutout floor or 44" MIN. R Specification Revised 7/05 Listed by -side installation. JRP20WJ/BJ GE® 24" Built-In Single Oven Dimensions and Installation...
... in inches) KW Rating 240V 3.4 208V 2.6 Breaker Size 20 Amps† †Check local codes for current dimensional data. above cutout floor 10 24 Allow 3/4" for stackable or side-by Underwriters Laboratories 320304 below cutout floor or 44" MIN. R Specification Revised 7/05 Listed by -side installation. JRP20WJ/BJ GE® 24" Built-In Single Oven Dimensions and Installation...


