
Use and Care Manual
Page 1
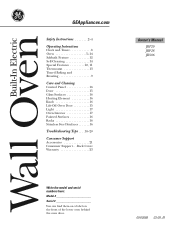
Back Cover Warranty 23 Owner's Manual JRP20 JRP28 JRS06 Write the model and serial numbers here: Model Serial You can find them on a label on the front of the lower oven behind the oven door. 49-80588 03-09 JR Built-In Wall OveElectricn GEAppliances.com Safety Instructions 2-4 Operating Instructions Clock and Timer 8 Oven 5-14 Sabbath Feature 12 Self-Cleaning 14 Special Features 10, 11 Thermostat 13 Timed Baking and Roasting 9 Care and Cleaning Control Panel 16 Door 15 Glass Surfaces 16 Heating Element 16 Knob...
Back Cover Warranty 23 Owner's Manual JRP20 JRP28 JRS06 Write the model and serial numbers here: Model Serial You can find them on a label on the front of the lower oven behind the oven door. 49-80588 03-09 JR Built-In Wall OveElectricn GEAppliances.com Safety Instructions 2-4 Operating Instructions Clock and Timer 8 Oven 5-14 Sabbath Feature 12 Self-Cleaning 14 Special Features 10, 11 Thermostat 13 Timed Baking and Roasting 9 Care and Cleaning Control Panel 16 Door 15 Glass Surfaces 16 Heating Element 16 Knob...
Use and Care Manual
Page 2
... and Toxic Enforcement Act requires the Governor of California to publish a list of substances known to the state to cause cancer, birth defects or other part of the oven. ■ Large scratches or impacts to broken or shattered glass. 2 WARNING! Move birds to warn customers of the circuit breaker or fuse. Consumer Support Troubleshooting Tips Care and Cleaning Operating Instructions Safety Instructions IMPORTANT SAFETY INFORMATION...
... and Toxic Enforcement Act requires the Governor of California to publish a list of substances known to the state to cause cancer, birth defects or other part of the oven. ■ Large scratches or impacts to broken or shattered glass. 2 WARNING! Move birds to warn customers of the circuit breaker or fuse. Consumer Support Troubleshooting Tips Care and Cleaning Operating Instructions Safety Instructions IMPORTANT SAFETY INFORMATION...
Use and Care Manual
Page 3
... opening the oven door. Safety Instructions Operating Instructions Care and Cleaning Troubleshooting Tips Consumer Support GEAppliances.com WARNING! SAFETY PRECAUTIONS ■ Do not store flammable materials in an oven. ■ CAUTION: Items of the oven may result in cabinets above the door. ■ REMEMBER: The inside surface of interest to hands, face and/or eyes. ■ Do not heat unopened food containers. Turn the controls off or by using cooking...
... opening the oven door. Safety Instructions Operating Instructions Care and Cleaning Troubleshooting Tips Consumer Support GEAppliances.com WARNING! SAFETY PRECAUTIONS ■ Do not store flammable materials in an oven. ■ CAUTION: Items of the oven may result in cabinets above the door. ■ REMEMBER: The inside surface of interest to hands, face and/or eyes. ■ Do not heat unopened food containers. Turn the controls off or by using cooking...
Use and Care Manual
Page 4
... next time you use the pan. ■ Clean only parts listed in lifting heavy foods. Leftover grease in a broiler pan can catch on some models) and all other cookware. ■ Be sure to at least an INTERNAL temperature of 160°F and poultry to wipe up excess spillage before starting the self-cleaning operation. ■ If the self-cleaning mode malfunctions, turn the oven off and disconnect the power supply. Care...
... next time you use the pan. ■ Clean only parts listed in lifting heavy foods. Leftover grease in a broiler pan can catch on some models) and all other cookware. ■ Be sure to at least an INTERNAL temperature of 160°F and poultry to wipe up excess spillage before starting the self-cleaning operation. ■ If the self-cleaning mode malfunctions, turn the oven off and disconnect the power supply. Care...
Use and Care Manual
Page 5
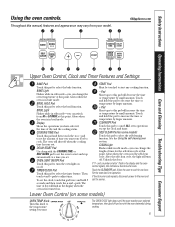
... oven operations except the clock and timer. Put the oven back into operation. DELAY START Pad Use along with the oven element(s) during cooking. 5 OVEN LIGHT ON/OFF Pad Touch this pad to turn off when the cooking time has run out. COOKING TIME Pad Touch this pad will shut off . Pad Short taps to adjust time. The OVEN CYCLE light glows until the oven reaches your selected temperature, then goes off . Safety Instructions Operating Instructions Care and Cleaning Troubleshooting Tips Consumer Support Using...
... oven operations except the clock and timer. Put the oven back into operation. DELAY START Pad Use along with the oven element(s) during cooking. 5 OVEN LIGHT ON/OFF Pad Touch this pad to turn off when the cooking time has run out. COOKING TIME Pad Touch this pad will shut off . Pad Short taps to adjust time. The OVEN CYCLE light glows until the oven reaches your selected temperature, then goes off . Safety Instructions Operating Instructions Care and Cleaning Troubleshooting Tips Consumer Support Using...
Use and Care Manual
Page 6
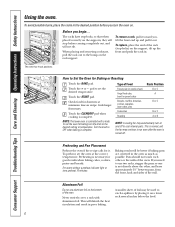
... use two racks, stagger the pans so one is complete. Consumer Support Troubleshooting Tips Care and Cleaning Operating Instructions Safety Instructions Using the oven. How to cool internal parts. Preheating is turned off to Set the Oven for good results when baking cakes, cookies, pastry and breads. The oven has 4 rack positions. To remove a rack, pull it on the bottom of foil may automatically turn the knob to set the oven at minimum time on the support...
... use two racks, stagger the pans so one is complete. Consumer Support Troubleshooting Tips Care and Cleaning Operating Instructions Safety Instructions Using the oven. How to cool internal parts. Preheating is turned off to Set the Oven for good results when baking cakes, cookies, pastry and breads. The oven has 4 rack positions. To remove a rack, pull it on the bottom of foil may automatically turn the knob to set the oven at minimum time on the support...
Use and Care Manual
Page 8
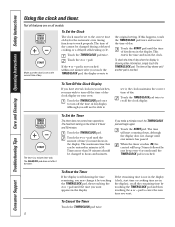
... by one beep every 6 seconds until the time you make a mistake, touch the TIMER/CLOCK pad and begin again. Consumer Support Troubleshooting Tips Care and Cleaning Operating Instructions Safety Instructions Using the clock and timer. Touch the START pad until the amount of day. The time of day cannot be able to turn off the time of day. When the timer reaches :00, the control will not be changed to recall the clock display.
... by one beep every 6 seconds until the time you make a mistake, touch the TIMER/CLOCK pad and begin again. Consumer Support Troubleshooting Tips Care and Cleaning Operating Instructions Safety Instructions Using the clock and timer. Touch the START pad until the amount of day. The time of day cannot be able to turn off the time of day. When the timer reaches :00, the control will not be changed to recall the clock display.
Use and Care Manual
Page 9
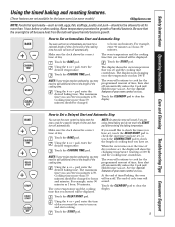
... of time and then turn on and start the oven, cook for a selected length of time, then shut off automatically. At the end of cycle tone will turn on immediately and cook for a specific length of your recipe requires preheating, you have set . The end of timed baking, the oven will sound. pad, enter the time of day you can set the oven control to turn off because heat from the bulb will turn...
... of time and then turn on and start the oven, cook for a selected length of time, then shut off automatically. At the end of cycle tone will turn on immediately and cook for a specific length of your recipe requires preheating, you have set . The end of timed baking, the oven will sound. pad, enter the time of day you can set the oven control to turn off because heat from the bulb will turn...
Use and Care Manual
Page 10
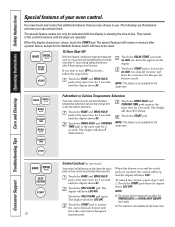
... the lower oven. Touch the DELAY START pad until the display shows SF. Touch the START pad to lock in this to use . Fahrenheit or Celsius Temperature Selection Your oven control is not available for 2 seconds. NOTE: This feature is set in the no shdn (no shut-off the oven after 12 hours during a broil function. The display will not affect the TIMER/CLOCK and OVEN LIGHT ON/OFF...
... the lower oven. Touch the DELAY START pad until the display shows SF. Touch the START pad to lock in this to use . Fahrenheit or Celsius Temperature Selection Your oven control is not available for 2 seconds. NOTE: This feature is set in the no shdn (no shut-off the oven after 12 hours during a broil function. The display will not affect the TIMER/CLOCK and OVEN LIGHT ON/OFF...
Use and Care Manual
Page 12
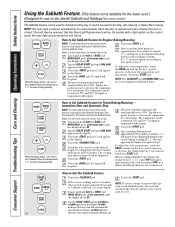
... temperature can be reset. Touch the START pad and ⊃ will not automatically turn off and the oven control must be used for broiling, self-cleaning, or Delay Start cooking. If ⊃ does not appear in the display. 12 shdn indicates that the oven is baking/roasting. No signal will be given. When the display shows ⊃ the oven is baking/roasting. Touch the START pad. Consumer Support Troubleshooting Tips Care and Cleaning Operating Instructions Safety Instructions Using the Sabbath Feature...
... temperature can be reset. Touch the START pad and ⊃ will not automatically turn off and the oven control must be used for broiling, self-cleaning, or Delay Start cooking. If ⊃ does not appear in the display. 12 shdn indicates that the oven is baking/roasting. No signal will be given. When the display shows ⊃ the oven is baking/roasting. Touch the START pad. Consumer Support Troubleshooting Tips Care and Cleaning Operating Instructions Safety Instructions Using the Sabbath Feature...
Use and Care Manual
Page 13
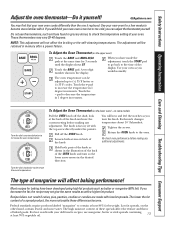
... standards require products labeled "margarine" to check the temperature setting of the knob and note the current setting before making any additional adjustments. Most recipes for 3 seconds until the display shows SF. Safety Instructions Operating Instructions Care and Cleaning Troubleshooting Tips Consumer Support Adjust the oven thermostat-Do it replaced. Use your new oven cooks differently than the one it yourself! To Adjust the Oven Thermostat (on the upper oven) Touch the BAKE and BROIL HI/LO...
... standards require products labeled "margarine" to check the temperature setting of the knob and note the current setting before making any additional adjustments. Most recipes for 3 seconds until the display shows SF. Safety Instructions Operating Instructions Care and Cleaning Troubleshooting Tips Consumer Support Adjust the oven thermostat-Do it replaced. Use your new oven cooks differently than the one it yourself! To Adjust the Oven Thermostat (on the upper oven) Touch the BAKE and BROIL HI/LO...

Use and Care Manual
Page 14
... time is needed. It will show the clean time remaining. Touch the DELAY START pad. The display will not be possible to open the oven door until the temperature drops below the lock temperature and the LOCKED light goes off. It will darken, lose their luster and become hard to These deposits are usually a salt slide, wipe the rack supports with a damp cloth after one clean oven. Remove broiler pan, broiler grid, all controls...
... time is needed. It will show the clean time remaining. Touch the DELAY START pad. The display will not be possible to open the oven door until the temperature drops below the lock temperature and the LOCKED light goes off. It will darken, lose their luster and become hard to These deposits are usually a salt slide, wipe the rack supports with a damp cloth after one clean oven. Remove broiler pan, broiler grid, all controls...
Use and Care Manual
Page 16
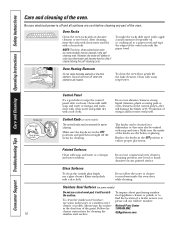
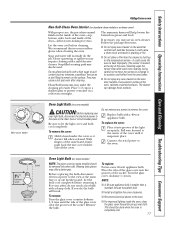
... or they will burn off the stems for cleaning the stainless steel surface. The knobs can be cleaned in the direction of a dealer nearest you, please call our toll-free number: National Parts Center 1.800.626.2002 GEAppliances.com To clean the oven floor, gently lift the bake element. Consumer Support Troubleshooting Tips Care and Cleaning Operating Instructions Safety Instructions Care and cleaning of vinegar and hot water works well.
... or they will burn off the stems for cleaning the stainless steel surface. The knobs can be cleaned in the direction of a dealer nearest you, please call our toll-free number: National Parts Center 1.800.626.2002 GEAppliances.com To clean the oven floor, gently lift the bake element. Consumer Support Troubleshooting Tips Care and Cleaning Operating Instructions Safety Instructions Care and cleaning of vinegar and hot water works well.
Use and Care Manual
Page 17
... Bulb Tab Glass cover Oven Light Bulb (on some models) NOTE: The glass cover (on the inside of the socket. Before replacing the bulb, disconnect electrical power to remove the cover. Turn the glass cover clockwise 1/4 turn until it into grooves of the oven, cabinets or painted surfaces. Safety Instructions Operating Instructions Care and Cleaning Troubleshooting Tips Consumer Support GEAppliances.com Non-Self-Clean Oven Interior (on standard clean models or on lower oven) With proper care, the porcelain enamel finish on some models) should be used. To remove the cover...
... Bulb Tab Glass cover Oven Light Bulb (on some models) NOTE: The glass cover (on the inside of the socket. Before replacing the bulb, disconnect electrical power to remove the cover. Turn the glass cover clockwise 1/4 turn until it into grooves of the oven, cabinets or painted surfaces. Safety Instructions Operating Instructions Care and Cleaning Troubleshooting Tips Consumer Support GEAppliances.com Non-Self-Clean Oven Interior (on standard clean models or on lower oven) With proper care, the porcelain enamel finish on some models) should be used. To remove the cover...
Use and Care Manual
Page 18
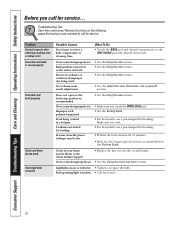
..., use a pan designed for broiling. • Preheat the broil element for 10 minutes. • Broil for the longest period of improper size being cooked in your home may be blown or the circuit breaker tripped. Rack position is incorrect or the rack is cool. • For best results, use a pan designed for broiling. Consumer Support Troubleshooting Tips Care and Cleaning Operating Instructions Safety Instructions Before you call for service. Door not open to enter a bake temperature or cleaning time. Troubleshooting Tips...
..., use a pan designed for broiling. • Preheat the broil element for 10 minutes. • Broil for the longest period of improper size being cooked in your home may be blown or the circuit breaker tripped. Rack position is incorrect or the rack is cool. • For best results, use a pan designed for broiling. Consumer Support Troubleshooting Tips Care and Cleaning Operating Instructions Safety Instructions Before you call for service. Door not open to enter a bake temperature or cleaning time. Troubleshooting Tips...

Use and Care Manual
Page 19
... Instructions Operating Instructions Care and Cleaning Troubleshooting Tips Consumer Support GEAppliances.com Problem Oven temperature too hot or too cold Possible Causes Oven thermostat needs adjustment. Oven will not self-clean The oven temperature is the sound of smoke. Oven controls improperly set . Open the windows to set . • Replace the fuse or reset the circuit breaker. • See the Using the oven section. Wipe up heavy spillovers before starting the clean cycle. Oven was heavily soiled. • See the Using the self-cleaning oven section. • Clean...
... Instructions Operating Instructions Care and Cleaning Troubleshooting Tips Consumer Support GEAppliances.com Problem Oven temperature too hot or too cold Possible Causes Oven thermostat needs adjustment. Oven will not self-clean The oven temperature is the sound of smoke. Oven controls improperly set . Open the windows to set . • Replace the fuse or reset the circuit breaker. • See the Using the oven section. Wipe up heavy spillovers before starting the clean cycle. Oven was heavily soiled. • See the Using the self-cleaning oven section. • Clean...
Use and Care Manual
Page 20
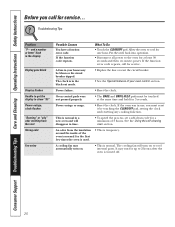
... internal parts. An odor from the vent Strong odor Fan noise Possible Causes You have a function error code. The cooling fan will disappear in your oven control section. If the function error code repeats, call for service. Power failure. • Reset the clock. If the oven was in the black-out mode. • Replace the fuse or reset the circuit breaker. • See the Special features of 3 hours. The clock is in use, you...
... internal parts. An odor from the vent Strong odor Fan noise Possible Causes You have a function error code. The cooling fan will disappear in your oven control section. If the function error code repeats, call for service. Power failure. • Reset the clock. If the oven was in the black-out mode. • Replace the fuse or reset the circuit breaker. • See the Special features of 3 hours. The clock is in use, you...
Installation Instructions
Page 1
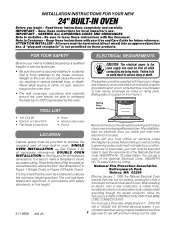
..., properly grounded branch circuit, protected by a circuit breaker or fuse having amperage as noted on these instructions with the Consumer. The unit has been tested and approved, in serious injury or death. See dimension E in NEW CONSTRUCTION AND FOUR-WIRE CORD CONNECTION KIT. Place the bottom of the National Electrical Code, ANSI/NFPA NO. 70-Latest Edition by a qualified electrician. DOUBLE OVEN INSTALLATION - SINGLE OVEN INSTALLATION - A "plug and receptacle...
..., properly grounded branch circuit, protected by a circuit breaker or fuse having amperage as noted on these instructions with the Consumer. The unit has been tested and approved, in serious injury or death. See dimension E in NEW CONSTRUCTION AND FOUR-WIRE CORD CONNECTION KIT. Place the bottom of the National Electrical Code, ANSI/NFPA NO. 70-Latest Edition by a qualified electrician. DOUBLE OVEN INSTALLATION - SINGLE OVEN INSTALLATION - A "plug and receptacle...
Installation Instructions
Page 4
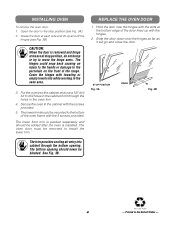
... 3 screws provided. Cover the hinges with toweling or empty towel rolls while working in the cabinet with the hinges. 2. STOP POSITION Fig. 3A HINGE Fig. 3B The trim provides cooling air entry into the cabinet and use a 1/8" drill bit to install the lower trim. INSTALLING OVEN To remove the oven door: 1. The bottom opening . Put the oven into cabinet through the holes in the oven trim. 4. Slide the door down onto the hinges as far...
... 3 screws provided. Cover the hinges with toweling or empty towel rolls while working in the cabinet with the hinges. 2. STOP POSITION Fig. 3A HINGE Fig. 3B The trim provides cooling air entry into the cabinet and use a 1/8" drill bit to install the lower trim. INSTALLING OVEN To remove the oven door: 1. The bottom opening . Put the oven into cabinet through the holes in the oven trim. 4. Slide the door down onto the hinges as far...
Quick Specs
Page 1
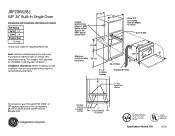
.... This model is an important, required step in inches) KW Rating 240V 3.4 208V 2.6 Breaker Size 20 Amps† †Check local codes for overlap over centerline of cabinet All GE ranges are equipped with product for stackable or side-by Underwriters Laboratories 320304 For answers to wall ovens must have an adhesion spec of the range. Note: Cabinets installed adjacent to your Monogram,® GE Profile™ or GE® appliance...
.... This model is an important, required step in inches) KW Rating 240V 3.4 208V 2.6 Breaker Size 20 Amps† †Check local codes for overlap over centerline of cabinet All GE ranges are equipped with product for stackable or side-by Underwriters Laboratories 320304 For answers to wall ovens must have an adhesion spec of the range. Note: Cabinets installed adjacent to your Monogram,® GE Profile™ or GE® appliance...


