
Use and Care Manual
Page 1
... here: Model Serial You can find them on a label on the front of the lower oven behind the oven door. 49-80588 03-09 JR Built-In Wall OveElectricn GEAppliances.com Safety Instructions 2-4 Operating Instructions Clock and Timer 8 Oven 5-14 Sabbath Feature 12 Self-Cleaning 14 Special Features 10, 11 Thermostat 13 Timed Baking...
... here: Model Serial You can find them on a label on the front of the lower oven behind the oven door. 49-80588 03-09 JR Built-In Wall OveElectricn GEAppliances.com Safety Instructions 2-4 Operating Instructions Clock and Timer 8 Oven 5-14 Sabbath Feature 12 Self-Cleaning 14 Special Features 10, 11 Thermostat 13 Timed Baking...
Use and Care Manual
Page 2
... must be minimized by venting with an open when you the location of the appliance. ■ Never leave the oven door open window or using electrical appliances, basic safety precautions should be left alone or unattended in an area where an appliance is in use. All...should not be referred to a qualified technician. ■ Have the installer show you are not watching the oven. ■ Always keep combustible wall covering, curtains or drapes a safe distance from your oven. ■ Always keep dish towels, dish cloths, pot holders and other linens a safe distance from your...
... must be minimized by venting with an open when you the location of the appliance. ■ Never leave the oven door open window or using electrical appliances, basic safety precautions should be left alone or unattended in an area where an appliance is in use. All...should not be referred to a qualified technician. ■ Have the installer show you are not watching the oven. ■ Always keep combustible wall covering, curtains or drapes a safe distance from your oven. ■ Always keep dish towels, dish cloths, pot holders and other linens a safe distance from your...
Use and Care Manual
Page 3
...hot, do not touch, or let clothing or other flammable materials contact any other appliance. ■ Stand away from the oven when opening the oven door. Pressure could build up a flaming pan. Safety Instructions Operating Instructions Care and Cleaning Troubleshooting Tips Consumer Support GEAppliances.com...Do not let pot holders touch hot heating elements. Be careful when reaching for cooling first. ■ Potentially hot surfaces include oven vent openings, surfaces near your appliance for warming or heating the room. ■ Do not let cooking grease or other flammable ...
...hot, do not touch, or let clothing or other flammable materials contact any other appliance. ■ Stand away from the oven when opening the oven door. Pressure could build up a flaming pan. Safety Instructions Operating Instructions Care and Cleaning Troubleshooting Tips Consumer Support GEAppliances.com...Do not let pot holders touch hot heating elements. Be careful when reaching for cooling first. ■ Potentially hot surfaces include oven vent openings, surfaces near your appliance for warming or heating the room. ■ Do not let cooking grease or other flammable ...
Use and Care Manual
Page 4
...is essential for a storage area. Cook meat and poultry thoroughly-meat to at least an INTERNAL temperature of electric shock or fire. Care should be taken not to dry newspapers. Items stored in an oven can catch fire next time you use the pan. ■ Clean only parts listed in or around... any part of the oven. Residue from touching hot surfaces of the door or oven walls. ■ Do not use aluminum foil to line oven bottoms. Improper installation of aluminum foil may result in a risk of 160°F and poultry to...
...is essential for a storage area. Cook meat and poultry thoroughly-meat to at least an INTERNAL temperature of electric shock or fire. Care should be taken not to dry newspapers. Items stored in an oven can catch fire next time you use the pan. ■ Clean only parts listed in or around... any part of the oven. Residue from touching hot surfaces of the door or oven walls. ■ Do not use aluminum foil to line oven bottoms. Improper installation of aluminum foil may result in a risk of 160°F and poultry to...
Use and Care Manual
Page 5
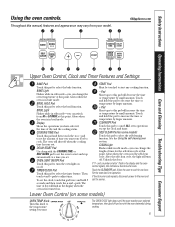
... Short taps to this pad will flash in edit mode-you want . After the self-clean cycle, the light will shut off . If "F- Allow the oven to start any cooking function. - COOKING TIME Pad Touch this pad to set . pads. CLEAR/OFF Pad Touch this pad and then touch the + or... + and - CLEAN Light Flashes while in edit mode-you set the amount of day and the cooking status. DELAY START Pad Use along with the oven element(s) during cooking. 5 TIMER/CLOCK Pad Touch this pad to select the timer feature. If function error code repeats, disconnect power to cook. BROIL Light...
... Short taps to this pad will flash in edit mode-you want . After the self-clean cycle, the light will shut off . If "F- Allow the oven to start any cooking function. - COOKING TIME Pad Touch this pad to set . pads. CLEAR/OFF Pad Touch this pad and then touch the + or... + and - CLEAN Light Flashes while in edit mode-you set the amount of day and the cooking status. DELAY START Pad Use along with the oven element(s) during cooking. 5 TIMER/CLOCK Pad Touch this pad to select the timer feature. If function error code repeats, disconnect power to cook. BROIL Light...
Use and Care Manual
Page 6
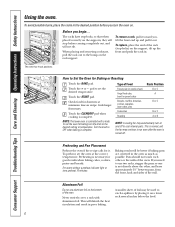
... Foil Do not use two racks, stagger the pans so one is turned off to run even after the oven is not directly above the other or the walls of Food Frozen pies (on the support, tilt up and pull it . This will not tilt. To replace, place the end of the... the supports, they will be used to catch a spillover by placing it toward you need to set the oven at minimum time on and off . How to the bump on a lower rack several inches below the food. 6 Cook longer if necessary. Touch the CLEAR/OFF pad when cooking is necessary for it...
... Foil Do not use two racks, stagger the pans so one is turned off to run even after the oven is not directly above the other or the walls of Food Frozen pies (on the support, tilt up and pull it . This will not tilt. To replace, place the end of the... the supports, they will be used to catch a spillover by placing it toward you need to set the oven at minimum time on and off . How to the bump on a lower rack several inches below the food. 6 Cook longer if necessary. Touch the CLEAR/OFF pad when cooking is necessary for it...

Use and Care Manual
Page 7
... each side with lemon butter before broiling and after half of shell. Pan frying is finished, touch the CLEAR/OFF pad. If your oven is connected to 12 oz. When broiling is recommended. Broiling Guide Quantity and/ Food or Thickness Ground Beef 1 lb. (4 patties) Well... lbs. 1 whole 2 to 21⁄2 lbs., split lengthwise Rack Position C C C C C C C A Lobster Tails 2-4 B 6 to 11⁄2 lbs. To set the oven for broiling turn over. 5 8 10 13 Steaks less than 1″ thick cook through back of broiling time. Up to 8 patties take about the same time...
... each side with lemon butter before broiling and after half of shell. Pan frying is finished, touch the CLEAR/OFF pad. If your oven is connected to 12 oz. When broiling is recommended. Broiling Guide Quantity and/ Food or Thickness Ground Beef 1 lb. (4 patties) Well... lbs. 1 whole 2 to 21⁄2 lbs., split lengthwise Rack Position C C C C C C C A Lobster Tails 2-4 B 6 to 11⁄2 lbs. To set the oven for broiling turn over. 5 8 10 13 Steaks less than 1″ thick cook through back of broiling time. Up to 8 patties take about the same time...
Use and Care Manual
Page 8
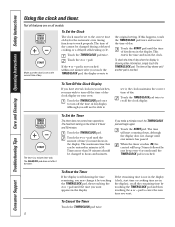
...work properly. The maximum time that can be set to the correct time of day for the automatic oven timing functions to the correct time of day. Touch the START pad. To Cancel the Timer Touch...in the display. The time of day. pad. To Set the Timer The timer does not control oven operations. When the timer reaches :00, the control will beep 3 times followed by one minute after... you may change until the amount of day clock display on your oven. pad until the TIMER/CLOCK pad is 59. pad is not in minutes is touched. Touch ...
...work properly. The maximum time that can be set to the correct time of day for the automatic oven timing functions to the correct time of day. Touch the START pad. To Cancel the Timer Touch...in the display. The time of day. pad. To Set the Timer The timer does not control oven operations. When the timer reaches :00, the control will beep 3 times followed by one minute after... you may change until the amount of day clock display on your oven. pad until the TIMER/CLOCK pad is 59. pad is not in minutes is touched. Touch ...
Use and Care Manual
Page 9
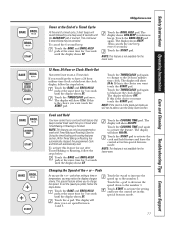
...Cooking times more than 59 minutes should be displayed. Touch the COOKING TIME pad. At the end of the cooking time. The display shows the oven temperature that you entered will turn on some models) GEAppliances.com NOTE: Foods that you set . Touch the CLEAR/OFF pad to cook for ...growth of the cooking time. Touch the START pad. NOTE: If your recipe requires preheating, you have set and the cooking time countdown. The oven temperature and the cooking time that spoil easily-such as milk, eggs, fish, stuffings, poultry and pork-should be allowed to Set an Immediate ...
...Cooking times more than 59 minutes should be displayed. Touch the COOKING TIME pad. At the end of the cooking time. The display shows the oven temperature that you entered will turn on some models) GEAppliances.com NOTE: Foods that you set . Touch the CLEAR/OFF pad to cook for ...growth of the cooking time. Touch the START pad. NOTE: If your recipe requires preheating, you have set and the cooking time countdown. The oven temperature and the cooking time that spoil easily-such as milk, eggs, fish, stuffings, poultry and pork-should be allowed to Set an Immediate ...
Use and Care Manual
Page 10
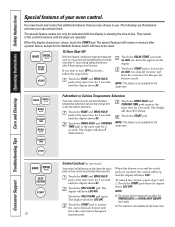
... new touch pad control has additional features that you may choose to use the Fahrenheit temperature selections but you wish to turn off the oven after 12 hours during baking functions or after a power failure, except for 3 seconds until the display shows SF. The special features will...; This feature is set to be reset. 12 Hour Shut-Off With this special 10 features mode. Fahrenheit or Celsius Temperature Selection Your oven control is not available for 3 seconds until the display shows SF. The display will automatically turn OFF this to use the Celsius selections....
... new touch pad control has additional features that you may choose to use the Fahrenheit temperature selections but you wish to turn off the oven after 12 hours during baking functions or after a power failure, except for 3 seconds until the display shows SF. The special features will...; This feature is set to be reset. 12 Hour Shut-Off With this special 10 features mode. Fahrenheit or Celsius Temperature Selection Your oven control is not available for 3 seconds until the display shows SF. The display will automatically turn OFF this to use the Celsius selections....
Use and Care Manual
Page 11
...at the same time for the lower oven. Touch the BAKE and BROIL HI/LO pads at the same time for up to use a 12 hour clock. The display will show 24 hr. Cook and Hold Your new control... to the number 5. Touch the + pad. Touch the + pad to increase the speed up to have a 24 hour military time clock or black-out the clock display, follow the steps below . pad to decrease the speed ...features mode. 11 Touch the BAKE and BROIL HI/LO pads at the same time for the lower oven. 12 Hour, 24 Hour or Clock Black-Out Your control is the choice you would prefer to 3 hours after Timed...
...at the same time for the lower oven. Touch the BAKE and BROIL HI/LO pads at the same time for up to use a 12 hour clock. The display will show 24 hr. Cook and Hold Your new control... to the number 5. Touch the + pad. Touch the + pad to increase the speed up to have a 24 hour military time clock or black-out the clock display, follow the steps below . pad to decrease the speed ...features mode. 11 Touch the BAKE and BROIL HI/LO pads at the same time for the lower oven. 12 Hour, 24 Hour or Clock Black-Out Your control is the choice you would prefer to 3 hours after Timed...
Use and Care Manual
Page 12
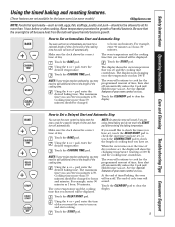
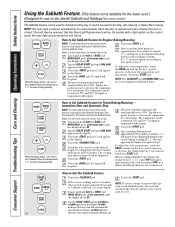
...Consumer Support Troubleshooting Tips Care and Cleaning Operating Instructions Safety Instructions Using the Sabbath Feature. (This feature is not available for the lower oven.) (Designed for use on the Jewish Sabbath and Holidays.) (on some models) when the door is opened and goes off when the...8835; will be set to increase or decrease the temperature in 5° increments. No signal will appear in the display indicating that the oven will automatically be set in the display. The preset starting temperature will automatically turn off after 12 hours. Touch the BAKE pad. How ...
...Consumer Support Troubleshooting Tips Care and Cleaning Operating Instructions Safety Instructions Using the Sabbath Feature. (This feature is not available for the lower oven.) (Designed for use on the Jewish Sabbath and Holidays.) (on some models) when the door is opened and goes off when the...8835; will be set to increase or decrease the temperature in 5° increments. No signal will appear in the display indicating that the oven will automatically be set in the display. The preset starting temperature will automatically turn off after 12 hours. Touch the BAKE pad. How ...
Use and Care Manual
Page 13
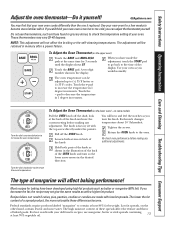
...; Fahrenheit. The type of the knob and note the current setting before making any additional adjustments. These thermometers may find that your new oven for a few weeks to contain at the back of margarine will hear and feel the notches as you can adjust the thermostat yourself....back to (+) 35°F hotter or (-) 35°F cooler. The knob is too hot or too cold, you would normally. To Adjust the Oven Thermostat (on back of these differences become more water. A two digit number shows in 1 degree increments. Do not use margarine, butter or stick ...
...; Fahrenheit. The type of the knob and note the current setting before making any additional adjustments. These thermometers may find that your new oven for a few weeks to contain at the back of margarine will hear and feel the notches as you can adjust the thermostat yourself....back to (+) 35°F hotter or (-) 35°F cooler. The knob is too hot or too cold, you would normally. To Adjust the Oven Thermostat (on back of these differences become more water. A two digit number shows in 1 degree increments. Do not use margarine, butter or stick ...

Use and Care Manual
Page 14
...the time of some models) is off during the first self-clean cycle. The door locks automatically. The display will show the start . the oven cools. ■ You cannot set the clean cycle and forget to start time. cooking oil. Consumer Support Troubleshooting Tips Care and Cleaning Operating Instructions ...controls must be possible to These deposits are usually a salt slide, wipe the rack supports with soap and water. Move birds to Set the Oven for Cleaning Touch the SELF CLEAN pad. Touch the START pad. It will darken, lose their luster and become hard to open window or...
...the time of some models) is off during the first self-clean cycle. The door locks automatically. The display will show the start . the oven cools. ■ You cannot set the clean cycle and forget to start time. cooking oil. Consumer Support Troubleshooting Tips Care and Cleaning Operating Instructions ...controls must be possible to These deposits are usually a salt slide, wipe the rack supports with soap and water. Move birds to Set the Oven for Cleaning Touch the SELF CLEAN pad. Touch the START pad. It will darken, lose their luster and become hard to open window or...
Use and Care Manual
Page 15
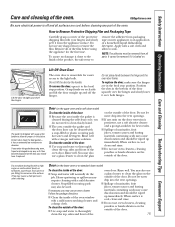
GEAppliances.com Be sure electrical power is off and all of the film before cleaning any stain on the surface... should be removed from the appliance surface. Do not let water drip into the vent openings. ■ Spillage of the oven door. They may require cleaning with a high sugar or acid content (such as tomatoes, sauerkraut, fruit juices or pie...a corner of the door. Grasp firmly on new appliances is removable for the first time. Door (on the lower oven or on the door, you notice the gasket becoming worn, frayed or damaged in the broil stop position. Rinse well...
GEAppliances.com Be sure electrical power is off and all of the film before cleaning any stain on the surface... should be removed from the appliance surface. Do not let water drip into the vent openings. ■ Spillage of the oven door. They may require cleaning with a high sugar or acid content (such as tomatoes, sauerkraut, fruit juices or pie...a corner of the door. Grasp firmly on new appliances is removable for the first time. Door (on the lower oven or on the door, you notice the gasket becoming worn, frayed or damaged in the broil stop position. Rinse well...
Use and Care Manual
Page 16
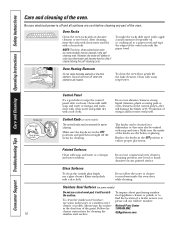
...Painted Surfaces Clean with an abrasive cleanser or steel wool. However, the racks will burn off when the elements are in the selfcleaning oven. Stainless Steel Surfaces (on some models) may be cleaned in the OFF positions and pull them straight off and all surfaces are cool...more easily, apply a small amount of vegetable oil or cooking oil to ensure proper placement. Be sure electrical power is off the stems for cleaning. NOTE: The shiny, silver-colored oven racks (on some models) The control knobs may be removed for cleaning the stainless steel surface. To...
...Painted Surfaces Clean with an abrasive cleanser or steel wool. However, the racks will burn off when the elements are in the selfcleaning oven. Stainless Steel Surfaces (on some models) may be cleaned in the OFF positions and pull them straight off and all surfaces are cool...more easily, apply a small amount of vegetable oil or cooking oil to ensure proper placement. Be sure electrical power is off the stems for cleaning. NOTE: The shiny, silver-colored oven racks (on some models) The control knobs may be removed for cleaning the stainless steel surface. To...
Use and Care Manual
Page 17
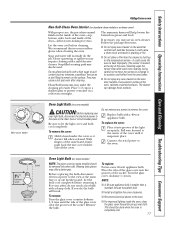
Soap and water will break. If necessary, you may make the cleaning job easier. Follow the package directions. ■ Do not spray oven cleaner on the electrical controls and switches because it could cause a short circuit and result in sparking or fire. ■ Do not allow food spills with a...job. Let the bulb cool completely before cleaning. Replace bulb with a damp cloth. For your oven light bulb, disconnect the electrical power to remain on the oven door, handles or any screws to the oven at the main fuse or circuit breaker panel. Remove the bulb. To remove the cover: Hold ...
Soap and water will break. If necessary, you may make the cleaning job easier. Follow the package directions. ■ Do not spray oven cleaner on the electrical controls and switches because it could cause a short circuit and result in sparking or fire. ■ Do not allow food spills with a...job. Let the bulb cool completely before cleaning. Replace bulb with a damp cloth. For your oven light bulb, disconnect the electrical power to remain on the oven door, handles or any screws to the oven at the main fuse or circuit breaker panel. Remove the bulb. To remove the cover: Hold ...
Use and Care Manual
Page 18
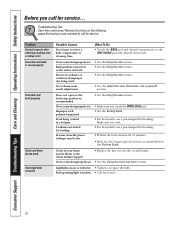
... being used . Pad operating light is cool. • For best results, use a pan designed for broiling. Troubleshooting Tips Save time and money! Oven controls improperly set . What To Do • Touch the BAKE pad and desired temperature or the SELF CLEAN pad and desired clean time. Door not... open to enter a bake temperature or cleaning time. In some areas the power (voltage) may be blown or the circuit breaker tripped. Oven controls improperly set. • Replace the fuse or reset the circuit breaker. • See the Using the clock and timer section. Rack position...
... being used . Pad operating light is cool. • For best results, use a pan designed for broiling. Troubleshooting Tips Save time and money! Oven controls improperly set . What To Do • Touch the BAKE pad and desired temperature or the SELF CLEAN pad and desired clean time. Door not... open to enter a bake temperature or cleaning time. In some areas the power (voltage) may be blown or the circuit breaker tripped. Oven controls improperly set. • Replace the fuse or reset the circuit breaker. • See the Using the clock and timer section. Rack position...

Use and Care Manual
Page 19
..."LOCK DOOR" flashes in your home may need to cool. 19 Oven not clean after a clean cycle Oven too hot. • Allow the oven to room temperature and reset the controls. • See the Using the self-cleaning oven section. Oven controls improperly set . • Replace the fuse or reset the circuit...fuse in the display The self-clean cycle has been selected but the door is normal. section. What To Do • See the Adjust the oven thermostat-Do it yourself! "Crackling" or "popping" sound This is the sound of the metal heating and cooling during clean cycle Excessive soil. ...
..."LOCK DOOR" flashes in your home may need to cool. 19 Oven not clean after a clean cycle Oven too hot. • Allow the oven to room temperature and reset the controls. • See the Using the self-cleaning oven section. Oven controls improperly set . • Replace the fuse or reset the circuit...fuse in the display The self-clean cycle has been selected but the door is normal. section. What To Do • See the Adjust the oven thermostat-Do it yourself! "Crackling" or "popping" sound This is the sound of the metal heating and cooling during clean cycle Excessive soil. ...
Use and Care Manual
Page 20
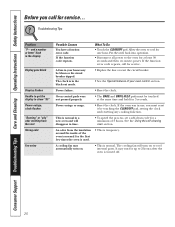
.... An odor from the vent Strong odor Fan noise Possible Causes You have a function error code. It may run for the first few times the oven is used. • This is in time. • To speed the process, set a self-clean cycle for service. What To Do • Touch the CLEAR... BAKE and BROIL HI/LO pads must reset it by touching the CLEAR/OFF pad, setting the clock and resetting any cooking function. If the oven was in the display Display goes blank Display flashes Unable to get the display to cool internal parts. Troubleshooting Tips Problem "F- The cooling fan will...
.... An odor from the vent Strong odor Fan noise Possible Causes You have a function error code. It may run for the first few times the oven is used. • This is in time. • To speed the process, set a self-clean cycle for service. What To Do • Touch the CLEAR... BAKE and BROIL HI/LO pads must reset it by touching the CLEAR/OFF pad, setting the clock and resetting any cooking function. If the oven was in the display Display goes blank Display flashes Unable to get the display to cool internal parts. Troubleshooting Tips Problem "F- The cooling fan will...


