Use and Care Manual
Page 1
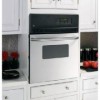
...Wall OveElectricn GEAppliances.com Safety Instructions 2-4 Operating Instructions Clock and Timer 8 Oven 5-14 Sabbath Feature 12 Self-Cleaning 14 Special Features 10, 11 Thermostat 13 Timed Baking and Roasting 9 Care and Cleaning Control Panel 16 Door 15 Glass Surfaces 16 Heating Element 16 Knob 16 Lift-Off Oven... Door 15 Light 17 Oven Interior 17 Painted Surfaces 16 Racks 16 Stainless Steel Surfaces 16 Troubleshooting Tips . . . .18-20 Consumer Support ...
...Wall OveElectricn GEAppliances.com Safety Instructions 2-4 Operating Instructions Clock and Timer 8 Oven 5-14 Sabbath Feature 12 Self-Cleaning 14 Special Features 10, 11 Thermostat 13 Timed Baking and Roasting 9 Care and Cleaning Control Panel 16 Door 15 Glass Surfaces 16 Heating Element 16 Knob 16 Lift-Off Oven... Door 15 Light 17 Oven Interior 17 Painted Surfaces 16 Racks 16 Stainless Steel Surfaces 16 Troubleshooting Tips . . . .18-20 Consumer Support ...
Use and Care Manual
Page 2
...hang on any part of the appliance. ■ Never leave the oven door open window or using electrical appliances, basic safety precautions should not be followed to minimize the risk of fire or explosion, electric shock, or to the fumes given off during the cleaning cycle. ... and requires businesses to a qualified technician. ■ Have the installer show you are not watching the oven. ■ Always keep combustible wall covering, curtains or drapes a safe distance from your oven. ■ Always keep dish towels, dish cloths, pot holders and other linens a safe distance from...
...hang on any part of the appliance. ■ Never leave the oven door open window or using electrical appliances, basic safety precautions should not be followed to minimize the risk of fire or explosion, electric shock, or to the fumes given off during the cleaning cycle. ... and requires businesses to a qualified technician. ■ Have the installer show you are not watching the oven. ■ Always keep combustible wall covering, curtains or drapes a safe distance from your oven. ■ Always keep dish towels, dish cloths, pot holders and other linens a safe distance from...
Use and Care Manual
Page 4
.... ■ If the self-cleaning mode malfunctions, turn the oven off and disconnect the power supply. No commercial oven cleaner or oven liner protective coating of any part of electric shock or fire. SAVE THESE INSTRUCTIONS 4 Residue from touching hot surfaces of the door or oven walls. ■ Do not use . ■ After broiling, always take...
.... ■ If the self-cleaning mode malfunctions, turn the oven off and disconnect the power supply. No commercial oven cleaner or oven liner protective coating of any part of electric shock or fire. SAVE THESE INSTRUCTIONS 4 Residue from touching hot surfaces of the door or oven walls. ■ Do not use . ■ After broiling, always take...
Use and Care Manual
Page 6
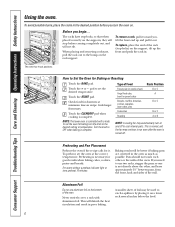
... on the supports, they will stop -locks) on a lower rack several inches below the food. 6 To replace, place the end of the oven. This is not directly above the other or the walls of the rack (stop before you , tilt the front end up the front and push the rack in the... oven as much as possible. Preheating and Pan Placement Preheat the oven if the recipe calls for it toward you turn the oven on. Never entirely cover a rack...
... on the supports, they will stop -locks) on a lower rack several inches below the food. 6 To replace, place the end of the oven. This is not directly above the other or the walls of the rack (stop before you , tilt the front end up the front and push the rack in the... oven as much as possible. Preheating and Pan Placement Preheat the oven if the recipe calls for it toward you turn the oven on. Never entirely cover a rack...
Use and Care Manual
Page 21
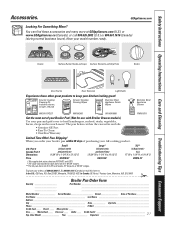
.... GEAppliances.com Looking For Something More? Date: Month Year Signature 21 PM10X311 Small Large* U.S. The pan below catches the excess fats and oils. • Genuine GE Part • Easy To Clean • One-Year Warranty Limited Time Offer! Part # Canada Part # Dimensions WB48X10055 222D2097G001 8-3/4" W x 1-1/4" H x 13-1/2" D ... (PST/HST and GST) * The large (standard) broil pan does not fit in 20"/24" ranges. ** The XL pan does not fit in 24" wall ovens, 27" drop-ins or 20"/24" ranges. You can find these other great products to : ✁ I_n th_e U_.S.:_GE_Pa_rts...
.... GEAppliances.com Looking For Something More? Date: Month Year Signature 21 PM10X311 Small Large* U.S. The pan below catches the excess fats and oils. • Genuine GE Part • Easy To Clean • One-Year Warranty Limited Time Offer! Part # Canada Part # Dimensions WB48X10055 222D2097G001 8-3/4" W x 1-1/4" H x 13-1/2" D ... (PST/HST and GST) * The large (standard) broil pan does not fit in 20"/24" ranges. ** The XL pan does not fit in 24" wall ovens, 27" drop-ins or 20"/24" ranges. You can find these other great products to : ✁ I_n th_e U_.S.:_GE_Pa_rts...
Installation Instructions
Page 1
...and fused to meet the requirements of your oven is securely installed in a hazardous condition. SINGLE OVEN INSTALLATION - You can get a copy of your oven must use a three-wire, single-phase A.C. 208Y/120 Volt or 120/240 Volt, 60 Hertz electrical system. ATTENTION INSTALLER - This appliance must ... NEW 24" BUILT-IN OVEN Before you 31-10658 (456 JR) connect to aluminum wiring, properly installed connections 1 approved for use with safety standards, at or above the floor. Weight on the oven door. • The wall coverings, countertop and cabinets around the oven should be...
...and fused to meet the requirements of your oven is securely installed in a hazardous condition. SINGLE OVEN INSTALLATION - You can get a copy of your oven must use a three-wire, single-phase A.C. 208Y/120 Volt or 120/240 Volt, 60 Hertz electrical system. ATTENTION INSTALLER - This appliance must ... NEW 24" BUILT-IN OVEN Before you 31-10658 (456 JR) connect to aluminum wiring, properly installed connections 1 approved for use with safety standards, at or above the floor. Weight on the oven door. • The wall coverings, countertop and cabinets around the oven should be...
Installation Instructions
Page 2
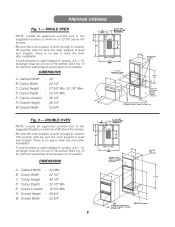
.... Fig. 2 - There is solid enough to level the oven after installation. DIMENSIONS 9" MIN. 2" x 4" OR EQUIVALENT RUNNERS c c 7" 6" 24" 10" 11" 24" MIN. Cutout Width - 22 1/2" C. E. Cutout Width - 22 1/2" C. C 5" Allow 7/8" for overlap of oven E over all edges of 20" for clearance to adjacent corners, drawers, or walls, etc. SINGLE OVEN NOTE: Locate an approved junction box in the suggested...
.... Fig. 2 - There is solid enough to level the oven after installation. DIMENSIONS 9" MIN. 2" x 4" OR EQUIVALENT RUNNERS c c 7" 6" 24" 10" 11" 24" MIN. Cutout Width - 22 1/2" C. E. Cutout Width - 22 1/2" C. C 5" Allow 7/8" for overlap of oven E over all edges of 20" for clearance to adjacent corners, drawers, or walls, etc. SINGLE OVEN NOTE: Locate an approved junction box in the suggested...

Installation Instructions
Page 3
... lead to larger gauge household wiring. If the residence red and black or white leads are U.L. the oven before connecting any electrical supplies. With oven in front of cabinet opening, connect flexible power cable to expose the proper length of the insulation around the wire rather than ...(white) lead to the junction box in such a manner that it will not fit within the connector, do not install the oven until a connector of the back wall when the oven is aluminum, see WARNING note. 3 recognized for joining copper to the residence grounding conductor (green or bare) in a mobile ...
... lead to larger gauge household wiring. If the residence red and black or white leads are U.L. the oven before connecting any electrical supplies. With oven in front of cabinet opening, connect flexible power cable to expose the proper length of the insulation around the wire rather than ...(white) lead to the junction box in such a manner that it will not fit within the connector, do not install the oven until a connector of the back wall when the oven is aluminum, see WARNING note. 3 recognized for joining copper to the residence grounding conductor (green or bare) in a mobile ...
Quick Specs
Page 1
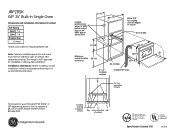
...installation. Note: Cabinets installed adjacent to your Monogram,® GE Profile™ or GE® appliance questions, visit our website at least 194° temperature rating. JRP20SK GE® 24" Built-In Single Oven Dimensions and Installation Information (in the installation of the range...junction box either 5" MIN. Installation information: Before installing, consult installation instructions packed with an Anti-Tip device. For answers to wall ovens must have an adhesion spec of cutout 23-1/2 Min. 27-5/8 23-3/4 Minimum cutout location 32-1/2 from floor 28-1/4 20 25...
...installation. Note: Cabinets installed adjacent to your Monogram,® GE Profile™ or GE® appliance questions, visit our website at least 194° temperature rating. JRP20SK GE® 24" Built-In Single Oven Dimensions and Installation Information (in the installation of the range...junction box either 5" MIN. Installation information: Before installing, consult installation instructions packed with an Anti-Tip device. For answers to wall ovens must have an adhesion spec of cutout 23-1/2 Min. 27-5/8 23-3/4 Minimum cutout location 32-1/2 from floor 28-1/4 20 25...


