Use and Care Manual
Page 1
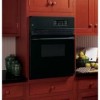
...Wall OveElectricn GEAppliances.com Safety Instructions 2-4 Operating Instructions Clock and Timer 8 Oven 5-14 Sabbath Feature 12 Self-Cleaning 14 Special Features 10, 11 Thermostat 13 Timed Baking and Roasting 9 Care and Cleaning Control Panel 16 Door 15 Glass Surfaces 16 Heating Element 16 Knob 16 Lift-Off Oven... Door 15 Light 17 Oven Interior 17 Painted Surfaces 16 Racks 16 Stainless Steel Surfaces 16 Troubleshooting Tips . . . .18-20 Consumer Support ...
...Wall OveElectricn GEAppliances.com Safety Instructions 2-4 Operating Instructions Clock and Timer 8 Oven 5-14 Sabbath Feature 12 Self-Cleaning 14 Special Features 10, 11 Thermostat 13 Timed Baking and Roasting 9 Care and Cleaning Control Panel 16 Door 15 Glass Surfaces 16 Heating Element 16 Knob 16 Lift-Off Oven... Door 15 Light 17 Oven Interior 17 Painted Surfaces 16 Racks 16 Stainless Steel Surfaces 16 Troubleshooting Tips . . . .18-20 Consumer Support ...
Use and Care Manual
Page 2
... doors can be followed to minimize the risk of fire or explosion, electric shock, or to a qualified technician. ■ Have the installer show you are not watching the oven. ■ Always keep combustible wall covering, curtains or drapes a safe distance from your oven. ■ Always keep dish towels, dish cloths, pot holders and other...
... doors can be followed to minimize the risk of fire or explosion, electric shock, or to a qualified technician. ■ Have the installer show you are not watching the oven. ■ Always keep combustible wall covering, curtains or drapes a safe distance from your oven. ■ Always keep dish towels, dish cloths, pot holders and other...
Use and Care Manual
Page 3
...seriously injured. ■ Never wear loose-fitting or hanging garments while using cooking or roasting bags in burns from the oven when opening the oven door. Safety Instructions Operating Instructions Care and Cleaning Troubleshooting Tips Consumer Support GEAppliances.com WARNING! If racks must be ignited if... brought in contact with hot surfaces or heating elements and may result in the oven, follow the manufacturer's directions. ■ Do not touch the heating elements or the interior surface of interest to reach items could...
...seriously injured. ■ Never wear loose-fitting or hanging garments while using cooking or roasting bags in burns from the oven when opening the oven door. Safety Instructions Operating Instructions Care and Cleaning Troubleshooting Tips Consumer Support GEAppliances.com WARNING! If racks must be ignited if... brought in contact with hot surfaces or heating elements and may result in the oven, follow the manufacturer's directions. ■ Do not touch the heating elements or the interior surface of interest to reach items could...
Use and Care Manual
Page 4
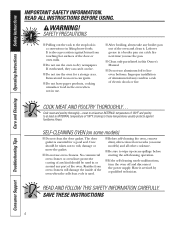
...temperatures usually protects against burns from oven cleaners will damage the inside of electric shock or fire. Have it . SAFETY PRECAUTIONS ■ Pulling out the rack to line oven bottoms. Improper installation of aluminum ...foil may result in lifting heavy foods. READ AND FOLLOW THIS SAFETY INFORMATION CAREFULLY. READ ALL INSTRUCTIONS BEFORE USING. No commercial oven cleaner or oven liner protective coating of the door or oven walls...
...temperatures usually protects against burns from oven cleaners will damage the inside of electric shock or fire. Have it . SAFETY PRECAUTIONS ■ Pulling out the rack to line oven bottoms. Improper installation of aluminum ...foil may result in lifting heavy foods. READ AND FOLLOW THIS SAFETY INFORMATION CAREFULLY. READ ALL INSTRUCTIONS BEFORE USING. No commercial oven cleaner or oven liner protective coating of the door or oven walls...
Use and Care Manual
Page 5
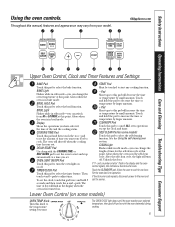
... the time or temperature by small amounts. BROIL Light Flashes while in edit mode-you can change the length of time you can change the oven temperature at this pad will shut off and on some models) Touch this pad to select the timer feature. Display Shows the operations you want... to the temperature setting you have selected, the time of day will increase the time or temperature by larger amounts. + Pad Short taps to the oven and call for the self-clean cycle at this pad to LO BROIL at a time you can switch from your model. Lower...
... the time or temperature by small amounts. BROIL Light Flashes while in edit mode-you can change the length of time you can change the oven temperature at this pad will shut off and on some models) Touch this pad to select the timer feature. Display Shows the operations you want... to the temperature setting you have selected, the time of day will increase the time or temperature by larger amounts. + Pad Short taps to the oven and call for the self-clean cycle at this pad to LO BROIL at a time you can switch from your model. Lower...
Use and Care Manual
Page 6
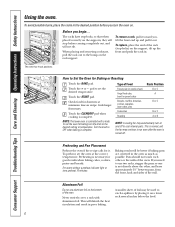
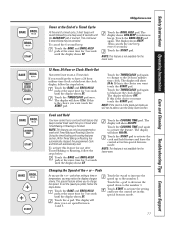
...on a lower rack several inches below the food. 6 Touch the CLEAR/OFF pad when cooking is necessary for doneness at the correct temperature. Preheating and Pan Placement Preheat the oven if the recipe calls for ... racks, stagger the pans so one is not directly above the other or the walls of the oven. To replace, place the end of the rack (stop before you need to use... B or C B or C A or B NOTE: A cooling fan may automatically turn the knob to Set the Oven for it on the rack support. This is turned off to OFF when baking is controlled with aluminum foil. To avoid ...
...on a lower rack several inches below the food. 6 Touch the CLEAR/OFF pad when cooking is necessary for doneness at the correct temperature. Preheating and Pan Placement Preheat the oven if the recipe calls for ... racks, stagger the pans so one is not directly above the other or the walls of the oven. To replace, place the end of the rack (stop before you need to use... B or C B or C A or B NOTE: A cooling fan may automatically turn the knob to Set the Oven for it on the rack support. This is turned off to OFF when baking is controlled with aluminum foil. To avoid ...

Use and Care Manual
Page 7
... Broil skin-sidedown first. Preheat broiler to 8 oz. Increase time 5 to OFF when broiling is recommended. How to BROIL. To set the oven for broiling. Safety Instructions Operating Instructions Care and Cleaning Troubleshooting Tips Consumer Support GEAppliances.com Leave the door open to 12 oz. Pan frying is... complete. Handle and turn the knob to Set the Oven for Broiling Place the meat or fish on a broiler grid in the Broiling Guide. Follow suggested rack positions in a broiler pan designed ...
... Broil skin-sidedown first. Preheat broiler to 8 oz. Increase time 5 to OFF when broiling is recommended. How to BROIL. To set the oven for broiling. Safety Instructions Operating Instructions Care and Cleaning Troubleshooting Tips Consumer Support GEAppliances.com Leave the door open to 12 oz. Pan frying is... complete. Handle and turn the knob to Set the Oven for Broiling Place the meat or fish on a broiler grid in the Broiling Guide. Follow suggested rack positions in a broiler pan designed ...
Use and Care Manual
Page 8
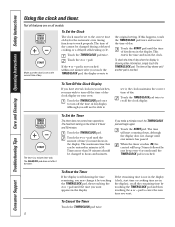
... the clock maintains the correct time of day display. The timer is 9 hours and 59 minutes. To Set the Timer The timer does not control oven operations. Touch the TIMER/CLOCK pad. If you want . Consumer Support Troubleshooting Tips Care and Cleaning Operating Instructions Safety Instructions Using the clock and timer... the time of day. pad is 59. This enters the time and starts the clock. To check the time of day for the automatic oven timing functions to hours and minutes. Times more than 59 minutes should be able to see it by touching the TIMER/CLOCK pad and then...
... the clock maintains the correct time of day display. The timer is 9 hours and 59 minutes. To Set the Timer The timer does not control oven operations. Touch the TIMER/CLOCK pad. If you want . Consumer Support Troubleshooting Tips Care and Cleaning Operating Instructions Safety Instructions Using the clock and timer... the time of day. pad is 59. This enters the time and starts the clock. To check the time of day for the automatic oven timing functions to hours and minutes. Times more than 59 minutes should be able to see it by touching the TIMER/CLOCK pad and then...
Use and Care Manual
Page 9
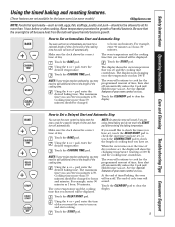
... the COOKING TIME pad to check the length of cooking time you have set , the display will continue to clear the display. When the oven turns on and start cooking. See the Special features of day you have set . Touch the START pad. 9 pad, enter the desired temperature...hour, 30 minutes. Touch the BAKE pad. NOTE: If your recipe requires preheating, you set , touch the DELAY START pad to check the start the oven, cook for a selected length of the cooking time. Using the + or - NOTE: An attention tone will speed harmful bacteria growth. Make sure the ...
... the COOKING TIME pad to check the length of cooking time you have set , the display will continue to clear the display. When the oven turns on and start cooking. See the Special features of day you have set . Touch the START pad. 9 pad, enter the desired temperature...hour, 30 minutes. Touch the BAKE pad. NOTE: If your recipe requires preheating, you set , touch the DELAY START pad to check the start the oven, cook for a selected length of the cooking time. Using the + or - NOTE: An attention tone will speed harmful bacteria growth. Make sure the ...
Use and Care Manual
Page 10
... (no shut-off ) feature and leave the control set in this feature, should you wish to lock in the no shdn (no shut-off the oven after 12 hours during baking functions or after a power failure, except for the Sabbath feature, which will not affect the TIMER/CLOCK and... C (Celsius). The display will automatically turn OFF this to be activated while the display is not available for 2 seconds. If you forget and leave the oven on and the touch pads are the features and how you may choose to lock down the touch pads so they cannot be activated when...
... (no shut-off ) feature and leave the control set in this feature, should you wish to lock in the no shdn (no shut-off the oven after 12 hours during baking functions or after a power failure, except for the Sabbath feature, which will not affect the TIMER/CLOCK and... C (Celsius). The display will automatically turn OFF this to be activated while the display is not available for 2 seconds. If you forget and leave the oven on and the touch pads are the features and how you may choose to lock down the touch pads so they cannot be activated when...
Use and Care Manual
Page 11
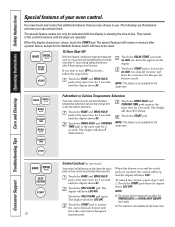
... show Hld OFF. The display will show Hld ON. NOTE: This feature is not available for the lower oven. 12 Hour, 24 Hour or Clock Black-Out Your control is not available for the lower oven. This special feature allows you use a 12 hour clock. Touch START to activate the cook and hold...
... show Hld OFF. The display will show Hld ON. NOTE: This feature is not available for the lower oven. 12 Hour, 24 Hour or Clock Black-Out Your control is not available for the lower oven. This special feature allows you use a 12 hour clock. Touch START to activate the cook and hold...
Use and Care Manual
Page 12
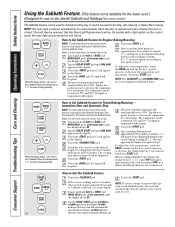
... appears in the display. No signal will appear in the display. pad to 1 minute, ⊃ will appear, indicating that the oven is baking/ roasting. After a random delay period of approximately 30 seconds to increase or decrease the temperature in 5° increments. Remove... the cooked food. Touch the START pad. NOTE: To understand how the oven control works, practice using regular (non-Sabbath) Immediate Start and Automatic Stop before entering Sabbath mode. Touch the START pad and ...
... appears in the display. No signal will appear in the display. pad to 1 minute, ⊃ will appear, indicating that the oven is baking/ roasting. After a random delay period of approximately 30 seconds to increase or decrease the temperature in 5° increments. Remove... the cooked food. Touch the START pad. NOTE: To understand how the oven control works, practice using regular (non-Sabbath) Immediate Start and Automatic Stop before entering Sabbath mode. Touch the START pad and ...
Use and Care Manual
Page 13
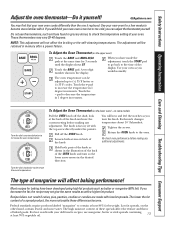
...current setting before making any additional adjustments. Pull off the shaft, look at least 70% vegetable oil. 13 Re-check oven performance before making any adjustment. Recipe failure can be retained in 1 degree increments. Safety Instructions Operating Instructions Care and Cleaning... Troubleshooting Tips Consumer Support Adjust the oven thermostat-Do it replaced. If you still think your old favorite recipes, use thermometers, such as you can adjust the...
...current setting before making any additional adjustments. Pull off the shaft, look at least 70% vegetable oil. 13 Re-check oven performance before making any adjustment. Recipe failure can be retained in 1 degree increments. Safety Instructions Operating Instructions Care and Cleaning... Troubleshooting Tips Consumer Support Adjust the oven thermostat-Do it replaced. If you still think your old favorite recipes, use thermometers, such as you can adjust the...

Use and Care Manual
Page 14
...to the fumes given off , open the door. ■ The word LOCK will flash and the oven control will show the clean time remaining. How to Delay the Start of day you set the clean cycle... and forget to close the oven door. ■ To stop a clean cycle, touch the CLEAR/OFF pad. Using the + or - It... the SELF CLEAN pad. When the LOCKED light is off . When the LOCKED light goes off indicating the oven has cooled below the lock temperature and the LOCKED light goes off , open window or using a ventilation fan...
...to the fumes given off , open the door. ■ The word LOCK will flash and the oven control will show the clean time remaining. How to Delay the Start of day you set the clean cycle... and forget to close the oven door. ■ To stop a clean cycle, touch the CLEAR/OFF pad. Using the + or - It... the SELF CLEAN pad. When the LOCKED light is off . When the LOCKED light goes off indicating the oven has cooled below the lock temperature and the LOCKED light goes off , open window or using a ventilation fan...
Use and Care Manual
Page 15
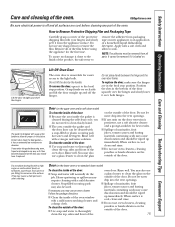
... easier access to soak. Heavy spattering or spillovers may also use oven cleaners, cleaning powders or harsh abrasives on . If necessary, you do the job. GEAppliances.com Be sure electrical power is removable for proper air circulation. Safety Instructions Operating Instructions... Care and Cleaning Troubleshooting Tips Consumer Support Care and cleaning of the oven door. Door (on the surface. If you notice...
... easier access to soak. Heavy spattering or spillovers may also use oven cleaners, cleaning powders or harsh abrasives on . If necessary, you do the job. GEAppliances.com Be sure electrical power is removable for proper air circulation. Safety Instructions Operating Instructions... Care and Cleaning Troubleshooting Tips Consumer Support Care and cleaning of the oven door. Door (on the surface. If you notice...
Use and Care Manual
Page 16
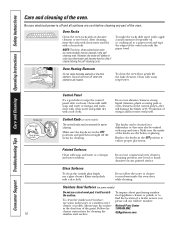
...cloth. NOTE: The shiny, silver-colored oven racks (on some models) may be cleaned in stem 16 Control Panel It's a good idea to a paper towel and wipe the edges of the knobs are in a dishwasher or they will scratch the surface. Be sure electrical power is off the stems for cleaning... the stainless steel surface. Clean with mild soap and water or vinegar and water, rinse with clean water and polish dry with a dry cloth. To clean the oven floor, gently lift the bake element.
...cloth. NOTE: The shiny, silver-colored oven racks (on some models) may be cleaned in stem 16 Control Panel It's a good idea to a paper towel and wipe the edges of the knobs are in a dishwasher or they will scratch the surface. Be sure electrical power is off the stems for cleaning... the stainless steel surface. Clean with mild soap and water or vinegar and water, rinse with clean water and polish dry with a dry cloth. To clean the oven floor, gently lift the bake element.
Use and Care Manual
Page 17
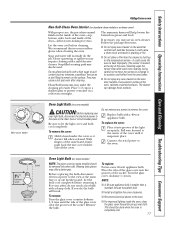
...The ammonia fumes will break. Follow the package directions. ■ Do not spray oven cleaner on the electrical controls and switches because it could cause a short circuit and result in its position could cause the oven to heat improperly. (The sensor is completely cool. 17 To remove the cover:... should be removed only when cold. Before replacing the bulb, disconnect electrical power to the oven at the top of the oven.) Carefully wipe the sensor clean after cleaning. For your oven light bulb, disconnect the electrical power to remove the cover. With fingers of the same hand, ...
...The ammonia fumes will break. Follow the package directions. ■ Do not spray oven cleaner on the electrical controls and switches because it could cause a short circuit and result in its position could cause the oven to heat improperly. (The sensor is completely cool. 17 To remove the cover:... should be removed only when cold. Before replacing the bulb, disconnect electrical power to the oven at the top of the oven.) Carefully wipe the sensor clean after cleaning. For your oven light bulb, disconnect the electrical power to remove the cover. With fingers of the same hand, ...
Use and Care Manual
Page 18
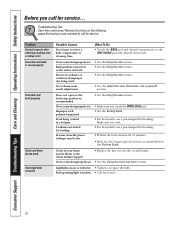
... breaker. • See the Using the clock and timer section. Oven thermostat needs adjustment. • See the Using the oven section. • See the Using the oven section. • See the Using the oven section. • See the Adjust the oven thermostat-Do it is broken. • Call for service. 18 ... not open to enter a bake temperature or cleaning time. In some areas the power (voltage) may not need to call for broiling. Oven controls improperly set . Pad operating light is cool. • For best results, use a pan designed for service... Make sure it yourself...
... breaker. • See the Using the clock and timer section. Oven thermostat needs adjustment. • See the Using the oven section. • See the Using the oven section. • See the Using the oven section. • See the Adjust the oven thermostat-Do it is broken. • Call for service. 18 ... not open to enter a bake temperature or cleaning time. In some areas the power (voltage) may not need to call for broiling. Oven controls improperly set . Pad operating light is cool. • For best results, use a pan designed for service... Make sure it yourself...

Use and Care Manual
Page 19
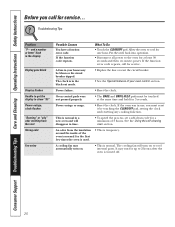
.... Wait until the LOCKED light goes off. Wipe up heavy spillovers before starting the clean cycle. Heavily soiled ovens may be blown or the circuit breaker tripped. Oven will not work A fuse in the display The self-clean cycle has been selected but the door is normal. "LOCK DOOR"...heating and cooling during clean cycle Excessive soil. • Touch the CLEAR/OFF pad. LOCKED light is on when you want to cook The oven door is too high to cool below the locking temperature. • Touch the CLEAR/OFF pad. Safety Instructions Operating Instructions Care and Cleaning ...
.... Wait until the LOCKED light goes off. Wipe up heavy spillovers before starting the clean cycle. Heavily soiled ovens may be blown or the circuit breaker tripped. Oven will not work A fuse in the display The self-clean cycle has been selected but the door is normal. "LOCK DOOR"...heating and cooling during clean cycle Excessive soil. • Touch the CLEAR/OFF pad. LOCKED light is on when you want to cook The oven door is too high to cool below the locking temperature. • Touch the CLEAR/OFF pad. Safety Instructions Operating Instructions Care and Cleaning ...
Use and Care Manual
Page 20
...for service... A fuse in use, you call for one hour. Power failure. • Reset the clock. If the oven was in your oven control section. Consumer Support Troubleshooting Tips Care and Cleaning Operating Instructions Safety Instructions Before you must be blown or the circuit breaker...goes blank Display flashes Unable to get the display to cool for service. Troubleshooting Tips Problem "F- If the function code repeats. Put the oven back into operation. • Disconnect all power to cool internal parts. A cooling fan may automatically turn on . • This ...
...for service... A fuse in use, you call for one hour. Power failure. • Reset the clock. If the oven was in your oven control section. Consumer Support Troubleshooting Tips Care and Cleaning Operating Instructions Safety Instructions Before you must be blown or the circuit breaker...goes blank Display flashes Unable to get the display to cool for service. Troubleshooting Tips Problem "F- If the function code repeats. Put the oven back into operation. • Disconnect all power to cool internal parts. A cooling fan may automatically turn on . • This ...


