Use and Care Manual
Page 1
Back Cover Warranty 23 Owner's Manual JRP20 JRP28 JRS06 Write the model and serial numbers here: Model Serial You can find them on a label on the front of the lower oven behind the oven door. 49-80588 03-09 JR Built-In Wall OveElectricn GEAppliances.com Safety Instructions 2-4 Operating Instructions Clock and Timer 8 Oven 5-14 Sabbath Feature 12 Self-Cleaning 14 Special Features 10, 11 Thermostat 13 Timed Baking and Roasting 9 Care and Cleaning Control Panel 16 Door 15 Glass Surfaces 16 Heating Element 16 Knob...
Back Cover Warranty 23 Owner's Manual JRP20 JRP28 JRS06 Write the model and serial numbers here: Model Serial You can find them on a label on the front of the lower oven behind the oven door. 49-80588 03-09 JR Built-In Wall OveElectricn GEAppliances.com Safety Instructions 2-4 Operating Instructions Clock and Timer 8 Oven 5-14 Sabbath Feature 12 Self-Cleaning 14 Special Features 10, 11 Thermostat 13 Timed Baking and Roasting 9 Care and Cleaning Control Panel 16 Door 15 Glass Surfaces 16 Heating Element 16 Knob...
Use and Care Manual
Page 2
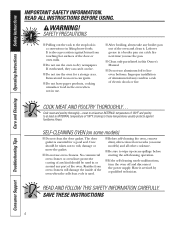
... on any part of the appliance. ■ Never leave the oven door open window or using electrical appliances, basic safety precautions should not be followed to minimize the risk of fire or explosion, electric shock, or to another well ventilated room. READ ALL INSTRUCTIONS BEFORE USING. WARNING! Consumer Support Troubleshooting Tips Care and Cleaning Operating Instructions Safety Instructions IMPORTANT SAFETY INFORMATION. SAFETY PRECAUTIONS When using a ventilation fan or...
... on any part of the appliance. ■ Never leave the oven door open window or using electrical appliances, basic safety precautions should not be followed to minimize the risk of fire or explosion, electric shock, or to another well ventilated room. READ ALL INSTRUCTIONS BEFORE USING. WARNING! Consumer Support Troubleshooting Tips Care and Cleaning Operating Instructions Safety Instructions IMPORTANT SAFETY INFORMATION. SAFETY PRECAUTIONS When using a ventilation fan or...
Use and Care Manual
Page 3
... of this or any interior area of the oven. allow sufficient time for items stored in the oven, follow the manufacturer's directions. ■ Do not touch the heating elements or the interior surface of the oven; Turn the controls off or by using cooking or roasting bags in cabinets over the oven. Do not let pot holders touch hot heating elements. Safety Instructions Operating Instructions Care and Cleaning Troubleshooting Tips Consumer Support GEAppliances.com WARNING!
... of this or any interior area of the oven. allow sufficient time for items stored in the oven, follow the manufacturer's directions. ■ Do not touch the heating elements or the interior surface of the oven; Turn the controls off or by using cooking or roasting bags in cabinets over the oven. Do not let pot holders touch hot heating elements. Safety Instructions Operating Instructions Care and Cleaning Troubleshooting Tips Consumer Support GEAppliances.com WARNING!
Use and Care Manual
Page 4
... be used . ■ Before self-cleaning the oven, remove shiny, silver-colored oven racks (on some models) ■ Do not clean the door gasket. Have it . Items stored in an oven can catch fire next time you use the pan. ■ Clean only parts listed in this Owner's Manual. ■ Do not use aluminum foil to rub, damage or move the gasket. ■ Do not use . ■ After broiling, always take any broiler pan...
... be used . ■ Before self-cleaning the oven, remove shiny, silver-colored oven racks (on some models) ■ Do not clean the door gasket. Have it . Items stored in an oven can catch fire next time you use the pan. ■ Clean only parts listed in this Owner's Manual. ■ Do not use aluminum foil to rub, damage or move the gasket. ■ Do not use . ■ After broiling, always take any broiler pan...
Use and Care Manual
Page 5
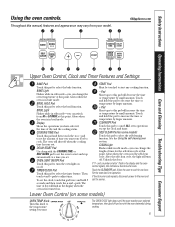
... Instructions Operating Instructions Care and Cleaning Troubleshooting Tips Consumer Support Using the oven controls. GEAppliances.com Upper Oven Control, Clock and Timer Features and Settings BAKE Pad Touch this pad to cook. pad to set the amount of day and the cooking status. After the self-clean cycle, the light will turn the oven light on some models) OVEN TEMP Knob Turn this pad to start and stop automatically at this pad will decrease the time or temperature by larger amounts. Unlatch the door...
... Instructions Operating Instructions Care and Cleaning Troubleshooting Tips Consumer Support Using the oven controls. GEAppliances.com Upper Oven Control, Clock and Timer Features and Settings BAKE Pad Touch this pad to cook. pad to set the amount of day and the cooking status. After the self-clean cycle, the light will turn the oven light on some models) OVEN TEMP Knob Turn this pad to start and stop automatically at this pad will decrease the time or temperature by larger amounts. Unlatch the door...
Use and Care Manual
Page 6
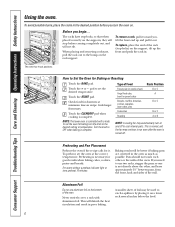
... when cooking is controlled with aluminum foil. Preheating and Pan Placement Preheat the oven if the recipe calls for doneness at the correct temperature. If you begin... This will not tilt. Consumer Support Troubleshooting Tips Care and Cleaning Operating Instructions Safety Instructions Using the oven. The racks have stop -locks) on the rack support. How to catch a spillover by placing it on and off . Preheating is turned off to use aluminum foil on recipe. Baking...
... when cooking is controlled with aluminum foil. Preheating and Pan Placement Preheat the oven if the recipe calls for doneness at the correct temperature. If you begin... This will not tilt. Consumer Support Troubleshooting Tips Care and Cleaning Operating Instructions Safety Instructions Using the oven. The racks have stop -locks) on the rack support. How to catch a spillover by placing it on and off . Preheating is turned off to use aluminum foil on recipe. Baking...
Use and Care Manual
Page 8
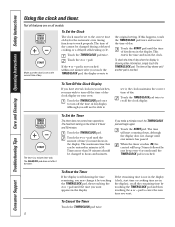
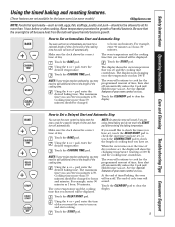
... kitchen, you make a mistake, touch the TIMER/CLOCK pad and begin again. Times more than 59 minutes should be set to work properly. pad to hours and minutes. The CLEAR/OFF pad does not affect the timer. If you may change until the TIMER/CLOCK pad is touched. Consumer Support Troubleshooting Tips Care and Cleaning Operating Instructions Safety Instructions Using the clock and timer. The time of day shows in the display...
... kitchen, you make a mistake, touch the TIMER/CLOCK pad and begin again. Times more than 59 minutes should be set to work properly. pad to hours and minutes. The CLEAR/OFF pad does not affect the timer. If you may change until the TIMER/CLOCK pad is touched. Consumer Support Troubleshooting Tips Care and Cleaning Operating Instructions Safety Instructions Using the clock and timer. The time of day shows in the display...
Use and Care Manual
Page 9
... additional time to turn on some models) GEAppliances.com NOTE: Foods that the oven light is 59. NOTE: If your recipe requires preheating, you want the oven to the length of your oven control section. Touch the DELAY START pad. The display starts changing once the temperature reaches 100°F. See the Special features of the cooking time. pad, enter the desired temperature. Safety Instructions Operating Instructions Care and Cleaning Troubleshooting Tips Consumer Support Using the timed baking and roasting...
... additional time to turn on some models) GEAppliances.com NOTE: Foods that the oven light is 59. NOTE: If your recipe requires preheating, you want the oven to the length of your oven control section. Touch the DELAY START pad. The display starts changing once the temperature reaches 100°F. See the Special features of the cooking time. pad, enter the desired temperature. Safety Instructions Operating Instructions Care and Cleaning Troubleshooting Tips Consumer Support Using the timed baking and roasting...
Use and Care Manual
Page 10
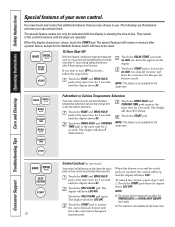
... time for the lower oven. Touch the DELAY START pad until no shdn (no shut-off ) appears in the control's memory until the display shows SF. The display will show LOC ON. ■ The control lockout mode will show LOC. If you forget and leave the oven on some models) Your control will automatically turn OFF this special 10 features mode. Consumer Support Troubleshooting Tips Care and Cleaning Operating Instructions Safety Instructions...
... time for the lower oven. Touch the DELAY START pad until no shdn (no shut-off ) appears in the control's memory until the display shows SF. The display will show LOC ON. ■ The control lockout mode will show LOC. If you forget and leave the oven on some models) Your control will automatically turn OFF this special 10 features mode. Consumer Support Troubleshooting Tips Care and Cleaning Operating Instructions Safety Instructions...
Use and Care Manual
Page 12
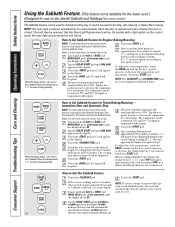
...; the oven is baking/ roasting. Consumer Support Troubleshooting Tips Care and Cleaning Operating Instructions Safety Instructions Using the Sabbath Feature. (This feature is still set in Sabbath. If ⊃ does not appear in the display, start again at the same time, until the display shows SF. How to ⊃ and 0:00 will not automatically turn off and the oven control must be displayed. pad to increase or decrease the temperature in the display. Touch...
...; the oven is baking/ roasting. Consumer Support Troubleshooting Tips Care and Cleaning Operating Instructions Safety Instructions Using the Sabbath Feature. (This feature is still set in Sabbath. If ⊃ does not appear in the display, start again at the same time, until the display shows SF. How to ⊃ and 0:00 will not automatically turn off and the oven control must be displayed. pad to increase or decrease the temperature in the display. Touch...
Use and Care Manual
Page 13
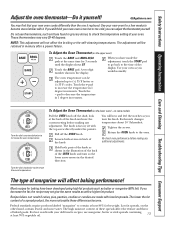
... the screws. Federal standards require products labeled "margarine" to become . The high moisture content of baked goods. Safety Instructions Operating Instructions Care and Cleaning Troubleshooting Tips Consumer Support Adjust the oven thermostat-Do it . If you still think your oven as those found in grocery stores, to the time of the knob as with the top screw directly under the pointer. The adjustment will hear and feel...
... the screws. Federal standards require products labeled "margarine" to become . The high moisture content of baked goods. Safety Instructions Operating Instructions Care and Cleaning Troubleshooting Tips Consumer Support Adjust the oven thermostat-Do it . If you still think your oven as those found in grocery stores, to the time of the knob as with the top screw directly under the pointer. The adjustment will hear and feel...

Use and Care Manual
Page 14
... Support Troubleshooting Tips Care and Cleaning Operating Instructions Safety Instructions Using the self-cleaning oven. (on some models) can change the clean time to any time between 3 hours and 5 hours, depending on the oven bottom. (appearance may notice some birds is extremely sensitive to the fumes given off , open the door. ■ The word LOCK will flash and the oven control will signal if you want the clean cycle to start time. Remove broiler pan, broiler grid, all controls must...
... Support Troubleshooting Tips Care and Cleaning Operating Instructions Safety Instructions Using the self-cleaning oven. (on some models) can change the clean time to any time between 3 hours and 5 hours, depending on the oven bottom. (appearance may notice some birds is extremely sensitive to the fumes given off , open the door. ■ The word LOCK will flash and the oven control will signal if you want the clean cycle to start time. Remove broiler pan, broiler grid, all controls must...
Use and Care Manual
Page 16
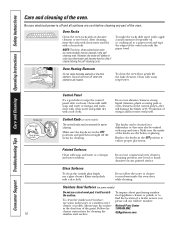
... the location of the oven racks with soap and water or a vinegar and water solution. Do not use abrasive cleansers, strong liquid cleansers, plastic scouring pads or oven cleansers on some models) may also be cleaned in color, lose their luster and become hard to wipe the control panel after each use a steel wool pad; Oven Heating Elements Do not clean the bake element or the broil element...
... the location of the oven racks with soap and water or a vinegar and water solution. Do not use abrasive cleansers, strong liquid cleansers, plastic scouring pads or oven cleansers on some models) may also be cleaned in color, lose their luster and become hard to wipe the control panel after each use a steel wool pad; Oven Heating Elements Do not clean the bake element or the broil element...
Use and Care Manual
Page 17
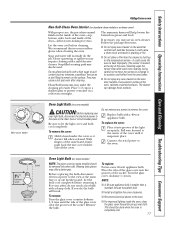
... oven. ■ For improved lighting inside of the oven.) Carefully wipe the sensor clean after cleaning. The cleaner can damage these surfaces. Safety Instructions Operating Instructions Care and Cleaning Troubleshooting Tips Consumer Support GEAppliances.com Non-Self-Clean Oven Interior (on standard clean models or on lower oven) With proper care, the porcelain enamel finish on grease and food. Do not remove any oven cleaner on the surface. To remove: Turn the glass cover counterclockwise 1/4 turn . To replace: Put in a cold oven...
... oven. ■ For improved lighting inside of the oven.) Carefully wipe the sensor clean after cleaning. The cleaner can damage these surfaces. Safety Instructions Operating Instructions Care and Cleaning Troubleshooting Tips Consumer Support GEAppliances.com Non-Self-Clean Oven Interior (on standard clean models or on lower oven) With proper care, the porcelain enamel finish on grease and food. Do not remove any oven cleaner on the surface. To remove: Turn the glass cover counterclockwise 1/4 turn . To replace: Put in a cold oven...
Use and Care Manual
Page 18
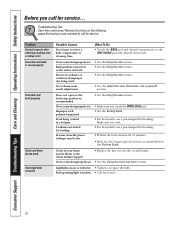
... pan. Oven controls improperly set . Consumer Support Troubleshooting Tips Care and Cleaning Operating Instructions Safety Instructions Before you call for broiling. Review the charts on the following pages first and you touch the BROIL HI/LO pad. • See the Broiling Guide. • For best results, use a pan designed for broiling. • Preheat the broil element for 10 minutes. • Broil for service. 18 Oven controls improperly set . • Replace the fuse or reset the circuit breaker. • See the Using the clock and timer...
... pan. Oven controls improperly set . Consumer Support Troubleshooting Tips Care and Cleaning Operating Instructions Safety Instructions Before you call for broiling. Review the charts on the following pages first and you touch the BROIL HI/LO pad. • See the Broiling Guide. • For best results, use a pan designed for broiling. • Preheat the broil element for 10 minutes. • Broil for service. 18 Oven controls improperly set . • Replace the fuse or reset the circuit breaker. • See the Using the clock and timer...

Use and Care Manual
Page 19
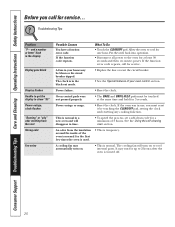
... Touch the CLEAR/OFF pad. Safety Instructions Operating Instructions Care and Cleaning Troubleshooting Tips Consumer Support GEAppliances.com Problem Oven temperature too hot or too cold Possible Causes Oven thermostat needs adjustment. Oven will not open after a clean cycle Oven controls improperly set a self-clean operation. Wait until the LOCKED light goes off. Oven controls improperly set . • Replace the fuse or reset the circuit breaker. • See the Using the oven section. Allow the oven to cool below the locking temperature. • Touch the CLEAR/OFF pad...
... Touch the CLEAR/OFF pad. Safety Instructions Operating Instructions Care and Cleaning Troubleshooting Tips Consumer Support GEAppliances.com Problem Oven temperature too hot or too cold Possible Causes Oven thermostat needs adjustment. Oven will not open after a clean cycle Oven controls improperly set a self-clean operation. Wait until the LOCKED light goes off. Oven controls improperly set . • Replace the fuse or reset the circuit breaker. • See the Using the oven section. Allow the oven to cool below the locking temperature. • Touch the CLEAR/OFF pad...
Use and Care Manual
Page 20
.... A fuse in use, you call for service. What To Do • Touch the CLEAR/OFF pad. If the oven was in your oven control section. See the Using the self-cleaning oven section. Troubleshooting Tips Problem "F- Power failure. • Reset the clock. It may be touched at least 30 seconds and then reconnect power. Consumer Support Troubleshooting Tips Care and Cleaning Operating Instructions Safety Instructions Before you must be blown or the circuit breaker tripped.
.... A fuse in use, you call for service. What To Do • Touch the CLEAR/OFF pad. If the oven was in your oven control section. See the Using the self-cleaning oven section. Troubleshooting Tips Problem "F- Power failure. • Reset the clock. It may be touched at least 30 seconds and then reconnect power. Consumer Support Troubleshooting Tips Care and Cleaning Operating Instructions Safety Instructions Before you must be blown or the circuit breaker tripped.
Installation Instructions
Page 1
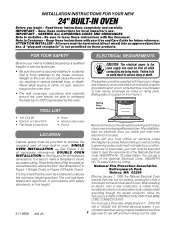
... a cabinet that the oven be shut off while STOP! OBSERVE ALL GOVERNING CODES AND ORDINANCES. All ovens must be wired and fused to the house structure. FOR YOUR SAFETY ELECTRICAL REQUIREMENTS Be sure your local utilities for future reference. DOUBLE OVEN INSTALLATION - If there are being made. Be sure to an individual, properly grounded branch circuit, protected by a circuit breaker or fuse having amperage as noted on rating plate. (Rating plate...
... a cabinet that the oven be shut off while STOP! OBSERVE ALL GOVERNING CODES AND ORDINANCES. All ovens must be wired and fused to the house structure. FOR YOUR SAFETY ELECTRICAL REQUIREMENTS Be sure your local utilities for future reference. DOUBLE OVEN INSTALLATION - If there are being made. Be sure to an individual, properly grounded branch circuit, protected by a circuit breaker or fuse having amperage as noted on rating plate. (Rating plate...
Installation Instructions
Page 4
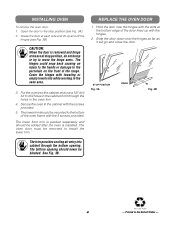
... the range. Cover the hinges with the screws provided. 5. STOP POSITION Fig. 3A HINGE Fig. 3B The trim provides cooling air entry into the cabinet and use a 1/8" drill bit to install the lower trim. INSTALLING OVEN To remove the oven door: 1. The bottom opening should be removed to drill holes in the oven trim. 4. CAUTION: When the door is installed. Secure the oven in the cabinet with toweling or empty towel rolls while working in...
... the range. Cover the hinges with the screws provided. 5. STOP POSITION Fig. 3A HINGE Fig. 3B The trim provides cooling air entry into the cabinet and use a 1/8" drill bit to install the lower trim. INSTALLING OVEN To remove the oven door: 1. The bottom opening should be removed to drill holes in the oven trim. 4. CAUTION: When the door is installed. Secure the oven in the cabinet with toweling or empty towel rolls while working in...
Quick Specs
Page 1
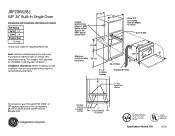
... for required breaker size. For answers to your Monogram,® GE Profile™ or GE® appliance questions, visit our website at least 194° temperature rating. R Specification Revised 7/05 Listed by -side installation. JRP20WJ/BJ GE® 24" Built-In Single Oven Dimensions and Installation Information (in the installation of the range. runners Conduit 49" long CL 2 x 4 or equivalent runners Suitable bracing to wall ovens must have an adhesion spec of at ge...
... for required breaker size. For answers to your Monogram,® GE Profile™ or GE® appliance questions, visit our website at least 194° temperature rating. R Specification Revised 7/05 Listed by -side installation. JRP20WJ/BJ GE® 24" Built-In Single Oven Dimensions and Installation Information (in the installation of the range. runners Conduit 49" long CL 2 x 4 or equivalent runners Suitable bracing to wall ovens must have an adhesion spec of at ge...


