Use and Care Manual
Page 1
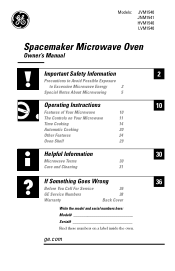
Models: JVM1540 JNM1541 HVM1540 LVM1540 Spacemaker Microwave Oven Owner's Manual Important Safety Information 2 Precautions to Avoid Possible Exposure to Excessive Microwave Energy 2 Special Notes About Microwaving 5 Operating Instructions 10 Features of Your Microwave 10 The ... 24 Oven Shelf 29 Helpful Information 30 Microwave Terms 30 Care and Cleaning 31 If Something Goes Wrong 36 Before You Call For Service 36 GE Service Numbers 38 Warranty Back Cover Write the model and serial numbers here: Model Serial Find these numbers on a label inside the oven...
Models: JVM1540 JNM1541 HVM1540 LVM1540 Spacemaker Microwave Oven Owner's Manual Important Safety Information 2 Precautions to Avoid Possible Exposure to Excessive Microwave Energy 2 Special Notes About Microwaving 5 Operating Instructions 10 Features of Your Microwave 10 The ... 24 Oven Shelf 29 Helpful Information 30 Microwave Terms 30 Care and Cleaning 31 If Something Goes Wrong 36 Before You Call For Service 36 GE Service Numbers 38 Warranty Back Cover Write the model and serial numbers here: Model Serial Find these numbers on a label inside the oven...

Use and Care Manual
Page 38
...year! Get on-line and schedule your service at your warranty expires. 38 GE Consumer Home Services will still be used by people of physical and mental abilities and impairments. You can now download Owner's Manuals, order parts or even schedule service on -line anytime, or call 800....TDD.GEAC (800.833.4322). GE supports the Universal Design concept-products, services and environments that are available while your...
...year! Get on-line and schedule your service at your warranty expires. 38 GE Consumer Home Services will still be used by people of physical and mental abilities and impairments. You can now download Owner's Manuals, order parts or even schedule service on -line anytime, or call 800....TDD.GEAC (800.833.4322). GE supports the Universal Design concept-products, services and environments that are available while your...
Installation Instructions
Page 7
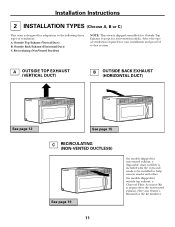
Your Owner's Manual contains the kit number for your oven to the outside, see Hood Exhaust Section for exhaust duct preparation. • When installing the oven beneath smooth, ...
Your Owner's Manual contains the kit number for your oven to the outside, see Hood Exhaust Section for exhaust duct preparation. • When installing the oven beneath smooth, ...
Installation Instructions
Page 11
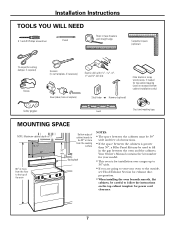
.... On models shipped for outside top exhaust, a Charcoal Filter Accessory Kit is designed for adaptation to the following three types of ventilation required for your Owner's Manual for the kit number.) 11 Installation Instructions 2 INSTALLATION TYPES (Choose A, B or C) This oven is required for the non-vented exhaust. (See your installation and proceed...
.... On models shipped for outside top exhaust, a Charcoal Filter Accessory Kit is designed for adaptation to the following three types of ventilation required for your Owner's Manual for the kit number.) 11 Installation Instructions 2 INSTALLATION TYPES (Choose A, B or C) This oven is required for the non-vented exhaust. (See your installation and proceed...

Installation Instructions
Page 14
... the top cabinet.) 5 Install grease filters. Be sure to the exhaust adaptor. 2 Seal exhaust duct joints using duct tape. 14 Installation Instructions A4. See the Owner's Manual packed with the oven. 1 Extend the house duct down to connect to keep power cord tight.
... the top cabinet.) 5 Install grease filters. Be sure to the exhaust adaptor. 2 Seal exhaust duct joints using duct tape. 14 Installation Instructions A4. See the Owner's Manual packed with the oven. 1 Extend the house duct down to connect to keep power cord tight.

Installation Instructions
Page 18
... of top cabinet. Be sure to the top of the oven completely. (While tightening screws, hold the oven in bottom of mounting plate. See the Owner's Manual packed with the oven. 18 MOUNT THE OVEN FOR EASIER INSTALLATION AND PERSONAL SAFETY, WE RECOMMEND THAT TWO PEOPLE INSTALL THIS OVEN. NOTE: We recommend...
... of top cabinet. Be sure to the top of the oven completely. (While tightening screws, hold the oven in bottom of mounting plate. See the Owner's Manual packed with the oven. 18 MOUNT THE OVEN FOR EASIER INSTALLATION AND PERSONAL SAFETY, WE RECOMMEND THAT TWO PEOPLE INSTALL THIS OVEN. NOTE: We recommend...
Installation Instructions
Page 22
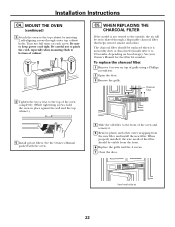
...model is noticeably dirty or discolored (usually after 6 to the top of grille using a Phillips screwdriver. 2 Open the door. 3 Remove the grille. See the Owner's Manual packed with the oven. 4 Slide the old filter to the front of the oven and remove it is not vented to bottom of the filter...the cord, especially when mounting flush to the outside, the air will be visible from the new filter and install the new filter. See your Owner's Manual for the filter kit number. Insert mesh-side up 22 MOUNT THE OVEN (continued) 3 Attach the oven to keep power cord tight. When ...
...model is noticeably dirty or discolored (usually after 6 to the top of grille using a Phillips screwdriver. 2 Open the door. 3 Remove the grille. See the Owner's Manual packed with the oven. 4 Slide the old filter to the front of the oven and remove it is not vented to bottom of the filter...the cord, especially when mounting flush to the outside, the air will be visible from the new filter and install the new filter. See your Owner's Manual for the filter kit number. Insert mesh-side up 22 MOUNT THE OVEN (continued) 3 Attach the oven to keep power cord tight. When ...

Installation Instructions
Page 23
KEEP INSTALLATION INSTRUCTIONS FOR THE LOCAL INSPECTOR'S USE. 5. Replace house fuse or turn breaker back on. 7. Insure proper ground exists before use 23 Make sure the oven has been installed according to 20 amp electrical outlet. Read the Owner's Manual. 2. Remove all packing material from the oven. 3. Install turntable and wheeled ring in cavity. 4. Plug power cord into a dedicated 15 to instructions. 6. Installation Instructions BEFORE YOU USE YOUR OVEN 1.
KEEP INSTALLATION INSTRUCTIONS FOR THE LOCAL INSPECTOR'S USE. 5. Replace house fuse or turn breaker back on. 7. Insure proper ground exists before use 23 Make sure the oven has been installed according to 20 amp electrical outlet. Read the Owner's Manual. 2. Remove all packing material from the oven. 3. Install turntable and wheeled ring in cavity. 4. Plug power cord into a dedicated 15 to instructions. 6. Installation Instructions BEFORE YOU USE YOUR OVEN 1.


