Use and Care Manual
Page 1
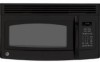
... Spacemaker Microwave Oven Owner's Manual Important Safety Information 2 Precautions to Avoid Possible Exposure to Excessive Microwave Energy 2 Special Notes About Microwaving 5 Operating Instructions 10 Features of Your Microwave 10 The Controls on Your Microwave 11 Time Cooking 14 Automatic Cooking 20 Other Features 24 Oven Shelf 29 Helpful Information 30 Microwave Terms 30 Care and Cleaning 31 If Something Goes Wrong 36 Before You Call For Service 36 GE Service Numbers 38 Warranty Back Cover...
... Spacemaker Microwave Oven Owner's Manual Important Safety Information 2 Precautions to Avoid Possible Exposure to Excessive Microwave Energy 2 Special Notes About Microwaving 5 Operating Instructions 10 Features of Your Microwave 10 The Controls on Your Microwave 11 Time Cooking 14 Automatic Cooking 20 Other Features 24 Oven Shelf 29 Helpful Information 30 Microwave Terms 30 Care and Cleaning 31 If Something Goes Wrong 36 Before You Call For Service 36 GE Service Numbers 38 Warranty Back Cover...

Use and Care Manual
Page 3
... When using a power cord from General Electric. • Do not cover or block any openings on the appliance. • Use this appliance only for its intended use as described in accordance with the provided Installation Instructions. • This over-the-range oven was designed for use over both gas and electric cooking equipment. • Do not operate this manual. See Grounding Instructions section on page 9. • Do not mount this...
... When using a power cord from General Electric. • Do not cover or block any openings on the appliance. • Use this appliance only for its intended use as described in accordance with the provided Installation Instructions. • This over-the-range oven was designed for use over both gas and electric cooking equipment. • Do not operate this manual. See Grounding Instructions section on page 9. • Do not mount this...

Use and Care Manual
Page 4
... water- If materials inside the oven while cooking. - Do not use this appliance outdoors. Remove wire twist-ties and metal handles from heated surfaces. • Do not immerse power cord or plug in water. • To reduce the risk of the microwave oven surface when the microwave oven is opened, the fire may spread. - Do not use . - If the door is in operation. 4 SAVE THESE INSTRUCTIONS IMPORTANT SAFETY INFORMATION...
... water- If materials inside the oven while cooking. - Do not use this appliance outdoors. Remove wire twist-ties and metal handles from heated surfaces. • Do not immerse power cord or plug in water. • To reduce the risk of the microwave oven surface when the microwave oven is opened, the fire may spread. - Do not use . - If the door is in operation. 4 SAVE THESE INSTRUCTIONS IMPORTANT SAFETY INFORMATION...
Use and Care Manual
Page 8
... compliance with a lid, a cookie sheet or a flat tray. • Use care when cleaning the vent fan filter. Take care to prevent the starting and spreading of accidental cooking fires while the vent fan is in this manual. Do not allow grease to build up on the microwave or the fan filter. • In the event of a grease fire on the surface units below the microwave oven, smother a flaming pan on surface...
... compliance with a lid, a cookie sheet or a flat tray. • Use care when cleaning the vent fan filter. Take care to prevent the starting and spreading of accidental cooking fires while the vent fan is in this manual. Do not allow grease to build up on the microwave or the fan filter. • In the event of a grease fire on the surface units below the microwave oven, smother a flaming pan on surface...

Use and Care Manual
Page 9
... electrical outlet to prevent flickering of lights, blowing of fuse or tripping of -cabinet installation. Consult a qualified electrician or service technician if the grounding instructions are used when the microwave oven cannot be grounded. For best operation, plug this appliance. not for the electric current. For installation between cabinets only; Each kit contains two 3″-wide filler panels. This appliance is your GE supplier, or see GE Service Numbers. Recirculating Charcoal Filter Kit Filter kits...
... electrical outlet to prevent flickering of lights, blowing of fuse or tripping of -cabinet installation. Consult a qualified electrician or service technician if the grounding instructions are used when the microwave oven cannot be grounded. For best operation, plug this appliance. not for the electric current. For installation between cabinets only; Each kit contains two 3″-wide filler panels. This appliance is your GE supplier, or see GE Service Numbers. Recirculating Charcoal Filter Kit Filter kits...

Use and Care Manual
Page 10
... latched for cleaning. 8 Convenience Guide. 9 Shelf (on some models). Food microwaves best when placed directly on the inside wall of Your Microwave (Throughout this manual, features and appearance may be removed for the microwave to be viewed while keeping microwaves confined in place when using the oven. Screen allows cooking to operate. 2 Door Latches. 3 Window with Metal Shield. Located on the turntable. 10 Rating Plate. The door must be in the oven. 4 Touch Control Panel. 5 Cooktop Light. 6 Grease Filter. 7 Removable Turntable. Lets you microwave several foods...
... latched for cleaning. 8 Convenience Guide. 9 Shelf (on some models). Food microwaves best when placed directly on the inside wall of Your Microwave (Throughout this manual, features and appearance may be removed for the microwave to be viewed while keeping microwaves confined in place when using the oven. Screen allows cooking to operate. 2 Door Latches. 3 Window with Metal Shield. Located on the turntable. 10 Rating Plate. The door must be in the oven. 4 Touch Control Panel. 5 Cooktop Light. 6 Grease Filter. 7 Removable Turntable. Lets you microwave several foods...

Use and Care Manual
Page 20
... foods. 1 Press COOK. 2 Select food type 1-9 (see the Cook Guide below). 3 Enter weight in ounces. 4 Press START. Cover with lid or vented plastic wrap. Cover with lid or vented plastic wrap. Cover with vented plastic wrap or wax paper. Drain and stir at signal. Comments Use microwave-safe casserole or bowl. Follow package instructions to 16 oz. Operating Instructions Convenience Features Cook (On some models) The Cook feature automatically sets the cooking times and power levels...
... foods. 1 Press COOK. 2 Select food type 1-9 (see the Cook Guide below). 3 Enter weight in ounces. 4 Press START. Cover with lid or vented plastic wrap. Cover with lid or vented plastic wrap. Cover with vented plastic wrap or wax paper. Drain and stir at signal. Comments Use microwave-safe casserole or bowl. Follow package instructions to 16 oz. Operating Instructions Convenience Features Cook (On some models) The Cook feature automatically sets the cooking times and power levels...

Use and Care Manual
Page 21
... oven starts immediately. On some models, press START. 4 Press 2 or 3 to Use the Popcorn Feature 1 Follow package instructions, using the Reheat feature. Works best with lid or vented plastic wrap. Reheat NOTE: Do not use the metal shelf when cooking popcorn. Press number pad 2 or 3. On some models, the oven starts immediately. 3 On some models, the serving size for one serving (see Reheat Guide below). Cover with lid or vented plastic wrap. Cover...
... oven starts immediately. On some models, press START. 4 Press 2 or 3 to Use the Popcorn Feature 1 Follow package instructions, using the Reheat feature. Works best with lid or vented plastic wrap. Reheat NOTE: Do not use the metal shelf when cooking popcorn. Press number pad 2 or 3. On some models, the oven starts immediately. 3 On some models, the serving size for one serving (see Reheat Guide below). Cover with lid or vented plastic wrap. Cover...

Use and Care Manual
Page 33
... fuse or circuit breaker panel or pull the plug. 2 Remove the top grille by taking out the 2 screws that holds the bulb. Screws 4 Remove the light cover located near the center of the light cover and lower the cover. 3 Be sure the bulb(s) to the oven. Replace with the same size and type bulb. 4 Raise the light shield and replace the screw. Light cover 3 Remove the charcoal filter (if present) to the oven. 33 Connect electrical power to access the light cover (see Remove Charcoal Filter...
... fuse or circuit breaker panel or pull the plug. 2 Remove the top grille by taking out the 2 screws that holds the bulb. Screws 4 Remove the light cover located near the center of the light cover and lower the cover. 3 Be sure the bulb(s) to the oven. Replace with the same size and type bulb. 4 Raise the light shield and replace the screw. Light cover 3 Remove the charcoal filter (if present) to the oven. 33 Connect electrical power to access the light cover (see Remove Charcoal Filter...
Use and Care Manual
Page 35
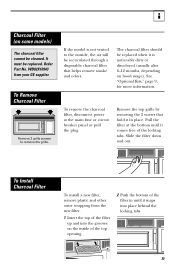
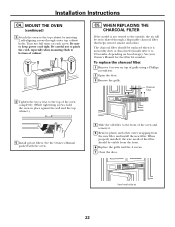
... Kits," page 9, for more information. Remove the top grille by removing the 2 screws that helps remove smoke and odors. To remove the charcoal filter, disconnect power at the bottom until it snaps into the grooves on the inside of the top opening. 2 Push the bottom of the filter up and into place behind the locking tabs. 35 Pull the filter at the main fuse or circuit breaker panel...
... Kits," page 9, for more information. Remove the top grille by removing the 2 screws that helps remove smoke and odors. To remove the charcoal filter, disconnect power at the bottom until it snaps into the grooves on the inside of the top opening. 2 Push the bottom of the filter up and into place behind the locking tabs. 35 Pull the filter at the main fuse or circuit breaker panel...

Use and Care Manual
Page 36
... may be blown or the circuit breaker tripped. "PLEASE INSERT PROBE" appears on display "SENSOR ERROR" appears on display. • Use Time Cook to heat for about 3 seconds to unlock the control. may make the oven floor get warm. • This is normal. Steam was opened before steam could be turned off while the microwave is operating. Power surge. • Unplug the microwave oven, then plug it back...
... may be blown or the circuit breaker tripped. "PLEASE INSERT PROBE" appears on display "SENSOR ERROR" appears on display. • Use Time Cook to heat for about 3 seconds to unlock the control. may make the oven floor get warm. • This is normal. Steam was opened before steam could be turned off while the microwave is operating. Power surge. • Unplug the microwave oven, then plug it back...

Use and Care Manual
Page 40
...; Product not accessible to provide required service. • Replacement of house fuses or resetting of circuit breakers. • Replacement of the cooktop light bulbs. • Failure of charge, all labor and related service costs to your home. Warrantor: General Electric Company. What Is Covered LIMITED ONE-YEAR WARRANTY For one -year warranty, GE will replace any succeeding owner for products purchased for service. Louisville, KY 40225 DE68-03467A 49...
...; Product not accessible to provide required service. • Replacement of house fuses or resetting of circuit breakers. • Replacement of the cooktop light bulbs. • Failure of charge, all labor and related service costs to your home. Warrantor: General Electric Company. What Is Covered LIMITED ONE-YEAR WARRANTY For one -year warranty, GE will replace any succeeding owner for products purchased for service. Louisville, KY 40225 DE68-03467A 49...
Installation Instructions
Page 2
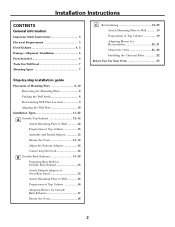
Installation Instructions CONTENTS General information Important Safety Instructions 3 Electrical Requirements 3 Hood Exhaust 4, 5 Damage-Shipment/Installation 6 Parts Included 6 Tools You Will Need 7 Mounting Space 7 Step-by-step installation guide Placement of Mounting Plate 8-10 Removing the Mounting Plate 8 Finding the Wall Studs 8 Determining Wall Plate Location 9 Aligning the Wall Plate 10 Installation Types 11-22 A Outside Top Exhaust 12-14 Attach Mounting Plate to Wall 12 Preparation of Top Cabinet 13 Assemble and Install Adaptor 13 Mount the Oven 13, 14 Adjust the ...
Installation Instructions CONTENTS General information Important Safety Instructions 3 Electrical Requirements 3 Hood Exhaust 4, 5 Damage-Shipment/Installation 6 Parts Included 6 Tools You Will Need 7 Mounting Space 7 Step-by-step installation guide Placement of Mounting Plate 8-10 Removing the Mounting Plate 8 Finding the Wall Studs 8 Determining Wall Plate Location 9 Aligning the Wall Plate 10 Installation Types 11-22 A Outside Top Exhaust 12-14 Attach Mounting Plate to Wall 12 Preparation of Top Cabinet 13 Assemble and Install Adaptor 13 Mount the Oven 13, 14 Adjust the ...
Installation Instructions
Page 3
... supporting the cabinet load, in addition to minimize the possibility of the National Electrical Code or the prevailing local code for this appliance. Installation Instructions IMPORTANT SAFETY INSTRUCTIONS This product requires a three-prong grounded outlet. The power supply cord and plug should be connected to avoid severe or fatal shock injury. CAUTION: For personal safety, remove house fuse or open circuit breaker before use The power cord...
... supporting the cabinet load, in addition to minimize the possibility of the National Electrical Code or the prevailing local code for this appliance. Installation Instructions IMPORTANT SAFETY INSTRUCTIONS This product requires a three-prong grounded outlet. The power supply cord and plug should be connected to avoid severe or fatal shock injury. CAUTION: For personal safety, remove house fuse or open circuit breaker before use The power cord...
Installation Instructions
Page 7
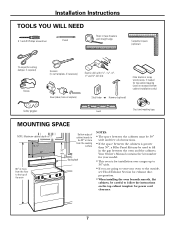
...) Filler blocks or scrap wood pieces, if needed for top cabinet spacing (used to follow the instructions on recessed bottom cabinet installations only) Safety goggles Level Duct and masking tape MOUNTING SPACE NOTE: Maximum cabinet depth is for installation over ranges up to 36″ wide. • If you are going to vent your model. • This oven is 13". 16-1⁄4″ 30″...
...) Filler blocks or scrap wood pieces, if needed for top cabinet spacing (used to follow the instructions on recessed bottom cabinet installations only) Safety goggles Level Duct and masking tape MOUNTING SPACE NOTE: Maximum cabinet depth is for installation over ranges up to 36″ wide. • If you are going to vent your model. • This oven is 13". 16-1⁄4″ 30″...
Installation Instructions
Page 8
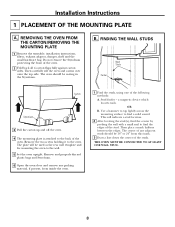
... ONE WALL STUD. 8 The oven should be used as the rear wall template and for mounting the oven to find a solid sound. B. Remove and properly discard plastic bags and Styrofoam. 6 Open the oven door and remove any adjacent studs should be resting in the Styrofoam. REMOVING THE OVEN FROM THE CARTON/REMOVING THE MOUNTING PLATE 1 Remove the turntable, installation instructions, filters, exhaust adaptor, damper, shelf and the small hardware bag. Use a hammer to tap lightly across the mounting surface...
... ONE WALL STUD. 8 The oven should be used as the rear wall template and for mounting the oven to find a solid sound. B. Remove and properly discard plastic bags and Styrofoam. 6 Open the oven door and remove any adjacent studs should be resting in the Styrofoam. REMOVING THE OVEN FROM THE CARTON/REMOVING THE MOUNTING PLATE 1 Remove the turntable, installation instructions, filters, exhaust adaptor, damper, shelf and the small hardware bag. Use a hammer to tap lightly across the mounting surface...
Installation Instructions
Page 11
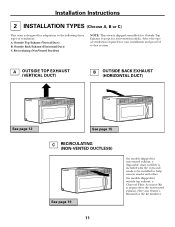
... page 15 C RECIRCULATING (NON-VENTED DUCTLESS) See page 19 On models shipped for non-vented exhaust, a disposable charcoal filter is shipped assembled for Outside Top Exhaust (except for non-vented models). Outside Top Exhaust (Vertical Duct) B. Installation Instructions 2 INSTALLATION TYPES (Choose A, B or C) This oven is required for the non-vented exhaust. (See your installation and proceed to that section. On models shipped for outside top exhaust, a Charcoal Filter Accessory Kit is designed for your Owner's Manual for the kit number.) 11
... page 15 C RECIRCULATING (NON-VENTED DUCTLESS) See page 19 On models shipped for non-vented exhaust, a disposable charcoal filter is shipped assembled for Outside Top Exhaust (except for non-vented models). Outside Top Exhaust (Vertical Duct) B. Installation Instructions 2 INSTALLATION TYPES (Choose A, B or C) This oven is required for the non-vented exhaust. (See your installation and proceed to that section. On models shipped for outside top exhaust, a Charcoal Filter Accessory Kit is designed for your Owner's Manual for the kit number.) 11

Installation Instructions
Page 14
... wall and the top cabinet.) 5 Install grease filters. Turn two full turns on each screw. See the Owner's Manual packed with the oven. 1 Extend the house duct down to connect to keep power cord tight. Be sure to the exhaust adaptor. 2 Seal exhaust duct joints using duct tape. 14 Installation Instructions A4. MOUNT THE OVEN (continued) Cabinet Front Cabinet Bottom Shelf Filler Block Equivalent to the house duct. ADJUST THE EXHAUST ADAPTOR Open the top cabinet and adjust the exhaust...
... wall and the top cabinet.) 5 Install grease filters. Turn two full turns on each screw. See the Owner's Manual packed with the oven. 1 Extend the house duct down to connect to keep power cord tight. Be sure to the exhaust adaptor. 2 Seal exhaust duct joints using duct tape. 14 Installation Instructions A4. MOUNT THE OVEN (continued) Cabinet Front Cabinet Bottom Shelf Filler Block Equivalent to the house duct. ADJUST THE EXHAUST ADAPTOR Open the top cabinet and adjust the exhaust...

Installation Instructions
Page 18
... of mounting plate. Be careful not to pinch the cord, especially when mounting flush to bottom of cabinet. 4 Tighten the two screws to the top cabinet by pulling cord. 1 Lift oven, tilt it tight throughout Steps 1-3. Installation Instructions B6. NOTE: We recommend using filler blocks if the cabinet front hangs below the cabinet bottom shelf. See the Owner's Manual packed with the oven. 18 NOTE: When mounting the oven, thread power cord...
... of mounting plate. Be careful not to pinch the cord, especially when mounting flush to bottom of cabinet. 4 Tighten the two screws to the top cabinet by pulling cord. 1 Lift oven, tilt it tight throughout Steps 1-3. Installation Instructions B6. NOTE: We recommend using filler blocks if the cabinet front hangs below the cabinet bottom shelf. See the Owner's Manual packed with the oven. 18 NOTE: When mounting the oven, thread power cord...
Installation Instructions
Page 22
... front of grille using a Phillips screwdriver. 2 Open the door. 3 Remove the grille. Be careful not to pinch the cord, especially when mounting flush to the outside, the air will be replaced when it is not vented to bottom of the oven completely. (While tightening screws, hold the oven in place against the wall and the top cabinet.) 5 Install grease filters. See your Owner's Manual for the filter kit number. MOUNT THE OVEN (continued) 3 Attach the oven to the...
... front of grille using a Phillips screwdriver. 2 Open the door. 3 Remove the grille. Be careful not to pinch the cord, especially when mounting flush to the outside, the air will be replaced when it is not vented to bottom of the oven completely. (While tightening screws, hold the oven in place against the wall and the top cabinet.) 5 Install grease filters. See your Owner's Manual for the filter kit number. MOUNT THE OVEN (continued) 3 Attach the oven to the...


