
User Manual
Page 3
... not working properly, or if it has been damaged or dropped. Do not repair or replace any service, disconnect the cooking center power supply at the household distribution panel by removing the fuse or switching off the circuit breaker. s Use this appliance only for its intended use corrosive chemicals or vapors in this appliance outdoors. s Do not operate this manual. s Don't allow anyone to heat or cook food...
... not working properly, or if it has been damaged or dropped. Do not repair or replace any service, disconnect the cooking center power supply at the household distribution panel by removing the fuse or switching off the circuit breaker. s Use this appliance only for its intended use corrosive chemicals or vapors in this appliance outdoors. s Do not operate this manual. s Don't allow anyone to heat or cook food...
User Manual
Page 4
... by covering pan completely with hot heating elements and may result in contact with well-fitting lid, cookie sheet or flat tray. Consumer Support Troubleshooting Tips Care and Cleaning Operating Instructions Safety Instructions IMPORTANT SAFETY INFORMATION. WARNING! s Do not store flammable material in the vicinity of this or any interior area of interest to these temperatures usually protects against foodborne illness. 4 s Do not store or use...
... by covering pan completely with hot heating elements and may result in contact with well-fitting lid, cookie sheet or flat tray. Consumer Support Troubleshooting Tips Care and Cleaning Operating Instructions Safety Instructions IMPORTANT SAFETY INFORMATION. WARNING! s Do not store flammable material in the vicinity of this or any interior area of interest to these temperatures usually protects against foodborne illness. 4 s Do not store or use...
User Manual
Page 5
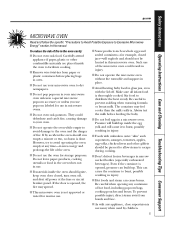
..., cooking pouches and boxes. s Hot foods and steam can build up inside the oven to facilitate cooking. s Do not pop popcorn in your oven. s Do not overcook potatoes. s Remove wire twist-ties from hands and face. s This microwave oven is opened , the fire may feel cooler than the milk really is done. Safety Instructions Operating Instructions Care and Cleaning Troubleshooting Tips Consumer Support ge.com MICROWAVE OVEN Read and follow the specific "Precautions...
..., cooking pouches and boxes. s Hot foods and steam can build up inside the oven to facilitate cooking. s Do not pop popcorn in your oven. s Do not overcook potatoes. s Remove wire twist-ties from hands and face. s This microwave oven is opened , the fire may feel cooler than the milk really is done. Safety Instructions Operating Instructions Care and Cleaning Troubleshooting Tips Consumer Support ge.com MICROWAVE OVEN Read and follow the specific "Precautions...

User Manual
Page 6
... or ignite. Most glass casseroles, cooking dishes, measuring cups, custard cups, pottery or china dinnerware which may be used in the microwave oven, keep the foil at least 1 inch away from the heated food. s Do not use . Paper products containing nylon or nylon filaments should not be microwaved in a microwave oven. TV dinners may also ignite. Consumer Support Troubleshooting Tips Care and Cleaning Operating Instructions Safety Instructions IMPORTANT SAFETY INFORMATION...
... or ignite. Most glass casseroles, cooking dishes, measuring cups, custard cups, pottery or china dinnerware which may be used in the microwave oven, keep the foil at least 1 inch away from the heated food. s Do not use . Paper products containing nylon or nylon filaments should not be microwaved in a microwave oven. TV dinners may also ignite. Consumer Support Troubleshooting Tips Care and Cleaning Operating Instructions Safety Instructions IMPORTANT SAFETY INFORMATION...
User Manual
Page 8
.... s Light reflection around the door. s Some TV-radio interference might be noticed while using your oven. s foil that a microwaved cake is the microwave term for more even heating and reduce cooking time. It's similar to food (upturned edges act like antennas). s metal such as roasts or cakes are allowed to stand to finish cooking or to escape. Consumer Support Troubleshooting Tips Care and Cleaning Operating Instructions Safety Instructions...
.... s Light reflection around the door. s Some TV-radio interference might be noticed while using your oven. s foil that a microwaved cake is the microwave term for more even heating and reduce cooking time. It's similar to food (upturned edges act like antennas). s metal such as roasts or cakes are allowed to stand to finish cooking or to escape. Consumer Support Troubleshooting Tips Care and Cleaning Operating Instructions Safety Instructions...
User Manual
Page 9
... self-clean cycle is essential for a fan-a fan noise should be used . Items stored in this Owner's Manual. READ AND FOLLOW THIS SAFETY INFORMATION CAREFULLY. The door gasket is used in or around any broiler pan out of fat drippings in a risk of grease or spillovers, which escapes can catch on some models) and all other cookware. I Keep the cooking center clean and free of accumulations of electric...
... self-clean cycle is essential for a fan-a fan noise should be used . Items stored in this Owner's Manual. READ AND FOLLOW THIS SAFETY INFORMATION CAREFULLY. The door gasket is used in or around any broiler pan out of fat drippings in a risk of grease or spillovers, which escapes can catch on some models) and all other cookware. I Keep the cooking center clean and free of accumulations of electric...
User Manual
Page 11
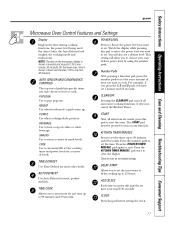
... Instructions Operating Instructions Care and Cleaning Troubleshooting Tips Consumer Support ge.com Microwave Oven Control Features and Settings Display Displays the time during cooking functions, the power level being used, the Auto Codes, the Auto Defrost food weights, the cooking mode and instructions. On the lower oven, time is shown in minutes and seconds (1:30 is increased 30 seconds. POPCORN Use to set the timer up . REHEAT Use when foods need a quick warm up to turn on any time up to set . POTATO Use when cooking whole potatoes. TIME...
... Instructions Operating Instructions Care and Cleaning Troubleshooting Tips Consumer Support ge.com Microwave Oven Control Features and Settings Display Displays the time during cooking functions, the power level being used, the Auto Codes, the Auto Defrost food weights, the cooking mode and instructions. On the lower oven, time is shown in minutes and seconds (1:30 is increased 30 seconds. POPCORN Use to set the timer up . REHEAT Use when foods need a quick warm up to turn on any time up to set . POTATO Use when cooking whole potatoes. TIME...
User Manual
Page 23
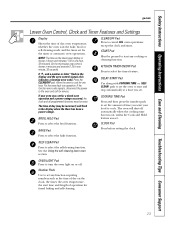
... for service. NOTE: The time on the clock, the timer, the oven temperature, the start time and length of operation for the timer or automatic oven operations. Press the CLEAR/OFF pad. CLOCK Pad Press before setting the clock. Allow the oven to select the timer feature. COOKING TIME Pad Press and then press the number pads to select the bake function. Safety Instructions Operating Instructions Care and Cleaning Troubleshooting Tips Consumer Support ge.com Lower Oven Control, Clock and Timer Features and Settings Display...
... for service. NOTE: The time on the clock, the timer, the oven temperature, the start time and length of operation for the timer or automatic oven operations. Press the CLEAR/OFF pad. CLOCK Pad Press before setting the clock. Allow the oven to select the timer feature. COOKING TIME Pad Press and then press the number pads to select the bake function. Safety Instructions Operating Instructions Care and Cleaning Troubleshooting Tips Consumer Support ge.com Lower Oven Control, Clock and Timer Features and Settings Display...
User Manual
Page 26
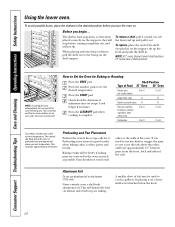
... oven is preheated and the display will disturb the heat circulation and result in . The control will beep when the oven is turned off to the bump on and off . Preheating is not directly above the other or the walls of the oven. Aluminum Foil Do not use two shelves, stagger the pans so one is necessary for Baking or Roasting Press the BAKE pad. Never entirely cover...
... oven is preheated and the display will disturb the heat circulation and result in . The control will beep when the oven is turned off to the bump on and off . Preheating is not directly above the other or the walls of the oven. Aluminum Foil Do not use two shelves, stagger the pans so one is necessary for Baking or Roasting Press the BAKE pad. Never entirely cover...
User Manual
Page 27
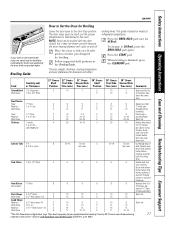
... well because the oven heating element will affect broiling times. Ham Slices 1″ thick (precooked) B 8 8 D 8 8 Increase time 5 to 12 oz. The size, weight, thickness, starting temperature and your oven is popular, but it to only 140°F means some food poisoning 27 organisms may survive." (Source: Safe Food Book. To change to 1/2″ thick C 5 5 E 5 5 Handle and turn over. Broiling Guide How to Set the Oven for cut-up chicken. Beef...
... well because the oven heating element will affect broiling times. Ham Slices 1″ thick (precooked) B 8 8 D 8 8 Increase time 5 to 12 oz. The size, weight, thickness, starting temperature and your oven is popular, but it to only 140°F means some food poisoning 27 organisms may survive." (Source: Safe Food Book. To change to 1/2″ thick C 5 5 E 5 5 Handle and turn over. Broiling Guide How to Set the Oven for cut-up chicken. Beef...
User Manual
Page 28
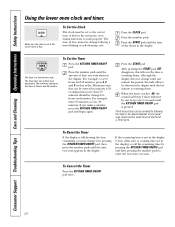
... beep 3 times followed by one minute has passed. Consumer Support Troubleshooting Tips Care and Cleaning Operating Instructions Safety Instructions Using the lower oven clock and timer. Press the CLOCK pad. this tells you want . The timer is 9 hours and 59 minutes. If you want shows in the display. To Reset the Timer If the display is counting down . To Set the Clock The clock must be changed during a timed baking or self-cleaning cycle. The timer does not control oven operations...
... beep 3 times followed by one minute has passed. Consumer Support Troubleshooting Tips Care and Cleaning Operating Instructions Safety Instructions Using the lower oven clock and timer. Press the CLOCK pad. this tells you want . The timer is 9 hours and 59 minutes. If you want shows in the display. To Reset the Timer If the display is counting down . To Set the Clock The clock must be changed during a timed baking or self-cleaning cycle. The timer does not control oven operations...

User Manual
Page 29
Safety Instructions Operating Instructions Care and Cleaning Troubleshooting Tips Consumer Support Using the lower oven timed baking and roasting features. (on some models) ge.com NOTE: Foods that spoil easily-such as 1 hr. 30 minutes. At the end of time, then shut off automatically, unless the Cook and Hold feature was set the oven control to delay-start the oven, cook for more than 1 hour before or after entering the baking temperature. The oven temperature and the cooking time that can...
Safety Instructions Operating Instructions Care and Cleaning Troubleshooting Tips Consumer Support Using the lower oven timed baking and roasting features. (on some models) ge.com NOTE: Foods that spoil easily-such as 1 hr. 30 minutes. At the end of time, then shut off automatically, unless the Cook and Hold feature was set the oven control to delay-start the oven, cook for more than 1 hour before or after entering the baking temperature. The oven temperature and the cooking time that can...
User Manual
Page 31
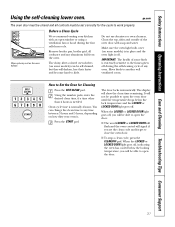
... set correctly for Cleaning Press the SELF CLEAN pad. When the LOCKED or LOCKED DOOR light goes off . Safety Instructions Operating Instructions Care and Cleaning Troubleshooting Tips Consumer Support Using the self-cleaning lower oven. Make sure the oven light bulb cover (on some birds is . Using the number pads, enter the desired clean time, if a time other than 4 hours is normally 4 hours. The door locks automatically. It will not be set the clean cycle and forget to open the door. 31 Remove broiler pan, broiler grid, all controls...
... set correctly for Cleaning Press the SELF CLEAN pad. When the LOCKED or LOCKED DOOR light goes off . Safety Instructions Operating Instructions Care and Cleaning Troubleshooting Tips Consumer Support Using the self-cleaning lower oven. Make sure the oven light bulb cover (on some birds is . Using the number pads, enter the desired clean time, if a time other than 4 hours is normally 4 hours. The door locks automatically. It will not be set the clean cycle and forget to open the door. 31 Remove broiler pan, broiler grid, all controls...
User Manual
Page 32
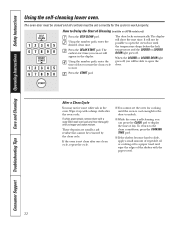
Consumer Support Troubleshooting Tips Care and Cleaning Operating Instructions Safety Instructions Using the self-cleaning lower oven. Using the number pads, enter the desired clean time. When the LOCKED or LOCKED DOOR light goes off . s If the shelves become hard to slide, apply a small amount of vegetable oil or cooking oil to Delay the Start of the shelves with the paper towel. 32 How to a paper towel and wipe the edges of Cleaning (available...
Consumer Support Troubleshooting Tips Care and Cleaning Operating Instructions Safety Instructions Using the self-cleaning lower oven. Using the number pads, enter the desired clean time. When the LOCKED or LOCKED DOOR light goes off . s If the shelves become hard to slide, apply a small amount of vegetable oil or cooking oil to Delay the Start of the shelves with the paper towel. 32 How to a paper towel and wipe the edges of Cleaning (available...
User Manual
Page 33
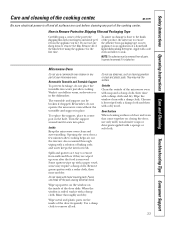
... your microwave oven. Safety Instructions Operating Instructions Care and Cleaning Troubleshooting Tips Consumer Support Care and cleaning of the protective shipping film with a sudsy cloth, then rinse and dry. How to remove all parts. Do not use a commercial oven cleaner on new appliances is best wiped with a damp cloth and then with metal scouring pads. Wash it seats into water just after cooking helps air out the interior...
... your microwave oven. Safety Instructions Operating Instructions Care and Cleaning Troubleshooting Tips Consumer Support Care and cleaning of the protective shipping film with a sudsy cloth, then rinse and dry. How to remove all parts. Do not use a commercial oven cleaner on new appliances is best wiped with a damp cloth and then with metal scouring pads. Wash it seats into water just after cooking helps air out the interior...
User Manual
Page 35
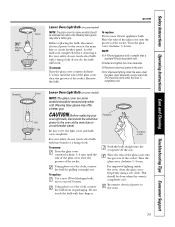
... improved lighting inside the oven, clean the glass cover frequently using a wet cloth. If you do not touch a hot bulb with bare fingers. CAUTION: Before replacing your oven light bulb, disconnect the electrical power to the oven at the main fuse or circuit breaker panel. Be sure to the oven. Turn the glass cover clockwise 1/4 turn until the tabs of the glass cover clear the grooves of the socket. Remove the bulb. s For improved lighting inside the oven, clean the glass cover frequently using a wet...
... improved lighting inside the oven, clean the glass cover frequently using a wet cloth. If you do not touch a hot bulb with bare fingers. CAUTION: Before replacing your oven light bulb, disconnect the electrical power to the oven at the main fuse or circuit breaker panel. Be sure to the oven. Turn the glass cover clockwise 1/4 turn until the tabs of the glass cover clear the grooves of the socket. Remove the bulb. s For improved lighting inside the oven, clean the glass cover frequently using a wet...
User Manual
Page 37
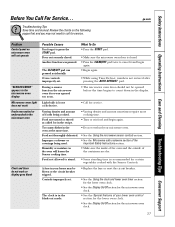
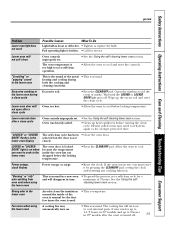
... cooking time. Controls improperly set . Food not turned or stirred as called for service. Humidity or moisture in the oven will not operate "SENSOR ERROR" appears in the microwave oven display Microwave oven light does not work Foods overcooked or undercooked in the microwave oven Clock and timer do not work or display goes blank Possible Causes You forgot to count down in the black-out mode. • Replace the fuse or reset the circuit breaker. • See the Using...
... cooking time. Controls improperly set . Food not turned or stirred as called for service. Humidity or moisture in the oven will not operate "SENSOR ERROR" appears in the microwave oven display Microwave oven light does not work Foods overcooked or undercooked in the microwave oven Clock and timer do not work or display goes blank Possible Causes You forgot to count down in the black-out mode. • Replace the fuse or reset the circuit breaker. • See the Using...
User Manual
Page 38
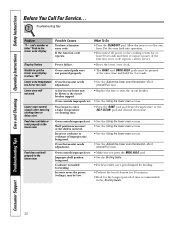
... improper size being used . Oven thermostat needs adjustment. • See the Using the lower oven section. • See the Using the lower oven section. • See the Using the lower oven section. • See the Adjust the lower oven thermostat-Do it yourself! section. Allow the oven to enter a bake temperature or cleaning time. • Press the BAKE pad and desired temperature or the SELF CLEAN pad and desired clean time. Consumer Support Troubleshooting Tips Care and Cleaning Operating Instructions Safety Instructions Before...
... improper size being used . Oven thermostat needs adjustment. • See the Using the lower oven section. • See the Using the lower oven section. • See the Using the lower oven section. • See the Adjust the lower oven thermostat-Do it yourself! section. Allow the oven to enter a bake temperature or cleaning time. • Press the BAKE pad and desired temperature or the SELF CLEAN pad and desired clean time. Consumer Support Troubleshooting Tips Care and Cleaning Operating Instructions Safety Instructions Before...
User Manual
Page 39
...; Close the oven door. minimum of time. If the oven was heavily soiled. • See the Using the self-cleaning lower oven section. • Clean up the excess soil and reset the clean cycle. Fan noise when using the lower oven This is normal. Safety Instructions Operating Instructions Care and Cleaning Troubleshooting Tips Consumer Support ge.com Problem Lower oven light does not work Possible Causes What To Do Light bulb is temporary. Lower oven door will not self-clean Oven controls improperly set a self-clean cycle for...
...; Close the oven door. minimum of time. If the oven was heavily soiled. • See the Using the self-cleaning lower oven section. • Clean up the excess soil and reset the clean cycle. Fan noise when using the lower oven This is normal. Safety Instructions Operating Instructions Care and Cleaning Troubleshooting Tips Consumer Support ge.com Problem Lower oven light does not work Possible Causes What To Do Light bulb is temporary. Lower oven door will not self-clean Oven controls improperly set a self-clean cycle for...

User Manual
Page 43
... original purchaser and any succeeding owner for products purchased for a particular purpose, are , consult your local or state consumer affairs office or your receipt here. This warranty gives you specific legal rights, and you may be responsible for other rights which fails due to the product caused by law. Safety Instructions Operating Instructions Care and Cleaning Troubleshooting Tips Consumer Support GE Built-In Microwave Cooking Center Warranty.
... original purchaser and any succeeding owner for products purchased for a particular purpose, are , consult your local or state consumer affairs office or your receipt here. This warranty gives you specific legal rights, and you may be responsible for other rights which fails due to the product caused by law. Safety Instructions Operating Instructions Care and Cleaning Troubleshooting Tips Consumer Support GE Built-In Microwave Cooking Center Warranty.


