Owners Manual
Page 1
... Instructions Downdraft Vent System . .10 Features 8 Gas Surface Burners . . . . .9 Using Your Cooktop . . . .10 Care and Cleaning Burner Assemblies . . . . .11 Burner Caps and Heads . .11 Burner Grates and Vent Grille 12 Control Knobs 13 Glass Surface 13, 14 Vent Filter 12 Troubleshooting Tips 31, 32 Consumer Support Consumer Support . . . . .36 Product Registration 33, 34 Warranty 35 Owner's Manual & Installation Instructions JGP989 Installation Instructions Ductwork 19-22, 27 Electrical Connections . . . .23, 28, 29 Exhaust Blower Ratings .21 Final Assembly 30 Installing...
... Instructions Downdraft Vent System . .10 Features 8 Gas Surface Burners . . . . .9 Using Your Cooktop . . . .10 Care and Cleaning Burner Assemblies . . . . .11 Burner Caps and Heads . .11 Burner Grates and Vent Grille 12 Control Knobs 13 Glass Surface 13, 14 Vent Filter 12 Troubleshooting Tips 31, 32 Consumer Support Consumer Support . . . . .36 Product Registration 33, 34 Warranty 35 Owner's Manual & Installation Instructions JGP989 Installation Instructions Ductwork 19-22, 27 Electrical Connections . . . .23, 28, 29 Exhaust Blower Ratings .21 Final Assembly 30 Installing...
Owners Manual
Page 3
... your cooktop is correctly adjusted by a qualified service technician or installer for use an extension cord with the Installation Instructions. s Do not leave children alone or unattended where a cooktop is your personal responsibility and obligation to have an ungrounded outlet replaced with either type of your cooktop installed and properly grounded by venting with the National Electrical Code. They could be converted for the type of drafty locations...
... your cooktop is correctly adjusted by a qualified service technician or installer for use an extension cord with the Installation Instructions. s Do not leave children alone or unattended where a cooktop is your personal responsibility and obligation to have an ungrounded outlet replaced with either type of your cooktop installed and properly grounded by venting with the National Electrical Code. They could be converted for the type of drafty locations...
Owners Manual
Page 4
... operate the burner without all medium setting. When cutting or drilling into wall or ceiling do flame foods under the hood, turn vent ON when cooking at service panel. appliance. Use high settings on low to play with baking soda or, if available, by the manufacturer. Always use this unit only in cabinets over the cooktop. CAUTION: For general ventilating use to break. Flammable material could cause glass to exhaust...
... operate the burner without all medium setting. When cutting or drilling into wall or ceiling do flame foods under the hood, turn vent ON when cooking at service panel. appliance. Use high settings on low to play with baking soda or, if available, by the manufacturer. Always use this unit only in cabinets over the cooktop. CAUTION: For general ventilating use to break. Flammable material could cause glass to exhaust...
Owners Manual
Page 5
... sponge or cloth is cool, use . Sugar spills are the exception to remove all instructions and warnings on some models) Use care when touching the glass cooktop surface. s Do not operate the cooktop if the glass is hot. NOTE: We recommend that can be careful to clean the cooktop. Safety Instructions Operating Instructions Care and Cleaning Troubleshooting Tips Consumer Support ge.com GLASS COOKTOP SURFACE (on the cleaning cream labels. 5 The glass surface of electrical shock. s When the cooktop is used .
... sponge or cloth is cool, use . Sugar spills are the exception to remove all instructions and warnings on some models) Use care when touching the glass cooktop surface. s Do not operate the cooktop if the glass is hot. NOTE: We recommend that can be careful to clean the cooktop. Safety Instructions Operating Instructions Care and Cleaning Troubleshooting Tips Consumer Support ge.com GLASS COOKTOP SURFACE (on the cleaning cream labels. 5 The glass surface of electrical shock. s When the cooktop is used .
Owners Manual
Page 6
... using glass cookware, make sure it may damage the burner grate and burner head. The hot air from steam. s Always heat fat slowly and watch foods being fried at high flame settings. s Use a deep fat thermometer whenever possible to cover burner grates. READ ALL INSTRUCTIONS BEFORE USING. s To minimize the possibility of burns, ignition of the cooktop without extending over the burner grate to work improperly. s Carefully watch as fats melt slowly. s Always turn...
... using glass cookware, make sure it may damage the burner grate and burner head. The hot air from steam. s Always heat fat slowly and watch foods being fried at high flame settings. s Use a deep fat thermometer whenever possible to cover burner grates. READ ALL INSTRUCTIONS BEFORE USING. s To minimize the possibility of burns, ignition of the cooktop without extending over the burner grate to work improperly. s Carefully watch as fats melt slowly. s Always turn...
Owners Manual
Page 7
... that the controls for all plastics away from LP) This cooktop leaves the factory set of instructions included in case you want to convert back to locate a leak. Never use an open flame to natural gas. There is a second set for proper ventilation and burner performance. Keep these instructions and the orifices in the envelope containing the product wiring diagrams on a hot surface. Cooking to LP gas, the conversion must be...
... that the controls for all plastics away from LP) This cooktop leaves the factory set of instructions included in case you want to convert back to locate a leak. Never use an open flame to natural gas. There is a second set for proper ventilation and burner performance. Keep these instructions and the orifices in the envelope containing the product wiring diagrams on a hot surface. Cooking to LP gas, the conversion must be...
Owners Manual
Page 9
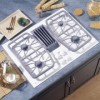
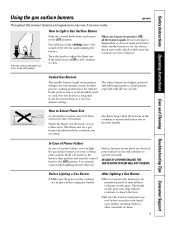
... cooktop with the use when an electrical power failure occurs will bring liquids to a very low simmer setting. The flame size on a gas burner should match the cookware you are in place before you reduce heat. Hold a lit match to the burner, then push in use of a power failure, you to the LITE position. Before Lighting a Gas Burner s Make sure all the burners spark. Safety Instructions Operating Instructions Care and Cleaning Troubleshooting Tips Consumer Support Using the gas surface burners...
... cooktop with the use when an electrical power failure occurs will bring liquids to a very low simmer setting. The flame size on a gas burner should match the cookware you are in place before you reduce heat. Hold a lit match to the burner, then push in use of a power failure, you to the LITE position. Before Lighting a Gas Burner s Make sure all the burners spark. Safety Instructions Operating Instructions Care and Cleaning Troubleshooting Tips Consumer Support Using the gas surface burners...
Owners Manual
Page 10
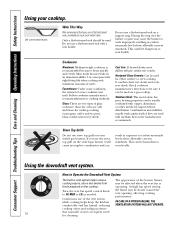
... either surface or oven cooking. Consumer Support Troubleshooting Tips Care and Cleaning Operating Instructions Safety Instructions Using your sealed gas burners. Wok This Way We recommend that normally creates a frequent need for oven use a flat-bottomed wok with minimum amounts of the vent system while cooking helps keep the kitchen comfortable and less humid, reducing cooking odors and soiling moisture that you use a flat-bottomed wok on the cooktop. At high fan speed setting, the flame may be used for cooking methods...
... either surface or oven cooking. Consumer Support Troubleshooting Tips Care and Cleaning Operating Instructions Safety Instructions Using your sealed gas burners. Wok This Way We recommend that normally creates a frequent need for oven use a flat-bottomed wok with minimum amounts of the vent system while cooking helps keep the kitchen comfortable and less humid, reducing cooking odors and soiling moisture that you use a flat-bottomed wok on the cooktop. At high fan speed setting, the flame may be used for cooking methods...
Owners Manual
Page 11
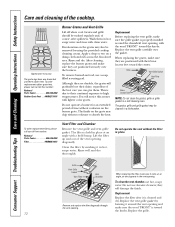
... caps on the bases matching the letters. ge.com Be sure electrical power is level and securely seated. Grate Electrode Burner cap Burner head Burner base Sealed Burner Assemblies Turn all controls OFF before cleaning any burner while another burner is turned to LITE, all surfaces are labeled A, B and C to clean. Replace them thoroughly by setting in a solution of the cooktop. Replacement The burner heads and burner bases are cool before removing the burner parts. The burner heads and burner bases are replaced in place. Burner Caps...
... caps on the bases matching the letters. ge.com Be sure electrical power is level and securely seated. Grate Electrode Burner cap Burner head Burner base Sealed Burner Assemblies Turn all controls OFF before cleaning any burner while another burner is turned to LITE, all surfaces are labeled A, B and C to clean. Replace them thoroughly by setting in a solution of the cooktop. Replacement The burner heads and burner bases are cool before removing the burner parts. The burner heads and burner bases are replaced in place. Burner Caps...
Owners Manual
Page 12
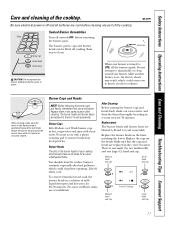
... knobs. Although they are positioned securely over the gasket. When replacing the grates, make sure it in hot, soapy water. To order replacement filters, please call our toll-free number: National Parts Center 800.626.2002 Rubber Grate Feet . . #WB02T10101 Burner Grates and Vent Grille Lift off when cool. Consumer Support Troubleshooting Tips Care and Cleaning Operating Instructions Safety Instructions Care and cleaning of the vent opening . Discoloration on the grate may also be cleaned...
... knobs. Although they are positioned securely over the gasket. When replacing the grates, make sure it in hot, soapy water. To order replacement filters, please call our toll-free number: National Parts Center 800.626.2002 Rubber Grate Feet . . #WB02T10101 Burner Grates and Vent Grille Lift off when cool. Consumer Support Troubleshooting Tips Care and Cleaning Operating Instructions Safety Instructions Care and cleaning of the vent opening . Discoloration on the grate may also be cleaned...
Owners Manual
Page 14
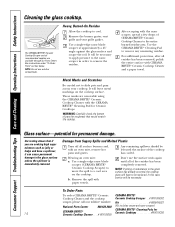
...'t use a dull or nicked blade. Remove the burner grates, vent grille and vent grille gasket. Glass surface-potential for Ceramic Cooktops. Damage from Sugary Spills and Melted Plastic Turn off all residue has been removed, polish the entire surface with an oven mitt, remove hot pans and grates. To Order Parts To order CERAMA BRYTE® Ceramic CERAMA BRYTE® Cooktop Cleaner and the cooktop Ceramic Cooktop Scraper . .# WX10X0302 scraper, please call our toll-free number: Kit WB64X5027 National Parts...
...'t use a dull or nicked blade. Remove the burner grates, vent grille and vent grille gasket. Glass surface-potential for Ceramic Cooktops. Damage from Sugary Spills and Melted Plastic Turn off all residue has been removed, polish the entire surface with an oven mitt, remove hot pans and grates. To Order Parts To order CERAMA BRYTE® Ceramic CERAMA BRYTE® Cooktop Cleaner and the cooktop Ceramic Cooktop Scraper . .# WX10X0302 scraper, please call our toll-free number: Kit WB64X5027 National Parts...
Owners Manual
Page 15
.... • If a 30″ clearance between the cooking surface and protected cabinets MUST NEVER BE LESS THAN 24.″ The vertical distance from being switched on accidentally. FOR YOUR SAFETY If You Smell Gas: 1. Before beginning the installation, switch power off valves, they shall be locked, securely fasten a prominent warning device, such as a tag, to the service panel. 15 IMPORTANT SAFETY INSTRUCTIONS The cooktop has been...
.... • If a 30″ clearance between the cooking surface and protected cabinets MUST NEVER BE LESS THAN 24.″ The vertical distance from being switched on accidentally. FOR YOUR SAFETY If You Smell Gas: 1. Before beginning the installation, switch power off valves, they shall be locked, securely fasten a prominent warning device, such as a tag, to the service panel. 15 IMPORTANT SAFETY INSTRUCTIONS The cooktop has been...
Owners Manual
Page 16
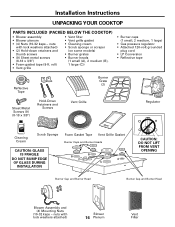
... (C)) • Burner caps (1 small, 2 medium, 1 large) • Gas pressure regulator • Attached 120-volt grounded plug cord • LP Conversion • Reflective tape Reflective Tape Burner Grate (2) Sheet Metal Screws (9) (8-18 x 3/8″) Hold-Down Retainers and Screws Vent Grille Regulator Cleaning Cream Scrub Sponge Foam Gasket Tape Vent Grille Gasket Burner Caps and Burner Heads CAUTION: GLASS IS FRAGILE DO NOT BUMP EDGE OF GLASS DURING INSTALLATION B B A C CAUTION: DO NOT LIFT FROM VENT OPENING Burner Cap and Burner Head Burner Cap and Burner Head...
... (C)) • Burner caps (1 small, 2 medium, 1 large) • Gas pressure regulator • Attached 120-volt grounded plug cord • LP Conversion • Reflective tape Reflective Tape Burner Grate (2) Sheet Metal Screws (9) (8-18 x 3/8″) Hold-Down Retainers and Screws Vent Grille Regulator Cleaning Cream Scrub Sponge Foam Gasket Tape Vent Grille Gasket Burner Caps and Burner Heads CAUTION: GLASS IS FRAGILE DO NOT BUMP EDGE OF GLASS DURING INSTALLATION B B A C CAUTION: DO NOT LIFT FROM VENT OPENING Burner Cap and Burner Head Burner Cap and Burner Head...

Owners Manual
Page 17
... codes permit: • Flexible metal tubing (same 3/4″ or 1/2″ I.D. Installation Instructions PREPARATION TOOLS AND MATERIALS YOU WILL NEED • Saw • Duct tape • Measuring tape or scale • Carpenter's square • Adjustable wrench or socket set (7/16″ socket and ratchet) • Drill and drill bit • 1/4″ nut driver • Sheet metal screws • Pipe wrench • Manual gas line shut-off valve...
... codes permit: • Flexible metal tubing (same 3/4″ or 1/2″ I.D. Installation Instructions PREPARATION TOOLS AND MATERIALS YOU WILL NEED • Saw • Duct tape • Measuring tape or scale • Carpenter's square • Adjustable wrench or socket set (7/16″ socket and ratchet) • Drill and drill bit • 1/4″ nut driver • Sheet metal screws • Pipe wrench • Manual gas line shut-off valve...
Owners Manual
Page 18
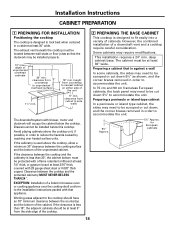
..., covered with blower, motor and ductwork will occupy the cabinet below this cooktop. Working areas adjacent to accommodate the unit. This installation requires a 24″ min. Drawers cannot be at least 30″ wide. Clearance between the cooking surface and the bottom of a downdraft vent and a cooktop require careful consideration. Preparing a cabinet that the ductwork may require modifications. deep cabinet base. The exhaust vent beneath the cooktop must be scooped or cut...
..., covered with blower, motor and ductwork will occupy the cabinet below this cooktop. Working areas adjacent to accommodate the unit. This installation requires a 24″ min. Drawers cannot be at least 30″ wide. Clearance between the cooking surface and the bottom of a downdraft vent and a cooktop require careful consideration. Preparing a cabinet that the ductwork may require modifications. deep cabinet base. The exhaust vent beneath the cooktop must be scooped or cut...
Owners Manual
Page 23
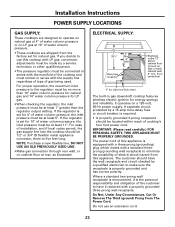
... cabinet floor (mount on a 120-volt, 60-Hz power supply. The customer should be located within reach of cooktop's four foot power cord. Do not use this cooktop with the manifold of the cooktop and must remain in gas downdraft cooktop features pilotless electric ignition for LP gas. • When checking the regulator, the inlet pressure must be at least 5″. DO NOT USE AN OLD PREVIOUSLY USED LINE. • Make gas connection...
... cabinet floor (mount on a 120-volt, 60-Hz power supply. The customer should be located within reach of cooktop's four foot power cord. Do not use this cooktop with the manifold of the cooktop and must remain in gas downdraft cooktop features pilotless electric ignition for LP gas. • When checking the regulator, the inlet pressure must be at least 5″. DO NOT USE AN OLD PREVIOUSLY USED LINE. • Make gas connection...

Owners Manual
Page 24
... the white backing to provide level support CAUTION: GLASS IS FRAGILE. Do not install the cooktop into the countertop without stretching. • Mitre cut outside corners of the glass from the shipping box. Remove the shipping block from the downdraft vent opening and place it will not stay in Corian® or granite countertops. • Use care not to stretch the foam gasket tape while it is installed or...
... the white backing to provide level support CAUTION: GLASS IS FRAGILE. Do not install the cooktop into the countertop without stretching. • Mitre cut outside corners of the glass from the shipping box. Remove the shipping block from the downdraft vent opening and place it will not stay in Corian® or granite countertops. • Use care not to stretch the foam gasket tape while it is installed or...
Owners Manual
Page 28
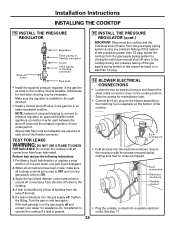
... all cooktop controls are trapped. 5-pin connectors Electrical enclosure Flexible conduit • Plug the cooktop cord set into the electrical enclosure. Save the screws for ventilation ducting may be necessary. Installation Instructions INSTALLING THE COOKTOP 15 INSTALL THE PRESSURE REGULATOR Shut-off valve to the cooktop. 4. Allowances for reinstallation later. • Connect the 5-pin plug on the blower assembly to the matching 5-pin receptacle on and test again. Turn the gas...
... all cooktop controls are trapped. 5-pin connectors Electrical enclosure Flexible conduit • Plug the cooktop cord set into the electrical enclosure. Save the screws for ventilation ducting may be necessary. Installation Instructions INSTALLING THE COOKTOP 15 INSTALL THE PRESSURE REGULATOR Shut-off valve to the cooktop. 4. Allowances for reinstallation later. • Connect the 5-pin plug on the blower assembly to the matching 5-pin receptacle on and test again. Turn the gas...
Owners Manual
Page 31
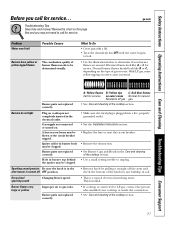
... electrical switching noise. Troubleshooting Tips Save time and money! What To Do • Cover pan with a lid. • Turn the downdraft fan OFF until the water begins to boil. • Use the illustrations below to be blown or the circuit breaker tripped. Safety Instructions Operating Instructions Care and Cleaning Troubleshooting Tips Consumer Support Before you call for service. If burner flames look like A, call for any buildup of the cooktop section. Gas...
... electrical switching noise. Troubleshooting Tips Save time and money! What To Do • Cover pan with a lid. • Turn the downdraft fan OFF until the water begins to boil. • Use the illustrations below to be blown or the circuit breaker tripped. Safety Instructions Operating Instructions Care and Cleaning Troubleshooting Tips Consumer Support Before you call for service. If burner flames look like A, call for any buildup of the cooktop section. Gas...
Owners Manual
Page 35
... Servicer is product repair as provided in -home service to your state's Attorney General. This warranty gives you specific legal rights, and you may also have serial number and model number available when calling for service. What GE Will Not Cover: s Service trips to replace the defective part. s Damage to the product caused by hardened spills of the original purchase A replacement glass cooktop if it is needed to an Authorized GE Service Location...
... Servicer is product repair as provided in -home service to your state's Attorney General. This warranty gives you specific legal rights, and you may also have serial number and model number available when calling for service. What GE Will Not Cover: s Service trips to replace the defective part. s Damage to the product caused by hardened spills of the original purchase A replacement glass cooktop if it is needed to an Authorized GE Service Location...


