Installation Instructions
Page 4
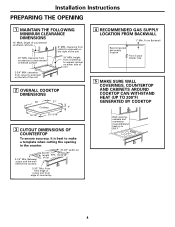
...the left of the unit 2 OVERALL COOKTOP DIMENSIONS 36″ 21″ Cooktop 3″ 18-7/8″ 33-11/16″ 3 CUTOUT DIMENSIONS OF COUNTERTOP To ensure accuracy, it is best to side wall on either side of countertop 4 RECOMMENDED GAS SUPPLY LOCATION FROM BACKWALL 1" Min. ... 200°F 4 clearance from front edge of cutout and front edge of unit 3-3/4″ MIN. Between cutout and the wall behind the cooktop 33-7/8" length of the unit 30″ MIN. From Backwall Recommended gas supply location From Cutout Center Line 5 MAKE SURE WALL COVERINGS, COUNTERTOP ...
...the left of the unit 2 OVERALL COOKTOP DIMENSIONS 36″ 21″ Cooktop 3″ 18-7/8″ 33-11/16″ 3 CUTOUT DIMENSIONS OF COUNTERTOP To ensure accuracy, it is best to side wall on either side of countertop 4 RECOMMENDED GAS SUPPLY LOCATION FROM BACKWALL 1" Min. ... 200°F 4 clearance from front edge of cutout and front edge of unit 3-3/4″ MIN. Between cutout and the wall behind the cooktop 33-7/8" length of the unit 30″ MIN. From Backwall Recommended gas supply location From Cutout Center Line 5 MAKE SURE WALL COVERINGS, COUNTERTOP ...
Installation Instructions
Page 5
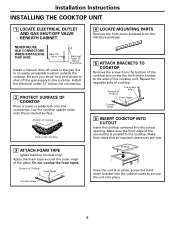
... opposite side of Cooktop Pre-drilled hole Foam Tapes Cooktop Glass 6 INSERT COOKTOP INTO CUTOUT Insert the cooktop centered into the cutout opening. Make final check that all required clearances are met. Be sure you know how and where to secure the unit into the cabinet sides to shut off valve in the gas line in an...
... opposite side of Cooktop Pre-drilled hole Foam Tapes Cooktop Glass 6 INSERT COOKTOP INTO CUTOUT Insert the cooktop centered into the cutout opening. Make final check that all required clearances are met. Be sure you know how and where to secure the unit into the cabinet sides to shut off valve in the gas line in an...


