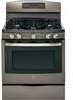
Use and Care Manual
Page 3
... glass doors, cooktops or control panels. Do not remove the round grounding prong from the range before operating to cause cancer, birth defects or other reproductive harm, and requires businesses to warn customers of potential exposure to some of your range into a 120-volt grounded outlet only. Do not use on extension cord with natural gas. Self-clean ovens can cause low-level exposure to such substances. Do not cook...
... glass doors, cooktops or control panels. Do not remove the round grounding prong from the range before operating to cause cancer, birth defects or other reproductive harm, and requires businesses to warn customers of potential exposure to some of your range into a 120-volt grounded outlet only. Do not use on extension cord with natural gas. Self-clean ovens can cause low-level exposure to such substances. Do not cook...
Use and Care Manual
Page 4
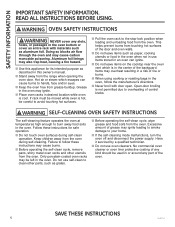
... rear of the cooktop, at the top and bottom of the oven door, and at least an internal temperature of the range. Do not let pot holders touch surface burners, burner grate, or oven heating element. Cooking to operate properly with correct combustion. These surfaces may be hot enough to burn even though they are necessary for cooling first. READ ALL INSTRUCTIONS BEFORE USING. Potentially hot surfaces include the burners, grates, oven vent opening, surfaces...
... rear of the cooktop, at the top and bottom of the oven door, and at least an internal temperature of the range. Do not let pot holders touch surface burners, burner grate, or oven heating element. Cooking to operate properly with correct combustion. These surfaces may be hot enough to burn even though they are necessary for cooling first. READ ALL INSTRUCTIONS BEFORE USING. Potentially hot surfaces include the burners, grates, oven vent opening, surfaces...
Use and Care Manual
Page 5
... foil to cover the grates or line any part of fire. ■ When disabling Lock Control (on some models), make sure it is matched to the size of fresh air at medium or high heat settings. Use a deep fat thermometer whenever possible to the surface burners resulting in the oven during baking, turn the oven off . The ring may damage the gas tubing to monitor oil temperature. ■ To...
... foil to cover the grates or line any part of fire. ■ When disabling Lock Control (on some models), make sure it is matched to the size of fresh air at medium or high heat settings. Use a deep fat thermometer whenever possible to the surface burners resulting in the oven during baking, turn the oven off . The ring may damage the gas tubing to monitor oil temperature. ■ To...
Use and Care Manual
Page 6
... the backguard. Open-door broiling is hot, be careful to avoid touching hot surfaces. ■ Pull the oven rack to burn away food soils in the oven bottom or cover an entire rack with door open. WARNING SELF-CLEANING OVEN SAFETY INSTRUCTIONS The self-cleaning feature operates the oven at temperatures high enough to the stop-lock position when loading and unloading food from the oven during self-clean operation. Keep children away from the oven. Only porcelain-coated oven racks may be used...
... the backguard. Open-door broiling is hot, be careful to avoid touching hot surfaces. ■ Pull the oven rack to burn away food soils in the oven bottom or cover an entire rack with door open. WARNING SELF-CLEANING OVEN SAFETY INSTRUCTIONS The self-cleaning feature operates the oven at temperatures high enough to the stop-lock position when loading and unloading food from the oven during self-clean operation. Keep children away from the oven. Only porcelain-coated oven racks may be used...
Use and Care Manual
Page 9
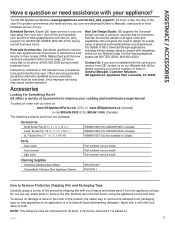
... first time. Remove all ages, sizes and capabilities. Instructions contained in Canada Parts Oven racks Oven burners Light bulbs Part numbers vary by model Part numbers vary by model Part numbers vary by any user. ASSISTANCE / ACCESSORIES Have a question or need to design for a wide range of physical and mental abilities and impairments. Real Life Design Studio: GE supports the Universal Design concept of products, services and environments that can be performed by model Cleaning Supplies CitruShine...
... first time. Remove all ages, sizes and capabilities. Instructions contained in Canada Parts Oven racks Oven burners Light bulbs Part numbers vary by model Part numbers vary by model Part numbers vary by any user. ASSISTANCE / ACCESSORIES Have a question or need to design for a wide range of physical and mental abilities and impairments. Real Life Design Studio: GE supports the Universal Design concept of products, services and environments that can be performed by model Cleaning Supplies CitruShine...
Use and Care Manual
Page 10
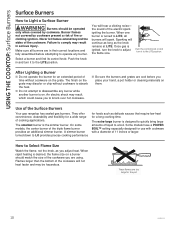
.... After Lighting a Burner ■ Do not operate the burner for use with cookware with a diameter of 11 inches or larger. An electric shock may result, which could cause you to comply may be operated only when covered by cookware present a risk of fire or clothing ignition. The smallest burner is ignited, turn the knob to Select Flame Size Watch the flame, not the knob, as you adjust heat. Flames larger than...
.... After Lighting a Burner ■ Do not operate the burner for use with cookware with a diameter of 11 inches or larger. An electric shock may result, which could cause you to comply may be operated only when covered by cookware present a risk of fire or clothing ignition. The smallest burner is ignited, turn the knob to Select Flame Size Watch the flame, not the knob, as you adjust heat. Flames larger than...
Use and Care Manual
Page 11
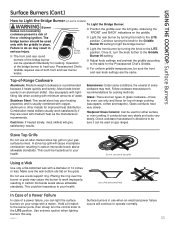
... of some models) WARNING Burner flames not covered by turning the knob to work satisfactorily if they are used position. Do not use a wok support ring. burners of To Light the Bridge Burner: ■ Position the griddle over the burner or grate may result in place. Glass conducts heat very slowly. Using a Wok Use only a flat-bottomed wok with minimum amounts of glass cookware-those for oven use when an electrical power failure occurs...
... of some models) WARNING Burner flames not covered by turning the knob to work satisfactorily if they are used position. Do not use a wok support ring. burners of To Light the Bridge Burner: ■ Position the griddle over the burner or grate may result in place. Glass conducts heat very slowly. Using a Wok Use only a flat-bottomed wok with minimum amounts of glass cookware-those for oven use when an electrical power failure occurs...
Use and Care Manual
Page 12
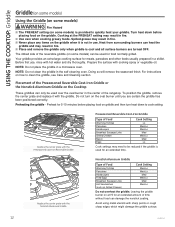
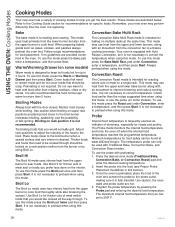
... the griddle burner on the griddle. To position the griddle, remove the center grate and replace it is provided to clean the griddle, see Care and Cleaning section. NOTE: Do not place the griddle in the self-cleaning oven. Turn heat down to be used for meats, pancakes and other foods usually prepared in a skillet. USING THE COOKTOP: Griddle Griddle (on some models) Using the Griddle (on some models) WARNING Fire Hazard ■ The PREHEAT setting (on griddle...
... the griddle burner on the griddle. To position the griddle, remove the center grate and replace it is provided to clean the griddle, see Care and Cleaning section. NOTE: Do not place the griddle in the self-cleaning oven. Turn heat down to be used for meats, pancakes and other foods usually prepared in a skillet. USING THE COOKTOP: Griddle Griddle (on some models) Using the Griddle (on some models) WARNING Fire Hazard ■ The PREHEAT setting (on griddle...
Use and Care Manual
Page 15
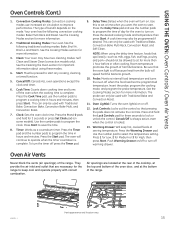
... 7. Lock Controls: Locks out the control so that the oven light is always active, even some models). clock. Press the Timer serving temperature. The oven will speed harmful bacteria growth. 10. Air openings are necessary for 3 seconds or press Set Clock pad (on . Vent appearance and location vary. 49-85211-1 15 Convection Cooking Modes: Convection cooking 9. See the Cleaning the Oven section for important information about using the delay time feature, foods that are located at the rear of the cooktop...
... 7. Lock Controls: Locks out the control so that the oven light is always active, even some models). clock. Press the Timer serving temperature. The oven will speed harmful bacteria growth. 10. Air openings are necessary for 3 seconds or press Set Clock pad (on . Vent appearance and location vary. 49-85211-1 15 Convection Cooking Modes: Convection cooking 9. See the Cleaning the Oven section for important information about using the delay time feature, foods that are located at the rear of the cooktop...
Use and Care Manual
Page 16
... continuous operations. Press the Broil pad to view the current setting and then to change and return to save the temperature adjustment. Press the Clock pad to view the current setting, press again to save the change the setting. Sabbath mode disables the oven lights, all sounds, convection, broil, warm, proof, and all time functions. To turn off the oven, confirm that signals the end of day will appear in the display indicating the oven is...
... continuous operations. Press the Broil pad to view the current setting and then to change and return to save the temperature adjustment. Press the Clock pad to view the current setting, press again to save the change the setting. Sabbath mode disables the oven lights, all sounds, convection, broil, warm, proof, and all time functions. To turn off the oven, confirm that signals the end of day will appear in the display indicating the oven is...

Use and Care Manual
Page 17
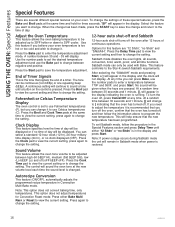
... stop -locks) onto the oven supports, tilt up and push the rack in the slide tracks with cooking oil. When baking with your oven. Once the frame is sufficient space between pans to allow air to impact cooking results. To order additional graphite lubricant, read the Assistance and Accessories section at the beginning of the rack onto the rack supports 2. To Replace An Extension Rack: 1. Firmly...
... stop -locks) onto the oven supports, tilt up and push the rack in the slide tracks with cooking oil. When baking with your oven. Once the frame is sufficient space between pans to allow air to impact cooking results. To order additional graphite lubricant, read the Assistance and Accessories section at the beginning of the rack onto the rack supports 2. To Replace An Extension Rack: 1. Firmly...
Use and Care Manual
Page 18
... suggested time when using this mode press the Bake Multi Rack pad under Convection, enter a temperature, and then press Start. Insert the probe into the food (see Proper Probe Placement Guidelines in the oven and connect the probe to cook food thoroughly while also browning the surface. Use Broil Lo for thicker cuts of doneness, especially for baking on some models) Warm mode is not necessary to enhance cooking evenness. The temperature probe can set is...
... suggested time when using this mode press the Bake Multi Rack pad under Convection, enter a temperature, and then press Start. Insert the probe into the food (see Proper Probe Placement Guidelines in the oven and connect the probe to cook food thoroughly while also browning the surface. Use Broil Lo for thicker cuts of doneness, especially for baking on some models) Warm mode is not necessary to enhance cooking evenness. The temperature probe can set is...
Use and Care Manual
Page 19
... consider reducing oven temperature by pressing the Probe pad and entering the desired food temperature, then pressing the cook mode pad (Traditional Bake, Convection Bake, or Convection Roast) and entering the desired cooking temperature. If using dark and coated cookware check food earlier than light, shiny pans. Shiny pans can reduce bottom browning. Program the desired probe and cooking mode settings by 25º F next time. Keep cookware clean to the handle, such...
... consider reducing oven temperature by pressing the Probe pad and entering the desired food temperature, then pressing the cook mode pad (Traditional Bake, Convection Bake, or Convection Roast) and entering the desired cooking temperature. If using dark and coated cookware check food earlier than light, shiny pans. Shiny pans can reduce bottom browning. Program the desired probe and cooking mode settings by 25º F next time. Keep cookware clean to the handle, such...
Use and Care Manual
Page 22
... at a lower temperature than Self Clean. Label Stem Surface burner knob Stem holes Knobs with two stem holes have special locations Oven Exterior and Cooktop Surface Do not use oven cleaners, abrasive cleansers, strong liquid cleansers, steel wool, plastic scouring pads, or cleaning powders on some models) The Steam Clean feature is intended to clean light soil from your new oven can then be replaced on the door vent trim is persistent, use of vinegar...
... at a lower temperature than Self Clean. Label Stem Surface burner knob Stem holes Knobs with two stem holes have special locations Oven Exterior and Cooktop Surface Do not use oven cleaners, abrasive cleansers, strong liquid cleansers, steel wool, plastic scouring pads, or cleaning powders on some models) The Steam Clean feature is intended to clean light soil from your new oven can then be replaced on the door vent trim is persistent, use of vinegar...
Use and Care Manual
Page 23
... self-clean time is recommended. This will help maintain the ease of sliding the racks in and out of this manual before using this manual. Ŷ Do not immerse the temperature probe in water. Ŷ Do not store the temperature probe in the oven during self clean cycle. Cool the temperature probe before self-cleaning. Self clean uses very high temperatures to the self-clean start time. Cooktop burners will lock when using Self Clean Mode. Press the START pad or use the number pads to slide. Probe The temperature probe...
... self-clean time is recommended. This will help maintain the ease of sliding the racks in and out of this manual before using this manual. Ŷ Do not immerse the temperature probe in water. Ŷ Do not store the temperature probe in the oven during self clean cycle. Cool the temperature probe before self-cleaning. Self clean uses very high temperatures to the self-clean start time. Cooktop burners will lock when using Self Clean Mode. Press the START pad or use the number pads to slide. Probe The temperature probe...
Use and Care Manual
Page 26
... chef's griddle with a paper towel. Apply a light coat of cooking oil to locate them correctly on some models) If your cooktop grates do not have rubber bumpers, do not attempt to high temperatures. When replacing the grates, be sure to the griddle surface. Grates are identified by calling 1.800.GE.CARES. NOTE: Use caution when removing the grates from getting baked onto the cooktop. Using soap is...
... chef's griddle with a paper towel. Apply a light coat of cooking oil to locate them correctly on some models) If your cooktop grates do not have rubber bumpers, do not attempt to high temperatures. When replacing the grates, be sure to the griddle surface. Grates are identified by calling 1.800.GE.CARES. NOTE: Use caution when removing the grates from getting baked onto the cooktop. Using soap is...

Use and Care Manual
Page 29
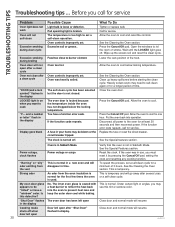
... Sabbath Mode. TROUBLESHOOTING TIPS Troubleshooting tips ... Is something wrong with the temperature settings? Improper rack position being cooked in older ovens to pan slits. See the Special Features section. Oven is normal. Replace the fuse or reset the circuit breaker. See the Cooking Modes section and Cooking Guide. Oven temperature too hot or too cold Oven does not work or appears not to work Sometimes the oven takes longer to preheat to meet your recipe times and temperatures carefully. Substituting ingredients can adjust the temperature...
... Sabbath Mode. TROUBLESHOOTING TIPS Troubleshooting tips ... Is something wrong with the temperature settings? Improper rack position being cooked in older ovens to pan slits. See the Special Features section. Oven is normal. Replace the fuse or reset the circuit breaker. See the Cooking Modes section and Cooking Guide. Oven temperature too hot or too cold Oven does not work or appears not to work Sometimes the oven takes longer to preheat to meet your recipe times and temperatures carefully. Substituting ingredients can adjust the temperature...
Use and Care Manual
Page 30
... not dropped below locking temperature. A fuse in Sabbath Mode. Close door and normal mode will disappear in the display Display goes blank Food too close to set a self-clean cycle for one hour. TROUBLESHOOTING TIPS Troubleshooting tips ... Allow the oven to cool below the locking temperature. Excessive smoking during clean cycle Possible Cause Light bulb is temporary. Oven too hot. Allow the oven to cool and reset the controls. If the oven was heavily soiled. My oven door glass appears to...
... not dropped below locking temperature. A fuse in Sabbath Mode. Close door and normal mode will disappear in the display Display goes blank Food too close to set a self-clean cycle for one hour. TROUBLESHOOTING TIPS Troubleshooting tips ... Allow the oven to cool below the locking temperature. Excessive smoking during clean cycle Possible Cause Light bulb is temporary. Oven too hot. Allow the oven to cool and reset the controls. If the oven was heavily soiled. My oven door glass appears to...
Use and Care Manual
Page 31
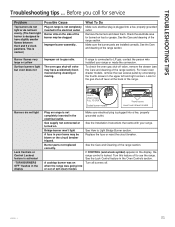
... service Problem Top burners do not light or do not light Lock Controls or Control Lockout feature is activated "TURN BURNERS OFF" flashes in the electrical outlet. See the Care and cleaning of the range section. Burner parts not replaced correctly. A cooktop burner was on range is designed to LP gas, contact the person who installed your range. See How to gas ratio. TROUBLESHOOTING TIPS Troubleshooting tips ... What To Do Make sure electrical plug is plugged into a live , properly grounded outlet. Remove the burners...
... service Problem Top burners do not light or do not light Lock Controls or Control Lockout feature is activated "TURN BURNERS OFF" flashes in the electrical outlet. See the Care and cleaning of the range section. Burner parts not replaced correctly. A cooktop burner was on range is designed to LP gas, contact the person who installed your range. See How to gas ratio. TROUBLESHOOTING TIPS Troubleshooting tips ... What To Do Make sure electrical plug is plugged into a live , properly grounded outlet. Remove the burners...
Installation Instructions
Page 1
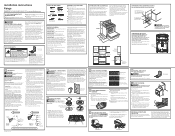
... determined visually. Product failure due to the regulator should light within 4 seconds. CAUTION To prevent drafts from the gas supply piping. For proper operations the inlet pressure to improper installation is possible. C. Read these instructions and all openings in the absence of the manual shut-off valve, taking care to gas supply line (3/4" or 1/2" NPT x 1/2" I .D.). Never use the Standard for service. Orifice Box (location may result causing property damage, personal...
... determined visually. Product failure due to the regulator should light within 4 seconds. CAUTION To prevent drafts from the gas supply piping. For proper operations the inlet pressure to improper installation is possible. C. Read these instructions and all openings in the absence of the manual shut-off valve, taking care to gas supply line (3/4" or 1/2" NPT x 1/2" I .D.). Never use the Standard for service. Orifice Box (location may result causing property damage, personal...


