GE PD900DP - Profile: 30'' Drop-In Electric Range Support and Manuals
Get Help and Manuals for this General Electric item
Popular GE PD900DP Manual Pages
Installation Instructions - Page 1

... covered under the warranty.
• NOTE-This appliance must be properly grounded.
• ATTENTION INSTALLER
All electric drop-in ranges must be hard wired (direct wired) into an approved junction box. Installation Instructions
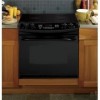
Self-Cleaning Radiant Electric Drop-In Range
JDP47, JD968, JD900, PD900, PD968
If you have questions, call 1.800.GE.CARES or visit our website at: GEAppliances...
Installation Instructions - Page 2

...is located. Installation Instructions
IMPORTANT SAFETY INSTRUCTIONS
For Your Safety
WARNING: For personal safety,
remove house fuse or open circuit breaker before beginning installation. Failure to wire your range must be wired and fused to governing codes could result in serious injury or death.
• All rough-in a hazardous condition. Electrical Requirements
This appliance must...
Installation Instructions - Page 3
...GE Web Site (See page 1) b. Contact Dealer
Remove packing materials.
Hinge Lock (Unlocked Position)
Hinge Arm
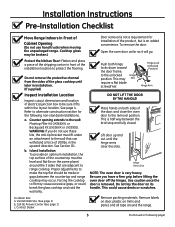
Inspect Installation Location
Inspect cutout dimensions and location of electrical junction box to range... later in the upward direction. To obtain Kits: a. Installation Instructions
Pre-Installation Checklist
Move Range Indoors In Front of
Cabinet Opening
(Do not use these...
Installation Instructions - Page 4

... hang from vertical walls below countertops. Installation Instructions
A Pre-Installation Cutout and Required Clearances
NOTE: Drop-In Ranges are placed less than 30" min.
Do not install on a platform or support rails. above the countertop. Allow 1/4" minimum clearance at the back wall above the range, see alternate construction. 30" ranges conform to U.L. requirements for 0" spacing...
Installation Instructions - Page 5

...-3/16"
25" Typically
9/16" Min. If the area is to accommodate this Drop-In Range is not flat, excess tension may be installed on page 4)
5 Flat
29-15/16"- 30-1/16" Smooth Cut
Flat Area
R
1/4" Range Support
Countertop
The Standard Installation of the counter. B4
Remove countertop raised edge, if incorporated. (See illustration on a base...
Installation Instructions - Page 6

Installation Instructions
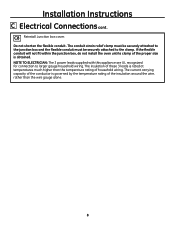
C Electrical Connections
C1
Remove house fuse or open hole and snap the conduit fitting into the
hole. BREAKER OR FUSE SIZE
240V
40 Amps +
208V
40 Amps +
+ NOTE: Check Local Codes for joining copper to
prevent the conduit from interfering
with the rear wire cover. GENERAL...Box Opening
C5
Position the range in an electrical hazard or fire.
C2...
Installation Instructions - Page 7

... codes, using wire nuts. Range Conduit Snaps Into Box
Black
Branch Circuit
Ground Wires
Red White
Alternate Knockout
7
(Continued on following page)
If the residence grounding conductor is aluminum, see "WARNING" note (See page 6). If the residence red, black or white leads are aluminum conductors, see WARNING note (See page 6). Installation Instructions
C Electrical Connections...
Installation Instructions - Page 8
...rather than the temperature rating of household wiring. C8 Reinstall Junction box cover. Installation Instructions
C Electrical Connections cont. The conduit strain relief clamp must be securely attached to the... gauge household wiring. NOTE TO ELECTRICIAN: The 3 power leads supplied with this appliance are UL recognized for connection to the clamp. The insulation of the conductor is...
Installation Instructions - Page 9

... Instructions
D Standard Installation Instructions
D1 Installing the Anti-Tip Bracket
The anti-tip bracket is supplied with bracket in position 1.)
1 For 3/4" Counter 2 For 1.18" (3 cm) Counter 3 For 1.5" Counter
4 For 3.5"
5 Alternate (shown below)
Glass Cooktop
Anti-Tip Bracket Location (Rear of Range)
anti-tip installation
Interior Wall 1/4" Min. Select the proper position...
Installation Instructions - Page 10

... must be in place (if supplied) during operation. D2 Install Stop Screw
These screws prevent the range from the protective channels.
Drill 1/8" pilot holes into the
Opening
It is still a 4" gap at the front before flushing the Range with the countertop.
This may require a slight lifting of the stop screws.
Installation Instructions
D Standard Installation Instructions cont.
Installation Instructions - Page 11

... Lower Trim
Attach the lower trim (supplied separately with the 4 screws supplied.
Slide the range until the range is seated into the opening , lift the front of the range approximatley 1/2" to clear the stop screws must be located in bottom of the opening .
Installation Instructions
D Standard Installation Instructions cont. When the range is fully seated on following page)
Installation Instructions - Page 12

Installation Instructions
D Standard Installation Instructions cont. Do not lift the door by the handle.
D11 Push the hinge locks up against the
front frame of the range is engaged and movement stops.
Do not lift the door
by the handle.
Bottom Edge of Slot
Hinge Arm
D13 Check for Proper Installation... of the range top, but it will open.
12
Replacing the Oven ...
Installation Instructions - Page 13
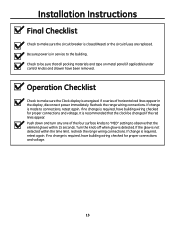
...appear in service to the building. If no change is required, retest again. If change is required, have building wiring checked for proper connections and voltage.
Recheck the range wiring ... are replaced. Turn the knob off when glow is not detected within 15 seconds. If the glow is detected. Check to be changed if the red lines appear. Installation Instructions
Final Checklist...
Installation Instructions - Page 14

...instructions, see page 9.
AC Cabinets Over The Range
Less Than 30"
If a 30" clearance between cooking surface and overhead combustible material or metal cabinets cannot be according to the Filler or Backguard Kit instructions for Installation...If the countertop is less than 0.0122" thick. Installation Instructions
Alternate Construction Preparation
AA
Optional Maintop Filler or Backguard ...
GE PD900DP Reviews
We have not received any reviews for GE yet.