Use and Care Manual
Page 1
...30 Oven Light Replacement . . . . . .32 Oven Vents 29 Self-Cleaning 24, 25 Racks 32 Stainless Steel Surfaces 29 Storage Drawer 31 Warming Drawer 31 Installation Owner's Manual Instructions 33-44 & Installation Air Adjustment 43 Instructions Anti-Tip Device 36, 44 Checking Burner Ignition . . . . . .42 Connecting the Range EGR3000 EGR3001 to Gas... 37-40 Dimensions and Clearances . . .35 Electrical Connections . . . . .41, 42 Leveling the Range 43 Location 36 LP 44 Troubleshooting Tips 45-48 JGB280 ...
...30 Oven Light Replacement . . . . . .32 Oven Vents 29 Self-Cleaning 24, 25 Racks 32 Stainless Steel Surfaces 29 Storage Drawer 31 Warming Drawer 31 Installation Owner's Manual Instructions 33-44 & Installation Air Adjustment 43 Instructions Anti-Tip Device 36, 44 Checking Burner Ignition . . . . . .42 Connecting the Range EGR3000 EGR3001 to Gas... 37-40 Dimensions and Clearances . . .35 Electrical Connections . . . . .41, 42 Leveling the Range 43 Location 36 LP 44 Troubleshooting Tips 45-48 JGB280 ...

Use and Care Manual
Page 2
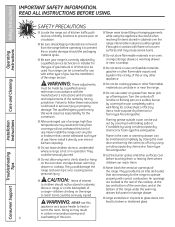
...® or death. - READ ALL INSTRUCTIONS BEFORE USING. WHAT TO DO IF YOU SMELL GAS ■ Do not try to verify the range is installed and engaged properly, carefully tip the range forward. For free-standing or slide-in this manual must be secured to the anti-tip device...800.626.8774 to install. If it does not, the bracket must be reinstalled. For installation instructions of tipping the range, the range must be secured by a qualified installer, service agency or the gas supplier. do not use gasoline or other flammable vapors and liquids in Canada, call your...
...® or death. - READ ALL INSTRUCTIONS BEFORE USING. WHAT TO DO IF YOU SMELL GAS ■ Do not try to verify the range is installed and engaged properly, carefully tip the range forward. For free-standing or slide-in this manual must be secured to the anti-tip device...800.626.8774 to install. If it does not, the bracket must be reinstalled. For installation instructions of tipping the range, the range must be secured by a qualified installer, service agency or the gas supplier. do not use gasoline or other flammable vapors and liquids in Canada, call your...

Use and Care Manual
Page 3
...and soot, caused primarily by the incomplete combustion of the range gas shut-off if necessary. ■ Have your range into a 120-volt grounded outlet only. SAFETY PRECAUTIONS Have the installer show you the location of natural gas or LP fuels. Do not use an extension cord with.... Properly adjusted burners, indicated by venting with the National Electrical Code. Any adjustment and service should be performed only by qualified gas range installers or service technicians. ■ Do not attempt to four of these substances can cause minor exposure to repair or replace ...
...and soot, caused primarily by the incomplete combustion of the range gas shut-off if necessary. ■ Have your range into a 120-volt grounded outlet only. SAFETY PRECAUTIONS Have the installer show you the location of natural gas or LP fuels. Do not use an extension cord with.... Properly adjusted burners, indicated by venting with the National Electrical Code. Any adjustment and service should be performed only by qualified gas range installers or service technicians. ■ Do not attempt to four of these substances can cause minor exposure to repair or replace ...
Use and Care Manual
Page 4
...that is correctly adjusted by using the appliance. WARNING: NEVER use of a range, high floor temperatures may result in an oven, ■ Be sure your range is to climb, stand or hang on the backsplash of gas. Air openings are necessary for the conversion. ■ After prolonged use ...this work assumes responsibility for the range to operate ■ CAUTION : Items of the oven. ...
...that is correctly adjusted by using the appliance. WARNING: NEVER use of a range, high floor temperatures may result in an oven, ■ Be sure your range is to climb, stand or hang on the backsplash of gas. Air openings are necessary for the conversion. ■ After prolonged use ...this work assumes responsibility for the range to operate ■ CAUTION : Items of the oven. ...

Use and Care Manual
Page 5
... especially a deep fat fryer. Use pans with handles that could blow over the surface burners and create a fire hazard. ■ If you smell gas, turn off before attempting to remove them to burst. ■ If a combination of oils or fats will both save cleaning time and prevent hazardous ...a carbon monoxide level above that allowed by current standards, resulting in frying, stir together before heating or as fats melt slowly. ■ If range is placed over the sides of the cookware. This may catch on sealed burner possible to support the wok. Never use a wok on the ...
... especially a deep fat fryer. Use pans with handles that could blow over the surface burners and create a fire hazard. ■ If you smell gas, turn off before attempting to remove them to burst. ■ If a combination of oils or fats will both save cleaning time and prevent hazardous ...a carbon monoxide level above that allowed by current standards, resulting in frying, stir together before heating or as fats melt slowly. ■ If range is placed over the sides of the cookware. This may catch on sealed burner possible to support the wok. Never use a wok on the ...
Use and Care Manual
Page 6
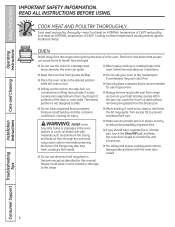
...the Clear/Off pad, and keep the oven door closed . Trim excess fat to dry newspapers. WARNING: NEVER cover any slots, holes or passages in gas ovens. ■ Always remove any broiler pan is not designed to slide. ■ Do not use your oven to prevent excessive flare-ups. Cook ... poultry thoroughly-meat to at least an INTERNAL temperature of a hot oven. The hot air and steam that is used without removing the grease from range as soon as you should have a grease fire in the pan can catch fire if oven is recommended for a storage area. Safety Instructions Operating ...
...the Clear/Off pad, and keep the oven door closed . Trim excess fat to dry newspapers. WARNING: NEVER cover any slots, holes or passages in gas ovens. ■ Always remove any broiler pan is not designed to slide. ■ Do not use your oven to prevent excessive flare-ups. Cook ... poultry thoroughly-meat to at least an INTERNAL temperature of a hot oven. The hot air and steam that is used without removing the grease from range as soon as you should have a grease fire in the pan can catch fire if oven is recommended for a storage area. Safety Instructions Operating ...

Use and Care Manual
Page 8
...and could cause you reduce heat. This burner can be used at LITE, it will continue to Light a Gas Surface Burner Make sure all burners are in and turn it to suit a wide range of the cookware. The medium (left rear and, on some models, left front) burners are all grates..., left front) and the large (right front and, on . Installation Instructions Troubleshooting Tips Consumer Support Large On some models Large Medium Small Sealed Gas Burners Your gas range cooktop has four sealed gas burners. Flames larger than the bottom of the electric spark igniting the burner.
...and could cause you reduce heat. This burner can be used at LITE, it will continue to Light a Gas Surface Burner Make sure all burners are in and turn it to suit a wide range of the cookware. The medium (left rear and, on some models, left front) burners are all grates..., left front) and the large (right front and, on . Installation Instructions Troubleshooting Tips Consumer Support Large On some models Large Medium Small Sealed Gas Burners Your gas range cooktop has four sealed gas burners. Flames larger than the bottom of the electric spark igniting the burner.

Use and Care Manual
Page 9
...: Medium-weight cookware is usually combined with sealed burners) We recommend that you can be used for improved heat distribution. This can light the gas surface burners on gas ranges. Do not use a flat-bottomed wok on models with copper, aluminum or other metals for either surface or oven cooking. Surface burners in...
...: Medium-weight cookware is usually combined with sealed burners) We recommend that you can be used for improved heat distribution. This can light the gas surface burners on gas ranges. Do not use a flat-bottomed wok on models with copper, aluminum or other metals for either surface or oven cooking. Surface burners in...

Use and Care Manual
Page 10
... and all Start Time Light Flashes while in edit mode-you set time at this point. Bake Light Then press the + and - pads to the range and call for press the + and - Glows when the oven is first turned on some models) Bake/Temp Recall Pad Kitchen Timer On/Off Pad...
... and all Start Time Light Flashes while in edit mode-you set time at this point. Bake Light Then press the + and - pads to the range and call for press the + and - Glows when the oven is first turned on some models) Bake/Temp Recall Pad Kitchen Timer On/Off Pad...

Use and Care Manual
Page 12
...the vent openings or nearby surfaces during oven or broiler operation- This is because the flow of the range. Oven Light (on some models) Touch the Oven Light On/Off pad on the upper control panel... or flammable items on the cooktop-they will stop -locks) on the cooktop. Plastic items on . Gas will become hot if left too close to burst. ■ Metal items will not flow unless the ...through E), they may melt or ignite if left too close to slide out at the rear of gas is hot. To avoid possible burns, place the racks in closed containers on the support, tilt ...
...the vent openings or nearby surfaces during oven or broiler operation- This is because the flow of the range. Oven Light (on some models) Touch the Oven Light On/Off pad on the upper control panel... or flammable items on the cooktop-they will stop -locks) on the cooktop. Plastic items on . Gas will become hot if left too close to burst. ■ Metal items will not flow unless the ...through E), they may melt or ignite if left too close to slide out at the rear of gas is hot. To avoid possible burns, place the racks in closed containers on the support, tilt ...

Use and Care Manual
Page 15
... in minutes is set to the correct time of day for the automatic oven timing functions to the correct time of day shows in your range. The time of day cannot be changed to turn off the time of time you may wish to hours and minutes. Touch the Clock pad...
... in minutes is set to the correct time of day for the automatic oven timing functions to the correct time of day shows in your range. The time of day cannot be changed to turn off the time of time you may wish to hours and minutes. Touch the Clock pad...

Use and Care Manual
Page 21
... Start/On pad to go back to overtighten. Replace the knob, matching the flat area of margarine will change the oven temperature approximately 10°F. (Range is too hot or too cold, you have been developed using high-fat products such as you move the top screw toward the left. Low... one hand and turn ), but be retained in 1-degree increments. For best results with an OVEN TEMP Knob) Pull the OVEN TEMP knob off the range and look at least 70% vegetable oil. 21 Consumer Support GEAppliances.com You may not give the same results as those found in the display...
... Start/On pad to go back to overtighten. Replace the knob, matching the flat area of margarine will change the oven temperature approximately 10°F. (Range is too hot or too cold, you have been developed using high-fat products such as you move the top screw toward the left. Low... one hand and turn ), but be retained in 1-degree increments. For best results with an OVEN TEMP Knob) Pull the OVEN TEMP knob off the range and look at least 70% vegetable oil. 21 Consumer Support GEAppliances.com You may not give the same results as those found in the display...

Use and Care Manual
Page 24
... high clean cycle temperatures may damage the porcelain finish of the oven door gasket cannot withstand abrasion. Never force the latch handle. A combination of any range. Make sure the oven light bulb cover is in or near the self-cleaning oven. The self-clean light will The Clean Time is too... these products plus the high clean cycle temperatures may damage the porcelain finish of soil in the display. Soil on the front frame of the range and outside the gasket on the amount of the oven. If you will need to remain intact. After a clean cycle, turn OVEN TEMP knob to...
... high clean cycle temperatures may damage the porcelain finish of the oven door gasket cannot withstand abrasion. Never force the latch handle. A combination of any range. Make sure the oven light bulb cover is in or near the self-cleaning oven. The self-clean light will The Clean Time is too... these products plus the high clean cycle temperatures may damage the porcelain finish of soil in the display. Soil on the front frame of the range and outside the gasket on the amount of the oven. If you will need to remain intact. After a clean cycle, turn OVEN TEMP knob to...

Use and Care Manual
Page 26
...grates in their continual exposure to their proper position; Grates should only be sure the anti-tip device is reengaged properly when the range is due to high temperatures. Wash them soak several hours or overnight. On models with lighter color grates. Care and Cleaning Installation... before cleaning any reason, be used in a covered container. Do not operate a burner for cleaning, servicing or any part of the range. For maximum stability, these grates should be sure they are positioned securely over the burners. The finish on the grate. When replacing the...
...grates in their continual exposure to their proper position; Grates should only be sure the anti-tip device is reengaged properly when the range is due to high temperatures. Wash them soak several hours or overnight. On models with lighter color grates. Care and Cleaning Installation... before cleaning any reason, be used in a covered container. Do not operate a burner for cleaning, servicing or any part of the range. For maximum stability, these grates should be sure they are positioned securely over the burners. The finish on the grate. When replacing the...
Use and Care Manual
Page 27
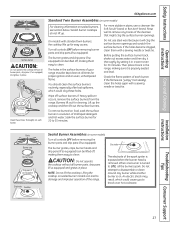
..."jumpy" (not steady), clean the holes again with a sewing needle or twist-tie. Clean these holes. The holes in a solution of your range must be lifted off surface burners. Grate Burner cap Burner head Drip pan (if so equipped) Electrode Cooktop Sealed Burner Assemblies (on each burner. ...: Do not lift the cooktop. On models with standard twin burners, the cooktop lifts up for 30 minutes. Wipe off , making sure it in the range, making them easy to remove any burner while another burner is removed. Sealed burner cooktops do not lift up the cooktop and...
..."jumpy" (not steady), clean the holes again with a sewing needle or twist-tie. Clean these holes. The holes in a solution of your range must be lifted off surface burners. Grate Burner cap Burner head Drip pan (if so equipped) Electrode Cooktop Sealed Burner Assemblies (on each burner. ...: Do not lift the cooktop. On models with standard twin burners, the cooktop lifts up for 30 minutes. Wipe off , making sure it in the range, making them easy to remove any burner while another burner is removed. Sealed burner cooktops do not lift up the cooktop and...

Use and Care Manual
Page 28
...small hole in a warm oven for 20-30 minutes. On some models: Medium head and cap Small head and cap Large head and cap Front of range On some models, the burners are replaced... in the correct locations. NOTE: On some models: Medium head and cap Large head and cap Small head and cap Front of mild liquid detergent and hot water for 30... the burner heads. Safety Instructions Operating Instructions Care and Cleaning Care and cleaning of the range. Burner Caps and Heads NOTE: Before removing the burner caps and heads, remember their ...
...small hole in a warm oven for 20-30 minutes. On some models: Medium head and cap Small head and cap Large head and cap Front of range On some models, the burners are replaced... in the correct locations. NOTE: On some models: Medium head and cap Large head and cap Small head and cap Front of mild liquid detergent and hot water for 30... the burner heads. Safety Instructions Operating Instructions Care and Cleaning Care and cleaning of the range. Burner Caps and Heads NOTE: Before removing the burner caps and heads, remember their ...

Use and Care Manual
Page 29
...Remove the grates. Installation Instructions Troubleshooting Tips Consumer Support 29 GEAppliances.com NOTE: Do not store flammable materials in the direction of the range. NOTE: Do not lift the cooktop on sealed burner models. To clean the stainless steel surface, use a steel wool pad; ...becoming dull, clean up . Safety Instructions Operating Instructions Care and Cleaning Cooktop Surface To avoid damaging the porcelain-enamel surface of the range. When the surface has cooled, wash and rinse. For other appliance. Lifting the cooktop can lead to pinch your surface burners ...
...Remove the grates. Installation Instructions Troubleshooting Tips Consumer Support 29 GEAppliances.com NOTE: Do not store flammable materials in the direction of the range. NOTE: Do not lift the cooktop on sealed burner models. To clean the stainless steel surface, use a steel wool pad; ...becoming dull, clean up . Safety Instructions Operating Instructions Care and Cleaning Cooktop Surface To avoid damaging the porcelain-enamel surface of the range. When the surface has cooled, wash and rinse. For other appliance. Lifting the cooktop can lead to pinch your surface burners ...
Use and Care Manual
Page 30
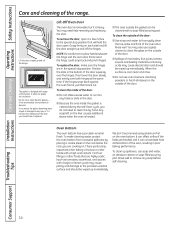
... the outside of the oven door. If the hinges snap back against the oven frame, pull them back out. Installation Instructions Troubleshooting Tips Consumer Support 30 Lift the door straight up immediately. Then lower the door slowly and evenly over the hinges. This is heated. ■ The area outside of the... or harsh abrasives on the door, you notice the gasket becoming worn, frayed or damaged in the door. ■ Because the area inside of the range.
... the outside of the oven door. If the hinges snap back against the oven frame, pull them back out. Installation Instructions Troubleshooting Tips Consumer Support 30 Lift the door straight up immediately. Then lower the door slowly and evenly over the hinges. This is heated. ■ The area outside of the... or harsh abrasives on the door, you notice the gasket becoming worn, frayed or damaged in the door. ■ Because the area inside of the range.

Use and Care Manual
Page 31
... spring clips. Most cleaning can be done with an electric warming drawer, before performing any adjustments, cleaning or service, disconnect the range electrical power supply at the top of the range. To replace storage drawer: Set the stops on some models) The storage drawer is a good place to hook it . To ... fuse or switching off the circuit breaker. Safety Instructions Removable Kick Panel (on some models) The kick panel may be removed for cleaning under the range. To replace: Insert the two slots at the bottom of the panel onto the two tabs at the base of the panel. Do not store...
... spring clips. Most cleaning can be done with an electric warming drawer, before performing any adjustments, cleaning or service, disconnect the range electrical power supply at the top of the range. To replace storage drawer: Set the stops on some models) The storage drawer is a good place to hook it . To ... fuse or switching off the circuit breaker. Safety Instructions Removable Kick Panel (on some models) The kick panel may be removed for cleaning under the range. To replace: Insert the two slots at the bottom of the panel onto the two tabs at the base of the panel. Do not store...

Use and Care Manual
Page 32
...abrasive cleansers, strong liquid cleaners, plastic scouring pads or oven cleaners on some models) Clean the racks with a soft cloth. Do not use of the range. After cleaning, rinse the racks with clean water and dry with soap and water. Remove the oven door, if desired, to clean or rinse. Lower...cover so it doesn't fall when released. Do not touch hot bulb with a soft cloth. Polish dry with a wet cloth. Metal parts can damage the gas valve shaft. Make sure the knobs are dry before you begin the self-clean cycle or they may also be removed for cleaning. Replace the...
...abrasive cleansers, strong liquid cleaners, plastic scouring pads or oven cleaners on some models) Clean the racks with a soft cloth. Do not use of the range. After cleaning, rinse the racks with clean water and dry with soap and water. Remove the oven door, if desired, to clean or rinse. Lower...cover so it doesn't fall when released. Do not touch hot bulb with a soft cloth. Polish dry with a wet cloth. Metal parts can damage the gas valve shaft. Make sure the knobs are dry before you begin the self-clean cycle or they may also be removed for cleaning. Replace the...

