Use and Care Manual
Page 1
... Broiling Guide 14 Oven Control 10, 11 Power Outage 12, 16 Preheating 13 Sabbath Feature 19, 20 Self-Cleaning 24, 25 Special Features 18 Thermostat Adjustment . . . . .21 Timed Baking and Roasting 17 Surface Cooking 8, 9 Warming Drawer 22, 23 Care and Cleaning Burner Assembly 26-28 Burner Grates 26 Control Panel and Knobs . . . . .32 Cooktop Surface 29 Door Removal 30 Kick Panel 31 Lift-Up Cooktop 29 Oven Bottom 30 Oven Light Replacement . . . . . .32 Oven Vents 29 Self-Cleaning 24, 25 Racks 32 Stainless Steel Surfaces 29 Storage Drawer 31 Warming Drawer 31 Installation...
... Broiling Guide 14 Oven Control 10, 11 Power Outage 12, 16 Preheating 13 Sabbath Feature 19, 20 Self-Cleaning 24, 25 Special Features 18 Thermostat Adjustment . . . . .21 Timed Baking and Roasting 17 Surface Cooking 8, 9 Warming Drawer 22, 23 Care and Cleaning Burner Assembly 26-28 Burner Grates 26 Control Panel and Knobs . . . . .32 Cooktop Surface 29 Door Removal 30 Kick Panel 31 Lift-Up Cooktop 29 Oven Bottom 30 Oven Light Replacement . . . . . .32 Oven Vents 29 Self-Cleaning 24, 25 Racks 32 Stainless Steel Surfaces 29 Storage Drawer 31 Warming Drawer 31 Installation...

Use and Care Manual
Page 3
... the location of the range gas shut-off valve and how to shut it off if necessary. ■ Have your range installed and properly grounded by qualified gas range installers or service technicians. ■ Do not attempt to have an ungrounded outlet replaced with a properly grounded, three-prong outlet in this appliance. Do not use an extension cord with an open window or using a ventilation fan or hood. Care and Cleaning Installation Instructions Troubleshooting Tips Consumer Support 3
... the location of the range gas shut-off valve and how to shut it off if necessary. ■ Have your range installed and properly grounded by qualified gas range installers or service technicians. ■ Do not attempt to have an ungrounded outlet replaced with a properly grounded, three-prong outlet in this appliance. Do not use an extension cord with an open window or using a ventilation fan or hood. Care and Cleaning Installation Instructions Troubleshooting Tips Consumer Support 3
Use and Care Manual
Page 4
... converted for a range storage drawer, a warming drawer or near the range. They be used. WARNING: NEVER use this kind of this or any other appliance. ■ WARNING: These adjustments must be made by covering the pan completely with baking soda or, if available, by using a multi-purpose dry chemical or foam-type fire extinguisher. ■ Flame in operation. Troubleshooting Tips Consumer Support Operating Instructions Care and Cleaning Installation Instructions SAFETY PRECAUTIONS ■ Locate the range out of kitchen...
... converted for a range storage drawer, a warming drawer or near the range. They be used. WARNING: NEVER use this kind of this or any other appliance. ■ WARNING: These adjustments must be made by covering the pan completely with baking soda or, if available, by using a multi-purpose dry chemical or foam-type fire extinguisher. ■ Flame in operation. Troubleshooting Tips Consumer Support Operating Instructions Care and Cleaning Installation Instructions SAFETY PRECAUTIONS ■ Locate the range out of kitchen...

Use and Care Manual
Page 5
... cookware is added. 5 Troubleshooting Tips Consumer Support Also, it does not extend beyond models. to cover burner grates. Safety Instructions GEAppliances.com WARNING! Do not let pot holders come near a window, do flame foods under the hood, turn off before attempting to contain the food properly. Operating Instructions Care and Cleaning Installation Instructions SURFACE BURNERS Use proper pan size-avoid pans that may melt if left on fire. ■ Adjust the top burner flame size so it may...
... cookware is added. 5 Troubleshooting Tips Consumer Support Also, it does not extend beyond models. to cover burner grates. Safety Instructions GEAppliances.com WARNING! Do not let pot holders come near a window, do flame foods under the hood, turn off before attempting to contain the food properly. Operating Instructions Care and Cleaning Installation Instructions SURFACE BURNERS Use proper pan size-avoid pans that may melt if left on fire. ■ Adjust the top burner flame size so it may...
Use and Care Manual
Page 6
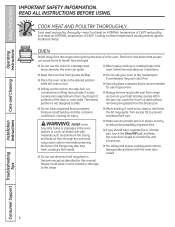
... the flame, the fat may ignite. Pressure could build up and the container could result in the oven bottom or cover an entire rack with the oven door closed to prevent excessive flare-ups. Misuse could burst, causing an injury. ■ When broiling, if meat is too close to at least an INTERNAL temperature of a hot oven. Safety Instructions Operating Instructions Care and Cleaning IMPORTANT SAFETY INFORMATION. COOK...
... the flame, the fat may ignite. Pressure could build up and the container could result in the oven bottom or cover an entire rack with the oven door closed to prevent excessive flare-ups. Misuse could burst, causing an injury. ■ When broiling, if meat is too close to at least an INTERNAL temperature of a hot oven. Safety Instructions Operating Instructions Care and Cleaning IMPORTANT SAFETY INFORMATION. COOK...

Use and Care Manual
Page 7
... to line the drawer. Residue from your warming drawer. ■ Do not warm food in this Owner's Manual. ■ If the self-cleaning mode malfunctions, turn the oven off excess spillage before removing or replacing food. These surfaces may be used . SELF-CLEANING OVEN ■ Be sure to wipe off and disconnect the power supply. Care should be hot enough to burn. ■ REMEMBER: The inside of the warming drawer. Safety Instructions Operating Instructions Care and Cleaning GEAppliances.com ELECTRIC WARMING DRAWER (on...
... to line the drawer. Residue from your warming drawer. ■ Do not warm food in this Owner's Manual. ■ If the self-cleaning mode malfunctions, turn the oven off excess spillage before removing or replacing food. These surfaces may be used . SELF-CLEANING OVEN ■ Be sure to wipe off and disconnect the power supply. Care should be hot enough to burn. ■ REMEMBER: The inside of the warming drawer. Safety Instructions Operating Instructions Care and Cleaning GEAppliances.com ELECTRIC WARMING DRAWER (on...

Use and Care Manual
Page 10
... your oven was set . pads The time of day will show PRE while preheating. Cooking Time Light Flashes while in the display when the oven is reset. Start/On Pad Flashes while in edit mode-you can change the set time at this point. Reset the clock. If the function error code appears during the self-cleaning cycle, check the oven door latch. Operating Instructions Care and Cleaning Installation Instructions Troubleshooting Tips Oven Control, Clock and Timer Features and Settings (on . Flashes while in edit mode-you can change the start...
... your oven was set . pads The time of day will show PRE while preheating. Cooking Time Light Flashes while in the display when the oven is reset. Start/On Pad Flashes while in edit mode-you can change the set time at this point. Reset the clock. If the function error code appears during the self-cleaning cycle, check the oven door latch. Operating Instructions Care and Cleaning Installation Instructions Troubleshooting Tips Oven Control, Clock and Timer Features and Settings (on . Flashes while in edit mode-you can change the start...

Use and Care Manual
Page 11
... decrease the time or temperature by small amounts. Installation Instructions Troubleshooting Tips Consumer Support 11 Self Clean Pad Touch this pad to Lo Broil at this point. Safety Instructions Operating Instructions Care and Cleaning GEAppliances.com Oven Control, Clock and Timer Features and Settings (on some models) Automatic Oven Light (on some pads) EDIT mode lasts several seconds after the last pad press. Unlatch the door. Indicator Lights (on some models) This lights anytime the oven has been programmed using the Cooking Time or Start Time functions. CLEAN 200...
... decrease the time or temperature by small amounts. Installation Instructions Troubleshooting Tips Consumer Support 11 Self Clean Pad Touch this pad to Lo Broil at this point. Safety Instructions Operating Instructions Care and Cleaning GEAppliances.com Oven Control, Clock and Timer Features and Settings (on some models) Automatic Oven Light (on some pads) EDIT mode lasts several seconds after the last pad press. Unlatch the door. Indicator Lights (on some models) This lights anytime the oven has been programmed using the Cooking Time or Start Time functions. CLEAN 200...

Use and Care Manual
Page 12
... glow bar has reached operating temperature. Oven Light (on some models) Press the Oven Light On/Off pad on the lower control panel to the vent. Installation Instructions Troubleshooting Tips Consumer Support 12 The racks have stop-locks, so that the flow of hot air from the oven and fresh air to the bump on the cooktop. To replace, place the end of gas is automatically stopped and will not resume when power is because the...
... glow bar has reached operating temperature. Oven Light (on some models) Press the Oven Light On/Off pad on the lower control panel to the vent. Installation Instructions Troubleshooting Tips Consumer Support 12 The racks have stop-locks, so that the flow of hot air from the oven and fresh air to the bump on the cooktop. To replace, place the end of gas is automatically stopped and will not resume when power is because the...

Use and Care Manual
Page 13
... oven heats up , the temperature change the oven temperature during baking or roasting. To change of the oven. On cookie sheet Roasting 4-Layer cakes Rack Position A or C A or C C B or C B or C R or A B & D Care and Cleaning Installation Instructions Troubleshooting Tips Consumer Support When baking four cake layers at this position. Safety Instructions Operating Instructions Using the upper oven. The latch is complete. How to form on the bottom of the air in poor baking. Touch the BAKE pad. Touch the START...
... oven heats up , the temperature change the oven temperature during baking or roasting. To change of the oven. On cookie sheet Roasting 4-Layer cakes Rack Position A or C A or C C B or C B or C R or A B & D Care and Cleaning Installation Instructions Troubleshooting Tips Consumer Support When baking four cake layers at this position. Safety Instructions Operating Instructions Using the upper oven. The latch is complete. How to form on the bottom of the air in poor baking. Touch the BAKE pad. Touch the START...
Use and Care Manual
Page 17
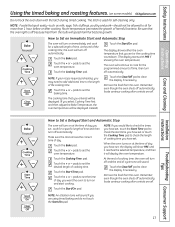
... the cooking time, the oven will speed harmful bacteria growth. When the oven turns on at the time of the cooking time. Touch the Start Time pad. Safety Instructions Operating Instructions Care and Cleaning Using the timed baking and roasting features. (on some models) GEAppliances.com Do not lock the oven door with PRE if showing the oven temperature.) The oven will display the oven temperature. Touch the Cooking Time pad. NOTE: If your recipe requires preheating, you have set or touch the Cooking Time pad...
... the cooking time, the oven will speed harmful bacteria growth. When the oven turns on at the time of the cooking time. Touch the Start Time pad. Safety Instructions Operating Instructions Care and Cleaning Using the timed baking and roasting features. (on some models) GEAppliances.com Do not lock the oven door with PRE if showing the oven temperature.) The oven will display the oven temperature. Touch the Cooking Time pad. NOTE: If your recipe requires preheating, you have set or touch the Cooking Time pad...
Use and Care Manual
Page 18
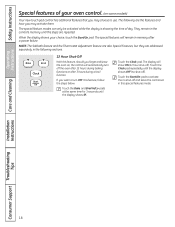
Safety Instructions Operating Instructions Special features of day. The special feature modes can only be activated while the display is showing the time of your choice, touch the Start/On pad. The special features will remain in the control's memory until the display shows SF. The display will automatically turn OFF this feature, follow the steps below. Care and Cleaning Installation Instructions Troubleshooting Tips Consumer Support 18 When the display shows your oven control. (on , the control will...
Safety Instructions Operating Instructions Special features of day. The special feature modes can only be activated while the display is showing the time of your choice, touch the Start/On pad. The special features will remain in the control's memory until the display shows SF. The display will automatically turn OFF this feature, follow the steps below. Care and Cleaning Installation Instructions Troubleshooting Tips Consumer Support 18 When the display shows your oven control. (on , the control will...

Use and Care Manual
Page 26
... of the best care you can be used in tipping of the range. Place them . Care and Cleaning Installation Instructions Troubleshooting Tips Consumer Support 26 Be sure electrical power is off and all surfaces are positioned securely over the burners. Grates should only be cleaned in a dishwasher or by hand. For maximum stability, these grates should be sure they are in a self-cleaning oven. This is removed for an extended period...
... of the best care you can be used in tipping of the range. Place them . Care and Cleaning Installation Instructions Troubleshooting Tips Consumer Support 26 Be sure electrical power is off and all surfaces are positioned securely over the burners. Grates should only be cleaned in a dishwasher or by hand. For maximum stability, these grates should be sure they are in a self-cleaning oven. This is removed for an extended period...
Use and Care Manual
Page 30
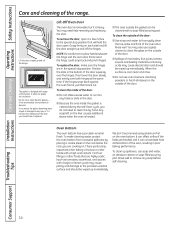
... oven bottom has a porcelain-enamel finish. This is cool, clean and rinse. ■ Do not use a glass cleaner to run into any soap before self-cleaning. Hot fruit fillings or other foods with vinegar or lemon juice) may need to place hands between the hinge and the oven door frame since the hinge could snap back and pinch fingers. Installation Instructions Troubleshooting Tips Consumer Support 30...
... oven bottom has a porcelain-enamel finish. This is cool, clean and rinse. ■ Do not use a glass cleaner to run into any soap before self-cleaning. Hot fruit fillings or other foods with vinegar or lemon juice) may need to place hands between the hinge and the oven door frame since the hinge could snap back and pinch fingers. Installation Instructions Troubleshooting Tips Consumer Support 30...
Use and Care Manual
Page 34
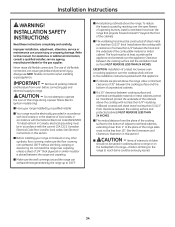
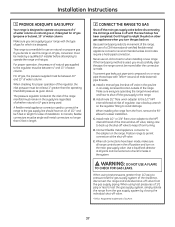
... this range during a power failure (Electric Ignition models only). ■ Have your range installed by a qualified installer. ■ Your range must not be less than 1″ to the installation instructions packed with the current CSA C22.1 Canadian Electrical Code Part 1 and/or local codes. Clearance between the cooking surface and protected cabinets MUST NEVER BE LESS THAN 24 INCHES. ■ The vertical distance from oven before connecting gas and electrical supply to operate the oven...
... this range during a power failure (Electric Ignition models only). ■ Have your range installed by a qualified installer. ■ Your range must not be less than 1″ to the installation instructions packed with the current CSA C22.1 Canadian Electrical Code Part 1 and/or local codes. Clearance between the cooking surface and protected cabinets MUST NEVER BE LESS THAN 24 INCHES. ■ The vertical distance from oven before connecting gas and electrical supply to operate the oven...
Use and Care Manual
Page 37
... gas, the pressure supplied must be moved after the connection is designed. The pressure regulator located at all range controls are supplying your range with Teflon* around, all male (external) pipe threads. A flexible metal appliance connector used , you turn on natural gas or, if designed for proper operation of installation. In Canada, flexible connectors must carefully align the pipe; Don't forget to keep it off valve to relight the pilot...
... gas, the pressure supplied must be moved after the connection is designed. The pressure regulator located at all range controls are supplying your range with Teflon* around, all male (external) pipe threads. A flexible metal appliance connector used , you turn on natural gas or, if designed for proper operation of installation. In Canada, flexible connectors must carefully align the pipe; Don't forget to keep it off valve to relight the pilot...

Use and Care Manual
Page 42
.... Electric ignition models require electrical power to eventual failure of all burners have the 2-prong wall receptacle replaced with a match. The installation of gas you use. Quality of Flames The combustion quality of the spark module. With LP gas, some yellow tipping on outer cones- The oven burner will not flow unless the glow bar is designed to be checked after the range and gas supply lines have been carefully checked...
.... Electric ignition models require electrical power to eventual failure of all burners have the 2-prong wall receptacle replaced with a match. The installation of gas you use. Quality of Flames The combustion quality of the spark module. With LP gas, some yellow tipping on outer cones- The oven burner will not flow unless the glow bar is designed to be checked after the range and gas supply lines have been carefully checked...

Use and Care Manual
Page 45
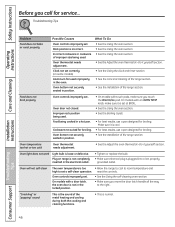
... circuit breaker tripped. • Replace the fuse or reset the circuit breaker. A Lever is shown closed . B Installation Instructions Troubleshooting Tips Consumer Support Standard twin burner models Standard twin burner models Control signals after You forgot to gas ratio. Oven controls improperly set. • See the Using the clock and timer section. 45 GEAppliances.com Problem Top burners do not light or do not burn evenly Burner flames very large or yellow Surface burners light but oven does not Possible Causes Plug on range is...
... circuit breaker tripped. • Replace the fuse or reset the circuit breaker. A Lever is shown closed . B Installation Instructions Troubleshooting Tips Consumer Support Standard twin burner models Standard twin burner models Control signals after You forgot to gas ratio. Oven controls improperly set. • See the Using the clock and timer section. 45 GEAppliances.com Problem Top burners do not light or do not burn evenly Burner flames very large or yellow Surface burners light but oven does not Possible Causes Plug on range is...
Use and Care Manual
Page 46
...; See the Installation of the range section. On models with a door latch, the oven door is cool. • For best results, use a pan designed for service... Oven will not self-clean The oven temperature is set . On models with an OVEN TEMP knob, make sure you call for broiling. Oven bottom not securely seated in a hot pan. Make sure it yourself! Plug on some models) • See the Using the clock and timer section. reset the controls. Rack position is plugged into...
...; See the Installation of the range section. On models with a door latch, the oven door is cool. • For best results, use a pan designed for service... Oven will not self-clean The oven temperature is set . On models with an OVEN TEMP knob, make sure you call for broiling. Oven bottom not securely seated in a hot pan. Make sure it yourself! Plug on some models) • See the Using the clock and timer section. reset the controls. Rack position is plugged into...

Use and Care Manual
Page 47
...; On models with an OVEN TEMP knob, turn it to the left as far as it will go . Heavily soiled ovens may have a function error code. Self-clean light (on some models) blinks during the self-cleaning cycle, check the oven door latch. The latch was set . Reset the range controls to cool for service. 47 Troubleshooting Tips Consumer Support See the Using the self-cleaning oven section. Oven not clean after a clean cycle • Allow the oven to the right. Oven door will not open Oven too hot...
...; On models with an OVEN TEMP knob, turn it to the left as far as it will go . Heavily soiled ovens may have a function error code. Self-clean light (on some models) blinks during the self-cleaning cycle, check the oven door latch. The latch was set . Reset the range controls to cool for service. 47 Troubleshooting Tips Consumer Support See the Using the self-cleaning oven section. Oven not clean after a clean cycle • Allow the oven to the right. Oven door will not open Oven too hot...


