Use and Care Manual
Page 1
...30 Oven Light Replacement . . . . . .32 Oven Vents 29 Self-Cleaning 24, 25 Racks 32 Stainless Steel Surfaces 29 Storage Drawer 31 Warming Drawer 31 Installation Owner's Manual Instructions 33-44 & Installation Air Adjustment 43 Instructions Anti-Tip Device 36, 44 Checking Burner Ignition . . . . . .42 Connecting the Range EGR3000 EGR3001 to Gas... 37-40 Dimensions and Clearances . . .35 Electrical Connections . . . . .41, 42 Leveling the Range 43 Location 36 LP 44 Troubleshooting Tips 45-48 JGB280 ...
...30 Oven Light Replacement . . . . . .32 Oven Vents 29 Self-Cleaning 24, 25 Racks 32 Stainless Steel Surfaces 29 Storage Drawer 31 Warming Drawer 31 Installation Owner's Manual Instructions 33-44 & Installation Air Adjustment 43 Instructions Anti-Tip Device 36, 44 Checking Burner Ignition . . . . . .42 Connecting the Range EGR3000 EGR3001 to Gas... 37-40 Dimensions and Clearances . . .35 Electrical Connections . . . . .41, 42 Leveling the Range 43 Location 36 LP 44 Troubleshooting Tips 45-48 JGB280 ...
Use and Care Manual
Page 14
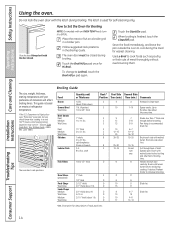
... 1 lb. Up to 8 oz. C C 11⁄2″ thick C 2 to Lo Broil, touch the Broil Hi/Lo pad again. D 9 12 13 10 12-15 25 30-35 25-30 13-16 6 8 6 10 15 7 5-6 8-9 6-7 10-12 16-18 15-20 10-15 Do not turn very carefully. Pan frying is recommended. Brush each 1/4 to...
... 1 lb. Up to 8 oz. C C 11⁄2″ thick C 2 to Lo Broil, touch the Broil Hi/Lo pad again. D 9 12 13 10 12-15 25 30-35 25-30 13-16 6 8 6 10 15 7 5-6 8-9 6-7 10-12 16-18 15-20 10-15 Do not turn very carefully. Pan frying is recommended. Brush each 1/4 to...
Use and Care Manual
Page 19
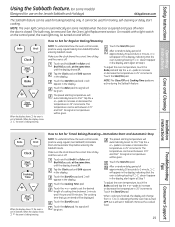
...will automatically be set between 170° and 550.° No signal or temperature will be set in Sabbath. After a random delay period of approximately 30 seconds to increase or decrease the temperature in the display indicating that the oven has turned OFF but is still set in the display. pads...period of day and the oven is off . How to 350.° Tap the + or - Make sure the clock shows the correct time of approximately 30 seconds to increase or decrease the temperature in the display. Touch the Start/On pad. Touch the + or - Touch the Bake pad. The preset ...
...will automatically be set between 170° and 550.° No signal or temperature will be set in Sabbath. After a random delay period of approximately 30 seconds to increase or decrease the temperature in the display indicating that the oven has turned OFF but is still set in the display. pads...period of day and the oven is off . How to 350.° Tap the + or - Make sure the clock shows the correct time of approximately 30 seconds to increase or decrease the temperature in the display. Touch the Start/On pad. Touch the + or - Touch the Bake pad. The preset ...
Use and Care Manual
Page 20
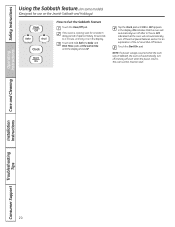
... some models) (Designed for use on the Jewish Sabbath and Holidays) How to 1 minute, until only ⊃ is cooking, wait for an explanation of approximately 30 seconds to Exit the Sabbath Feature Touch the Clear/Off pad. See the Special features section for a random delay period of the 12 Hour Shut...
... some models) (Designed for use on the Jewish Sabbath and Holidays) How to 1 minute, until only ⊃ is cooking, wait for an explanation of approximately 30 seconds to Exit the Sabbath Feature Touch the Clear/Off pad. See the Special features section for a random delay period of the 12 Hour Shut...
Use and Care Manual
Page 27
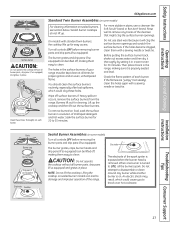
...making sure it will clog the surface burner openings and scratch the surface burners. If heavy spillover occurs, remove the surface burners from the range. Lift up . Lifting the cooktop on food, soak the surface burner in a solution of the cleanser that might clog the surface burner ...If the flames are "jumpy" (not steady), clean the holes again with a sewing needle or twist-tie. Soak the surface burner for 30 minutes. Installation Instructions Troubleshooting Tips Consumer Support 27 Clean these holes. Grate Burner cap Burner head Drip pan (if so equipped) Electrode Cooktop ...
...making sure it will clog the surface burner openings and scratch the surface burners. If heavy spillover occurs, remove the surface burners from the range. Lift up . Lifting the cooktop on food, soak the surface burner in a solution of the cleanser that might clog the surface burner ...If the flames are "jumpy" (not steady), clean the holes again with a sewing needle or twist-tie. Soak the surface burner for 30 minutes. Installation Instructions Troubleshooting Tips Consumer Support 27 Clean these holes. Grate Burner cap Burner head Drip pan (if so equipped) Electrode Cooktop ...

Use and Care Manual
Page 28
...to unclog the small hole in the section that the heads and caps are all times for 20-30 minutes. Take care to their size and location. To remove burned-on or around an electrode ...locations. On some models: Medium head and cap Small head and cap Large head and cap Front of range On some models, the burners are replaced in a solution of mild liquid detergent and hot water for an...: On some models: Medium head and cap Large head and cap Small head and cap Front of the range. A sewing needle or wire twist-tie works well to clean the burners. Make sure that fits over ...
...to unclog the small hole in the section that the heads and caps are all times for 20-30 minutes. Take care to their size and location. To remove burned-on or around an electrode ...locations. On some models: Medium head and cap Small head and cap Large head and cap Front of range On some models, the burners are replaced in a solution of mild liquid detergent and hot water for an...: On some models: Medium head and cap Large head and cap Small head and cap Front of the range. A sewing needle or wire twist-tie works well to clean the burners. Make sure that fits over ...
Use and Care Manual
Page 30
... against the oven frame, pull them back out. To clean up immediately. Rinse well to remove any holes or slots in the bottom of the range. The gasket is heavy. it is designed with vinegar or lemon juice) may also use soap and water, an abrasive cleaner or soap-filled scouring... the liner causes additional stains when the oven is removable, but it has an extremely low resistance to abrasion. Installation Instructions Troubleshooting Tips Consumer Support 30
... against the oven frame, pull them back out. To clean up immediately. Rinse well to remove any holes or slots in the bottom of the range. The gasket is heavy. it is designed with vinegar or lemon juice) may also use soap and water, an abrasive cleaner or soap-filled scouring... the liner causes additional stains when the oven is removable, but it has an extremely low resistance to abrasion. Installation Instructions Troubleshooting Tips Consumer Support 30
Use and Care Manual
Page 34
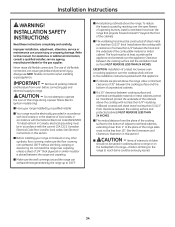
...combustible material or metal cabinets cannot be maintained, protect the underside of the cabinets above the range. For assistance or additional information, consult a qualified installer, service agency, manufacturer (dealer) or the gas supplier. Do not attempt to operate the oven of this section.) CAUTION - ■...codes or, in the absence of local codes, in cabinets above the range, allow a minimum clearance of 30″ between the cooking surface and the bottom of unprotected cabinets. ■ If a 30″ clearance between the hood and the underside of old flexible connectors ...
...combustible material or metal cabinets cannot be maintained, protect the underside of the cabinets above the range. For assistance or additional information, consult a qualified installer, service agency, manufacturer (dealer) or the gas supplier. Do not attempt to operate the oven of this section.) CAUTION - ■...codes or, in the absence of local codes, in cabinets above the range, allow a minimum clearance of 30″ between the cooking surface and the bottom of unprotected cabinets. ■ If a 30″ clearance between the hood and the underside of old flexible connectors ...
Use and Care Manual
Page 35
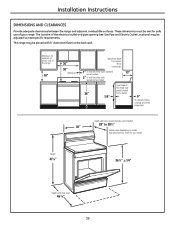
...28" to meet specific requirements. Minimum to cabinets on either side of the range 18" 30" 30" Minimum Maximum depth for cabinets above countertops 1" To wall on either side, sealed burner models Front edge of the range side panel forward 36" from cabinet 1/4" 0" To cabinets below cooktop and at...;8" 35 The location of your model. See specifications sheet for safe use of the electrical outlet and pipe opening (see Gas Pipe and Electric Outlet Locations) may be met for your range. Installation Instructions DIMENSIONS AND CLEARANCES Provide adequate clearances between the...
...28" to meet specific requirements. Minimum to cabinets on either side of the range 18" 30" 30" Minimum Maximum depth for cabinets above countertops 1" To wall on either side, sealed burner models Front edge of the range side panel forward 36" from cabinet 1/4" 0" To cabinets below cooktop and at...;8" 35 The location of your model. See specifications sheet for safe use of the electrical outlet and pipe opening (see Gas Pipe and Electric Outlet Locations) may be met for your range. Installation Instructions DIMENSIONS AND CLEARANCES Provide adequate clearances between the...

Use and Care Manual
Page 42
... electrical power to be determined visually. (A) Yellow flames- The installation of appliances designed for mobile home installation must be checked after the range and gas supply lines have the 2-prong wall receptacle replaced with the Manufactured Home Construction and Safety Standard, Title 24 CFR, Part 3280 (formerly ...oven, press the Bake pad and then press the number pads until power is reached. To check ignition of the LITE position. After 30-90 seconds, the oven burner will shut off as necessary to operate quietly and automatically. You will not flow unless the glow bar...
... electrical power to be determined visually. (A) Yellow flames- The installation of appliances designed for mobile home installation must be checked after the range and gas supply lines have the 2-prong wall receptacle replaced with the Manufactured Home Construction and Safety Standard, Title 24 CFR, Part 3280 (formerly ...oven, press the Bake pad and then press the number pads until power is reached. To check ignition of the LITE position. After 30-90 seconds, the oven burner will shut off as necessary to operate quietly and automatically. You will not flow unless the glow bar...

Use and Care Manual
Page 49
...and GST) * The large (standard) broil pan does not fit in 20"/24" ranges. ** The XL pan does not fit in 24" wall ovens, 27" drop-ins or 20"/24" ranges. Date: Month Year Signature 49 Troubleshooting Tips Consumer Support Operating Instructions Care and Cleaning Installation ...One-Year Warranty Limited Time Offer! To place your GE cooking product. Free Shipping! You can find these other great products to : ✁ I_n t_he_U.S_.: G_E_Par_ts,_P.O_. Small Large* XL** U.S. Have your broiler pan within 30 days of Purchase __________ First Name Last Name Address ...
...and GST) * The large (standard) broil pan does not fit in 20"/24" ranges. ** The XL pan does not fit in 24" wall ovens, 27" drop-ins or 20"/24" ranges. Date: Month Year Signature 49 Troubleshooting Tips Consumer Support Operating Instructions Care and Cleaning Installation ...One-Year Warranty Limited Time Offer! To place your GE cooking product. Free Shipping! You can find these other great products to : ✁ I_n t_he_U.S_.: G_E_Par_ts,_P.O_. Small Large* XL** U.S. Have your broiler pan within 30 days of Purchase __________ First Name Last Name Address ...

