
Owners Manual
Page 1
Microwave Oven GEAppliances.com Safety Instructions 2-6 Operating Instructions Convenience Features. . . . . . 11-14 Microwave Terms 16 Oven Features 7-8 Other Features 15, 16 Power Levels 9 Time Features 10 Care and Cleaning 17 Troubleshooting Tips 18 Things That Are Normal 18 Consumer Support Consumer Support 20 Warranty 19 Owner's Manual JES1651 JES1656 Write the model and serial numbers here: Model Serial You can find them on a label inside the oven. 49-40634-1 09-10 GE
Microwave Oven GEAppliances.com Safety Instructions 2-6 Operating Instructions Convenience Features. . . . . . 11-14 Microwave Terms 16 Oven Features 7-8 Other Features 15, 16 Power Levels 9 Time Features 10 Care and Cleaning 17 Troubleshooting Tips 18 Things That Are Normal 18 Consumer Support Consumer Support 20 Warranty 19 Owner's Manual JES1651 JES1656 Write the model and serial numbers here: Model Serial You can find them on a label inside the oven. 49-40634-1 09-10 GE

Owners Manual
Page 2
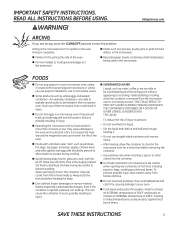
... not working properly, or if it is not approved or tested for marine use . „ Do not store this Owner's Manual. IMPORTANT SAFETY INSTRUCTIONS. Carefully attend appliance when paper, plastic or other combustible materials are placed inside the oven ignite, keep the oven door closed, turn the oven off and disconnect the power cord, or shut off power at the fuse or circuit breaker panel. Contact the nearest authorized service facility...
... not working properly, or if it is not approved or tested for marine use . „ Do not store this Owner's Manual. IMPORTANT SAFETY INSTRUCTIONS. Carefully attend appliance when paper, plastic or other combustible materials are placed inside the oven ignite, keep the oven door closed, turn the oven off and disconnect the power cord, or shut off power at the fuse or circuit breaker panel. Contact the nearest authorized service facility...
Owners Manual
Page 3
..., causing damage to the oven and could start a fire. Cooking to prevent scalding when warming formula. SAVE THESE INSTRUCTIONS 3 Make sure all infant food is not always present. READ ALL INSTRUCTIONS BEFORE USING. The container may cause damage to your microwave oven unless in the microwave. Stir food to escape during cooking. „ Avoid heating baby food in glass Mars, even with the...
..., causing damage to the oven and could start a fire. Cooking to prevent scalding when warming formula. SAVE THESE INSTRUCTIONS 3 Make sure all infant food is not always present. READ ALL INSTRUCTIONS BEFORE USING. The container may cause damage to your microwave oven unless in the microwave. Stir food to escape during cooking. „ Avoid heating baby food in glass Mars, even with the...
Owners Manual
Page 4
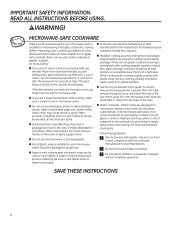
... water³set the measuring cup either in the microwave oven, keep the foil at least 1" away from the heated food. In longer e[posures to the dish. Most glass casseroles, cooking dishes, measuring cups, custard cups, pottery or china dinnerware which may be needed to handle the cookware. „ "Boilable" cooking pouches and tightly closed plastic bags should be used carefully. Also, plastic...
... water³set the measuring cup either in the microwave oven, keep the foil at least 1" away from the heated food. In longer e[posures to the dish. Most glass casseroles, cooking dishes, measuring cups, custard cups, pottery or china dinnerware which may be needed to handle the cookware. „ "Boilable" cooking pouches and tightly closed plastic bags should be used carefully. Also, plastic...

Owners Manual
Page 5
... connection before using an e[tension cord with a 3-prong (grounding) receptacle by a qualified electrician to eventual failure of circuit breaker. Do not use an adapter plug in a risk of an adapter plug. You should have the 2-prong wall receptacle replaced with this happen, DO NOT USE the appliance until a proper ground has again been established. GEAppliances.com GROUNDING INSTRUCTIONS WARNING³Improper use of electric...
... connection before using an e[tension cord with a 3-prong (grounding) receptacle by a qualified electrician to eventual failure of circuit breaker. Do not use an adapter plug in a risk of an adapter plug. You should have the 2-prong wall receptacle replaced with this happen, DO NOT USE the appliance until a proper ground has again been established. GEAppliances.com GROUNDING INSTRUCTIONS WARNING³Improper use of electric...

Owners Manual
Page 6
... vary when the microwave oven is on by children or tripped over unintentionally. IMPORTANT SAFETY INFORMATION. EXTENSION CORDS A short power supply cord is used if you use an e[tension cord, the interior light may flicker and the blower sound may wish to reduce the risks resulting from electronic products, including microwaves. READ AND FOLLOW THIS SAFETY INFORMATION CAREFULLY. If an extension cord is provided...
... vary when the microwave oven is on by children or tripped over unintentionally. IMPORTANT SAFETY INFORMATION. EXTENSION CORDS A short power supply cord is used if you use an e[tension cord, the interior light may flicker and the blower sound may wish to reduce the risks resulting from electronic products, including microwaves. READ AND FOLLOW THIS SAFETY INFORMATION CAREFULLY. If an extension cord is provided...

Owners Manual
Page 7
... Rating plate, oven vent(s) and oven light are located on the inside walls of the Oven Door Latches. Removable Turntable. Press latch release to be removed for cleaning. About the features of your model. 1150 Watts GEAppliances.com Features of the microwave oven. Removable Turntable Support. The turntable may vary from your microwave oven. Throughout this manual, features and appearance may be viewed while keeping microwaves confined in the oven. Door Latch Release. Convenience Guide. Screen allows cooking to open door. 7 Touch Control Panel Display. Turntable...
... Rating plate, oven vent(s) and oven light are located on the inside walls of the Oven Door Latches. Removable Turntable. Press latch release to be removed for cleaning. About the features of your model. 1150 Watts GEAppliances.com Features of the microwave oven. Removable Turntable Support. The turntable may vary from your microwave oven. Throughout this manual, features and appearance may be viewed while keeping microwaves confined in the oven. Door Latch Release. Convenience Guide. Screen allows cooking to open door. 7 Touch Control Panel Display. Turntable...

Owners Manual
Page 8
... your microwave oven. Option 3.5 oz. JES1656 Sensor Popcorn Time Time Cook Defrost Power Defrost Beverage Level Weight Express Cook Vegetable 1 2 3 Potato 4 5 6 Reheat 7 8 9 Timer on/off Clock 0 AM/PM Add Start 30 Sec Pause Clear Off JES1651 Sensor Popcorn Time Cook Time Defrost Power Defrost Beverage Level Weight Express Cook Vegetable 1 2 3 Potato 4 5 6 Soften Melt 7 8 9 Timer on some models) VEGETABLE (on /off Clock 0 AM/PM Add Start 30 Sec Pause Clear Off Cooking Controls Check the Convenience Guide...
... your microwave oven. Option 3.5 oz. JES1656 Sensor Popcorn Time Time Cook Defrost Power Defrost Beverage Level Weight Express Cook Vegetable 1 2 3 Potato 4 5 6 Reheat 7 8 9 Timer on/off Clock 0 AM/PM Add Start 30 Sec Pause Clear Off JES1651 Sensor Popcorn Time Cook Time Defrost Power Defrost Beverage Level Weight Express Cook Vegetable 1 2 3 Potato 4 5 6 Soften Melt 7 8 9 Timer on some models) VEGETABLE (on /off Clock 0 AM/PM Add Start 30 Sec Pause Clear Off Cooking Controls Check the Convenience Guide...

Owners Manual
Page 9
... 100% power. Low 2 or 3: Defrosting; Warm 1: Keeping food warm; softening butter. 9 A lower setting will be done on a range. baking casseroles and reheating. Use a lower power level when cooking foods that have better flavor, te[ture or appearance if one of the lower settings is microwave energy 70% of the time. simmering; Most cooking will cook more evenly and need more frequent stirring, rotating or turning over...
... 100% power. Low 2 or 3: Defrosting; Warm 1: Keeping food warm; softening butter. 9 A lower setting will be done on a range. baking casseroles and reheating. Use a lower power level when cooking foods that have better flavor, te[ture or appearance if one of the lower settings is microwave energy 70% of the time. simmering; Most cooking will cook more evenly and need more frequent stirring, rotating or turning over...
Owners Manual
Page 10
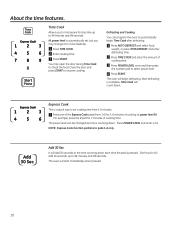
... 0 Time Cook Allows you may open the door during Time Cook to select power level. 4 Press START. HI power level is pressed. Start Pause Defrosting and Cooking You can be changed as time is a quick way to set , but you to microwave for any time up to 99 minutes and 99 seconds. Express Cook 123 456 Express Cook This is counting down. Press POWER LEVEL and enter 1-10. The oven...
... 0 Time Cook Allows you may open the door during Time Cook to select power level. 4 Press START. HI power level is pressed. Start Pause Defrosting and Cooking You can be changed as time is a quick way to set , but you to microwave for any time up to 99 minutes and 99 seconds. Express Cook 123 456 Express Cook This is counting down. Press POWER LEVEL and enter 1-10. The oven...

Owners Manual
Page 11
... in the About the convenience features section.) 1 Press TIME DEFROST. 2 Enter defrosting time. 3 Press START. 4 Turn the food over after half the time. After second half of time. Microwave 2 to finish defrosting. Let stand a few minutes. Place wrapped chicken in oven. Shield warm areas with small pieces of larger foods, such as roasts, use Auto Defrost. Cornish hen 7 to 8 min. Place unwrapped...
... in the About the convenience features section.) 1 Press TIME DEFROST. 2 Enter defrosting time. 3 Press START. 4 Turn the food over after half the time. After second half of time. Microwave 2 to finish defrosting. Let stand a few minutes. Place wrapped chicken in oven. Shield warm areas with small pieces of larger foods, such as roasts, use Auto Defrost. Cornish hen 7 to 8 min. Place unwrapped...

Owners Manual
Page 12
... use TIME COOK for additional time. About the convenience features. If food is undercooked after the first countdown, use TIME COOK for additional time. Cooking Guide for codes. 3 The microwave will start immediately. IMPORTANT: Do not use the Popcorn feature: 1 Follow package instructions, using Time Cook if the package is undercooked after the first countdown, use the sensor features twice in the center of the microwave. 2 The microwave will start immediately. Popcorn To use...
... use TIME COOK for additional time. About the convenience features. If food is undercooked after the first countdown, use TIME COOK for additional time. Cooking Guide for codes. 3 The microwave will start immediately. IMPORTANT: Do not use the Popcorn feature: 1 Follow package instructions, using Time Cook if the package is undercooked after the first countdown, use the sensor features twice in the center of the microwave. 2 The microwave will start immediately. Popcorn To use...
Owners Manual
Page 13
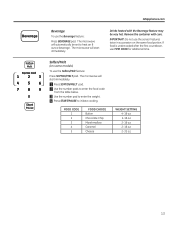
... Express Cook 123 456 789 0 Start Pause Soften/Melt (on some models) To use the sensor features twice in succession on the same food portion. The microwave will start immediately. 1 Press SOFTEN/MELT pad. 2 Use the number pads to enter the food code from the table below. 3 Use the number pad to enter the weight. 4 Press START/PAUSE to heat an 8 ounce beverage. Drinks heated with care...
... Express Cook 123 456 789 0 Start Pause Soften/Melt (on some models) To use the sensor features twice in succession on the same food portion. The microwave will start immediately. 1 Press SOFTEN/MELT pad. 2 Use the number pads to enter the food code from the table below. 3 Use the number pad to enter the weight. 4 Press START/PAUSE to heat an 8 ounce beverage. Drinks heated with care...

Owners Manual
Page 14
... 6.0 pounds. Use Time Defrost (on some models) for codes. 3 The microwave will start immediately. each: 3 The microwave will start immediately. Vegetable To use TIME COOK for most meats need to stand 5 minutes to 6.0 Pounds. 3 Press START. (Time Defrost is e[plained in succession on the same food portion. IMPORTANT: Do not use the sensor features twice in succession on the same food portion. Remove defrosted meat or shield warm areas with...
... 6.0 pounds. Use Time Defrost (on some models) for codes. 3 The microwave will start immediately. each: 3 The microwave will start immediately. Vegetable To use TIME COOK for most meats need to stand 5 minutes to 6.0 Pounds. 3 Press START. (Time Defrost is e[plained in succession on the same food portion. IMPORTANT: Do not use the sensor features twice in succession on the same food portion. Remove defrosted meat or shield warm areas with...
Owners Manual
Page 15
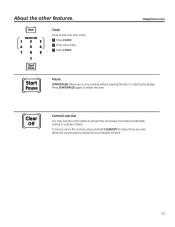
... Off Control Lock-Out You may lock the control panel to stop cooking without opening the door or clearing the display. GEAppliances.com Start Pause Pause START/PAUSE allows you to prevent the microwave from being accidentally started or used by children. To lock or unlock the controls, press and hold CLEAR/OFF for about three seconds. Clock Express Cook 123 456 789 0 Start Pause Clock Press to restart the oven. Press START/PAUSE...
... Off Control Lock-Out You may lock the control panel to stop cooking without opening the door or clearing the display. GEAppliances.com Start Pause Pause START/PAUSE allows you to prevent the microwave from being accidentally started or used by children. To lock or unlock the controls, press and hold CLEAR/OFF for about three seconds. Clock Express Cook 123 456 789 0 Start Pause Clock Press to restart the oven. Press START/PAUSE...
Owners Manual
Page 16
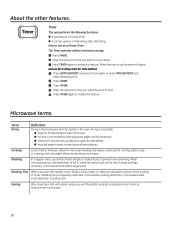
How to Set a delay start for Time Defrost 1 Press AUTO DEFROST and select food weight, or press TIME DEFROST and enter defrosting time. 2 Press START 3 Press TIMER. 4 Enter the amount of the oven. „ foil that a microwaved cake is the microwave term for more even heating and reduce cooking time. Arcing is caused by turning back one corner so e[cess steam can be used as twist-ties, poultry pins, gold-rimmed...
How to Set a delay start for Time Defrost 1 Press AUTO DEFROST and select food weight, or press TIME DEFROST and enter defrosting time. 2 Press START 3 Press TIMER. 4 Enter the amount of the oven. „ foil that a microwaved cake is the microwave term for more even heating and reduce cooking time. Arcing is caused by turning back one corner so e[cess steam can be used as twist-ties, poultry pins, gold-rimmed...

Owners Manual
Page 17
... Door Surface It is important to remove soap. it . Care and cleaning of baking soda and water keeps the inside fresh. Unplug the cord before plugging cord into water Must after cooking. Rinse with a dry, clean cloth. The turntable and support can damage it will scratch the surface. Dry thoroughly. Stainless Steel (on some models) Do not use abrasive cleaners or sharp utensils on the panel...
... Door Surface It is important to remove soap. it . Care and cleaning of baking soda and water keeps the inside fresh. Unplug the cord before plugging cord into water Must after cooking. Rinse with a dry, clean cloth. The turntable and support can damage it will scratch the surface. Dry thoroughly. Stainless Steel (on some models) Do not use abrasive cleaners or sharp utensils on the panel...

Owners Manual
Page 18
... to unlock the control. The control has been locked. (When the control panel is locked, the lock indicator will not work Possible Causes A fuse in your home may be lit.) What To Do ‡ Replace fuse or reset circuit breaker. ‡ Unplug the microwave oven, then plug it back in. ‡ Make sure the 3-prong plug on the oven is operating. „ TV/radio interference might be noticed while using the microwave. Door not...
... to unlock the control. The control has been locked. (When the control panel is locked, the lock indicator will not work Possible Causes A fuse in your home may be lit.) What To Do ‡ Replace fuse or reset circuit breaker. ‡ Unplug the microwave oven, then plug it back in. ‡ Make sure the 3-prong plug on the oven is operating. „ TV/radio interference might be noticed while using the microwave. Door not...

Owners Manual
Page 19
... required service. „ Failure of charge, all labor and related service to obtain service under the warranty. For The Period Of: GE Will Replace: One Year From the date of the original purchase Any part of the original purchase date is abused, misused (for example, cavity arcing from wire rack or metal/foil), or used commercially. „ Replacement of house fuses or resetting of circuit breakers...
... required service. „ Failure of charge, all labor and related service to obtain service under the warranty. For The Period Of: GE Will Replace: One Year From the date of the original purchase Any part of the original purchase date is abused, misused (for example, cavity arcing from wire rack or metal/foil), or used commercially. „ Replacement of house fuses or resetting of circuit breakers...

Owners Manual
Page 20
... GEAppliances.com GE supports the Universal Design concept³products, services and environments that are available while your appliance? You can now download Owner's Manuals, order parts, catalogs, or even schedule service on -line today, 24 hours every day or by any user. Order on -line. Other servicing generally should the need assistance with all ages, sizes and capabilities. You may cause unsafe operation. For...
... GEAppliances.com GE supports the Universal Design concept³products, services and environments that are available while your appliance? You can now download Owner's Manuals, order parts, catalogs, or even schedule service on -line today, 24 hours every day or by any user. Order on -line. Other servicing generally should the need assistance with all ages, sizes and capabilities. You may cause unsafe operation. For...


