User Manual
Page 1
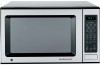
Microwave Oven www.GEAppliances.com Safety Information . .2-11 Operating Instructions Auto Feature 21 Microwave Terms . . . . .28 Other Features . . . 26, 27 Oven Features . . . .12, 13 Power Levels 14 Sensor Features . . 22-25 Time Features . . . .15-20 Care and Cleaning Inside 29 Outside 30 Turntable 29 Troubleshooting Tips 31, 32 Things That Are Normal 33 Consumer Support Consumer Support . . . . .Back Cover Warranty 35 Owner's Manual JES1651 Write the model and serial numbers here: Model Serial Find these numbers on a label inside the oven. 49-40426 05-04 JR
Microwave Oven www.GEAppliances.com Safety Information . .2-11 Operating Instructions Auto Feature 21 Microwave Terms . . . . .28 Other Features . . . 26, 27 Oven Features . . . .12, 13 Power Levels 14 Sensor Features . . 22-25 Time Features . . . .15-20 Care and Cleaning Inside 29 Outside 30 Turntable 29 Troubleshooting Tips 31, 32 Things That Are Normal 33 Consumer Support Consumer Support . . . . .Back Cover Warranty 35 Owner's Manual JES1651 Write the model and serial numbers here: Model Serial Find these numbers on a label inside the oven. 49-40426 05-04 JR
User Manual
Page 2
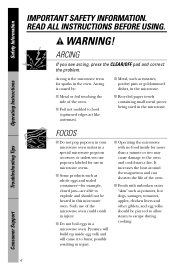
... provided Installation Excessive Microwave Energy Instructions. Connect only inches or more back from to a properly grounded the countertop edge to the: 1 door (bent), 2 hinges and latches (broken or loosened), 3 door seals and sealing surfaces. Consumer Support READ ALL INSTRUCTIONS BEFORE USING. For your safety, the information in normal usage. Safety Information IMPORTANT SAFETY INFORMATION. Operating Instructions Troubleshooting Tips WARNING! It is particularly important that the oven door...
... provided Installation Excessive Microwave Energy Instructions. Connect only inches or more back from to a properly grounded the countertop edge to the: 1 door (bent), 2 hinges and latches (broken or loosened), 3 door seals and sealing surfaces. Consumer Support READ ALL INSTRUCTIONS BEFORE USING. For your safety, the information in normal usage. Safety Information IMPORTANT SAFETY INFORMATION. Operating Instructions Troubleshooting Tips WARNING! It is particularly important that the oven door...
User Manual
Page 3
... or counter. I See door surface cleaning instructions in this manual. I Do not store anything directly on top of the microwave oven surface when the microwave oven is necessary when used by qualified service personnel. Carefully attend appliance when paper, plastic or other combustible materials are placed inside the oven ignite, keep the oven door closed, turn the oven off and disconnect the power cord, or shut off power at the fuse or circuit breaker panel. Do not use . - I Use...
... or counter. I See door surface cleaning instructions in this manual. I Do not store anything directly on top of the microwave oven surface when the microwave oven is necessary when used by qualified service personnel. Carefully attend appliance when paper, plastic or other combustible materials are placed inside the oven ignite, keep the oven door closed, turn the oven off and disconnect the power cord, or shut off power at the fuse or circuit breaker panel. Do not use . - I Use...
User Manual
Page 4
... pierced to allow steam to food (upturned edges act like antennas). READ ALL INSTRUCTIONS BEFORE USING. Safety Information Operating Instructions IMPORTANT SAFETY INFORMATION. I Recycled paper towels containing small metal pieces being used in this microwave oven. Arcing is caused by: I Some products such as twist-ties, poultry pins or gold-rimmed dishes, in injury. I Foods with no food inside egg yolk...
... pierced to allow steam to food (upturned edges act like antennas). READ ALL INSTRUCTIONS BEFORE USING. Safety Information Operating Instructions IMPORTANT SAFETY INFORMATION. I Recycled paper towels containing small metal pieces being used in this microwave oven. Arcing is caused by: I Some products such as twist-ties, poultry pins or gold-rimmed dishes, in injury. I Foods with no food inside egg yolk...
User Manual
Page 5
... thoroughly cooked. I Cook meat and poultry thoroughly-meat to at least an INTERNAL temperature of 160°F and poultry to burst, possibly resulting in injury. Safety Information www.GEAppliances.com Operating Instructions Troubleshooting Tips I Avoid heating baby food in glass jars, even with narrow necks. - Always test the formula before feeding the baby. To prevent possible injury, direct steam away from the microwave oven...
... thoroughly cooked. I Cook meat and poultry thoroughly-meat to at least an INTERNAL temperature of 160°F and poultry to burst, possibly resulting in injury. Safety Information www.GEAppliances.com Operating Instructions Troubleshooting Tips I Avoid heating baby food in glass jars, even with narrow necks. - Always test the formula before feeding the baby. To prevent possible injury, direct steam away from the microwave oven...
User Manual
Page 6
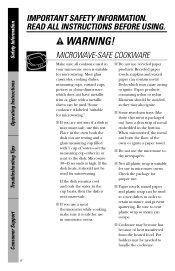
... INSTRUCTIONS BEFORE USING. I Paper towels, waxed paper and plastic wrap can be needed to vent plastic wrap so steam can burn the floor of water-set the measuring cup either in the cup heats, then the dish is microwave-safe, use . Some cookware is packaged on) have metallic trim or glaze with 1 cup of the oven or ignite a paper towel. Troubleshooting Tips Consumer Support...
... INSTRUCTIONS BEFORE USING. I Paper towels, waxed paper and plastic wrap can be needed to vent plastic wrap so steam can burn the floor of water-set the measuring cup either in the cup heats, then the dish is microwave-safe, use . Some cookware is packaged on) have metallic trim or glaze with 1 cup of the oven or ignite a paper towel. Troubleshooting Tips Consumer Support...

User Manual
Page 7
... immediately after cooking, possibly resulting in foil trays less than 3/4″ high; I "Boilable" cooking pouches and tightly closed plastic bags should be slit, pierced or vented as directed by package. In longer exposures to use them in strict compliance with plastic wrap, remove covering carefully and direct steam away from the sides of overcooking. Troubleshooting Tips Consumer Support 7 When using foil in this guide. Even...
... immediately after cooking, possibly resulting in foil trays less than 3/4″ high; I "Boilable" cooking pouches and tightly closed plastic bags should be slit, pierced or vented as directed by package. In longer exposures to use them in strict compliance with plastic wrap, remove covering carefully and direct steam away from the sides of overcooking. Troubleshooting Tips Consumer Support 7 When using foil in this guide. Even...

User Manual
Page 8
... installed and grounded. Safety Information Operating Instructions IMPORTANT SAFETY INFORMATION. In the event of an electrical short circuit, grounding reduces the risk of electric shock. Do not under any circumstances cut or remove the third (ground) prong from the power cord. If the power cord is your personal responsibility and obligation to prevent flickering of lights, blowing of fuse or tripping of circuit breaker. 8 Troubleshooting Tips Consumer Support...
... installed and grounded. Safety Information Operating Instructions IMPORTANT SAFETY INFORMATION. In the event of an electrical short circuit, grounding reduces the risk of electric shock. Do not under any circumstances cut or remove the third (ground) prong from the power cord. If the power cord is your personal responsibility and obligation to prevent flickering of lights, blowing of fuse or tripping of circuit breaker. 8 Troubleshooting Tips Consumer Support...
User Manual
Page 9
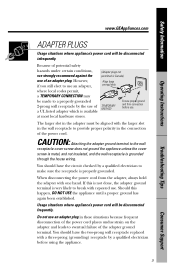
..., where local codes permit, a TEMPORARY CONNECTION may be disconnected frequently. Usage situations where appliance's power cord will be aligned with the larger slot in the wall receptacle to provide proper polarity in the connection of the power cord. You should have the circuit checked by a qualified electrician to a properly grounded 2-prong wall receptacle by a qualified electrician before use . Troubleshooting Tips Consumer Support 9 If...
..., where local codes permit, a TEMPORARY CONNECTION may be disconnected frequently. Usage situations where appliance's power cord will be aligned with the larger slot in the wall receptacle to provide proper polarity in the connection of the power cord. You should have the circuit checked by a qualified electrician to a properly grounded 2-prong wall receptacle by a qualified electrician before use . Troubleshooting Tips Consumer Support 9 If...
User Manual
Page 10
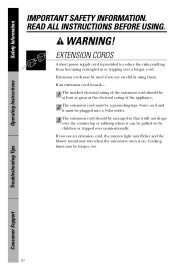
... when the microwave oven is on by children or tripped over a longer cord. EXTENSION CORDS A short power supply cord is used if you use an extension cord, the interior light may flicker and the blower sound may be used - 1 The marked electrical rating of the extension cord should be at least as great as the electrical rating of the appliance; 2 The extension cord must be a grounding-type 3-wire cord and...
... when the microwave oven is on by children or tripped over a longer cord. EXTENSION CORDS A short power supply cord is used if you use an extension cord, the interior light may flicker and the blower sound may be used - 1 The marked electrical rating of the extension cord should be at least as great as the electrical rating of the appliance; 2 The extension cord must be a grounding-type 3-wire cord and...

User Manual
Page 11
Safety Information Operating Instructions www.GEAppliances.com READ AND FOLLOW THIS SAFETY INFORMATION CAREFULLY. SAVE THESE INSTRUCTIONS 11 Troubleshooting Tips Consumer Support
Safety Information Operating Instructions www.GEAppliances.com READ AND FOLLOW THIS SAFETY INFORMATION CAREFULLY. SAVE THESE INSTRUCTIONS 11 Troubleshooting Tips Consumer Support
User Manual
Page 12
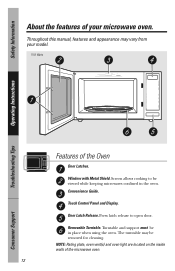
... the microwave oven. 12 Troubleshooting Tips Consumer Support Touch Control Panel and Display. Screen allows cooking to open door. Turntable and support must be viewed while keeping microwaves confined in place when using the oven. NOTE: Rating plate, oven vent(s) and oven light are located on the inside walls of your model. 1150 Watts Features of the Oven Door Latches. Throughout this manual, features and appearance may be removed for cleaning. Window with Metal Shield. The turntable may vary from your microwave oven. Press latch...
... the microwave oven. 12 Troubleshooting Tips Consumer Support Touch Control Panel and Display. Screen allows cooking to open door. Turntable and support must be viewed while keeping microwaves confined in place when using the oven. NOTE: Rating plate, oven vent(s) and oven light are located on the inside walls of your model. 1150 Watts Features of the Oven Door Latches. Throughout this manual, features and appearance may be removed for cleaning. Window with Metal Shield. The turntable may vary from your microwave oven. Press latch...
User Manual
Page 14
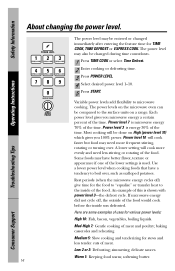
... microwave oven can be done on a range. Most cooking will be compared to boil over . Power level 10 will cook more evenly and need more frequent stirring, rotating or turning over , such as scalloped potatoes. Here are some examples of meat. Med-High 7: Gentle cooking of this is used. softening butter. 14 Troubleshooting Tips Consumer Support Power level 3 is microwave energy 70% of the time. A lower setting...
... microwave oven can be done on a range. Most cooking will be compared to boil over . Power level 10 will cook more evenly and need more frequent stirring, rotating or turning over , such as scalloped potatoes. Here are some examples of meat. Med-High 7: Gentle cooking of this is used. softening butter. 14 Troubleshooting Tips Consumer Support Power level 3 is microwave energy 70% of the time. A lower setting...
User Manual
Page 18
... foil. See the Defrosting Guide for more even defrosting. power level 10 cuts the total time to a microwave-safe dish. Power level 7 cuts the total defrosting time in the package. This is normal when oven is automatically set at High power. You can be heard during defrosting. However, food will need more even defrosting of larger foods, such as roasts, use Auto Defrost. Plastic storage...
... foil. See the Defrosting Guide for more even defrosting. power level 10 cuts the total time to a microwave-safe dish. Power level 7 cuts the total defrosting time in the package. This is normal when oven is automatically set at High power. You can be heard during defrosting. However, food will need more even defrosting of larger foods, such as roasts, use Auto Defrost. Plastic storage...

User Manual
Page 20
... seconds to 6) for 2 minutes of cooking time. 20 Troubleshooting Tips Consumer Support Press one of the Express Cook pads (from 1 to the time counting down . Express Cook This is pressed. Press POWER LEVEL and enter 1-10. The power level can be changed as a quick way to set 30 seconds of cooking time. Add 30 Seconds You can use this feature two ways: I It can...
... seconds to 6) for 2 minutes of cooking time. 20 Troubleshooting Tips Consumer Support Press one of the Express Cook pads (from 1 to the time counting down . Express Cook This is pressed. Press POWER LEVEL and enter 1-10. The power level can be changed as a quick way to set 30 seconds of cooking time. Add 30 Seconds You can use this feature two ways: I It can...
User Manual
Page 21
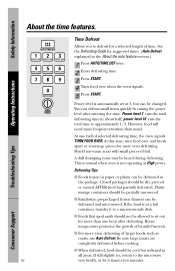
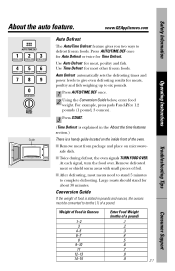
... oven signals TURN FOOD OVER. I Remove meat from package and place on the inside front of foil. www.GEAppliances.com Operating Instructions Troubleshooting Tips Auto Defrost The Auto/Time Defrost feature gives you two ways to six pounds. 1 Press AUTO/TIME DEF once. 2 Using the Conversion Guide below, enter food weight. Auto Defrost automatically sets the defrosting times and power levels to give even defrosting results for Time Defrost. Remove defrosted meat or shield warm...
... oven signals TURN FOOD OVER. I Remove meat from package and place on the inside front of foil. www.GEAppliances.com Operating Instructions Troubleshooting Tips Auto Defrost The Auto/Time Defrost feature gives you two ways to six pounds. 1 Press AUTO/TIME DEF once. 2 Using the Conversion Guide below, enter food weight. Auto Defrost automatically sets the defrosting times and power levels to give even defrosting results for Time Defrost. Remove defrosted meat or shield warm...
User Manual
Page 24
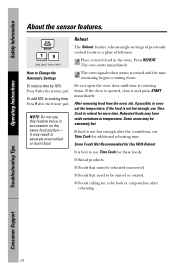
... begins counting down . Safety Information Operating Instructions About the sensor features. The oven starts immediately. To reduce time by 10%: Press 1 after reheating. Do not open the oven door until time is not hot enough, use this feature twice in the oven. If the door is best to even out the temperature. After removing food from the oven, stir, if possible, to use Time Cook for a dry look or...
... begins counting down . Safety Information Operating Instructions About the sensor features. The oven starts immediately. To reduce time by 10%: Press 1 after reheating. Do not open the oven door until time is not hot enough, use this feature twice in the oven. If the door is best to even out the temperature. After removing food from the oven, stir, if possible, to use Time Cook for a dry look or...
User Manual
Page 25
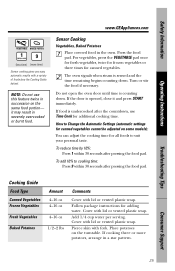
... potatoes on some models): You can adjust the cooking time for adding water. The oven signals when steam is counting down . Follow package instructions for all foods to cooking time: Press 9 within 30 seconds after pressing the food pad. Cover with lid or vented plastic wrap. www.GEAppliances.com Sensor Cooking Vegetables, Baked Potatoes Place covered food in a star pattern. Troubleshooting Tips Consumer Support 25 To reduce...
... potatoes on some models): You can adjust the cooking time for adding water. The oven signals when steam is counting down . Follow package instructions for all foods to cooking time: Press 9 within 30 seconds after pressing the food pad. Cover with lid or vented plastic wrap. www.GEAppliances.com Sensor Cooking Vegetables, Baked Potatoes Place covered food in a star pattern. Troubleshooting Tips Consumer Support 25 To reduce...

User Manual
Page 31
... program, the door was opened before steam could be blown or the circuit breaker tripped. • Replace fuse or reset circuit breaker. Food weight not entered • Make sure you have after pressing TIME COOK. Power surge. • Unplug the microwave oven, then plug it . • Press CLEAR/OFF. www.GEAppliances.com Troubleshooting Tips Save time and money! Problem Oven will not start Control panel lighted, yet oven will not start "SENSOR ERROR" appears on the oven is shown counting...
... program, the door was opened before steam could be blown or the circuit breaker tripped. • Replace fuse or reset circuit breaker. Food weight not entered • Make sure you have after pressing TIME COOK. Power surge. • Unplug the microwave oven, then plug it . • Press CLEAR/OFF. www.GEAppliances.com Troubleshooting Tips Save time and money! Problem Oven will not start Control panel lighted, yet oven will not start "SENSOR ERROR" appears on the oven is shown counting...

User Manual
Page 35
... GE Will Not Cover: I Service trips to your home to teach you must take the microwave oven to use within the USA. I Damage caused after delivery. I Replacement of house fuses or resetting of the microwave oven which vary from the date of original purchase GE Will Replace: Any part of circuit breakers. This warranty is also available, but you how to a General Electric Customer Care® servicer and pick it is needed...
... GE Will Not Cover: I Service trips to your home to teach you must take the microwave oven to use within the USA. I Damage caused after delivery. I Replacement of house fuses or resetting of the microwave oven which vary from the date of original purchase GE Will Replace: Any part of circuit breakers. This warranty is also available, but you how to a General Electric Customer Care® servicer and pick it is needed...


