
User Manual
Page 14
Charging the battery and Inserting the battery 1. Plug the other end of the connecting cable into the charger base. 3. Open the battery compartment. 1 2 Leave the battery to charge until the charger light goes green. (To maximize battery life, the first charge should be at least 4 hours) 10 Place the battery into a wall outlet. 1. Plug one end of the connecting cable into the charger as shown. 2.
Charging the battery and Inserting the battery 1. Plug the other end of the connecting cable into the charger base. 3. Open the battery compartment. 1 2 Leave the battery to charge until the charger light goes green. (To maximize battery life, the first charge should be at least 4 hours) 10 Place the battery into a wall outlet. 1. Plug one end of the connecting cable into the charger as shown. 2.
User Manual
Page 25
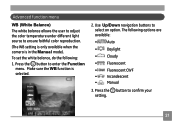
... Balance) The white balance allows the user to adjust the color temperature under different light source to select an option. Use Up/Down navigation buttons to ensure faithful color reproduction. (The WB setting is only available when the camera is selected. 2. Press the button to enter the Function menu. To set the...
... Balance) The white balance allows the user to adjust the color temperature under different light source to select an option. Use Up/Down navigation buttons to ensure faithful color reproduction. (The WB setting is only available when the camera is selected. 2. Press the button to enter the Function menu. To set the...
User Manual
Page 26
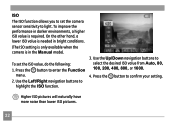
... other hand, a lower ISO value is needed in bright conditions. (The ISO setting is only available when the camera is in darker environments, a higher ISO value is required. To set the camera sensor sensitivity to light. Press the button to select the desired ISO value from Auto, 80, 100, 200, 400, 800, or...
... other hand, a lower ISO value is needed in bright conditions. (The ISO setting is only available when the camera is in darker environments, a higher ISO value is required. To set the camera sensor sensitivity to light. Press the button to select the desired ISO value from Auto, 80, 100, 200, 400, 800, or...

User Manual
Page 32
USING THE MODES LCD Screen display Still shooting mode display Mode: 1 2 3 4 5 67 8 9 10 18 19 11 12 13 14 15 1 Shooting mode icon Auto Panorama Scene 28 16 17 Manual Portrait Image Stabilization 2 Scene icon (only available for Scene mode) Sport Fireworks Children Indoor Leaf Glass Museum Landscape Snow Sunset Night landscape Night portrait 3 Light metering method Spot AE Center-Weight Ai AE 4 EV indicator 5 Self-timer indicator 2-second self-timer 10-second self-timer Continuous shot
USING THE MODES LCD Screen display Still shooting mode display Mode: 1 2 3 4 5 67 8 9 10 18 19 11 12 13 14 15 1 Shooting mode icon Auto Panorama Scene 28 16 17 Manual Portrait Image Stabilization 2 Scene icon (only available for Scene mode) Sport Fireworks Children Indoor Leaf Glass Museum Landscape Snow Sunset Night landscape Night portrait 3 Light metering method Spot AE Center-Weight Ai AE 4 EV indicator 5 Self-timer indicator 2-second self-timer 10-second self-timer Continuous shot

User Manual
Page 34
Video shooting mode display Mode: 1 2 3 45 6 8 7 14 13 9 10 11 12 1 Shooting mode icon 2 Light metering method Spot AE Center-Weight Ai AE 30 3 EV indicator 4 Self-timer indicator 2-second self-timer 10-second self-timer Continuous shot 5 Macro mode indicator Macro mode 6 Battery status 7 Mode name Appears for 3 seconds when the mode is first switched to. 8 Remaining time for videos that can be taken. 9 Focus frame 10 Zoom indicator 11 Video resolution 12 Video quality 13 Record icon
Video shooting mode display Mode: 1 2 3 45 6 8 7 14 13 9 10 11 12 1 Shooting mode icon 2 Light metering method Spot AE Center-Weight Ai AE 30 3 EV indicator 4 Self-timer indicator 2-second self-timer 10-second self-timer Continuous shot 5 Macro mode indicator Macro mode 6 Battery status 7 Mode name Appears for 3 seconds when the mode is first switched to. 8 Remaining time for videos that can be taken. 9 Focus frame 10 Zoom indicator 11 Video resolution 12 Video quality 13 Record icon

User Manual
Page 83
ISO Sensitivity AF Method Light Metering Method Exposure Control Method Exposure Compensation Shutter Speed Continuous Shooting Playback Modes White Balance Control Auto, ISO 80/100/200/400/800/1600 Single ...
ISO Sensitivity AF Method Light Metering Method Exposure Control Method Exposure Compensation Shutter Speed Continuous Shooting Playback Modes White Balance Control Auto, ISO 80/100/200/400/800/1600 Single ...
