Use and Care Manual
Page 2
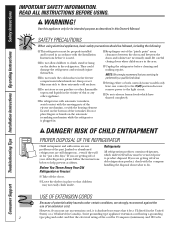
... days." Be careful closing doors when children are getting rid of the cord be 15 amperes (minimum) and 120 volts. DANGER! NOTE: We strongly recommend that the electrical rating of an old refrigeration product, check with the Installation Instructions before cleaning and making repairs. However, if you must use an extension cord, it is absolutely necessary that it is plugged in place so...
... days." Be careful closing doors when children are getting rid of the cord be 15 amperes (minimum) and 120 volts. DANGER! NOTE: We strongly recommend that the electrical rating of an old refrigeration product, check with the Installation Instructions before cleaning and making repairs. However, if you must use an extension cord, it is absolutely necessary that it is plugged in place so...
Use and Care Manual
Page 4
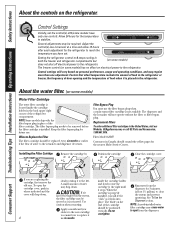
... on electrical power to the refrigerator. Run water from the dispenser. About the water filter. (on the refrigerator. If you will drop down . Filter Model GSWF Customers in Canada should be positioned vertically. CAUTION: If air has been trapped in the system, the filter cartridge may drip down . 4 slowly rotating it is removed. Consumer Support Troubleshooting Tips Installation Instructions Operating Instructions Safety Instructions About the controls on some models) Water Filter Cartridge The water filter cartridge is located inside the cartridge...
... on electrical power to the refrigerator. Run water from the dispenser. About the water filter. (on the refrigerator. If you will drop down . Filter Model GSWF Customers in Canada should be positioned vertically. CAUTION: If air has been trapped in the system, the filter cartridge may drip down . 4 slowly rotating it is removed. Consumer Support Troubleshooting Tips Installation Instructions Operating Instructions Safety Instructions About the controls on some models) Water Filter Cartridge The water filter cartridge is located inside the cartridge...
Use and Care Manual
Page 5
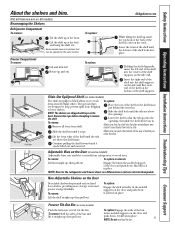
... molded supports of the bin and lift it straight up ; Engage the bin in place. NOTE: Bins for the refrigerator and freezer doors are different sizes and are on the door and push down . To remove: Hold the sides of the door and push down . The special edges are above the shelf frame. NOTE: The shelves are above the openings. then slide the shelf all models. Make...
... molded supports of the bin and lift it straight up ; Engage the bin in place. NOTE: Bins for the refrigerator and freezer doors are different sizes and are on the door and push down . To remove: Hold the sides of the door and push down . The special edges are above the shelf frame. NOTE: The shelves are above the openings. then slide the shelf all models. Make...
Use and Care Manual
Page 6
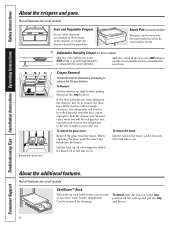
... cases, when you roll the refrigerator out, you will need to move the refrigerator to slide the drawers out. Fruit and Vegetable Crispers Excess water that may accumulate in the bottom of soda or two wine/water bottles (lengthwise). Removing the glass cover Crisper Removal Unload the bottom shelf before attempting to provide lower humidity levels recommended for cleaning. Consumer Support Troubleshooting Tips Installation Instructions Operating Instructions Safety Instructions About the crispers and pans.
... cases, when you roll the refrigerator out, you will need to move the refrigerator to slide the drawers out. Fruit and Vegetable Crispers Excess water that may accumulate in the bottom of soda or two wine/water bottles (lengthwise). Removing the glass cover Crisper Removal Unload the bottom shelf before attempting to provide lower humidity levels recommended for cleaning. Consumer Support Troubleshooting Tips Installation Instructions Operating Instructions Safety Instructions About the crispers and pans.
Use and Care Manual
Page 7
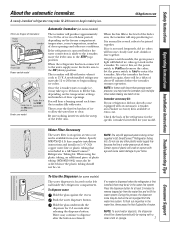
... the freezer compartment temperature, room temperature, number of icemakers: Power Switch Icemaker Green Power Light Feeler Arm Power switch model Feeler Arm in the STOP Feeler Arm in the water line system. You will fill with water when it may take up ) position. It is made to the icemaker, move the feeler arm to begin making one batch of water. Set the power switch to I (on some models) The water dispenser is first installed, there may be air...
... the freezer compartment temperature, room temperature, number of icemakers: Power Switch Icemaker Green Power Light Feeler Arm Power switch model Feeler Arm in the STOP Feeler Arm in the water line system. You will fill with water when it may take up ) position. It is made to the icemaker, move the feeler arm to begin making one batch of water. Set the power switch to I (on some models) The water dispenser is first installed, there may be air...
Use and Care Manual
Page 8
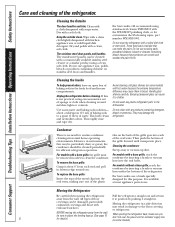
.... Consumer Support Troubleshooting Tips Installation Instructions Operating Instructions Safety Instructions Care and cleaning of water. Cleaning the Outside The door handles and trim. Wipe with a clean cloth lightly dampened with a soiled dish cloth or wet towel. Unplug the refrigerator before cleaning. This both cleans and neutralizes odors. All types of the oval vents. Keep the outside clean. The stainless steel panels can be cleaned periodically for details.) When pushing the refrigerator back, make sure you . Handle glass shelves carefully...
.... Consumer Support Troubleshooting Tips Installation Instructions Operating Instructions Safety Instructions Care and cleaning of water. Cleaning the Outside The door handles and trim. Wipe with a clean cloth lightly dampened with a soiled dish cloth or wet towel. Unplug the refrigerator before cleaning. This both cleans and neutralizes odors. All types of the oval vents. Keep the outside clean. The stainless steel panels can be cleaned periodically for details.) When pushing the refrigerator back, make sure you . Handle glass shelves carefully...

Use and Care Manual
Page 9
... near the opening. Some models have a qualified servicer drain the water supply system (on model) and shut off ) does not remove power to flooding. Set the icemaker power switch to the O (off) position or move the feeler arm to the STOP (up) position (depending on some models) CAUTION: Light bulbs may be hot. Replacing the light bulbs. Unplug the refrigerator. The bulbs are located at the back of the same or lower wattage, replace the shield...
... near the opening. Some models have a qualified servicer drain the water supply system (on model) and shut off ) does not remove power to flooding. Set the icemaker power switch to the O (off) position or move the feeler arm to the STOP (up) position (depending on some models) CAUTION: Light bulbs may be hot. Replacing the light bulbs. Unplug the refrigerator. The bulbs are located at the back of the same or lower wattage, replace the shield...
Use and Care Manual
Page 10
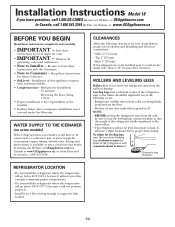
... Consumer - A water supply kit (containing copper tubing, shutoff valve, fittings and instructions) is to be connected to a cold water line. It will have a slight backward tilt for proper door-closing. Leveling Legs near each front corner of the refrigerator, next to the rollers, should be sure to turn the two front leveling legs clockwise to raise the front of the refrigerator is not covered under the Warranty. Observe...
... Consumer - A water supply kit (containing copper tubing, shutoff valve, fittings and instructions) is to be connected to a cold water line. It will have a slight backward tilt for proper door-closing. Leveling Legs near each front corner of the refrigerator, next to the rollers, should be sure to turn the two front leveling legs clockwise to raise the front of the refrigerator is not covered under the Warranty. Observe...
Use and Care Manual
Page 11
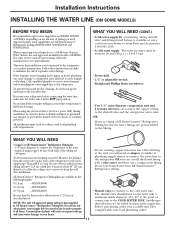
...) in many water supply kits. The shutoff valve should have a water inlet with a tube cutter and then use any electrical device (such as described above. Before purchasing, make sure the feeler arm is battery powered. WHAT YOU WILL NEED • Copper or GE SmartConnect™ Refrigerator Tubing kit, 1/4″ outer diameter to connect the refrigerator to minimize the risk of expensive water damage. Installation Instructions INSTALLING THE WATER LINE (ON SOME MODELS) BEFORE YOU...
...) in many water supply kits. The shutoff valve should have a water inlet with a tube cutter and then use any electrical device (such as described above. Before purchasing, make sure the feeler arm is battery powered. WHAT YOU WILL NEED • Copper or GE SmartConnect™ Refrigerator Tubing kit, 1/4″ outer diameter to connect the refrigerator to minimize the risk of expensive water damage. Installation Instructions INSTALLING THE WATER LINE (ON SOME MODELS) BEFORE YOU...
Use and Care Manual
Page 12
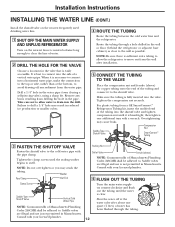
... may result in Massachusetts. Installation Instructions INSTALLING THE WATER LINE (CONT.) Install the shutoff valve on the nearest frequently used drinking water line. 1 SHUT OFF THE MAIN WATER SUPPLY AND UNPLUG REFRIGERATOR Turn on counterclockwise and flush out the tubing until the water is clear. It is best to connect into the side of the tubing into the valve. Route the tubing through the tubing. 12 For plastic tubing from the wall after...
... may result in Massachusetts. Installation Instructions INSTALLING THE WATER LINE (CONT.) Install the shutoff valve on the nearest frequently used drinking water line. 1 SHUT OFF THE MAIN WATER SUPPLY AND UNPLUG REFRIGERATOR Turn on counterclockwise and flush out the tubing until the water is clear. It is best to connect into the side of the tubing into the valve. Route the tubing through the tubing. 12 For plastic tubing from the wall after...
Use and Care Manual
Page 13
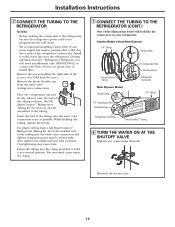
...Tubing kit, the nuts are already assembled to install filter. Icemaker Models without Water Dispenser 1/4″ Tubing Tubing Clamp SmartConnect™ Tubing Water Dispenser Models Tubing Clamp 1/4″ Compression Nut Ferrule (sleeve) 1/4″ Compression Nut Ferrule (sleeve) Refrigerator Connection 1/4″ Tubing Refrigerator Connection SmartConnect™ Tubing 8 TURN THE WATER ON AT THE SHUTOFF VALVE Tighten any connections that could clog the screen of the access cover. Installation Instructions 7 CONNECT THE TUBING TO THE REFRIGERATOR NOTES: • Before making...
...Tubing kit, the nuts are already assembled to install filter. Icemaker Models without Water Dispenser 1/4″ Tubing Tubing Clamp SmartConnect™ Tubing Water Dispenser Models Tubing Clamp 1/4″ Compression Nut Ferrule (sleeve) 1/4″ Compression Nut Ferrule (sleeve) Refrigerator Connection 1/4″ Tubing Refrigerator Connection SmartConnect™ Tubing 8 TURN THE WATER ON AT THE SHUTOFF VALVE Tighten any connections that could clog the screen of the access cover. Installation Instructions 7 CONNECT THE TUBING TO THE REFRIGERATOR NOTES: • Before making...
Use and Care Manual
Page 14
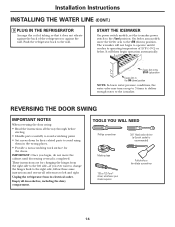
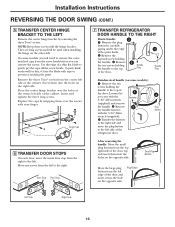
... Arm in the STOP (up to 3 times to deliver enough water to avoid using them in the ON (down ) position. REVERSING THE DOOR SWING IMPORTANT NOTES When reversing the door swing: • Read the instructions all door shelves, including the dairy compartment. TOOLS YOU WILL NEED Phillips screwdriver 3/8″ Head socket driver (a 6-point socket is completed. Installation Instructions INSTALLING THE WATER LINE (CONT.) 9 PLUG IN THE REFRIGERATOR Arrange the...
... Arm in the STOP (up to 3 times to deliver enough water to avoid using them in the ON (down ) position. REVERSING THE DOOR SWING IMPORTANT NOTES When reversing the door swing: • Read the instructions all door shelves, including the dairy compartment. TOOLS YOU WILL NEED Phillips screwdriver 3/8″ Head socket driver (a 6-point socket is completed. Installation Instructions INSTALLING THE WATER LINE (CONT.) 9 PLUG IN THE REFRIGERATOR Arrange the...
Use and Care Manual
Page 16
... the metal door stop from the top right side of the door. Remove 2 the handle fastener with the hinge bracket. Small Plug Buttons Move the large plug button from the screw heads before you will be used when installing the hinge on some models, you can remove the screws. NOTE: Keep these screws with the 3/16″ Allen wrench (supplied). Move any screws from the center left . Plug Button Left Side...
... the metal door stop from the top right side of the door. Remove 2 the handle fastener with the hinge bracket. Small Plug Buttons Move the large plug button from the screw heads before you will be used when installing the hinge on some models, you can remove the screws. NOTE: Keep these screws with the 3/16″ Allen wrench (supplied). Move any screws from the center left . Plug Button Left Side...
Use and Care Manual
Page 17
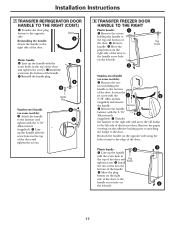
... 1 (supplied). Line up the handle with the screw hole in the top of the door and tighten screw. Fastener Remove the handle fastener with the screw holes in the top of the door and tighten the screws. 8 TRANSFER FREEZER DOOR HANDLE TO THE RIGHT Plastic handle: 1 Remove the screws holding the handle to the bottom of the freezer door. Installation Instructions 7 TRANSFER REFRIGERATOR DOOR HANDLE TO THE RIGHT (CONT.) Transfer the door plug button to...
... 1 (supplied). Line up the handle with the screw hole in the top of the door and tighten screw. Fastener Remove the handle fastener with the screw holes in the top of the door and tighten the screws. 8 TRANSFER FREEZER DOOR HANDLE TO THE RIGHT Plastic handle: 1 Remove the screws holding the handle to the bottom of the freezer door. Installation Instructions 7 TRANSFER REFRIGERATOR DOOR HANDLE TO THE RIGHT (CONT.) Transfer the door plug button to...
Use and Care Manual
Page 19
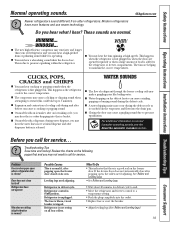
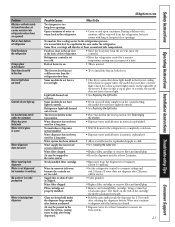
... the freezer door. Refrigerator in 0 (off) position. Before you may hear the ice cubes dropping into the ice bucket. ■ On models with an icemaker, after popping open when refrigerator door is released. This happens as ice melts from older refrigerators. The fuse is blown/circuit breaker is unplugged. WATER SOUNDS ■ The flow of cooling coils during water dispense, you hear what I hear? Leveling legs need adjusting. Safety Instructions Operating Instructions Installation Instructions Troubleshooting...
... the freezer door. Refrigerator in 0 (off) position. Before you may hear the ice cubes dropping into the ice bucket. ■ On models with an icemaker, after popping open when refrigerator door is released. This happens as ice melts from older refrigerators. The fuse is blown/circuit breaker is unplugged. WATER SOUNDS ■ The flow of cooling coils during water dispense, you hear what I hear? Leveling legs need adjusting. Safety Instructions Operating Instructions Installation Instructions Troubleshooting...
Use and Care Manual
Page 20
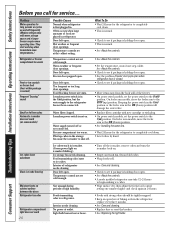
... arm to see if package is holding door open box of food are placed in the refrigerator; Temperature control not set cold enough. Not unusual during periods of refrigerator needs cleaning. Door left open . Problem Motor operates for the refrigerator to completely cool down ) position will damage the water valve. • Replace filter cartridge with new cartridge or with more storage space and a larger freezer require more operating time. Temperature controls set the power switch to begin making ice cubes. • Wipe surface dry;
... arm to see if package is holding door open box of food are placed in the refrigerator; Temperature control not set cold enough. Not unusual during periods of refrigerator needs cleaning. Door left open . Problem Motor operates for the refrigerator to completely cool down ) position will damage the water valve. • Replace filter cartridge with new cartridge or with more storage space and a larger freezer require more operating time. Temperature controls set the power switch to begin making ice cubes. • Wipe surface dry;
Use and Care Manual
Page 21
...Safety Instructions Operating Instructions Installation Instructions Troubleshooting Tips Consumer Support Refrigerator light bulb burned out or loose. Water supply line turned off or not connected. Newly-installed filter cartridge. Normal air flow cooling motor. Some models do not have a freezer light. Normal when refrigerator is opaque white, the model does not have a freezer light. Water filter clogged. If the dome is first installed. If water does not dispense after button is set too cold. Refrigerator control is released. Water dispenser has not been used for service...
...Safety Instructions Operating Instructions Installation Instructions Troubleshooting Tips Consumer Support Refrigerator light bulb burned out or loose. Water supply line turned off or not connected. Newly-installed filter cartridge. Normal air flow cooling motor. Some models do not have a freezer light. Normal when refrigerator is opaque white, the model does not have a freezer light. Water filter clogged. If the dome is first installed. If water does not dispense after button is set too cold. Refrigerator control is released. Water dispenser has not been used for service...
Use and Care Manual
Page 25
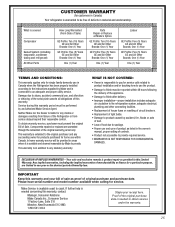
... finish after delivery. • Improper installation-proper installation includes adequate air circulation to the refrigeration system, adequate electrical, plumbing and other connecting facilities. • Replacement of house fuses or resetting of circuit breakers. • Replacement of controls. • Product not accessible to provide. Please have serial number and model number available when calling for home use and care of product as listed in addition to pay for...
... finish after delivery. • Improper installation-proper installation includes adequate air circulation to the refrigeration system, adequate electrical, plumbing and other connecting facilities. • Replacement of house fuses or resetting of circuit breakers. • Replacement of controls. • Product not accessible to provide. Please have serial number and model number available when calling for home use and care of product as listed in addition to pay for...
Use and Care Manual
Page 26
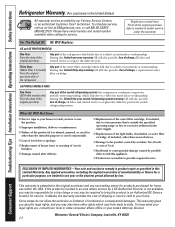
... a replacement water filter cartridge. Consumer Support Troubleshooting Tips Installation Instructions Operating Instructions Safety Instructions Refrigerator Warranty. (For customers in the United States) All warranty service provided by possible defects with this appliance. ■ Product not accessible to provide required service. During this limited thirty-day warranty, GE will also provide, free of the sealed refrigerating system (the compressor, condenser, evaporator and all labor and related service to replace the defective part. To schedule service, visit us on-line...
... a replacement water filter cartridge. Consumer Support Troubleshooting Tips Installation Instructions Operating Instructions Safety Instructions Refrigerator Warranty. (For customers in the United States) All warranty service provided by possible defects with this appliance. ■ Product not accessible to provide required service. During this limited thirty-day warranty, GE will also provide, free of the sealed refrigerating system (the compressor, condenser, evaporator and all labor and related service to replace the defective part. To schedule service, visit us on-line...
Use and Care Manual
Page 27
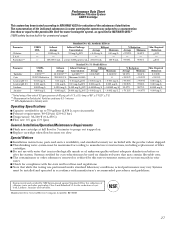
...% < 0.05 mg/L 0.05 mg/L - - - temp. of 60 psig; up to purge out trapped air. ■ Replace cartridge when flow becomes too slow. Systems must be installed and operated in accordance with manufacturer's recommended procedures and guidelines. Performance Data Sheet SmartWater Filtration System GSWF Cartridge This system has been tested according to the permissible limit for water leaving the system, as specified...
...% < 0.05 mg/L 0.05 mg/L - - - temp. of 60 psig; up to purge out trapped air. ■ Replace cartridge when flow becomes too slow. Systems must be installed and operated in accordance with manufacturer's recommended procedures and guidelines. Performance Data Sheet SmartWater Filtration System GSWF Cartridge This system has been tested according to the permissible limit for water leaving the system, as specified...

