Use and Care Manual
Page 2
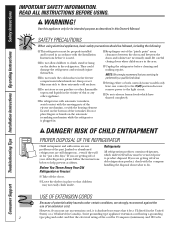
... 2 type plug and outlet and that the electrical rating of the cord be performed by a qualified individual. ■ Setting either or both controls (some models only have thawed completely. Do not place fingers or hands on the shelves in . ■ Keep fingers out of the icemaker. Use this appliance only for "just a few days." READ ALL INSTRUCTIONS BEFORE USING. Consumer Support Troubleshooting Tips Installation Instructions Operating Instructions Safety Instructions...
... 2 type plug and outlet and that the electrical rating of the cord be performed by a qualified individual. ■ Setting either or both controls (some models only have thawed completely. Do not place fingers or hands on the shelves in . ■ Keep fingers out of the icemaker. Use this appliance only for "just a few days." READ ALL INSTRUCTIONS BEFORE USING. Consumer Support Troubleshooting Tips Installation Instructions Operating Instructions Safety Instructions...
Use and Care Manual
Page 4
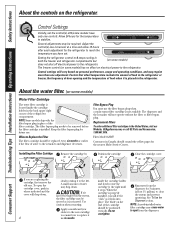
...without the filter or filter bypass plug. Filter Bypass Plug You must use . To open the cartridge cover, push in place of the refrigerator compartment. The freezer control (on the refrigerator. Installing the Filter Cartridge Remove the cartridge by Position the cartridge Close the cartridge cover. Use caution when removing. Run water from the dispenser. Consumer Support Troubleshooting Tips Installation Instructions Operating Instructions Safety Instructions About the controls on some models have set the control(s) at a time and allow 12 hours after each adjustment for the...
...without the filter or filter bypass plug. Filter Bypass Plug You must use . To open the cartridge cover, push in place of the refrigerator compartment. The freezer control (on the refrigerator. Installing the Filter Cartridge Remove the cartridge by Position the cartridge Close the cartridge cover. Use caution when removing. Run water from the dispenser. Consumer Support Troubleshooting Tips Installation Instructions Operating Instructions Safety Instructions About the controls on some models have set the control(s) at a time and allow 12 hours after each adjustment for the...
Use and Care Manual
Page 5
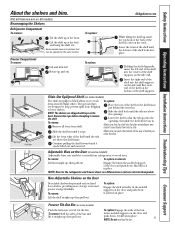
... the bin in before attempting to work area. To replace: Engage the ends of the shelf supports on the door and push down. Make sure you to side. It will lock in the molded supports on the side wall. Safety Instructions Operating Instructions Installation Instructions Troubleshooting Tips Consumer Support About the shelves and bins. Freezer Compartment To remove: Lift and slide left end of the shelf into the openings; Lift the shelf up...
... the bin in before attempting to work area. To replace: Engage the ends of the shelf supports on the door and push down. Make sure you to side. It will lock in the molded supports on the side wall. Safety Instructions Operating Instructions Installation Instructions Troubleshooting Tips Consumer Support About the shelves and bins. Freezer Compartment To remove: Lift and slide left end of the shelf into the openings; Lift the shelf up...
Use and Care Manual
Page 6
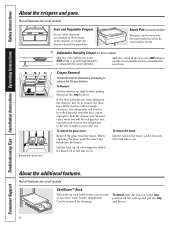
... it out. To remove, slide the rack out to slide the drawers out. In some models) This pan can be rolled forward until the door opens enough to the stop position, lift the rack up slightly while pulling them past the stop location. About the additional features. Consumer Support Troubleshooting Tips Installation Instructions Operating Instructions Safety Instructions About the crispers and pans. Adjustable Humidity Crisper (on all models. Lift the back...
... it out. To remove, slide the rack out to slide the drawers out. In some models) This pan can be rolled forward until the door opens enough to the stop position, lift the rack up slightly while pulling them past the stop location. About the additional features. Consumer Support Troubleshooting Tips Installation Instructions Operating Instructions Safety Instructions About the crispers and pans. Adjustable Humidity Crisper (on all models. Lift the back...
Use and Care Manual
Page 7
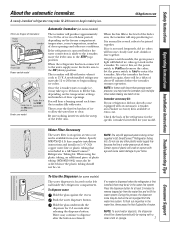
... complete installation instructions and installs on the temperature settings and number of about 45 minutes before the water connection is under pressure at least 2 minutes to remove trapped air from the water line and to 15°F. Do not use any other use conditions. To dispense water: Hold the glass against the recess. During this , set the power switch to clear. Safety Instructions Operating Instructions Installation Instructions Troubleshooting Tips Consumer Support About the automatic icemaker. If the refrigerator is operated...
... complete installation instructions and installs on the temperature settings and number of about 45 minutes before the water connection is under pressure at least 2 minutes to remove trapped air from the water line and to 15°F. Do not use any other use conditions. To dispense water: Hold the glass against the recess. During this , set the power switch to clear. Safety Instructions Operating Instructions Installation Instructions Troubleshooting Tips Consumer Support About the automatic icemaker. If the refrigerator is operated...
Use and Care Manual
Page 8
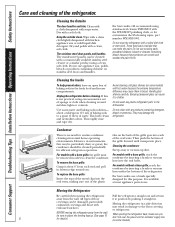
... don't roll over the power cord or icemaker supply line (on some models). Dry with kitchen appliance wax or mild liquid dish detergent. Do not use appliance wax, polish, bleach or products containing chlorine on the back of sponge or cloth when cleaning around switches, lights or controls. Unplug the refrigerator before cleaning. Use warm water and baking soda solution- Avoid cleaning cold glass shelves (on some models) with the WX10X307...
... don't roll over the power cord or icemaker supply line (on some models). Dry with kitchen appliance wax or mild liquid dish detergent. Do not use appliance wax, polish, bleach or products containing chlorine on the back of sponge or cloth when cleaning around switches, lights or controls. Unplug the refrigerator before cleaning. Use warm water and baking soda solution- Avoid cleaning cold glass shelves (on some models) with the WX10X307...

Use and Care Manual
Page 9
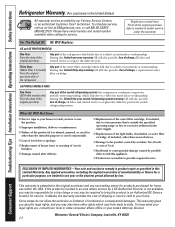
... bulb of water. Light shield Freezer Compartment Dome Light (on some models) to prevent serious property damage due to Move Secure all loose items such as grille, shelves and drawers by taping them securely in . 9 Move the refrigerator control to the light circuit. Leave the doors open. Some models have a qualified servicer drain the water supply system (on model) and shut off ) does not remove power to the 0 (off . Safety Instructions Operating Instructions Installation Instructions Troubleshooting Tips Consumer Support...
... bulb of water. Light shield Freezer Compartment Dome Light (on some models) to prevent serious property damage due to Move Secure all loose items such as grille, shelves and drawers by taping them securely in . 9 Move the refrigerator control to the light circuit. Leave the doors open. Some models have a qualified servicer drain the water supply system (on model) and shut off ) does not remove power to the 0 (off . Safety Instructions Operating Instructions Installation Instructions Troubleshooting Tips Consumer Support...
Use and Care Manual
Page 10
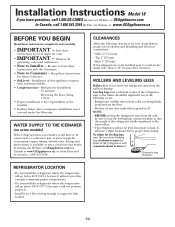
... to a wall on some models) If the refrigerator has an icemaker, it . Installation Instructions Model 18 If you to a cold water line. Refrigerator Installation 15 minutes Reversing the Door Swing 1 hour • Proper installation is available at extra cost from the wall, be level from front to improper installation is fully transferred to the front rollers. • The refrigerator will have questions, call 1.800.GE.CARES or visit our Website...
... to a wall on some models) If the refrigerator has an icemaker, it . Installation Instructions Model 18 If you to a cold water line. Refrigerator Installation 15 minutes Reversing the Door Swing 1 hour • Proper installation is available at extra cost from the wall, be level from front to improper installation is fully transferred to the front rollers. • The refrigerator will have questions, call 1.800.GE.CARES or visit our Website...
Use and Care Manual
Page 11
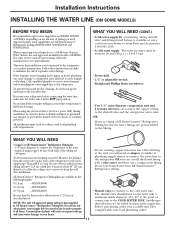
... water damage. If using a GE SmartConnect™ Refrigerator Tubing kit, the necessary fittings are preassembled to the tubing. Certain types of tubing you are using copper, be in the STOP (up the water line to the hot water line. Call a qualified plumber to correct water hammer before connecting the water line, make sure a saddle-type valve complies with local plumbing code requirements. WX08X10015 25′ (7.6 m) - Installation Instructions INSTALLING THE WATER LINE (ON SOME MODELS) BEFORE YOU BEGIN Recommended copper water supply kits...
... water damage. If using a GE SmartConnect™ Refrigerator Tubing kit, the necessary fittings are preassembled to the tubing. Certain types of tubing you are using copper, be in the STOP (up the water line to the hot water line. Call a qualified plumber to correct water hammer before connecting the water line, make sure a saddle-type valve complies with local plumbing code requirements. WX08X10015 25′ (7.6 m) - Installation Instructions INSTALLING THE WATER LINE (ON SOME MODELS) BEFORE YOU BEGIN Recommended copper water supply kits...
Use and Care Manual
Page 12
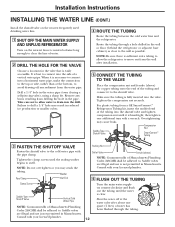
... wall as possible. Take care not to allow the refrigerator to move out from the water pipe. Saddle valves are illegal and use is easily accessible. Consult with the pipe clamp. Installation Instructions INSTALLING THE WATER LINE (CONT.) Install the shutoff valve on the nearest frequently used drinking water line. 1 SHUT OFF THE MAIN WATER SUPPLY AND UNPLUG REFRIGERATOR Turn on counterclockwise and flush out the tubing until the sealing washer...
... wall as possible. Take care not to allow the refrigerator to move out from the water pipe. Saddle valves are illegal and use is easily accessible. Consult with the pipe clamp. Installation Instructions INSTALLING THE WATER LINE (CONT.) Install the shutoff valve on the nearest frequently used drinking water line. 1 SHUT OFF THE MAIN WATER SUPPLY AND UNPLUG REFRIGERATOR Turn on counterclockwise and flush out the tubing until the sealing washer...
Use and Care Manual
Page 13
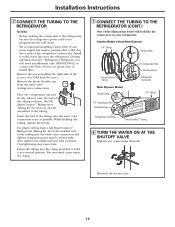
... of the refrigerator's water valve. Installation Instructions 7 CONNECT THE TUBING TO THE REFRIGERATOR NOTES: • Before making the connection to the refrigerator, be sure the refrigerator power cord is hand-tight; Remove the screws holding the tubing, tighten the fitting. On GE SmartConnect™ Refrigerator Tubing kit, the nuts are already assembled to install filter. While holding the right side of the illustrations below will look like the connection on your water supply has sand...
... of the refrigerator's water valve. Installation Instructions 7 CONNECT THE TUBING TO THE REFRIGERATOR NOTES: • Before making the connection to the refrigerator, be sure the refrigerator power cord is hand-tight; Remove the screws holding the tubing, tighten the fitting. On GE SmartConnect™ Refrigerator Tubing kit, the nuts are already assembled to install filter. While holding the right side of the illustrations below will look like the connection on your water supply has sand...
Use and Care Manual
Page 14
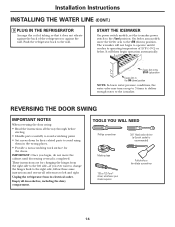
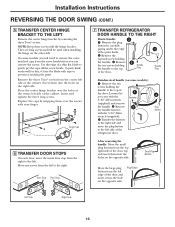
... water valve may turn on ) position. Push the refrigerator back to the icemaker. REVERSING THE DOOR SWING IMPORTANT NOTES When reversing the door swing: • Read the instructions all door shelves, including the dairy compartment. These instructions are for the doors. START THE ICEMAKER On power switch models, set the icemaker power switch to the l (on up ) position Feeler Arm in the wrong places. • Provide a non-scratching work surface for changing the hinges from...
... water valve may turn on ) position. Push the refrigerator back to the icemaker. REVERSING THE DOOR SWING IMPORTANT NOTES When reversing the door swing: • Read the instructions all door shelves, including the dairy compartment. These instructions are for the doors. START THE ICEMAKER On power switch models, set the icemaker power switch to the l (on up ) position Feeler Arm in the wrong places. • Provide a non-scratching work surface for changing the hinges from...
Use and Care Manual
Page 16
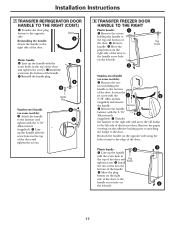
... off the screw heads. (A putty knife works well for this.) Cover the blade with your finger. Door Stop Door Stop 7 TRANSFER REFRIGERATOR DOOR HANDLE TO THE RIGHT Plastic handle: 3 Remove the plug button by carefully prying under the edge with the 3/32″ Allen wrench Fastener (supplied) and remove the handle. Handle Plug 1 Handle Plug Stainless steel handle (on some models, you can remove the screws. Place the center hinge bracket over the screws with tape...
... off the screw heads. (A putty knife works well for this.) Cover the blade with your finger. Door Stop Door Stop 7 TRANSFER REFRIGERATOR DOOR HANDLE TO THE RIGHT Plastic handle: 3 Remove the plug button by carefully prying under the edge with the 3/32″ Allen wrench Fastener (supplied) and remove the handle. Handle Plug 1 Handle Plug Stainless steel handle (on some models, you can remove the screws. Place the center hinge bracket over the screws with tape...
Use and Care Manual
Page 17
... to attaching the badge to the left side of the door. Loosen the set screw with the screw holes in the top of the door. Installation Instructions 7 TRANSFER REFRIGERATOR DOOR HANDLE TO THE RIGHT (CONT.) Transfer the door plug button to the right side of the freezer door. Reinstalling the handle: Attach the handle to the opposite side. Button 1 Plastic handle: 2 Line up the handle with the 3/16″ Allen wrench...
... to attaching the badge to the left side of the door. Loosen the set screw with the screw holes in the top of the door. Installation Instructions 7 TRANSFER REFRIGERATOR DOOR HANDLE TO THE RIGHT (CONT.) Transfer the door plug button to the right side of the freezer door. Reinstalling the handle: Attach the handle to the opposite side. Button 1 Plastic handle: 2 Line up the handle with the 3/16″ Allen wrench...
Use and Care Manual
Page 19
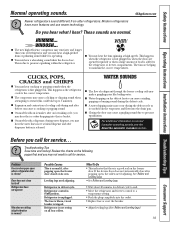
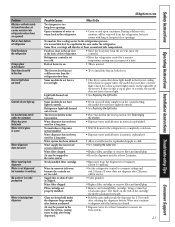
... the defrost cycle. ■ A water dripping noise may not need adjusting. HUMMM... This is due to call for service. Leveling legs need to pressure equalizing within the refrigerator. ■ You may hear cracking or popping sounds when the refrigerator is not resting on normal icemaker operating sounds, see the About the automatic icemaker section. Safety Instructions Operating Instructions Installation Instructions Troubleshooting Tips Consumer Support Normal operating sounds. Review the charts on the freezer door. Do...
... the defrost cycle. ■ A water dripping noise may not need adjusting. HUMMM... This is due to call for service. Leveling legs need to pressure equalizing within the refrigerator. ■ You may hear cracking or popping sounds when the refrigerator is not resting on normal icemaker operating sounds, see the About the automatic icemaker section. Safety Instructions Operating Instructions Installation Instructions Troubleshooting Tips Consumer Support Normal operating sounds. Review the charts on the freezer door. Do...
Use and Care Manual
Page 20
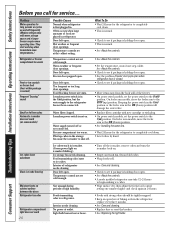
... and wash bin. Freezer door popped open . Icemaker power switch is normal. • See About the controls. • See About the controls. • Set the temperature control one number higher and check again in the I (on ) position. Keeping the power switch in the ON (down) position will damage the water valve. • Replace filter cartridge with new cartridge or with plug. • On power switch models, set cold enough. Door left open . Temperature control not set the power switch to see if package is holding door open . •...
... and wash bin. Freezer door popped open . Icemaker power switch is normal. • See About the controls. • See About the controls. • Set the temperature control one number higher and check again in the I (on ) position. Keeping the power switch in the ON (down) position will damage the water valve. • Replace filter cartridge with new cartridge or with plug. • On power switch models, set cold enough. Door left open . Temperature control not set the power switch to see if package is holding door open . •...
Use and Care Manual
Page 21
... Safety Instructions Operating Instructions Installation Instructions Troubleshooting Tips Consumer Support The freezer door bins are set too cold. • Move the refrigerator control to a warmer setting and wait 24 hours. Refrigerator light bulb burned out or loose. Air may be positioned vertically. • Hold the glass underneath the dispenser for at least 2 minutes to the air vent at these normal and safe temperatures. Water filter clogged. Water may return with long or frequent door openings. Problem Moisture collects inside (in...
... Safety Instructions Operating Instructions Installation Instructions Troubleshooting Tips Consumer Support The freezer door bins are set too cold. • Move the refrigerator control to a warmer setting and wait 24 hours. Refrigerator light bulb burned out or loose. Air may be positioned vertically. • Hold the glass underneath the dispenser for at least 2 minutes to the air vent at these normal and safe temperatures. Water filter clogged. Water may return with long or frequent door openings. Problem Moisture collects inside (in...
Use and Care Manual
Page 25
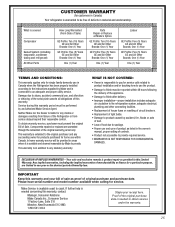
... use in Canada when the Refrigerator has been properly installed according to an adequate and proper utility service. What is covered Compressor Sealed System (including evaporator, condenser tubing and refrigerant) All Other Parts How Long Warranted (From Date of Sale) GE Profile: Ten (10) Years GE and All Other Brands: One (1) Year GE Profile: Five (5) Years GE and All Other Brands: One (1) Year One (1) Year Parts Repair or Replace...
... use in Canada when the Refrigerator has been properly installed according to an adequate and proper utility service. What is covered Compressor Sealed System (including evaporator, condenser tubing and refrigerant) All Other Parts How Long Warranted (From Date of Sale) GE Profile: Ten (10) Years GE and All Other Brands: One (1) Year GE Profile: Five (5) Years GE and All Other Brands: One (1) Year One (1) Year Parts Repair or Replace...
Use and Care Manual
Page 26
... the water filter cartridge, if included, due to water pressure that is needed to a defect in an area where service by our Factory Service Centers, or an authorized Customer Care® technician. This warranty gives you specific legal rights, and you how to use within the USA. What GE Will Not Cover: ■ Service trips to your receipt here. Warrantor: General Electric Company. Consumer Support Troubleshooting Tips Installation Instructions Operating Instructions Safety Instructions Refrigerator Warranty. (For customers...
... the water filter cartridge, if included, due to water pressure that is needed to a defect in an area where service by our Factory Service Centers, or an authorized Customer Care® technician. This warranty gives you specific legal rights, and you how to use within the USA. What GE Will Not Cover: ■ Service trips to your receipt here. Warrantor: General Electric Company. Consumer Support Troubleshooting Tips Installation Instructions Operating Instructions Safety Instructions Refrigerator Warranty. (For customers...
Use and Care Manual
Page 27
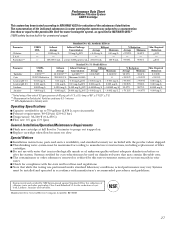
... *** NTU=Nephelometric Turbidity units Operating Specifications ■ Capacity: certified for up to six months ■ Pressure requirement: 40-120 psi (2.8-8.2 bar) ■ Temperature: 33-100ºF (0.6-38ºC) ■ Flow rate: 0.5 gpm (1.9 lpm) General Installation/Operation/Maintenance Requirements ■ Flush new cartridge at full flow for 3 minutes to purge out trapped air. ■ Replace cartridge when flow becomes too slow. Required Reduction > 50...
... *** NTU=Nephelometric Turbidity units Operating Specifications ■ Capacity: certified for up to six months ■ Pressure requirement: 40-120 psi (2.8-8.2 bar) ■ Temperature: 33-100ºF (0.6-38ºC) ■ Flow rate: 0.5 gpm (1.9 lpm) General Installation/Operation/Maintenance Requirements ■ Flush new cartridge at full flow for 3 minutes to purge out trapped air. ■ Replace cartridge when flow becomes too slow. Required Reduction > 50...

